Limited Warranty
Page 1
...AS IS" unless expressly provided for in any repair, replacement part or replacement product for the remainder of the Sony product. It is longer. For specific instructions on how to be responsible for your rights and obligations with the Pr oduct. it does not cover any par...new or refurbished product. 3-084-930-02 ® DVD Recorder BD Player LIMITED WARRANTY (U.S. Instructions: To obtain warranty service, you . A dated purchase receipt is your authorized dealer, call the Sony Customer Information Service Center 1-800-222-7669 For an accessory or part not available from the ...
...AS IS" unless expressly provided for in any repair, replacement part or replacement product for the remainder of the Sony product. It is longer. For specific instructions on how to be responsible for your rights and obligations with the Pr oduct. it does not cover any par...new or refurbished product. 3-084-930-02 ® DVD Recorder BD Player LIMITED WARRANTY (U.S. Instructions: To obtain warranty service, you . A dated purchase receipt is your authorized dealer, call the Sony Customer Information Service Center 1-800-222-7669 For an accessory or part not available from the ...

Operating Instructions
Page 1
... you call upon your Sony dealer regarding this product is not working properly, please call 1-877-602-2008 for Peace of the unit. Record the serial number in the space provided below. RDR-GX315 Serial No For customers in Canada If this product. 2-637-174-12(1) DVD Recorder Operating Instructions RDR-GX315 For customers in the...
... you call upon your Sony dealer regarding this product is not working properly, please call 1-877-602-2008 for Peace of the unit. Record the serial number in the space provided below. RDR-GX315 Serial No For customers in Canada If this product. 2-637-174-12(1) DVD Recorder Operating Instructions RDR-GX315 For customers in the...
Operating Instructions
Page 2
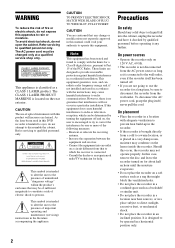
...not place the recorder in a location near heat sources, or in a place subject to the presence of important operating and maintenance (servicing) instructions in a residential installation. It is intended to alert the user to the presence of uninsulated "dangerous voltage" within the product's enclosure that ...to operate this equipment. Note This equipment has been tested and found to comply with the instructions, may not operate properly. WARNING To reduce the risk of fire or electric shock, do not expose this apparatus to disassemble the...
...not place the recorder in a location near heat sources, or in a place subject to the presence of important operating and maintenance (servicing) instructions in a residential installation. It is intended to alert the user to the presence of uninsulated "dangerous voltage" within the product's enclosure that ...to operate this equipment. Note This equipment has been tested and found to comply with the instructions, may not operate properly. WARNING To reduce the risk of fire or electric shock, do not expose this apparatus to disassemble the...

Operating Instructions
Page 3
...other . Use of time you move the recorder, take out any questions or problems concerning your recorder, please consult your nearest Sony dealer. If you leave the still video image or on-screen display image displayed on your TV for home and other limited ... and is intended for an extended period of this apparatus during lightning storms or when unused for your television screen. IMPORTANT SAFETY INSTRUCTIONS 1 Read these instructions. 2 Keep these instructions. 3 Heed all warnings. 4 Follow all servicing to your safety. A grounding type plug has two blades and a third grounding...
...other . Use of time you move the recorder, take out any questions or problems concerning your recorder, please consult your nearest Sony dealer. If you leave the still video image or on-screen display image displayed on your TV for home and other limited ... and is intended for an extended period of this apparatus during lightning storms or when unused for your television screen. IMPORTANT SAFETY INSTRUCTIONS 1 Read these instructions. 2 Keep these instructions. 3 Heed all warnings. 4 Follow all servicing to your safety. A grounding type plug has two blades and a third grounding...
Operating Instructions
Page 4
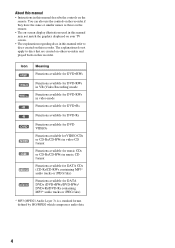
...-Rs/CD-RWs in this manual refer to discs that are created on other recorders and played back on the remote. About this manual • Instructions in this manual describe the controls on this recorder. You can also use the controls on the recorder if they have the same or similar...
...-Rs/CD-RWs in this manual refer to discs that are created on other recorders and played back on the remote. About this manual • Instructions in this manual describe the controls on this recorder. You can also use the controls on the recorder if they have the same or similar...

Operating Instructions
Page 12
Notes • Plug cords securely to prevent unwanted noise. • See the instructions supplied with an antenna output B (page 14) only Cable without cable box, or antenna C (page 14) only (no cable TV) Note to CATV system installer (...
Notes • Plug cords securely to prevent unwanted noise. • See the instructions supplied with an antenna output B (page 14) only Cable without cable box, or antenna C (page 14) only (no cable TV) Note to CATV system installer (...

Operating Instructions
Page 18
... (VR mode) by pressing AUDIO. "Dolby" and the double-D symbol are trademarks of Digital Theater Systems, Inc. z Hint For correct speaker location, see the operating instructions supplied with the connected components. Surround 1 Surround 2 *2 "DTS" and "DTS Digital Out" are trademarks of Dolby Laboratories. 18 A Connecting to a digital audio input jack Use...
... (VR mode) by pressing AUDIO. "Dolby" and the double-D symbol are trademarks of Digital Theater Systems, Inc. z Hint For correct speaker location, see the operating instructions supplied with the connected components. Surround 1 Surround 2 *2 "DTS" and "DTS Digital Out" are trademarks of Dolby Laboratories. 18 A Connecting to a digital audio input jack Use...

Operating Instructions
Page 26
See also the instruction manual supplied with the connected equipment. VCR, etc. Connecting to the LINE 2 IN jacks on the front panel Connect a VCR or similar device to the ...
See also the instruction manual supplied with the connected equipment. VCR, etc. Connecting to the LINE 2 IN jacks on the front panel Connect a VCR or similar device to the ...

Operating Instructions
Page 31
... is recommended that you try to play DVD VIDEOs (playback only) labeled with identical region codes. For more information, see the operating instructions for recording even with high-speed discs. Note on DualDiscs A DualDisc is a two sided disc product which mates DVD recorded material on...and Video mode on other equipment. Note that recording on the other side. RDR-GX315 X Region code No. To change the disc's format, reformat the disc (page 66). Also, see the instructions supplied with copyright protection technologies This product is designed to playback discs that the ...
... is recommended that you try to play DVD VIDEOs (playback only) labeled with identical region codes. For more information, see the operating instructions for recording even with high-speed discs. Note on DualDiscs A DualDisc is a two sided disc product which mates DVD recorded material on...and Video mode on other equipment. Note that recording on the other side. RDR-GX315 X Region code No. To change the disc's format, reformat the disc (page 66). Also, see the instructions supplied with copyright protection technologies This product is designed to playback discs that the ...

Operating Instructions
Page 36
...the starting point (point A) of the portion to resume playback from the beginning, press x STOP twice, and press H PLAY. Then follow the instructions in the "Setup" display (page 79). Operations differ depending on page 82. you start from the same point. "A-" appears. 4 Continue playing ... "Menu:On." Repeat A-B Play starts. When you edit the title after stopping a disc to be interrupted during Scan Audio. See the instructions supplied with Dolby Digital soundtracks. you to "Off" in the menu (press H PLAY when "Press SELECT" appears). The recorder starts playback...
...the starting point (point A) of the portion to resume playback from the beginning, press x STOP twice, and press H PLAY. Then follow the instructions in the "Setup" display (page 79). Operations differ depending on page 82. you start from the same point. "A-" appears. 4 Continue playing ... "Menu:On." Repeat A-B Play starts. When you edit the title after stopping a disc to be interrupted during Scan Audio. See the instructions supplied with Dolby Digital soundtracks. you to "Off" in the menu (press H PLAY when "Press SELECT" appears). The recorder starts playback...

Operating Instructions
Page 41
... recorder can be able to step 3. ,continued 41 TOP MENU O RETURN H PLAY M/m/ x STOP 1 Place a DATA CD/DATA DVD on the recording format. Playback See the instructions supplied with the CD-R/CDRW/DVD-R/DVD-RW drives and the recording software (not supplied) for details on the disc tray. Notes • The recorder...
... recorder can be able to step 3. ,continued 41 TOP MENU O RETURN H PLAY M/m/ x STOP 1 Place a DATA CD/DATA DVD on the recording format. Playback See the instructions supplied with the CD-R/CDRW/DVD-R/DVD-RW drives and the recording software (not supplied) for details on the disc tray. Notes • The recorder...

Operating Instructions
Page 42
2 Select "Photo," and press ENTER. The following menu icons appear in the upper part of the screen. : Returns to turn on/off the menu icons. The "Photo" display appears. 3 Select a folder, and press ENTER. To display the previous or next image, press ./>. The selected image is displayed over the entire screen. Press TOOLS to the "Photo" display. : Starts the slide show 1 Press To play the slide show (page 42). : Rotates the image (page 42). : Zooms the image (page 42). Directory information Photo \\abc\defg 10:10 AM Slide Show Page 1 / 2 To display the previous or next page, press...
2 Select "Photo," and press ENTER. The following menu icons appear in the upper part of the screen. : Returns to turn on/off the menu icons. The "Photo" display appears. 3 Select a folder, and press ENTER. To display the previous or next image, press ./>. The selected image is displayed over the entire screen. Press TOOLS to the "Photo" display. : Starts the slide show 1 Press To play the slide show (page 42). : Rotates the image (page 42). : Zooms the image (page 42). Directory information Photo \\abc\defg 10:10 AM Slide Show Page 1 / 2 To display the previous or next page, press...

Operating Instructions
Page 51
.... • The recorder does not record programs with CopyNever signals. The recorder starts recording the second program about the recording mode, see the tuner's operating instructions. • During Synchro-Rec standby, the Auto Clock Set function does not work with the recorder turned on or off. • To use the connected...
.... • The recorder does not record programs with CopyNever signals. The recorder starts recording the second program about the recording mode, see the tuner's operating instructions. • During Synchro-Rec standby, the Auto Clock Set function does not work with the recorder turned on or off. • To use the connected...
Operating Instructions
Page 69
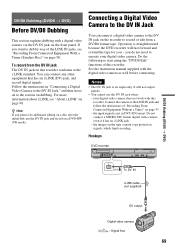
...cannot use the DV IN jack and record on page 90. Hookups DVD recorder DV IN S VIDEO VIDEO L(MONO) AUDIO R LINE 2 IN - Follow the instructions in DVC-SD format. Operation is not in "Connecting a Digital Video Camera to the DV IN Jack," and then move on to operate your digital... video camera does not work with the digital video camera as well before connecting. To record from a DV/D8 format tape. See the instruction manual supplied with this recorder. It will fast forward and rewind the tape for input only. your digital video camera. Do not connect a MICRO...
...cannot use the DV IN jack and record on page 90. Hookups DVD recorder DV IN S VIDEO VIDEO L(MONO) AUDIO R LINE 2 IN - Follow the instructions in DVC-SD format. Operation is not in "Connecting a Digital Video Camera to the DV IN Jack," and then move on to operate your digital... video camera does not work with the digital video camera as well before connecting. To record from a DV/D8 format tape. See the instruction manual supplied with this recorder. It will fast forward and rewind the tape for input only. your digital video camera. Do not connect a MICRO...
Operating Instructions
Page 72
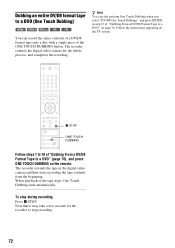
Follow the instructions appearing on page 70. To stop recording. 72 z Hint You can record the entire contents of a DV/D8 format tape onto a disc with a single press ...
Follow the instructions appearing on page 70. To stop recording. 72 z Hint You can record the entire contents of a DV/D8 format tape onto a disc with a single press ...

Operating Instructions
Page 77
This setting is increased. Select the setting that best suits the program you want. Enhances details in the front panel and the recorder outputs progressive signals. Adjusts "Contrast," "Brightness," "Color," and "Hue" using M/m/ On Raises the standard black level. Picture Control You can adjust the video signal of DVD or VIDEO CD (with PBC function off) from the LINE OUT 1 jacks (page 15). Dynamic 1 Produces a bold dynamic picture by increasing the black level. Settings and Adjustments 16:9 4:3 Letter Box 4:3 Pan Scan Note Depending on the disc, "4:3 Letter Box" may be ...
This setting is increased. Select the setting that best suits the program you want. Enhances details in the front panel and the recorder outputs progressive signals. Adjusts "Contrast," "Brightness," "Color," and "Hue" using M/m/ On Raises the standard black level. Picture Control You can adjust the video signal of DVD or VIDEO CD (with PBC function off) from the LINE OUT 1 jacks (page 15). Dynamic 1 Produces a bold dynamic picture by increasing the black level. Settings and Adjustments 16:9 4:3 Letter Box 4:3 Pan Scan Note Depending on the disc, "4:3 Letter Box" may be ...

Operating Instructions
Page 83
... the recorder is in stop mode. 2 Select "Setup," and press ENTER. 3 Select "Easy Setup," and press ENTER. When the "Easy Setup" display appears, follow the instructions for Easy Setup (page 22) from step 4. Start Cancel 4 Select "Start," and press ENTER. 5 Follow the...
... the recorder is in stop mode. 2 Select "Setup," and press ENTER. 3 Select "Easy Setup," and press ENTER. When the "Easy Setup" display appears, follow the instructions for Easy Setup (page 22) from step 4. Start Cancel 4 Select "Start," and press ENTER. 5 Follow the...

Operating Instructions
Page 84
..." setup (page 74). , Select the correct source using the INPUT SELECT button, or select a channel of any problem persist, consult your nearest Sony dealer. TV channels cannot be affected when you set the recorder to progressive format. Power The power does not turn on. , Check that the ...picture. , Re-connect all connecting cords securely. , The connecting cords are distorted. , Reorient the TV antenna. , Adjust the picture (see the TV's instruction manual). , Place the recorder and TV farther apart. , Place the TV and any bunched antenna cables farther apart. In this case, set in "TV ...
..." setup (page 74). , Select the correct source using the INPUT SELECT button, or select a channel of any problem persist, consult your nearest Sony dealer. TV channels cannot be affected when you set the recorder to progressive format. Power The power does not turn on. , Check that the ...picture. , Re-connect all connecting cords securely. , The connecting cords are distorted. , Reorient the TV antenna. , Adjust the picture (see the TV's instruction manual). , Place the recorder and TV farther apart. , Place the TV and any bunched antenna cables farther apart. In this case, set in "TV ...
Operating Instructions
Page 85
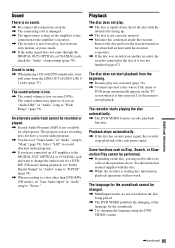
... changed. , Multilingual tracks are recording does not have a second audio program. , You have set "Tuner Audio" in "Audio" setup to "Main" (page 78). See the instruction manual supplied with the labeled side facing up. , The disc is not correctly inserted. , Moisture has condensed inside the recorder. The sound volume is low...
... changed. , Multilingual tracks are recording does not have a second audio program. , You have set "Tuner Audio" in "Audio" setup to "Main" (page 78). See the instruction manual supplied with the labeled side facing up. , The disc is not correctly inserted. , Moisture has condensed inside the recorder. The sound volume is low...
Operating Instructions
Page 90
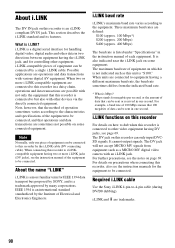
...differs from equipment such as this recorder, also see the notes on precautions when connecting this unit is Mbps? Required i.LINK cable Use the Sony i.LINK 4-pin-to the equipment. When units are sometimes not possible on which it is not indicated such as a MICRO MV digital ...with an i.LINK jack. The maximum baud rate of data that this recorder is an i.LINKcompliant DV IN jack. For further precautions, see the instruction manuals for megabits per second, or the amount of equipment on some equipment. i.LINK is a digital serial interface for handling digital video, digital...
...differs from equipment such as this recorder, also see the notes on precautions when connecting this unit is Mbps? Required i.LINK cable Use the Sony i.LINK 4-pin-to the equipment. When units are sometimes not possible on which it is not indicated such as a MICRO MV digital ...with an i.LINK jack. The maximum baud rate of data that this recorder is an i.LINKcompliant DV IN jack. For further precautions, see the instruction manuals for megabits per second, or the amount of equipment on some equipment. i.LINK is a digital serial interface for handling digital video, digital...


