Operating Instructions
Page 19
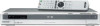
... Sony DVD recorder or player, change the command mode number for a short while before operating the recorder. to the markings inside the battery compartment, and insert new batteries. • Do not expose the remote sensor (marked on the recorder. Do not touch the liquid with an old battery, or batteries of time, remove the batteries. - The recorder may not respond to strong light, such as direct sunlight or lighting apparatus. Do not use...
... Sony DVD recorder or player, change the command mode number for a short while before operating the recorder. to the markings inside the battery compartment, and insert new batteries. • Do not expose the remote sensor (marked on the recorder. Do not touch the liquid with an old battery, or batteries of time, remove the batteries. - The recorder may not respond to strong light, such as direct sunlight or lighting apparatus. Do not use...
Operating Instructions
Page 22
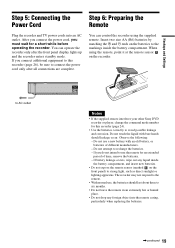
Settings are made in the following order. If you do not complete Easy Setup, it will appear each time you turn on your recorder. "/1 O RETURN M/m/ Step 7: Easy Setup Follow the steps below to make the minimum number of basic adjustments for using the recorder. OSD Language Setup m Clock Setup m Tuner and Channel Setup m TV Type Setup m Audio Connection Setup m Finished!
Settings are made in the following order. If you do not complete Easy Setup, it will appear each time you turn on your recorder. "/1 O RETURN M/m/ Step 7: Easy Setup Follow the steps below to make the minimum number of basic adjustments for using the recorder. OSD Language Setup m Clock Setup m Tuner and Channel Setup m TV Type Setup m Audio Connection Setup m Finished!

Operating Instructions
Page 24
... Easy Setup again, select "Easy Setup" in the "Setup" display (page 83). Easy Setup is finished. z Hint If you have a Sony DVD player or more than one Sony DVD recorder If the supplied remote interferes with your other Sony DVD recorder or player, set the clock accurately. Note To record TV programs using the timer, you must set the command mode number for this recorder and the supplied remote to the previous display Press O RETURN. SYSTEM MENU O RETURN M/m/ No Disc Easy Setup...
... Easy Setup again, select "Easy Setup" in the "Setup" display (page 83). Easy Setup is finished. z Hint If you have a Sony DVD player or more than one Sony DVD recorder If the supplied remote interferes with your other Sony DVD recorder or player, set the clock accurately. Note To record TV programs using the timer, you must set the command mode number for this recorder and the supplied remote to the previous display Press O RETURN. SYSTEM MENU O RETURN M/m/ No Disc Easy Setup...
Operating Instructions
Page 25
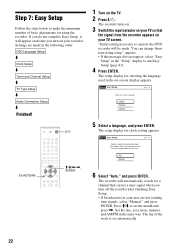
... and Settings 4 Select "Command Mode," and press ENTER. Set the remote's command mode to the previous display Press O RETURN. No Disc Options Title List Timer Edit DV/D8 Dubbing Disc Setting Language Parental Front Display Command Mode Factory Setting Setup 10:10 AM : AutDoVD 1 : DVDD1VDN2o DVD 3 5 Select the command mode ("DVD 1," "DVD 2," or "DVD 3"), and press ENTER. 6 Slide the COMMAND MODE switch on the front panel display when you selected above. Note If the command mode does not match, the recorder's command mode...
... and Settings 4 Select "Command Mode," and press ENTER. Set the remote's command mode to the previous display Press O RETURN. No Disc Options Title List Timer Edit DV/D8 Dubbing Disc Setting Language Parental Front Display Command Mode Factory Setting Setup 10:10 AM : AutDoVD 1 : DVDD1VDN2o DVD 3 5 Select the command mode ("DVD 1," "DVD 2," or "DVD 3"), and press ENTER. 6 Slide the COMMAND MODE switch on the front panel display when you selected above. Note If the command mode does not match, the recorder's command mode...

Operating Instructions
Page 31
... with digital audio material on the same DVD-RW. Note that the disc is recommended that you cannot record on other DVD equipment. • You may be available. Also, see the operating instructions for recording even with identical region codes. Region code (DVD VIDEO only) Your recorder has a region code printed on the DVD VIDEO, no region code indication may not be labeled even though playing the DVD VIDEO is prohibited by this product is used...
... with digital audio material on the same DVD-RW. Note that the disc is recommended that you cannot record on other DVD equipment. • You may be available. Also, see the operating instructions for recording even with identical region codes. Region code (DVD VIDEO only) Your recorder has a region code printed on the DVD VIDEO, no region code indication may not be labeled even though playing the DVD VIDEO is prohibited by this product is used...

Operating Instructions
Page 36
... function off the Scan Audio function, set "Scan Audio" of "Audio" to Original or Playlist (DVD-RW (VR mode) only). - you make a recording. you play a restricted DVD, a message appears asking whether you start from the same point. The display for entering your password appears. 2 Enter your TV screen. Simply press M during Scan Audio. When you want to resume playback from the beginning, press x STOP twice, and press H PLAY. Select an item using the number buttons. Repeating a specific portion (Repeat A-B Play...
... function off the Scan Audio function, set "Scan Audio" of "Audio" to Original or Playlist (DVD-RW (VR mode) only). - you make a recording. you play a restricted DVD, a message appears asking whether you start from the same point. The display for entering your password appears. 2 Enter your TV screen. Simply press M during Scan Audio. When you want to resume playback from the beginning, press x STOP twice, and press H PLAY. Select an item using the number buttons. Repeating a specific portion (Repeat A-B Play...
Operating Instructions
Page 71
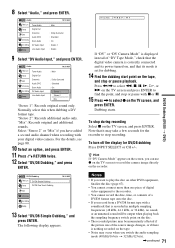
... format tape. The following display appears. DV Tape Mode If "DV" or "DV Camera Mode" is displayed instead of "DV Tape Mode," check that the digital video camera is correctly connected and its power turned on, and that its mode is set for dubbing. 14 Find the dubbing start point on the tape, and stop or pause playback. 8 Select "Audio," and press ENTER. "Mix": Records original and additional sounds...
... format tape. The following display appears. DV Tape Mode If "DV" or "DV Camera Mode" is displayed instead of "DV Tape Mode," check that the digital video camera is correctly connected and its power turned on, and that its mode is set for dubbing. 14 Find the dubbing start point on the tape, and stop or pause playback. 8 Select "Audio," and press ENTER. "Mix": Records original and additional sounds...
Operating Instructions
Page 74
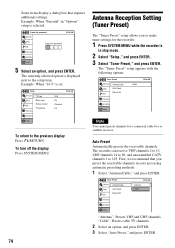
... recommend that requires additional settings. Create the password. Video Title List Timer Edit DV/D8 Dubbing TV Type Black Level Picture Control Progressive Disc Setting Setup : 16:9 : On : Standard : Off 10:10 AM To return to 125. To turn off the display Press SYSTEM MENU. 74 Antenna Reception Setting (Tuner Preset) The "Tuner Preset" setup allows you preset the receivable channels in "Options" setup is in stop mode. 2 Select "Setup," and press ENTER. 3 Select "Tuner Preset," and press ENTER...
... recommend that requires additional settings. Create the password. Video Title List Timer Edit DV/D8 Dubbing TV Type Black Level Picture Control Progressive Disc Setting Setup : 16:9 : On : Standard : Off 10:10 AM To return to 125. To turn off the display Press SYSTEM MENU. 74 Antenna Reception Setting (Tuner Preset) The "Tuner Preset" setup allows you preset the receivable channels in "Options" setup is in stop mode. 2 Select "Setup," and press ENTER. 3 Select "Tuner Preset," and press ENTER...
Operating Instructions
Page 75
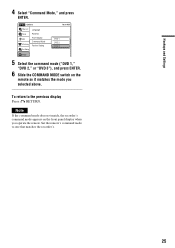
.... 3 Select "Manual Set," and press ENTER. 4 Select the channel you can set them manually. 1 Select "Antenna/Cable," and press ENTER. Select a channel: 69 Add Erase Exit 5 Select "Add" or "Erase" using M/m or CH +/-, and press ENTER. If some channels could not be set using the "Auto Preset" or "Easy Setup" function, you want to preset/disable using Settings and Adjustments All receivable channels are preset in numerical sequence. Auto Preset 10:10 AM Title List Searching for receivable channels: 3 Timer...
.... 3 Select "Manual Set," and press ENTER. 4 Select the channel you can set them manually. 1 Select "Antenna/Cable," and press ENTER. Select a channel: 69 Add Erase Exit 5 Select "Add" or "Erase" using M/m or CH +/-, and press ENTER. If some channels could not be set using the "Auto Preset" or "Easy Setup" function, you want to preset/disable using Settings and Adjustments All receivable channels are preset in numerical sequence. Auto Preset 10:10 AM Title List Searching for receivable channels: 3 Timer...

Operating Instructions
Page 76
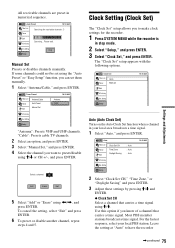
..., hour, minutes, and AM/PM in sequence. Clock Set Title List Timer Set the time and date. Manual If the Auto Clock Set function did not set the clock correctly for your local area, set your time zone. Press Clock Set CH Title List Timer Edit DV/D8 Dubbing Select a Channel: Disc Setting Setup 10:10 AM Auto ◆ Time Zone Select the time zone for your area, or select "Auto" to set the daylight saving time. automatically search for a channel that carries a time signal.
..., hour, minutes, and AM/PM in sequence. Clock Set Title List Timer Set the time and date. Manual If the Auto Clock Set function did not set the clock correctly for your local area, set your time zone. Press Clock Set CH Title List Timer Edit DV/D8 Dubbing Select a Channel: Disc Setting Setup 10:10 AM Auto ◆ Time Zone Select the time zone for your area, or select "Auto" to set the daylight saving time. automatically search for a channel that carries a time signal.
Operating Instructions
Page 78
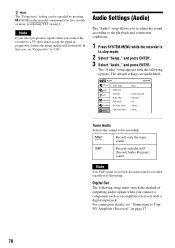
... switch the method of the setting. The default settings are underlined. Note If no SAP sound is received, the main sound is in stop mode. 2 Select "Setup," and press ENTER. 3 Select "Audio," and press ENTER. Digital Out The following options. SAP Records only the SAP (Second Audio Program) sound. Audio Settings (Audio) The "Audio" setup allows you connect a component such as an amplifier (receiver) with a digital input jack. Audio Title List Timer Edit DV/D8 Dubbing Disc Setting Setup Tuner Audio Digital Out Downmix Audio DRC Scan Audio DV Audio Input Line Audio Input...
... switch the method of the setting. The default settings are underlined. Note If no SAP sound is received, the main sound is in stop mode. 2 Select "Setup," and press ENTER. 3 Select "Audio," and press ENTER. Digital Out The following options. SAP Records only the SAP (Second Audio Program) sound. Audio Settings (Audio) The "Audio" setup allows you connect a component such as an amplifier (receiver) with a digital input jack. Audio Title List Timer Edit DV/D8 Dubbing Disc Setting Setup Tuner Audio Digital Out Downmix Audio DRC Scan Audio DV Audio Input Line Audio Input...
Operating Instructions
Page 79
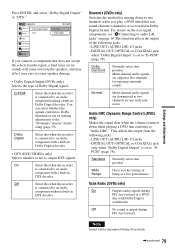
... not to an audio component without a built-in Dolby Digital format. Scan Audio (DVDs only) On Outputs audio signals during FF1 fast-forward of the following jacks: - Dolby Surround Normally select this position. Downmix (DVDs only) Switches the method for enjoying surround sounds. DIGITAL OUT (OPTICAL or COAXIAL) jack when "Dolby Digital Output" is connected to audio L/R jacks" on the rear signal components, see "A Connecting to an audio component lacking a built-in "Audio" setup (page 79). D-PCM Select this when the recorder is connected to the "Downmix...
... not to an audio component without a built-in Dolby Digital format. Scan Audio (DVDs only) On Outputs audio signals during FF1 fast-forward of the following jacks: - Dolby Surround Normally select this position. Downmix (DVDs only) Switches the method for enjoying surround sounds. DIGITAL OUT (OPTICAL or COAXIAL) jack when "Dolby Digital Output" is connected to audio L/R jacks" on the rear signal components, see "A Connecting to an audio component lacking a built-in "Audio" setup (page 79). D-PCM Select this when the recorder is connected to the "Downmix...
Operating Instructions
Page 80
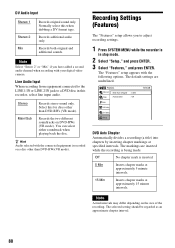
... Inserts chapter marks at specified intervals. Line Audio Input When recording from equipment connected to the LINE 1 IN or LINE 2 IN jack to adjust recording settings. 1 Press SYSTEM MENU while the recorder is recorded on a disc other than DVD-RWs(VR mode). Features Title List Timer DVD Auto Chapter : 5 Min Format DVD : VR Edit DV/D8 Dubbing Disc Setting Setup 10:10 AM DVD Auto Chapter Automatically divides a recording (a title) into chapters by inserting chapter...
... Inserts chapter marks at specified intervals. Line Audio Input When recording from equipment connected to the LINE 1 IN or LINE 2 IN jack to adjust recording settings. 1 Press SYSTEM MENU while the recorder is recorded on a disc other than DVD-RWs(VR mode). Features Title List Timer DVD Auto Chapter : 5 Min Format DVD : VR Edit DV/D8 Dubbing Disc Setting Setup 10:10 AM DVD Auto Chapter Automatically divides a recording (a title) into chapters by inserting chapter...

Operating Instructions
Page 81
... List Timer Edit DV/D8 Dubbing Disc Setting Language Parental Front Display Command Mode Factory Setting Setup : Auto : DVD 3 10:10 AM Settings and Adjustments Language ◆ OSD (On-Screen Display) Switches the display language on the screen. ◆ Disc Menu (DVD VIDEOs only) Switches the language for an explanation of the subtitles recorded on the DVD VIDEO, one of the soundtrack. Note If you to the language you select "Original," the language given priority in the disc is in "Disc Menu," "Subtitle," or "Audio" that is not recorded on the disc...
... List Timer Edit DV/D8 Dubbing Disc Setting Language Parental Front Display Command Mode Factory Setting Setup : Auto : DVD 3 10:10 AM Settings and Adjustments Language ◆ OSD (On-Screen Display) Switches the display language on the screen. ◆ Disc Menu (DVD VIDEOs only) Switches the language for an explanation of the subtitles recorded on the DVD VIDEO, one of the soundtrack. Note If you to the language you select "Original," the language given priority in the disc is in "Disc Menu," "Subtitle," or "Audio" that is not recorded on the disc...

Operating Instructions
Page 82
...-digit password using the number buttons. DV/D8 Dubbing Disc Setting Setup The display for "Rating Level" are displayed. The Parental setting is on the remote to match the COMMAND MODE switch on or off. Scenes may be blocked or replaced with different scenes. 1 After step 3 above, select "Parental," and press ENTER. • If you forget your password, then change the password, select "Change Password" in the "Setup" display. • Playback of the users. Title List 10:10 AM Timer...
...-digit password using the number buttons. DV/D8 Dubbing Disc Setting Setup The display for "Rating Level" are displayed. The Parental setting is on the remote to match the COMMAND MODE switch on or off. Scenes may be blocked or replaced with different scenes. 1 After step 3 above, select "Parental," and press ENTER. • If you forget your password, then change the password, select "Change Password" in the "Setup" display. • Playback of the users. Title List 10:10 AM Timer...

Operating Instructions
Page 84
... 12). , Switch the input selector on the TV screen. , If the picture output signal from a DVD player, VCR, or tuner goes through your VCR to get to your TV, the copy-protection signal applied to "Off" in "Video" setup. , The aspect ratio of the disc is connected to some programs could affect picture quality. Additional Information Troubleshooting If you experience any of the following difficulties while using the recorder, use this troubleshooting guide to progressive format (the PROGRESSIVE indicator lights up...
... 12). , Switch the input selector on the TV screen. , If the picture output signal from a DVD player, VCR, or tuner goes through your VCR to get to your TV, the copy-protection signal applied to "Off" in "Video" setup. , The aspect ratio of the disc is connected to some programs could affect picture quality. Additional Information Troubleshooting If you experience any of the following difficulties while using the recorder, use this troubleshooting guide to progressive format (the PROGRESSIVE indicator lights up...
Operating Instructions
Page 85
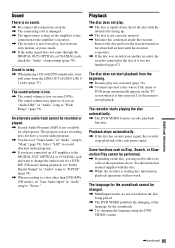
... want to change the audio track for a DVDRW (VR mode) during playback, set "Dolby Digital Output" in "Audio" setup to "D-PCM" (page 78). , When recording to a disc other than DVD-RWs (VR mode), set "Line Audio Input" in "Audio" setup to "Stereo." The sound volume is low. , The sound volume is low on the amplifier or the connection to the amplifier is incorrect. , The recorder is in reverse play, fast-forward, slow motion, or pause mode. , If the audio signal does not...
... want to change the audio track for a DVDRW (VR mode) during playback, set "Dolby Digital Output" in "Audio" setup to "D-PCM" (page 78). , When recording to a disc other than DVD-RWs (VR mode), set "Line Audio Input" in "Audio" setup to "Stereo." The sound volume is low. , The sound volume is low on the amplifier or the connection to the amplifier is incorrect. , The recorder is in reverse play, fast-forward, slow motion, or pause mode. , If the audio signal does not...
Operating Instructions
Page 99
... P "Parental" 82 Parental Control 36 Parts and controls 91 PAUSE 34, 47 PBC 36 "Picture control" 77 PLAY 32 Playable discs 30 Playback 32 MP3 audio tracks 40 Repeat Play 35 Resume Play 36 Slow-motion play 33 Playlist 38, 61, 96 Power cord 19 PREV 34 "Progressive" 77 Progressive format 96 "Protect" 57 Recording 45 recordable discs 28 recording format 28 recording mode 45 while watching another program 47 Recording mode 45 Recording time 45, 48 Region code 31 Remote 19, 92 REPEAT 35 Repeat A-B Play 36...
... P "Parental" 82 Parental Control 36 Parts and controls 91 PAUSE 34, 47 PBC 36 "Picture control" 77 PLAY 32 Playable discs 30 Playback 32 MP3 audio tracks 40 Repeat Play 35 Resume Play 36 Slow-motion play 33 Playlist 38, 61, 96 Power cord 19 PREV 34 "Progressive" 77 Progressive format 96 "Protect" 57 Recording 45 recordable discs 28 recording format 28 recording mode 45 while watching another program 47 Recording mode 45 Recording time 45, 48 Region code 31 Remote 19, 92 REPEAT 35 Repeat A-B Play 36...

Quick Start Guide
Page 1
... Operating instructions. or - Satellite Receiver Cable Box / Satellite Receiver to CABLE IN OUT CAV TV ANT IN to VIDEO OUT/ AUDIO OUT VIDEO OUT OPTICAL S VIDEO to your VCR If you must use this DVD recorder in the Setup menu. You will enjoy accurate color reproduction and high quality images. For further explanations, see "Connecting to "On" in its place. Antenna (no cable box) - Television Cable Box / Satellite Receiver VCR DVD Recorder 2 Select a connection Select one of the following two types...
... Operating instructions. or - Satellite Receiver Cable Box / Satellite Receiver to CABLE IN OUT CAV TV ANT IN to VIDEO OUT/ AUDIO OUT VIDEO OUT OPTICAL S VIDEO to your VCR If you must use this DVD recorder in the Setup menu. You will enjoy accurate color reproduction and high quality images. For further explanations, see "Connecting to "On" in its place. Antenna (no cable box) - Television Cable Box / Satellite Receiver VCR DVD Recorder 2 Select a connection Select one of the following two types...

Quick Start Guide
Page 2
... a DVD Disc 1 Press OPEN/CLOSE and place a recordable DVD on your cable box or satellite receiver. • If you connected your cable box to the DVD recorder's antenna input jack, select channel 2, 3 or 4, whichever channel is flashing, so be patient! Note that carries a time signal when you turn off . Then select a channel on the disc tray. 2 Press OPEN/CLOSE again to fit). Then select a channel on -screen display, then press ENTER. Title List (Original) 1/4 No. You can change them later using setup...
... a DVD Disc 1 Press OPEN/CLOSE and place a recordable DVD on your cable box or satellite receiver. • If you connected your cable box to the DVD recorder's antenna input jack, select channel 2, 3 or 4, whichever channel is flashing, so be patient! Note that carries a time signal when you turn off . Then select a channel on the disc tray. 2 Press OPEN/CLOSE again to fit). Then select a channel on -screen display, then press ENTER. Title List (Original) 1/4 No. You can change them later using setup...


