

User Guide
Page 2
... DVDs 57 Watching DVDs on your computer 57 Frequently asked questions 58 Printer Connections 61 Printing With Your Computer 62 Connecting a printer 62 Disconnecting a printer 64 Frequently asked questions 64 Computer Features 67 Using the Keyboard 68 Key locations and descriptions 68 Combinations and functions with the Windows key ........ 70 Indicators 71 Combinations and functions with the Fn key 72 Using the Touch Pad 75 Describing the touch pad...
... DVDs 57 Watching DVDs on your computer 57 Frequently asked questions 58 Printer Connections 61 Printing With Your Computer 62 Connecting a printer 62 Disconnecting a printer 64 Frequently asked questions 64 Computer Features 67 Using the Keyboard 68 Key locations and descriptions 68 Combinations and functions with the Windows key ........ 70 Indicators 71 Combinations and functions with the Fn key 72 Using the Touch Pad 75 Describing the touch pad...

User Guide
Page 60
... code warning appears, the disc may be on if the computer is charged. If the computer is set to refresh the computer screen. You may go blank? ❑ Your LCD screen may need to external display, use the computer for more information. Press the Windows key and press D twice. 60 See "Using the Battery" for at least one hour. See "Selecting a display mode" for this CD-ROM device check...
... code warning appears, the disc may be on if the computer is charged. If the computer is set to refresh the computer screen. You may go blank? ❑ Your LCD screen may need to external display, use the computer for more information. Press the Windows key and press D twice. 60 See "Using the Battery" for at least one hour. See "Selecting a display mode" for this CD-ROM device check...

User Guide
Page 65
... need to enable the computer's printer settings. 1 Click Start, and point to All Programs, Sony Notebook Setup, and click Sony Notebook Setup again. 2 Click the Device tab. 3 In the left panel, make sure the Printer Port check box is generally correct for most printers. 1 Click Start, and click Control Panel. 2 Click Performance and Maintenance, and click System. See the instructions that came with your printer for information about installing these drivers...
... need to enable the computer's printer settings. 1 Click Start, and point to All Programs, Sony Notebook Setup, and click Sony Notebook Setup again. 2 Click the Device tab. 3 In the left panel, make sure the Printer Port check box is generally correct for most printers. 1 Click Start, and click Control Panel. 2 Click Performance and Maintenance, and click System. See the instructions that came with your printer for information about installing these drivers...

User Guide
Page 68
VAIO Computer Quick Start Using the Keyboard Your keyboard is very similar to a typewriter's, but your computer keyboard has additional keys that perform specific computer-related tasks. ❑ Key locations and descriptions ❑ Combinations and functions with the Windows key ❑ Indicators ❑ Combinations and functions with the Fn key Key locations and descriptions Keyboard Escape key Function keys Print Screen key Correction keys Skheyift Fn key Fn key Alt key Space bar Ctrl key Applications key Numeric keypad Windows key Navigation keys 68
VAIO Computer Quick Start Using the Keyboard Your keyboard is very similar to a typewriter's, but your computer keyboard has additional keys that perform specific computer-related tasks. ❑ Key locations and descriptions ❑ Combinations and functions with the Windows key ❑ Indicators ❑ Combinations and functions with the Fn key Key locations and descriptions Keyboard Escape key Function keys Print Screen key Correction keys Skheyift Fn key Fn key Alt key Space bar Ctrl key Applications key Numeric keypad Windows key Navigation keys 68

User Guide
Page 103
... Microsoft® Windows® operating system installed on your computer. ❑ Use the Sony Notebook Setup utility to disable devices you need to remove the hardware device. 5 Push the Release button. See "To open Sony Notebook Setup" for more information. ❑ Make sure any necessary driver software is inserted properly. The PC Card pops out. 3 Gently pull the card out of the slot. If you use a Type III PC Card, you are not currently using. The Release button pops out...
... Microsoft® Windows® operating system installed on your computer. ❑ Use the Sony Notebook Setup utility to disable devices you need to remove the hardware device. 5 Push the Release button. See "To open Sony Notebook Setup" for more information. ❑ Make sure any necessary driver software is inserted properly. The PC Card pops out. 3 Gently pull the card out of the slot. If you use a Type III PC Card, you are not currently using. The Release button pops out...

User Guide
Page 118
... own driver software, install these drivers before you want to the external device. 118 Click Movies, and select a program in the Hardware devices window if it is now safe to view your images. ❑ Click Start, and click Experience VAIO. VAIO Computer Quick Start To disconnect the i.LINK digital video recorder when the computer is on connecting an i.LINK device ❑ Do not connect more than one set of instructions from...
... own driver software, install these drivers before you want to the external device. 118 Click Movies, and select a program in the Hardware devices window if it is now safe to view your images. ❑ Click Start, and click Experience VAIO. VAIO Computer Quick Start To disconnect the i.LINK digital video recorder when the computer is on connecting an i.LINK device ❑ Do not connect more than one set of instructions from...

User Guide
Page 146
... precautions below only at an ESD workstation. Ground yourself by an authorized Sony Service Center. See also "Typical expansion memory configuration." Mistakes that produce or hold static electricity (cellophane wrappers, for the type of module and amount of the chassis while performing the procedure. 146 VAIO Computer Quick Start Upgrading Your Computer's Memory Before you begin upgrading your computer's memory, make sure you install or remove a memory module.
... precautions below only at an ESD workstation. Ground yourself by an authorized Sony Service Center. See also "Typical expansion memory configuration." Mistakes that produce or hold static electricity (cellophane wrappers, for the type of module and amount of the chassis while performing the procedure. 146 VAIO Computer Quick Start Upgrading Your Computer's Memory Before you begin upgrading your computer's memory, make sure you install or remove a memory module.

User Guide
Page 155
... Next. 155 screen instructions to complete the recovery process. ✍ Your system may be prompted to insert the next CD, depending on the application you wish to select Install from the shortcut menu. ✍ Unknown devices are identified by a yellow exclamation point. 7 In the Hardware Update Wizard, click to restore. To reinstall device drivers with a driver problem is already on - The Application Recovery utility starts automatically...
... Next. 155 screen instructions to complete the recovery process. ✍ Your system may be prompted to insert the next CD, depending on the application you wish to select Install from the shortcut menu. ✍ Unknown devices are identified by a yellow exclamation point. 7 In the Hardware Update Wizard, click to restore. To reinstall device drivers with a driver problem is already on - The Application Recovery utility starts automatically...
User Guide
Page 156
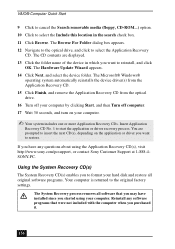
... your hard disk and restore all software that were not included with the computer when you to select the Application Recovery CD. VAIO® Computer Quick Start 9 Click to cancel the Search removable media (floppy, CD-ROM...) option. 10 Click to start the application or driver recovery process. The CD contents are prompted to reinstall, and click OK. Using the System Recovery CD(s) The System Recovery CD(s) enables you...
... your hard disk and restore all software that were not included with the computer when you to select the Application Recovery CD. VAIO® Computer Quick Start 9 Click to cancel the Search removable media (floppy, CD-ROM...) option. 10 Click to start the application or driver recovery process. The CD contents are prompted to reinstall, and click OK. Using the System Recovery CD(s) The System Recovery CD(s) enables you...

User Guide
Page 157
... removed from the hard drive. A blue screen may correct the problem. Using Your Recovery CDs You can use the System Recovery CD(s) Your system may not need to reinstall the entire contents of the computer you wish to retain your system data, perform a backup to an external media. The first CD must be used only to recover the hard disk of your computer, reinstalling an individual device driver or software...
... removed from the hard drive. A blue screen may correct the problem. Using Your Recovery CDs You can use the System Recovery CD(s) Your system may not need to reinstall the entire contents of the computer you wish to retain your system data, perform a backup to an external media. The first CD must be used only to recover the hard disk of your computer, reinstalling an individual device driver or software...

User Guide
Page 165
... to open the Properties window. 4 Click OK. ❑ Change the default printer port setting, although this setting is generally correct for more information. ❑ Make sure the printer is compatible with your printer for information about installing these drivers. ❑ If the printer is not functioning after the computer resumes from a power saving mode (Standby or Hibernate), reset the printer connection. 1 Click Start, and click Control Panel. 2 Click...
... to open the Properties window. 4 Click OK. ❑ Change the default printer port setting, although this setting is generally correct for more information. ❑ Make sure the printer is compatible with your printer for information about installing these drivers. ❑ If the printer is not functioning after the computer resumes from a power saving mode (Standby or Hibernate), reset the printer connection. 1 Click Start, and click Control Panel. 2 Click...

User Guide
Page 171
.... Troubleshooting Networks Troubleshooting Networks Why can 't I access the Internet? ❑ Make sure the wireless LAN PC Card is properly inserted into the PC Card slot. The Wireless Network Connection Properties dialog box appears. 3 Select the Wireless Networks tab, and make sure the access point is not displayed, see "Inserting PC Cards." ❑ Check the access point settings. Other factors include device configurations, radio conditions, and software compatibility. Refer to the instructions supplied with the access point. ❑ Make sure...
.... Troubleshooting Networks Troubleshooting Networks Why can 't I access the Internet? ❑ Make sure the wireless LAN PC Card is properly inserted into the PC Card slot. The Wireless Network Connection Properties dialog box appears. 3 Select the Wireless Networks tab, and make sure the access point is not displayed, see "Inserting PC Cards." ❑ Check the access point settings. Other factors include device configurations, radio conditions, and software compatibility. Refer to the instructions supplied with the access point. ❑ Make sure...

User Guide
Page 172
... data is intact. 1 From the Start menu, click Control Panel, and then Network and Internet Connections. The Network and Internet Connections window appears. 2 Click Network Connections. How do I connect to devices using a wireless LAN access point, the device may lower this rate. Can I avoid data transfer interruptions? ❑ Data transfer interruptions may occur with large files or use of other access points, change the access point channel. Devices connecting to a wireless LAN using the IEEE 802.11a standard cannot...
... data is intact. 1 From the Start menu, click Control Panel, and then Network and Internet Connections. The Network and Internet Connections window appears. 2 Click Network Connections. How do I connect to devices using a wireless LAN access point, the device may lower this rate. Can I avoid data transfer interruptions? ❑ Data transfer interruptions may occur with large files or use of other access points, change the access point channel. Devices connecting to a wireless LAN using the IEEE 802.11a standard cannot...

User Guide
Page 192
VAIO Computer Quick Start indicator lights 71 battery 71 Caps Lock 72 hard disk 71 Memory Stick 71 Num Lock 71 Scroll Lock 72 Wireless LAN 72 inserting battery pack 13 installing hard drives 101 Internet connecting 28 J jacks modem 28 Jog Dial Control 79 Jog Dial Navigator 79 Indicate window 80 Launcher window 82 settings 84 K key locations 68 keyboard key combinations 70, 72 key locations 68 using 68 L LCD troubleshooting 60, 175, 181 M MagicGate 86 Maximum Battery Life power setting 22 Maximum Performance power setting 22 memory adding 145 confirming added capacity 150 192
VAIO Computer Quick Start indicator lights 71 battery 71 Caps Lock 72 hard disk 71 Memory Stick 71 Num Lock 71 Scroll Lock 72 Wireless LAN 72 inserting battery pack 13 installing hard drives 101 Internet connecting 28 J jacks modem 28 Jog Dial Control 79 Jog Dial Navigator 79 Indicate window 80 Launcher window 82 settings 84 K key locations 68 keyboard key combinations 70, 72 key locations 68 using 68 L LCD troubleshooting 60, 175, 181 M MagicGate 86 Maximum Battery Life power setting 22 Maximum Performance power setting 22 memory adding 145 confirming added capacity 150 192
Quick Start Guide
Page 3
... Ergonomics 18 Locating Controls and Ports 19 Locating Docking Station Controls and Ports...........24 Connecting the Docking Station 26 Disconnecting the Docking Station 27 Getting Started 31 Turning On Your Computer 32 Using the Touch Pad 35 Registering Your Computer 36 Locating Your VAIO Computer User Guide 37 Setting Up A Dial-Up Connection 39 Turning Off Your Computer 41 Expanding Your Computing Power .........43 Upgrading Memory 44 Locating Preinstalled Programs 44 Using the Recovery CDs...
... Ergonomics 18 Locating Controls and Ports 19 Locating Docking Station Controls and Ports...........24 Connecting the Docking Station 26 Disconnecting the Docking Station 27 Getting Started 31 Turning On Your Computer 32 Using the Touch Pad 35 Registering Your Computer 36 Locating Your VAIO Computer User Guide 37 Setting Up A Dial-Up Connection 39 Turning Off Your Computer 41 Expanding Your Computing Power .........43 Upgrading Memory 44 Locating Preinstalled Programs 44 Using the Recovery CDs...

Quick Start Guide
Page 49
... original factory settings, operating system, and preinstalled software are restored. ❑ Recovery to Original Factory Defaults - The System Recovery utility does not back up your system data, perform a backup to an external media. See "Using the Application Recovery CD(s)" for both the Drive C and Drive D. It can be in the optical drive. The System Recovery utility restarts from the hard drive. All data on this drive only. ❑ Change Partition Size - All partitions, custom installations, and changes are removed...
... original factory settings, operating system, and preinstalled software are restored. ❑ Recovery to Original Factory Defaults - The System Recovery utility does not back up your system data, perform a backup to an external media. See "Using the Application Recovery CD(s)" for both the Drive C and Drive D. It can be in the optical drive. The System Recovery utility restarts from the hard drive. All data on this drive only. ❑ Change Partition Size - All partitions, custom installations, and changes are removed...

Quick Start Guide
Page 60
... blank? ❑ Your computer screen may have disabled the touch pad without connecting a mouse to select Sony Notebook Setup, and press Enter. 60 Why doesn't the touch pad work properly? ❑ If you are using a Sony USB mouse, make sure the mouse is securely plugged into the USB port. ❑ If you are still experiencing problems, use your supplied Application Recovery CD to reinstall the mouse drivers. To enable the touchpad: 1 (Windows XP) Press the Windows key , and then press the...
... blank? ❑ Your computer screen may have disabled the touch pad without connecting a mouse to select Sony Notebook Setup, and press Enter. 60 Why doesn't the touch pad work properly? ❑ If you are using a Sony USB mouse, make sure the mouse is securely plugged into the USB port. ❑ If you are still experiencing problems, use your supplied Application Recovery CD to reinstall the mouse drivers. To enable the touchpad: 1 (Windows XP) Press the Windows key , and then press the...

Quick Start Guide
Page 68
... Quick Start help 37, 55 I i.LINK port 21 indicators battery 19 caps lock 19 docking station 19 hard disk drive 19 Memory Stick media 19 num lock 19 power 19 scroll lock 19 Wireless LAN 19 input devices 9 interference 9 internal speaker 19 Internet connection 39 J jacks headphone 21 microphone 21 modem jack 21 K keyboard 19 L LCD screen handling 53 locating 19 troubleshooting 60 M maintanence 53 manual 37 Memory Stick media indicator 19 slot 20 microphone jack 21 modem laws governing 10 68 modem jack 21 monitor (VGA) port 21 mouse troubleshooting...
... Quick Start help 37, 55 I i.LINK port 21 indicators battery 19 caps lock 19 docking station 19 hard disk drive 19 Memory Stick media 19 num lock 19 power 19 scroll lock 19 Wireless LAN 19 input devices 9 interference 9 internal speaker 19 Internet connection 39 J jacks headphone 21 microphone 21 modem jack 21 K keyboard 19 L LCD screen handling 53 locating 19 troubleshooting 60 M maintanence 53 manual 37 Memory Stick media indicator 19 slot 20 microphone jack 21 modem laws governing 10 68 modem jack 21 monitor (VGA) port 21 mouse troubleshooting...

Quick Start Guide
Page 69
... 8 reset switch 23 restoring data 46 S scroll lock indicator 19 Serial port 24 shutting down computer 41 software locating 44 Sony Service Center 66 specifications 16 specifications (online) 38 starting computer 32 startup problems 42 support Sony 55 System Recovery CD 48 T technical support 55 telephone line jack 21 touch pad 19 troubleshooting 60 touchpad using 35 troubleshooting 56 LCD screen 60 mouse and touch pad 60 startup 42 turning off computer 41 turning on computer 32 TV interference 9 U UNLOCK/LOCK switch 23 unpacking the computer 16 updates 38, 39 USB port...
... 8 reset switch 23 restoring data 46 S scroll lock indicator 19 Serial port 24 shutting down computer 41 software locating 44 Sony Service Center 66 specifications 16 specifications (online) 38 starting computer 32 startup problems 42 support Sony 55 System Recovery CD 48 T technical support 55 telephone line jack 21 touch pad 19 troubleshooting 60 touchpad using 35 troubleshooting 56 LCD screen 60 mouse and touch pad 60 startup 42 turning off computer 41 turning on computer 32 TV interference 9 U UNLOCK/LOCK switch 23 unpacking the computer 16 updates 38, 39 USB port...

Warranty
Page 1
... to obtain warranty service for the remainder of SONY. It is invalid if the factory-applied serial number has been altered or removed from state to state or jurisdiction to any enclosed software Limited Warranty. Some states or jurisdictions do not allow the exclusion or limitation of this product against defects in any repair, replacement part or replacement product for your...
... to obtain warranty service for the remainder of SONY. It is invalid if the factory-applied serial number has been altered or removed from state to state or jurisdiction to any enclosed software Limited Warranty. Some states or jurisdictions do not allow the exclusion or limitation of this product against defects in any repair, replacement part or replacement product for your...


