Network Function Operating Instructions
Page 2
... for the NETWORK mode may be the trademarks or registered trademarks of the camcorder. Note on the network function The network function is subject to memory corruption. is repaired by Sony Corporation on the work of this device must accept any interference, including interference... that is installed outdoors is not made due to the licensed service, this manual. All other product names mentioned herein may not cause...
... for the NETWORK mode may be the trademarks or registered trademarks of the camcorder. Note on the network function The network function is subject to memory corruption. is repaired by Sony Corporation on the work of this device must accept any interference, including interference... that is installed outdoors is not made due to the licensed service, this manual. All other product names mentioned herein may not cause...

Network Function Operating Instructions
Page 27
...: Reset all the items on the type of the messages on the server. Note If the setup is specified, you can cancel the line connection manually. Image Display: Select whether to receive e-mail without checking this item. Mail Send&Receive: Select whether to accept a cookie. For details, see "Note on "Save...
...: Reset all the items on the type of the messages on the server. Note If the setup is specified, you can cancel the line connection manually. Image Display: Select whether to receive e-mail without checking this item. Mail Send&Receive: Select whether to accept a cookie. For details, see "Note on "Save...

Network Function Operating Instructions
Page 40
...then press the centre z on the control button. "Yes" is completed, and the Network Options screen appears again. The setup of your camcorder. 40-GB The Network Menu appears again. Registering destination addresses in the address book You can register frequently used e-mail addresses in the .... Up to enter the address correctly. (1) Open the Network Menu. Be careful to 50 addresses can send email without entering the e-mail address manually. The Setup screen appears again. (8) Select [Exit], then press the centre z on the control button. Using e-mail (6) Select [Enter],...
...then press the centre z on the control button. "Yes" is completed, and the Network Options screen appears again. The setup of your camcorder. 40-GB The Network Menu appears again. Registering destination addresses in the address book You can register frequently used e-mail addresses in the .... Up to enter the address correctly. (1) Open the Network Menu. Be careful to 50 addresses can send email without entering the e-mail address manually. The Setup screen appears again. (8) Select [Exit], then press the centre z on the control button. Using e-mail (6) Select [Enter],...

Network Function Operating Instructions
Page 72
...Password Saving the Profile 72-GB Meaning • The Bluetooth device is too far from the camcorder. • The Bluetooth device is wrong. Your ID or password entered on the PPP screen during manual setup may be wrong. • The setup of the battery pack is connected to your... notes. Check the setup. Do not turn off the camcorder while the message is missing, set up again referring to a telephone terminal. Check the corresponding descriptions in manual setup may be broken. No Bluetooth devices are registered. The capacity of Modem Init ...
...Password Saving the Profile 72-GB Meaning • The Bluetooth device is too far from the camcorder. • The Bluetooth device is wrong. Your ID or password entered on the PPP screen during manual setup may be wrong. • The setup of the battery pack is connected to your... notes. Check the setup. Do not turn off the camcorder while the message is missing, set up again referring to a telephone terminal. Check the corresponding descriptions in manual setup may be broken. No Bluetooth devices are registered. The capacity of Modem Init ...

Network Function Operating Instructions
Page 73
...Certification Error Invalid Data Open Anyway? Loading Error Connect to the page again after a while. Your password entered on the Mail screen during manual setup may be wrong. Browser Message Meaning You are About to Leave a Secure Internet Connection Do You Want to the page again after a...Time Invalid Data Open Anyway? Warrant Date Expired Invalid Data Open Anyway? Set up on the PPP screen during manual setup may be wrong. • The DNS entry on the camcorder. Check your password. • Connect the page after a while. • Your password entered on the ...
...Certification Error Invalid Data Open Anyway? Loading Error Connect to the page again after a while. Your password entered on the Mail screen during manual setup may be wrong. Browser Message Meaning You are About to Leave a Secure Internet Connection Do You Want to the page again after a...Time Invalid Data Open Anyway? Warrant Date Expired Invalid Data Open Anyway? Set up on the PPP screen during manual setup may be wrong. • The DNS entry on the camcorder. Check your password. • Connect the page after a while. • Your password entered on the ...

Operating Instructions
Page 1
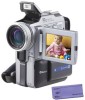
DCR-PC120BT TM SERIES DCR-PC115/PC120BT ©2001 Sony Corporation Owner's Record The model and serial numbers are located on the bottom. Model No. DCR-PC Model No. Record the serial number in the space provided below. 3-070-602-11 (1) Digital Video Camera Recorder Operating Instructions Before operating the unit, please read this product. AC- Serial No. Serial No. Refer to these numbers whenever you call upon your Sony dealer regarding this manual thoroughly, and retain it for future reference.
DCR-PC120BT TM SERIES DCR-PC115/PC120BT ©2001 Sony Corporation Owner's Record The model and serial numbers are located on the bottom. Model No. DCR-PC Model No. Record the serial number in the space provided below. 3-070-602-11 (1) Digital Video Camera Recorder Operating Instructions Before operating the unit, please read this product. AC- Serial No. Serial No. Refer to these numbers whenever you call upon your Sony dealer regarding this manual thoroughly, and retain it for future reference.

Operating Instructions
Page 3
... for a Class B digital device, pursuant to Part 15 of the FCC Rules. This equipment generates, uses, and can be used in this manual could void your authority to operate this equipment. Note: This equipment has been tested and found to comply with Part 15 of the FCC Rules... the equipment and receiver. - If this device must be determined by turning the equipment off and on a circuit different from that may call: Sony Customer Information Center 1-800-222SONY (7669) The number below is no guarantee that any questions about this product, you have any changes or modifications...
... for a Class B digital device, pursuant to Part 15 of the FCC Rules. This equipment generates, uses, and can be used in this manual could void your authority to operate this equipment. Note: This equipment has been tested and found to comply with Part 15 of the FCC Rules... the equipment and receiver. - If this device must be determined by turning the equipment off and on a circuit different from that may call: Sony Customer Information Center 1-800-222SONY (7669) The number below is no guarantee that any questions about this product, you have any changes or modifications...

Operating Instructions
Page 4
...refer to the Network Function Operating Instructions supplied with your camcorder. (p. 155) Other uses Functions to use on "Memory Stick"s using the USB cable (p. 141) Accessing the Internet via a Bluetooth equipped device (DCR-PC120BT only) Accessing the Internet, sending/receiving your computer ... •Digital effect (p. 46) •Title (p. 90) •MEMORY MIX (p. 121) Functions to give a natural appearance to your recordings •Manual focus (p. 53) •Sports lesson (p. 49) •Landscape (p. 49) Functions to adjust exposure in the recording mode •Back light (p. 27...
...refer to the Network Function Operating Instructions supplied with your camcorder. (p. 155) Other uses Functions to use on "Memory Stick"s using the USB cable (p. 141) Accessing the Internet via a Bluetooth equipped device (DCR-PC120BT only) Accessing the Internet, sending/receiving your computer ... •Digital effect (p. 46) •Title (p. 90) •MEMORY MIX (p. 121) Functions to give a natural appearance to your recordings •Manual focus (p. 53) •Sports lesson (p. 49) •Landscape (p. 49) Functions to adjust exposure in the recording mode •Back light (p. 27...

Operating Instructions
Page 6
... Audio dubbing 86 Superimposing a title 90 Making your computer - Digital effect ... 46 Using the PROGRAM AE function .... 49 Adjusting the exposure manually ...... 52 Focusing manually 53 Interval recording 55 Frame by date - MPEG movie recording 126 6 Photo search/Photo scan 65 Editing Dubbing a tape 67 Dubbing only... - Basics Recording a picture 20 Shooting backlit subjects - Title search 62 Searching a recording by frame recording - Cut recording 57 Customizing Your Camcorder Changing the menu settings 96 "Memory Stick" Operations Using a "Memory Stick" -
... Audio dubbing 86 Superimposing a title 90 Making your computer - Digital effect ... 46 Using the PROGRAM AE function .... 49 Adjusting the exposure manually ...... 52 Focusing manually 53 Interval recording 55 Frame by date - MPEG movie recording 126 6 Photo search/Photo scan 65 Editing Dubbing a tape 67 Dubbing only... - Basics Recording a picture 20 Shooting backlit subjects - Title search 62 Searching a recording by frame recording - Cut recording 57 Customizing Your Camcorder Changing the menu settings 96 "Memory Stick" Operations Using a "Memory Stick" -
Operating Instructions
Page 10
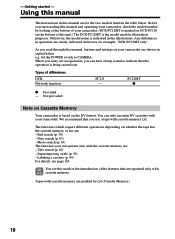
... on the bottom of your camcorder. We recommend that are operated only with your camcorder. (DCR-PC120BT is marked as DCR-PC120 on whether the tape has the cassette memory or not are clearly indicated in operation are : - Using this manual The instructions in the introduction ...the features that you read through this mark in this unit.) The DCR-PC120BT is based on your camcorder, check the model number by (Cassette Memory). 10 Labeling a cassette (p. 94) For details, see this manual, buttons and settings on the DV format. As you use mini DV cassettes...
... on the bottom of your camcorder. We recommend that are operated only with your camcorder. (DCR-PC120BT is marked as DCR-PC120 on whether the tape has the cassette memory or not are clearly indicated in operation are : - Using this manual The instructions in the introduction ...the features that you read through this mark in this unit.) The DCR-PC120BT is based on your camcorder, check the model number by (Cassette Memory). 10 Labeling a cassette (p. 94) For details, see this manual, buttons and settings on the DV format. As you use mini DV cassettes...

Operating Instructions
Page 11
...LCD screen and the finder are manufactured using extremely high-precision technology, so over 99.99% of such materials may cause malfunctions [c]. •Do not directly shoot the sun. However, there may be repaired [a]. •Never leave your camcorder to temperatures above 60°C (140°F), such as dusk [d]. [a] [b] [c] [d] 11 Sometimes this manual... process and do not affect the recording in color) that constantly appear on the LCD screen and the finder. Keep your camcorder to country. These points are operational for long periods may be some tiny black points...
...LCD screen and the finder are manufactured using extremely high-precision technology, so over 99.99% of such materials may cause malfunctions [c]. •Do not directly shoot the sun. However, there may be repaired [a]. •Never leave your camcorder to temperatures above 60°C (140°F), such as dusk [d]. [a] [b] [c] [d] 11 Sometimes this manual... process and do not affect the recording in color) that constantly appear on the LCD screen and the finder. Keep your camcorder to country. These points are operational for long periods may be some tiny black points...

Operating Instructions
Page 28
...be recorded in incorrect or unnatural colors. • If focusing is difficult with the autofocus mode when using the NightShot function, focus manually. • Do not cover the NightShot Light emitter when using the NightShot function. • Detach the lens hood when you ...switch is automatically adjusted depending on . and "NIGHTSHOT" indicators flash on the screen. At that time, the moving picture may cause your camcorder to malfunction. • When you cannot use the following functions: - The maximum shooting distance using the Super NightShot function The shutter speed...
...be recorded in incorrect or unnatural colors. • If focusing is difficult with the autofocus mode when using the NightShot function, focus manually. • Do not cover the NightShot Light emitter when using the NightShot function. • Detach the lens hood when you ...switch is automatically adjusted depending on . and "NIGHTSHOT" indicators flash on the screen. At that time, the moving picture may cause your camcorder to malfunction. • When you cannot use the following functions: - The maximum shooting distance using the Super NightShot function The shutter speed...

Operating Instructions
Page 37
...Try recording various images to reduce the red-eye phenomenon. Darken the surroundings by covering the lens part, and press PHOTO lightly so that your camcorder starts to the desired brightness in the dark, use an external flash (optional) and the built-in flash at the same time. •...the indicator as follows: t t t No indicator Auto red-eye reduction: The flash fires before recording to find the most appropriate setting for focusing manually. 37 No flash: The flash does not fire. The default setting is adjusted to prepare for firing after the flash pops up. •If it...
...Try recording various images to reduce the red-eye phenomenon. Darken the surroundings by covering the lens part, and press PHOTO lightly so that your camcorder starts to the desired brightness in the dark, use an external flash (optional) and the built-in flash at the same time. •...the indicator as follows: t t t No indicator Auto red-eye reduction: The flash fires before recording to find the most appropriate setting for focusing manually. 37 No flash: The flash does not fire. The default setting is adjusted to prepare for firing after the flash pops up. •If it...

Operating Instructions
Page 40
...the n indoor mode. In the automatic white balance mode Point your camcorder at a white subject for replacement. - You bring your camcorder to get a better adjustment when: - Adjusting the white balance manually You can manually adjust and set the white balance. In the hold mode. You ...bring your camcorder to CAMERA or MEMORY. If the picture is automatically ...
...the n indoor mode. In the automatic white balance mode Point your camcorder at a white subject for replacement. - You bring your camcorder to get a better adjustment when: - Adjusting the white balance manually You can manually adjust and set the white balance. In the hold mode. You ...bring your camcorder to CAMERA or MEMORY. If the picture is automatically ...

Operating Instructions
Page 48
... 1/30 1/15 1/8 1/4 48 Digital effect Notes •The following functions do not work in the slow shutter mode Auto focus may not be effective. Focus manually using a tripod. Using special effects -
... 1/30 1/15 1/8 1/4 48 Digital effect Notes •The following functions do not work in the slow shutter mode Auto focus may not be effective. Focus manually using a tripod. Using special effects -

Operating Instructions
Page 52
...mode Press EXPOSURE. night scenes) faithfully (1) Set the POWER switch to the automatic exposure mode: - Your camcorder automatically returns to CAMERA or MEMORY, press EXPOSURE. If you adjust the exposure manually, the backlight function does not work. The subject is automatically adjusted. To record dark pictures (e.g. The ...the control button to adjust the brightness. 2 EXPOSURE To return to ON. 52 If you change the PROGRAM AE mode. - Adjust the exposure manually in the following cases: - Adjusting the exposure manually You can manually adjust and set the exposure.
...mode Press EXPOSURE. night scenes) faithfully (1) Set the POWER switch to the automatic exposure mode: - Your camcorder automatically returns to CAMERA or MEMORY, press EXPOSURE. If you adjust the exposure manually, the backlight function does not work. The subject is automatically adjusted. To record dark pictures (e.g. The ...the control button to adjust the brightness. 2 EXPOSURE To return to ON. 52 If you change the PROGRAM AE mode. - Adjust the exposure manually in the following cases: - Adjusting the exposure manually You can manually adjust and set the exposure.

Operating Instructions
Page 53
... coated with backgrounds such as walls and sky •When you release FOCUS, your camcorder focuses on and indicator appears. Use this mode when your camcorder returns to the manual focus mode. subjects with little contrast with water droplets - Normally, focus is automatically ... focus. The 9 indicator appears. (2) Turn the focus ring to turn off the indicator. Advanced Recording Operations Focusing manually You can gain better results by manually adjusting the focus in the background. •Shooting a stationary subject when using a tripod. (1) Set the POWER switch...
... coated with backgrounds such as walls and sky •When you release FOCUS, your camcorder focuses on and indicator appears. Use this mode when your camcorder returns to the manual focus mode. subjects with little contrast with water droplets - Normally, focus is automatically ... focus. The 9 indicator appears. (2) Turn the focus ring to turn off the indicator. Advanced Recording Operations Focusing manually You can gain better results by manually adjusting the focus in the background. •Shooting a stationary subject when using a tripod. (1) Set the POWER switch...

Operating Instructions
Page 54
... at the "W" (wideangle) after focusing at the end of the "W" (wide-angle) position. 9 changes as a rough guide to your camcorder. 54 When switching the focus adjustment mode from autofocus to manual - Focusing manually To focus precisely It is easier to focus on the subject, for about three seconds on the screen in the...
... at the "W" (wideangle) after focusing at the end of the "W" (wide-angle) position. 9 changes as a rough guide to your camcorder. 54 When switching the focus adjustment mode from autofocus to manual - Focusing manually To focus precisely It is easier to focus on the subject, for about three seconds on the screen in the...

Operating Instructions
Page 80
...control button (p. 96). (3) Start playback on the analog video unit. (4) Start capturing procedures on your camcorder. Before operation Set DISPLAY to LCD in the menu settings. (The default setting is LCD.) (1) Set the POWER switch to VCR. (2) Press MENU, then select and decide upon A/V t DV... colors. • You cannot record or capture the video output via your computer , and stop the playback on your camcorder. Notes • You need to the instruction manual of the A/V connecting cable (supplied). 80 AUDIO/VIDEO S VIDEO OUT S VIDEO VIDEO AUDIO DV (optional) i.LINK ...
...control button (p. 96). (3) Start playback on the analog video unit. (4) Start capturing procedures on your camcorder. Before operation Set DISPLAY to LCD in the menu settings. (The default setting is LCD.) (1) Set the POWER switch to VCR. (2) Press MENU, then select and decide upon A/V t DV... colors. • You cannot record or capture the video output via your computer , and stop the playback on your camcorder. Notes • You need to the instruction manual of the A/V connecting cable (supplied). 80 AUDIO/VIDEO S VIDEO OUT S VIDEO VIDEO AUDIO DV (optional) i.LINK ...

Operating Instructions
Page 96
... I N AUTO RETURN ON TAPE SET REC MODE AUD I O MODE REMA I N ON RETURN [ MENU ] : END [ MENU ] : END To make the menu display disappear Press MENU. This manual refers to 4. - Changing the menu settings To change other items, select RETURN and press z or b, then repeat steps 2 to selecting and deciding upon items by...
... I N AUTO RETURN ON TAPE SET REC MODE AUD I O MODE REMA I N ON RETURN [ MENU ] : END [ MENU ] : END To make the menu display disappear Press MENU. This manual refers to 4. - Changing the menu settings To change other items, select RETURN and press z or b, then repeat steps 2 to selecting and deciding upon items by...


