Operating Instructions
Page 1
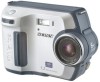
Owner's Record The model and serial numbers are located on the bottom. Model No Serial No MVC-FD100/FD200 ©2002 Sony Corporation Record the serial number in the space provided below. Refer to these numbers whenever you call upon your Sony dealer regarding this manual thoroughly, and retain it for future reference. 3-073-074-13(1) Digital Still Camera Operating Instructions Before operating the unit, please read this product.
Owner's Record The model and serial numbers are located on the bottom. Model No Serial No MVC-FD100/FD200 ©2002 Sony Corporation Record the serial number in the space provided below. Refer to these numbers whenever you call upon your Sony dealer regarding this manual thoroughly, and retain it for future reference. 3-073-074-13(1) Digital Still Camera Operating Instructions Before operating the unit, please read this product.
Operating Instructions
Page 2
...hazard, do not expose the unit to the following two conditions: (1) This device may not cause harmful interference, and (2) this manual could void your authority to Part 15 of the FCC Rules. Address: 16450 W. Telephone Number: 858-942-2230 This device complies ...of uninsulated "dangerous voltage" within the product's enclosure that may call: Sony Customer Information Center 1-800-222-SONY (7669) The number below is subject to persons. Address: 16450 W. Operation is for a Class B digital device, pursuant to operate this product, you have any interference received, including...
...hazard, do not expose the unit to the following two conditions: (1) This device may not cause harmful interference, and (2) this manual could void your authority to Part 15 of the FCC Rules. Address: 16450 W. Telephone Number: 858-942-2230 This device complies ...of uninsulated "dangerous voltage" within the product's enclosure that may call: Sony Customer Information Center 1-800-222-SONY (7669) The number below is subject to persons. Address: 16450 W. Operation is for a Class B digital device, pursuant to operate this product, you have any interference received, including...
Operating Instructions
Page 4
...; The LCD screen and the finder are manufactured using your camera Operating instructions Before operating the unit, please read this manual, buttons and settings on other equipment and playback of the "Memory Stick" • This camera conforms with other materials may cause malfunctions. Be sure to... use. Trial recording Before you record one-time events, you read through this manual thoroughly, and retain it before using extremely highprecision technology so over 99.99% of your camera still images recorded on the LCD screen and the finder. You cannot play back on...
...; The LCD screen and the finder are manufactured using your camera Operating instructions Before operating the unit, please read this manual, buttons and settings on other equipment and playback of the "Memory Stick" • This camera conforms with other materials may cause malfunctions. Be sure to... use. Trial recording Before you record one-time events, you read through this manual thoroughly, and retain it before using extremely highprecision technology so over 99.99% of your camera still images recorded on the LCD screen and the finder. You cannot play back on...
Operating Instructions
Page 27
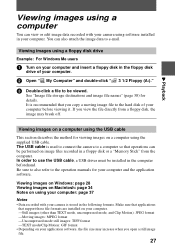
... using a floppy disk drive Example: For Windows Me users 1 Turn on using your computer: page 37 Notes • Data recorded with your camera using software installed in the following formats. Viewing images on Windows: page 28 Viewing images on Macintosh: page 34 Notes on your computer and insert... a floppy disk or a "Memory Stick" from a floppy disk, the image may increase when you open a still image file. 27 You can also attach the image data to the operation manuals for details. In order to use the USB cable, a USB driver must be performed on your application software, ...
... using a floppy disk drive Example: For Windows Me users 1 Turn on using your computer: page 37 Notes • Data recorded with your camera using software installed in the following formats. Viewing images on Windows: page 28 Viewing images on Macintosh: page 34 Notes on your computer and insert... a floppy disk or a "Memory Stick" from a floppy disk, the image may increase when you open a still image file. 27 You can also attach the image data to the operation manuals for details. In order to use the USB cable, a USB driver must be performed on your application software, ...
Operating Instructions
Page 28
...the camera from your computer, which was converted to another file format, the "FILE ERROR" message may appear and you connect two or more The USB connector must be installed at the same time as standard. Operation is not assured in this manual. • In this manual, ...a single computer or use a hub, operation is referred to as "Windows XP." Viewing images on your camera. • Operations are not guaranteed for Windows only) Communications between your camera and your computer may not recover after recovering from Suspend or Sleep. • Microsoft, Windows and Windows ...
...the camera from your computer, which was converted to another file format, the "FILE ERROR" message may appear and you connect two or more The USB connector must be installed at the same time as standard. Operation is not assured in this manual. • In this manual, ...a single computer or use a hub, operation is referred to as "Windows XP." Viewing images on your camera. • Operations are not guaranteed for Windows only) Communications between your camera and your computer may not recover after recovering from Suspend or Sleep. • Microsoft, Windows and Windows ...

Operating Instructions
Page 42
...Ver.1.0 for Sony" You can easily view a still image and/or moving image recorded by your camera using the "PIXELA ImageMixer Ver.1.0 for Sony" in accordance with your computer. Before operation If you are indicated in the CD-ROM drive of your camera. The "DirectX...(R) Setup" screen appears. 4 Click "Install." The title screen appears after a moment. If you are using Windows 2000 and Windows XP, log in as an administrator. 1 Turn on the CD-ROM supplied with the instructions displayed on your computer. 2 Insert the supplied CD-ROM in the operation manual...
...Ver.1.0 for Sony" You can easily view a still image and/or moving image recorded by your camera using the "PIXELA ImageMixer Ver.1.0 for Sony" in accordance with your computer. Before operation If you are indicated in the CD-ROM drive of your camera. The "DirectX...(R) Setup" screen appears. 4 Click "Install." The title screen appears after a moment. If you are using Windows 2000 and Windows XP, log in as an administrator. 1 Turn on the CD-ROM supplied with the instructions displayed on your computer. 2 Insert the supplied CD-ROM in the operation manual...

Operating Instructions
Page 47
...the manual.html file in the folder in blue characters (site address). If the image is not printed Confirm whether the printer setting is printed. The "ImageMixer Help" screen appears. 2 You can find detailed information about "PIXELA ImageMixer Ver.1.0 for Sony" ImageMixer Ver.1.0 for Sony." The...can access the information you have any questions about procedures and functions of "PIXELA ImageMixer Ver.1.0 for Sony is installed. For Macintosh users Use your printer for Sony is a trademark of the screen. Click "OK." See the operating instructions supplied with your web browser...
...the manual.html file in the folder in blue characters (site address). If the image is not printed Confirm whether the printer setting is printed. The "ImageMixer Help" screen appears. 2 You can find detailed information about "PIXELA ImageMixer Ver.1.0 for Sony" ImageMixer Ver.1.0 for Sony." The...can access the information you have any questions about procedures and functions of "PIXELA ImageMixer Ver.1.0 for Sony is installed. For Macintosh users Use your printer for Sony is a trademark of the screen. Click "OK." See the operating instructions supplied with your web browser...

Operating Instructions
Page 49
... You cannot clear the menu bar on the control button to enter the item. The color of the selected item or the frame of this manual refers to execute each function. Before performing advanced operations Turning on/off the operation buttons (menu bar) on the LCD screen Press v to display the...
... You cannot clear the menu bar on the control button to enter the item. The color of the selected item or the frame of this manual refers to execute each function. Before performing advanced operations Turning on/off the operation buttons (menu bar) on the LCD screen Press v to display the...

Operating Instructions
Page 64
... subject or the auto focus does not work well. 1 2 1 Set the PLAY/STILL/MOVIE selector to STILL or MOVIE. 2 Press FOCUS repeatedly until a sharp focus is automatically adjusted. The manual focus indicator appears on the LCD screen. Use the information as flower or insect from close... up. 1 2 1 Set the PLAY/STILL/MOVIE selector to STILL or MOVIE. 2 Press FOCUS repeatedly until the (macro) indicator...
... subject or the auto focus does not work well. 1 2 1 Set the PLAY/STILL/MOVIE selector to STILL or MOVIE. 2 Press FOCUS repeatedly until a sharp focus is automatically adjusted. The manual focus indicator appears on the LCD screen. Use the information as flower or insect from close... up. 1 2 1 Set the PLAY/STILL/MOVIE selector to STILL or MOVIE. 2 Press FOCUS repeatedly until the (macro) indicator...

Operating Instructions
Page 67
... exposure toward +, and when recording a subject with extremely bright illumination such as shown below, we recommend that you adjust the exposure manually. You can select values ranging from the menu. 3 Select the desired exposure value. When recording a backlighted subject or a subject ...in steps of 1/3 EV. Tips Normally, the camera automatically adjusts the exposure. Adjusting the exposure (EXPOSURE) 1 2, 3 1 Set the PLAY/STILL/MOVIE selector to STILL or MOVIE. 2 Select [CAMERA] and then [EXPOSURE] from +2.0 EV to −2.0 EV in the snow, set...
... exposure toward +, and when recording a subject with extremely bright illumination such as shown below, we recommend that you adjust the exposure manually. You can select values ranging from the menu. 3 Select the desired exposure value. When recording a backlighted subject or a subject ...in steps of 1/3 EV. Tips Normally, the camera automatically adjusts the exposure. Adjusting the exposure (EXPOSURE) 1 2, 3 1 Set the PLAY/STILL/MOVIE selector to STILL or MOVIE. 2 Select [CAMERA] and then [EXPOSURE] from +2.0 EV to −2.0 EV in the snow, set...
Operating Instructions
Page 99
...83 Clip Motion 59 CLOCK SET 14 Control button 48 COPY 77 D DELETE 75 , DEMO 55 DIGITAL ZOOM .....21 54 DISK COPY 79 DISK TOOL 51 DPOF 80 E Editing COPY 77 DELETE 75 ...pack 9 86 , ISO film speed ..........54 65 J , , JPEG 18 27 41 M Macro recording 64 Manual focusing 64 "Memory Stick" Copying 77 Format 81 Inserting 17 Number of recordable images 58 ,62 63 60,...14 SHARPNESS 54 Single display 70 SLIDE SHOW 72 Still image Playback 24 Recording 18 T TEXT mode 62 TIFF 63 U USB 27 Using flash 22 Using your camera abroad 85 V Viewing images using a computer 27...
...83 Clip Motion 59 CLOCK SET 14 Control button 48 COPY 77 D DELETE 75 , DEMO 55 DIGITAL ZOOM .....21 54 DISK COPY 79 DISK TOOL 51 DPOF 80 E Editing COPY 77 DELETE 75 ...pack 9 86 , ISO film speed ..........54 65 J , , JPEG 18 27 41 M Macro recording 64 Manual focusing 64 "Memory Stick" Copying 77 Format 81 Inserting 17 Number of recordable images 58 ,62 63 60,...14 SHARPNESS 54 Single display 70 SLIDE SHOW 72 Still image Playback 24 Recording 18 T TEXT mode 62 TIFF 63 U USB 27 Using flash 22 Using your camera abroad 85 V Viewing images using a computer 27...


