
Operating Instructions (primary manual)
Page 2
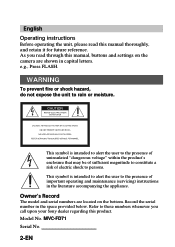
... of important operating and maintenance (servicing) instructions in the space provided below. Record the serial number in the literature accompanying the appliance. MVC-FD71 Serial No. 2-EN As you call upon your Sony dealer regarding this product. WARNING To prevent fire or shock hazard, do not expose the unit to persons. English Operating instructions Before operating the unit, please read through this manual, buttons and settings...
... of important operating and maintenance (servicing) instructions in the space provided below. Record the serial number in the literature accompanying the appliance. MVC-FD71 Serial No. 2-EN As you call upon your Sony dealer regarding this product. WARNING To prevent fire or shock hazard, do not expose the unit to persons. English Operating instructions Before operating the unit, please read through this manual, buttons and settings...
Operating Instructions (primary manual)
Page 3
... equipment off and on, the user is connected. - These limits are cautioned that any changes or modifications not expressly approved in this manual could void your nearest Sony Service Center or Factory Service Center. This equipment generates, uses, and can radiate radio frequency energy and, if not installed and used in accordance with the limits for help. Consult the dealer or an...
... equipment off and on, the user is connected. - These limits are cautioned that any changes or modifications not expressly approved in this manual could void your nearest Sony Service Center or Factory Service Center. This equipment generates, uses, and can radiate radio frequency energy and, if not installed and used in accordance with the limits for help. Consult the dealer or an...
Operating Instructions (primary manual)
Page 5
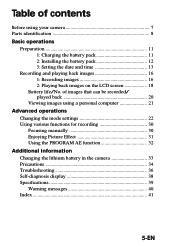
... operations 22 Changing the mode settings 22 Using various functions for recording 30 Focusing manually 30 Enjoying Picture Effect 31 Using the PROGRAM AE function 32 Additional information 33 Changing the lithium battery in the camera 33 Precautions 34 Troubleshooting 36 Self-diagnosis display 38 Specifications 39 Warning messages 40 Index 41 5-EN TaMbVlCe-FDo71(fE) contents Table of images that can be recorded/ played back 20 Viewing images using your camera 7 Parts identification 8 Basic operations 11 Preparation 11 1: Charging...
... operations 22 Changing the mode settings 22 Using various functions for recording 30 Focusing manually 30 Enjoying Picture Effect 31 Using the PROGRAM AE function 32 Additional information 33 Changing the lithium battery in the camera 33 Precautions 34 Troubleshooting 36 Self-diagnosis display 38 Specifications 39 Warning messages 40 Index 41 5-EN TaMbVlCe-FDo71(fE) contents Table of images that can be recorded/ played back 20 Viewing images using your camera 7 Parts identification 8 Basic operations 11 Preparation 11 1: Charging...
Operating Instructions (primary manual)
Page 6
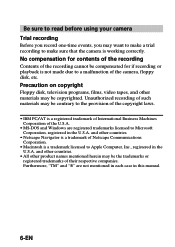
...-DOS and Windows are not mentioned in each case in this manual. 6-EN Unauthorized recording of such materials may be compensated for if recording or playback is a trademark licensed to a malfunction of their respective companies. Be sure to read before using your camera Trial recording Before you record one-time events, you may want to make sure that the camera is working correctly...
...-DOS and Windows are not mentioned in each case in this manual. 6-EN Unauthorized recording of such materials may be compensated for if recording or playback is a trademark licensed to a malfunction of their respective companies. Be sure to read before using your camera Trial recording Before you record one-time events, you may want to make sure that the camera is working correctly...

Operating Instructions (primary manual)
Page 7
... and follow instructions on how to use floppy disks or image and memory data breakdown, damage or loss may occur. Do not get the unit wet. Supplied accessories Digital still camera (1) Power cord (1 set) Shoulder strap (1) Battery charger (1) NP-F330 battery pack (1) Lens cap (1) 7-EN Back up recommendations To avoid the potential risk of data loss always copy (back up) data to get the unit wet When taking pictures outdoors in...
... and follow instructions on how to use floppy disks or image and memory data breakdown, damage or loss may occur. Do not get the unit wet. Supplied accessories Digital still camera (1) Power cord (1 set) Shoulder strap (1) Battery charger (1) NP-F330 battery pack (1) Lens cap (1) 7-EN Back up recommendations To avoid the potential risk of data loss always copy (back up) data to get the unit wet When taking pictures outdoors in...
Operating Instructions (primary manual)
Page 9
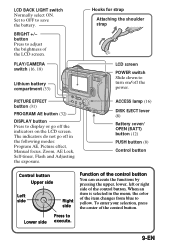
... LCD screen. PICTURE EFFECT button (31) PROGRAM AE button (32) DISPLAY button Press to Lower side execute. BRIGHT +/- ACCESS lamp (16) DISK EJECT lever (8) Battery cover/ OPEN (BATT) button (12) PUSH button (8) Control button Control button Upper side Left side Right side Press to display or go off the power. When an item is selected in the following modes: Program AE, Picture effect, Manual focus, Zoom, AE Lock, Self-timer, Flash and Adjusting the exposure. LCD BACK LIGHT switch Normally select ON. Function...
... LCD screen. PICTURE EFFECT button (31) PROGRAM AE button (32) DISPLAY button Press to Lower side execute. BRIGHT +/- ACCESS lamp (16) DISK EJECT lever (8) Battery cover/ OPEN (BATT) button (12) PUSH button (8) Control button Control button Upper side Left side Right side Press to display or go off the power. When an item is selected in the following modes: Program AE, Picture effect, Manual focus, Zoom, AE Lock, Self-timer, Flash and Adjusting the exposure. LCD BACK LIGHT switch Normally select ON. Function...

Operating Instructions (primary manual)
Page 12
... toward the battery compartment. To remove the battery pack Open the battery cover. Close the cover. ÷ Preparation Installing the battery pack 1 Open the battery cover. Auto power-off function During recording if you leave the camera inactive for about 3 minutes while the power is on, the camera turns off automatically to the time for which the battery lasts if you simply keep the camera on recording or playing back images*. Be careful...
... toward the battery compartment. To remove the battery pack Open the battery cover. Close the cover. ÷ Preparation Installing the battery pack 1 Open the battery cover. Auto power-off function During recording if you leave the camera inactive for about 3 minutes while the power is on, the camera turns off automatically to the time for which the battery lasts if you simply keep the camera on recording or playing back images*. Be careful...
Operating Instructions (primary manual)
Page 13
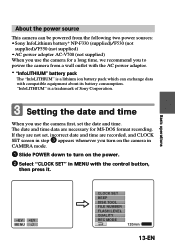
... turn on the power. 2 Select "CLOCK SET" in CAMERA mode. 1 Slide POWER down to power the camera from a wall outlet with the AC power adaptor. * "InfoLITHIUM" battery pack The "InfoLITHIUM" is a trademark of Sony Corporation. Setting the date and time When you use the camera for MS-DOS format recording. Basic operations -EV +EV MENU ÷ CLOCK SET BEEP DISK TOOL FILE NUMBER FLASH LEVEL QUALITY REC MODE 120min 13-EN The date and time data are not set the date...
... turn on the power. 2 Select "CLOCK SET" in CAMERA mode. 1 Slide POWER down to power the camera from a wall outlet with the AC power adaptor. * "InfoLITHIUM" battery pack The "InfoLITHIUM" is a trademark of Sony Corporation. Setting the date and time When you use the camera for MS-DOS format recording. Basic operations -EV +EV MENU ÷ CLOCK SET BEEP DISK TOOL FILE NUMBER FLASH LEVEL QUALITY REC MODE 120min 13-EN The date and time data are not set the date...

Operating Instructions (primary manual)
Page 16
... image is recorded on the disk, the ACCESS lamp flashes. Press the shutter button fully down . The number of images you can record on a floppy disk About 25 - 40 images with all default settings. (p. 24) Note When the image is flashing, never shake or strike the unit. AE (auto exposure), AWB (auto white 3 balance) and AF (auto focus) are frozen. ACCESS lamp 1 Set PLAY/CAMERA to turn the power off or remove the battery pack or floppy disk. Otherwise, the image data...
... image is recorded on the disk, the ACCESS lamp flashes. Press the shutter button fully down . The number of images you can record on a floppy disk About 25 - 40 images with all default settings. (p. 24) Note When the image is flashing, never shake or strike the unit. AE (auto exposure), AWB (auto white 3 balance) and AF (auto focus) are frozen. ACCESS lamp 1 Set PLAY/CAMERA to turn the power off or remove the battery pack or floppy disk. Otherwise, the image data...

Operating Instructions (primary manual)
Page 17
... indicator Remaining battery time indicator Basic operations * Only displayed during recording The indicators on the LCD screen are not recorded. QUALITY (p. 25) Selecting the flash level - FILE NUMBER (p. 25) 17-EN Flash indicator /Flash level indicator Manual focusing Program AE indicator Exposure/Zoom indicator* Picture effect indicator LCD brightness indicator* Adjusting the exposure button MENU button Self-timer button f W T SEPIA -EV +EV MENU BMP STD 10 E : 91 : 01 AE lock indicator Self-timer indicator Recording mode indicator Image quality indicator Remaining disk...
... indicator Remaining battery time indicator Basic operations * Only displayed during recording The indicators on the LCD screen are not recorded. QUALITY (p. 25) Selecting the flash level - FILE NUMBER (p. 25) 17-EN Flash indicator /Flash level indicator Manual focusing Program AE indicator Exposure/Zoom indicator* Picture effect indicator LCD brightness indicator* Adjusting the exposure button MENU button Self-timer button f W T SEPIA -EV +EV MENU BMP STD 10 E : 91 : 01 AE lock indicator Self-timer indicator Recording mode indicator Image quality indicator Remaining disk...

Operating Instructions (primary manual)
Page 19
...-EN COPY (p. 27) Deleting images - Functions you can use for playback of recorded images Adjusting the brightness of the playback image Remaining battery time indicator Slide show (p. 23) Protecting images - Basic operations The indicators during playback Image number File type indicator MVC-011S MENU INDEX STD 11/12 1998 7 4 12:30PM 120min Image quality indicator Remaining disk capacity indicator Number of stored images in the floppy disk File name Recording date of the LCD screen (p. 9) Playing back recorded images like an animated slide show button * INDEX button MENU button...
...-EN COPY (p. 27) Deleting images - Functions you can use for playback of recorded images Adjusting the brightness of the playback image Remaining battery time indicator Slide show (p. 23) Protecting images - Basic operations The indicators during playback Image number File type indicator MVC-011S MENU INDEX STD 11/12 1998 7 4 12:30PM 120min Image quality indicator Remaining disk capacity indicator Number of stored images in the floppy disk File name Recording date of the LCD screen (p. 9) Playing back recorded images like an animated slide show button * INDEX button MENU button...

Operating Instructions (primary manual)
Page 22
... yellow. When the setting is selected, the color of step 1. Changing the mode settings 1 Select "MENU" with the control button, then press it . CAMERA mode PLAY mode CLOCK SET BEEP DISK TOOL FILE NUMBER FLASH LEVEL QUALITY REC MODE 120min CLOCK SET BEEP DISK TOOL DELETE COPY PROTECT 120min 2 Select desired item with the control button, then press it. CLOCK SET BEEP DISK TOOL FILE NUMBER FLASH LEVEL QUALITY REC MODE MULTI BITMAP E-MAIL NORMAL 22-EN The menu appears on the LCD screen.
... yellow. When the setting is selected, the color of step 1. Changing the mode settings 1 Select "MENU" with the control button, then press it . CAMERA mode PLAY mode CLOCK SET BEEP DISK TOOL FILE NUMBER FLASH LEVEL QUALITY REC MODE 120min CLOCK SET BEEP DISK TOOL DELETE COPY PROTECT 120min 2 Select desired item with the control button, then press it. CLOCK SET BEEP DISK TOOL FILE NUMBER FLASH LEVEL QUALITY REC MODE MULTI BITMAP E-MAIL NORMAL 22-EN The menu appears on the LCD screen.

Operating Instructions (primary manual)
Page 24
... zoom is not emptied. • 1/4-size E-mail files are fixed to record 55 images or above, "DISK FULL" appears on the LCD screen. • In MULTI mode, the program AE, picture effect and focus are stored in BITMAP mode. After recording the BITMAP picture, "DISK FULL" appears on the LCD screen and you attempt to the selected mode and effect, respectively, and the flash is needed when recording in another folder. ÷Changing the mode settings Recording mode...
... zoom is not emptied. • 1/4-size E-mail files are fixed to record 55 images or above, "DISK FULL" appears on the LCD screen. • In MULTI mode, the program AE, picture effect and focus are stored in BITMAP mode. After recording the BITMAP picture, "DISK FULL" appears on the LCD screen and you attempt to the selected mode and effect, respectively, and the flash is needed when recording in another folder. ÷Changing the mode settings Recording mode...

Operating Instructions (primary manual)
Page 26
... protect a displayed image(s) from the menu while the image is displayed on the floppy disk. •Select SELECT to protect selected images. 1 Use the control button to display the red " mark at the upper left side of the image. To cancel selection, press the control button again. In INDEX screen mode •Select ALL to protect all the images on the LCD screen. To cancel protecting image, select "CANCEL" with the control button, then press it . ÷Changing...
... protect a displayed image(s) from the menu while the image is displayed on the floppy disk. •Select SELECT to protect selected images. 1 Use the control button to display the red " mark at the upper left side of the image. To cancel selection, press the control button again. In INDEX screen mode •Select ALL to protect all the images on the LCD screen. To cancel protecting image, select "CANCEL" with the control button, then press it . ÷Changing...

Operating Instructions (primary manual)
Page 28
... delete the protected image. • When you select "SELECT" , you want to another floppy disk, select "CONTINUE" with the control button, the press it . ÷Changing the mode settings 4 Once copying is completed, the message "COMPLETE" is displayed on a floppy disk halfway (in steps 2 through 4), turn off the camera. In INDEX screen mode •Select ALL to delete all the images on the floppy disk. •Select SELECT to delete selected images. 1 Use the control button...
... delete the protected image. • When you select "SELECT" , you want to another floppy disk, select "CONTINUE" with the control button, the press it . ÷Changing the mode settings 4 Once copying is completed, the message "COMPLETE" is displayed on a floppy disk halfway (in steps 2 through 4), turn off the camera. In INDEX screen mode •Select ALL to delete all the images on the floppy disk. •Select SELECT to delete selected images. 1 Use the control button...

Operating Instructions (primary manual)
Page 29
... operations Formatting and copying takes about 1 minutes maximum. • Be sure to use the formatted floppy disk to another . To copy all data stored in a floppy disk to set the date and time. CLOCK SET Select this item to another 1 Select "DISK COPY", then "OK". Check the contents of the above steps from 1 through 4, turn the beep sound off the camera. • Formatting erases all information on the floppy disk, and with copying disk...
... operations Formatting and copying takes about 1 minutes maximum. • Be sure to use the formatted floppy disk to another . To copy all data stored in a floppy disk to set the date and time. CLOCK SET Select this item to another 1 Select "DISK COPY", then "OK". Check the contents of the above steps from 1 through 4, turn the beep sound off the camera. • Formatting erases all information on the floppy disk, and with copying disk...
Operating Instructions (primary manual)
Page 33
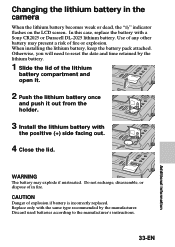
..., the "I" indicator flashes on the LCD screen. Otherwise, you will need to the manufacturer's instructions. 33-EN Additional information Replace only with the same type recommended by the lithium battery. 1 Slide the lid of fire or explosion. Discard used batteries according to reset the date and time retained by the manufacturer. WARNING The battery may present a risk of the lithium battery compartment and open it. 2 Push...
..., the "I" indicator flashes on the LCD screen. Otherwise, you will need to the manufacturer's instructions. 33-EN Additional information Replace only with the same type recommended by the lithium battery. 1 Slide the lid of fire or explosion. Discard used batteries according to reset the date and time retained by the manufacturer. WARNING The battery may present a risk of the lithium battery compartment and open it. 2 Push...
Operating Instructions (primary manual)
Page 36
... when shooting a very bright subject. n Charge the battery pack fully. • The battery pack has served its time. You cannot record images. n Place the camera away from the TV, etc. • You are recorded. Cause and/or Solution • The camera does not operate when using a battery pack that uses strong magnets. n Use an "InfoLITHIUM" battery pack. (p. 13) • The floppy disk is insufficient. n Replace the battery pack with the light...
... when shooting a very bright subject. n Charge the battery pack fully. • The battery pack has served its time. You cannot record images. n Place the camera away from the TV, etc. • You are recorded. Cause and/or Solution • The camera does not operate when using a battery pack that uses strong magnets. n Use an "InfoLITHIUM" battery pack. (p. 13) • The floppy disk is insufficient. n Replace the battery pack with the light...
Operating Instructions (primary manual)
Page 37
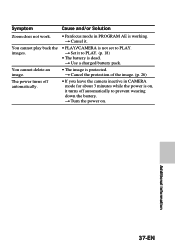
... not set to PLAY. (p. 18) • The battery is dead. n Use a charged battery pack. Additional information 37-EN The power turns off automatically to prevent wearing down the battery. n Turn the power on , it turns off automatically. • The image is protected. n Cancel the protection of the image. (p. 26) • If you leave the camera inactive in PROGRAM AE is working. You cannot delete an image. Symptom Cause and/or Solution Zoom...
... not set to PLAY. (p. 18) • The battery is dead. n Use a charged battery pack. Additional information 37-EN The power turns off automatically to prevent wearing down the battery. n Turn the power on , it turns off automatically. • The image is protected. n Cancel the protection of the image. (p. 26) • If you leave the camera inactive in PROGRAM AE is working. You cannot delete an image. Symptom Cause and/or Solution Zoom...
Operating Instructions (primary manual)
Page 41
... 21, 23 Lithium battery 35 M Manual focusing 30 Menu 22 Moisture condensation .......... 35 MULTI 23 N, P Normal charge 11 PICTURE EFFECT 31 Playing back 18 PROGRAM AE 32 PROTECT 26 R REC MODE 23 Recording 16 Remaining battery indicator 17, 19 S, T Self-diagnosis display 38 Self timer 10 Setting the date and time ....... 13 Solar window 10 Troubleshooting 36 U, V Using flash 10 Viewing images using a personal computer 21 W, Z Watching on the LCD screen ..... 18 Warning messages 40 Zoom 10 41-EN Additional...
... 21, 23 Lithium battery 35 M Manual focusing 30 Menu 22 Moisture condensation .......... 35 MULTI 23 N, P Normal charge 11 PICTURE EFFECT 31 Playing back 18 PROGRAM AE 32 PROTECT 26 R REC MODE 23 Recording 16 Remaining battery indicator 17, 19 S, T Self-diagnosis display 38 Self timer 10 Setting the date and time ....... 13 Solar window 10 Troubleshooting 36 U, V Using flash 10 Viewing images using a personal computer 21 W, Z Watching on the LCD screen ..... 18 Warning messages 40 Zoom 10 41-EN Additional...


