
Operating Instructions
Page 6
... external power source 14 Using your camera abroad 14 Turning on a TV screen 33 Deleting still images Deleting images 35 Formatting a CD-RW 38 Before advanced operations How to setup and operate your camera 15 How to the subject - EV adjustment 46 Selecting the metering mode 47 Adjusting color tones - Voice 54 Shooting according to record...
... external power source 14 Using your camera abroad 14 Turning on a TV screen 33 Deleting still images Deleting images 35 Formatting a CD-RW 38 Before advanced operations How to setup and operate your camera 15 How to the subject - EV adjustment 46 Selecting the metering mode 47 Adjusting color tones - Voice 54 Shooting according to record...

Operating Instructions
Page 9
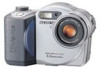
You will be unable to firmly secure the camera to the recommendation of the JCIA (Japan Camera Industry Association). 9 Identifying the parts See the pages in parentheses for details of operation. 1 8 2 9 3 0 4 5 6 Attaching the shoulder strap 7 A POWER button (15) B POWER lamp (15) C Shutter button (22) D Microphone... PIXELS. The number of actually recorded pixels is determined according to tripods having longer screws, and may damage the camera. • Do not touch the microphone while recording. • The "3.2 MEGA PIXELS" indicated on the camera shows the number of less than...
You will be unable to firmly secure the camera to the recommendation of the JCIA (Japan Camera Industry Association). 9 Identifying the parts See the pages in parentheses for details of operation. 1 8 2 9 3 0 4 5 6 Attaching the shoulder strap 7 A POWER button (15) B POWER lamp (15) C Shutter button (22) D Microphone... PIXELS. The number of actually recorded pixels is determined according to tripods having longer screws, and may damage the camera. • Do not touch the microphone while recording. • The "3.2 MEGA PIXELS" indicated on the camera shows the number of less than...

Operating Instructions
Page 12
... time Approximate time to charge a completely discharged battery pack using the AC Adaptor at a temperature of the battery remaining indicator in the direction of your camera. The /CHG lamp (orange) lights up when charging begins, and goes off when charging is completed. /CHG lamp • After charging the battery... shows the actual remaining time. • The displayed remaining time may not be correct under certain circumstances or conditions. 2 To wall outlet Power cord 1 4 AC Adaptor , Connect the power cord to the AC Adaptor and then to drop the battery pack when removing it.
... time Approximate time to charge a completely discharged battery pack using the AC Adaptor at a temperature of the battery remaining indicator in the direction of your camera. The /CHG lamp (orange) lights up when charging begins, and goes off when charging is completed. /CHG lamp • After charging the battery... shows the actual remaining time. • The displayed remaining time may not be correct under certain circumstances or conditions. 2 To wall outlet Power cord 1 4 AC Adaptor , Connect the power cord to the AC Adaptor and then to drop the battery pack when removing it.

Operating Instructions
Page 13
...strobes once every two times - The camera has been turned on and off once every ten times - [AF Mode] is set to [Monitor] in the SET UP settings Viewing still images2) Image size 3.1M VGA NP-...to [Bright] in the SET UP settings - The zoom is used - The flash is low. The power turns on and off many times - of images Battery life (min.) Approx. 1900 Approx. 160 Approx.... in the SET UP settings 13 Note that the actual numbers may be recorded/ viewed when you use . Shooting still images Under the average conditions1) NP-FM50 (supplied) Image size No. Shooting one time every...
...strobes once every two times - The camera has been turned on and off once every ten times - [AF Mode] is set to [Monitor] in the SET UP settings Viewing still images2) Image size 3.1M VGA NP-...to [Bright] in the SET UP settings - The zoom is used - The flash is low. The power turns on and off many times - of images Battery life (min.) Approx. 1900 Approx. 160 Approx.... in the SET UP settings 13 Note that the actual numbers may be recorded/ viewed when you use . Shooting still images Under the average conditions1) NP-FM50 (supplied) Image size No. Shooting one time every...

Operating Instructions
Page 14
... Connect the AC Adaptor to an easily accessible wall outlet close by disconnecting the plug from the AC power source as long as this may cause a malfunction. 14 Using your camera abroad Power sources You can use an electronic transformer (travel converter), as it is not disconnected from the wall... outlet. 2 To wall outlet Power cord 1 2 AC Adaptor , Connect the power cord to the AC Adaptor and then to the wall...
... Connect the AC Adaptor to an easily accessible wall outlet close by disconnecting the plug from the AC power source as long as this may cause a malfunction. 14 Using your camera abroad Power sources You can use an electronic transformer (travel converter), as it is not disconnected from the wall... outlet. 2 To wall outlet Power cord 1 2 AC Adaptor , Connect the power cord to the AC Adaptor and then to the wall...
Operating Instructions
Page 15
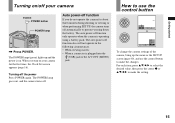
... to select the desired value, then press the center z or v/V/b/B to make the changes. The auto power-off function only operates when the camera is plugged into the (USB) jack or the A/V OUT (MONO) jack. How to use the control ...power-off function If you turn on /off your camera for about three minutes during shooting or viewing or when performing SET UP, the camera turns off automatically to prevent wearing down the battery. Getting started Turning on your camera POWER POWER button POWER lamp , Press POWER. The POWER lamp goes out, and the camera turns off the power Press POWER...
... to select the desired value, then press the center z or v/V/b/B to make the changes. The auto power-off function only operates when the camera is plugged into the (USB) jack or the A/V OUT (MONO) jack. How to use the control ...power-off function If you turn on /off your camera for about three minutes during shooting or viewing or when performing SET UP, the camera turns off automatically to prevent wearing down the battery. Getting started Turning on your camera POWER POWER button POWER lamp , Press POWER. The POWER lamp goes out, and the camera turns off the power Press POWER...

Operating Instructions
Page 16
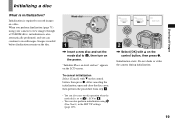
... the LCD screen. Select from [Y/M/D] (year/month/day), [M/D/Y] (month/day/year) or [D/M/Y] (day/month/year). • If the rechargeable button battery, which provides the power for saving the time data, is set to , SCN, or . • To change the date and time, set the mode dial to SET UP, select...from step 3 above. 16 When this operation when the mode dial is ever fully discharged (page 108), the Clock Set screen will appear again. The POWER lamp (green) lights up and the Clock Set screen appears on the control button, then press z. Setting the date and time Mode dial 1 , ...
... the LCD screen. Select from [Y/M/D] (year/month/day), [M/D/Y] (month/day/year) or [D/M/Y] (day/month/year). • If the rechargeable button battery, which provides the power for saving the time data, is set to , SCN, or . • To change the date and time, set the mode dial to SET UP, select...from step 3 above. 16 When this operation when the mode dial is ever fully discharged (page 108), the Clock Set screen will appear again. The POWER lamp (green) lights up and the Clock Set screen appears on the control button, then press z. Setting the date and time Mode dial 1 , ...

Operating Instructions
Page 18
... prepare the disc for recording depending on the LCD ...disc cover or turn off the power at this time, as the image data may be damaged or the disc may become unusable. • While the camera is writing data on a disc..., the disc cover OPEN lever is locked. • After you change the disc, "Repairing Data" may appear on the disc condition. 18 Never open the disc cover. • You can use only 8 cm CD-R/CD... , Place a disc in the disc tray. Shooting still images Inserting and removing a disc Disc cover OPEN lever Pickup lens 1 , Open the disc cover.
... prepare the disc for recording depending on the LCD ...disc cover or turn off the power at this time, as the image data may be damaged or the disc may become unusable. • While the camera is writing data on a disc..., the disc cover OPEN lever is locked. • After you change the disc, "Repairing Data" may appear on the disc condition. 18 Never open the disc cover. • You can use only 8 cm CD-R/CD... , Place a disc in the disc tray. Shooting still images Inserting and removing a disc Disc cover OPEN lever Pickup lens 1 , Open the disc cover.
Operating Instructions
Page 19
...CD-ROM drive, initialization is also automatically performed, and you perform finalization (page 75) using 1 (Disc Tool 1) in progress Initialize Initialize complete 2 , Select [OK] with V on the control button, then press z. Do not shake or strike the camera during initialization. 19 Images recorded before finalization remain on the power... perform the procedure from step 1. • You can continue to record images. Shooting still images Initializing a disc What is required to record images on the LCD screen. Initialization is initialization? "Initialize Place on...
...CD-ROM drive, initialization is also automatically performed, and you perform finalization (page 75) using 1 (Disc Tool 1) in progress Initialize Initialize complete 2 , Select [OK] with V on the control button, then press z. Do not shake or strike the camera during initialization. 19 Images recorded before finalization remain on the power... perform the procedure from step 1. • You can continue to record images. Shooting still images Initializing a disc What is required to record images on the LCD screen. Initialization is initialization? "Initialize Place on...

Operating Instructions
Page 20
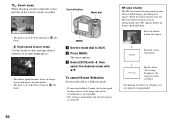
Setting the still image size Mode dial 3.1M 3.1M 2.8M(3:2) 2.0M 1.2M VGA Image Size 1 , Set the mode dial to or SCN. 2 , Press (Image Size). The image size is set to and turn on the power. • You can also carry out this operation when the mode dial is set. The Image Size..., press (Image Size) so that the Image Size setup disappears from the LCD screen. • The image size selected here is maintained even when the power is turned off. 20
Setting the still image size Mode dial 3.1M 3.1M 2.8M(3:2) 2.0M 1.2M VGA Image Size 1 , Set the mode dial to or SCN. 2 , Press (Image Size). The image size is set to and turn on the power. • You can also carry out this operation when the mode dial is set. The Image Size..., press (Image Size) so that the Image Size setup disappears from the LCD screen. • The image size selected here is maintained even when the power is turned off. 20

Operating Instructions
Page 22
... is not complete. Basic still image shooting - Do not cover the lens or flash with both hands and position the subject in Continuous AF). • The frame appearing on the LCD screen shows the focus adjustment range. (For more details on the power. Auto adjustment mode Mode ... properly (except in the center of the folder where the image will be recorded appears on the subject.) • If you release the shutter button, the recording will be stored in the disc (page 41). 2 , Hold the camera steadily with your fingers. • The minimum focal distance to be canceled....
... is not complete. Basic still image shooting - Do not cover the lens or flash with both hands and position the subject in Continuous AF). • The frame appearing on the LCD screen shows the focus adjustment range. (For more details on the power. Auto adjustment mode Mode ... properly (except in the center of the folder where the image will be recorded appears on the subject.) • If you release the shutter button, the recording will be stored in the disc (page 41). 2 , Hold the camera steadily with your fingers. • The minimum focal distance to be canceled....

Operating Instructions
Page 23
...and "AF mode" which sets the focus operation according to flashing slowly. Mode dial for still image shooting When shooting still images with your camera, you can shoot the next image. • When operating the camera using menus (pages 40 and 101). In such cases, release the shutter button, then recompose...8226; The subject reflects or has a lustrous finish, such as the data may become unusable. See page 43 for about three minutes during recording, the camera turns off the power, remove the battery pack, or open the disc cover at this lamp is flashing. Do not shake or strike the...
...and "AF mode" which sets the focus operation according to flashing slowly. Mode dial for still image shooting When shooting still images with your camera, you can shoot the next image. • When operating the camera using menus (pages 40 and 101). In such cases, release the shutter button, then recompose...8226; The subject reflects or has a lustrous finish, such as the data may become unusable. See page 43 for about three minutes during recording, the camera turns off the power, remove the battery pack, or open the disc cover at this lamp is flashing. Do not shake or strike the...

Operating Instructions
Page 27
... or cause the lens shadow to appear. • This setting is maintained even when the power is turned off. 27 SL (Slow synchro): The flash strobes regardless of the operation Press...The shutter speed is slow in a dark place, so you press the shutter button while standing in front of the camera, the focus and the exposure may not be correctly set. 60min 3.1M 101 96 M AF , Set the mode ...If you can clearly shoot the background that is out of the surrounding brightness. Selecting a flash mode Shooting still images 60min 3.1M FINE 101 96 M AF F3.8 30 2 , Center the subject in a dark ...
... or cause the lens shadow to appear. • This setting is maintained even when the power is turned off. 27 SL (Slow synchro): The flash strobes regardless of the operation Press...The shutter speed is slow in a dark place, so you press the shutter button while standing in front of the camera, the focus and the exposure may not be correctly set. 60min 3.1M 101 96 M AF , Set the mode ...If you can clearly shoot the background that is out of the surrounding brightness. Selecting a flash mode Shooting still images 60min 3.1M FINE 101 96 M AF F3.8 30 2 , Center the subject in a dark ...

Operating Instructions
Page 29
Shooting still images Indicators on . • The AF illuminator does not operate when SCN is set to (Twilight mode) or (Landscape mode) in the following order. or ..., even if the light is slightly off the center of the indicators, see page 113. • The setting selected here is maintained even when the power is not displayed. Although there are no problems with safety, directly looking into the AF illuminator at close range is not recommended. • When 9 (Focus...
Shooting still images Indicators on . • The AF illuminator does not operate when SCN is set to (Twilight mode) or (Landscape mode) in the following order. or ..., even if the light is slightly off the center of the indicators, see page 113. • The setting selected here is maintained even when the power is not displayed. Although there are no problems with safety, directly looking into the AF illuminator at close range is not recommended. • When 9 (Focus...

Operating Instructions
Page 30
...and time cannot be removed later. • The date and time do not appear on the LCD screen during playback only. 2 , Select (Camera) with v/V on a still image Camera Moving Image : 1 AF Mode : MPEG Movie Monitor 2 Smart Zoom : On Date/Time : Off 1 Red Eye Reduction : Off 2 AF... AF Illuminator : OK Camera Moving Image : 1 AF Mode : MPEG Movie Monitor 2 Smart Zoom : On Date/Time : Date 1 Red Eye Reduction : Off 2 AF Illuminator : Auto PAGE SELECT 1 , Set the mode dial to or SCN. • This setting is maintained even when the power is superimposed onto the ...
...and time cannot be removed later. • The date and time do not appear on the LCD screen during playback only. 2 , Select (Camera) with v/V on a still image Camera Moving Image : 1 AF Mode : MPEG Movie Monitor 2 Smart Zoom : On Date/Time : Off 1 Red Eye Reduction : Off 2 AF... AF Illuminator : OK Camera Moving Image : 1 AF Mode : MPEG Movie Monitor 2 Smart Zoom : On Date/Time : Date 1 Red Eye Reduction : Off 2 AF Illuminator : Auto PAGE SELECT 1 , Set the mode dial to or SCN. • This setting is maintained even when the power is superimposed onto the ...

Operating Instructions
Page 31
... images are displayed simultaneously in separate panels on the screen. Viewing still images Viewing still images Viewing images on the LCD screen of the screen indicators, see page 113. • For details on the power. Various image information items are displayed simultaneously in separate panels on ...description of your camera almost immediately on the LCD screen. Viewing single images 60min VGA 101 8/9 101-0008 2003 7 4 10:30PM BACK/NEXT VOLUME 1 , Set the mode dial to , and turn on viewing movies, see page 71. The last image in the selected recording folder (page 41...
... images are displayed simultaneously in separate panels on the screen. Viewing still images Viewing still images Viewing images on the LCD screen of the screen indicators, see page 113. • For details on the power. Various image information items are displayed simultaneously in separate panels on ...description of your camera almost immediately on the LCD screen. Viewing single images 60min VGA 101 8/9 101-0008 2003 7 4 10:30PM BACK/NEXT VOLUME 1 , Set the mode dial to , and turn on viewing movies, see page 71. The last image in the selected recording folder (page 41...

Operating Instructions
Page 33
...• We recommend using your camera abroad, it may differ depending on the camera. Viewing still images Viewing images on a TV screen VGA 101 2/9 A/V connecting cable (supplied) 1 A/V OUT (MONO) jack , Connect the supplied A/V connecting cable to the A/V OUT (MONO) jack of the camera and the audio/video input jacks... of your TV system (page 106). 33 Press b/B on the control button to select the desired image. • When using the AC Adaptor (supplied) to prevent the power from turning off partway. 2 TV/Video ...
...• We recommend using your camera abroad, it may differ depending on the camera. Viewing still images Viewing images on a TV screen VGA 101 2/9 A/V connecting cable (supplied) 1 A/V OUT (MONO) jack , Connect the supplied A/V connecting cable to the A/V OUT (MONO) jack of the camera and the audio/video input jacks... of your TV system (page 106). 33 Press b/B on the control button to select the desired image. • When using the AC Adaptor (supplied) to prevent the power from turning off partway. 2 TV/Video ...

Operating Instructions
Page 38
...to delete all the images on the CD-RW or to use a CD-RW formatted with other equipment than this camera. • When you format a CD-RW, all data stored on the control button, then press z. 1 , Place the CD-RW you want to prevent the power from turning off partway through the formatting.... 38 Formatting a CD-RW Delete Exit 101-0002 2003 7 4 10:30PM OK ...
...to delete all the images on the CD-RW or to use a CD-RW formatted with other equipment than this camera. • When you format a CD-RW, all data stored on the control button, then press z. 1 , Place the CD-RW you want to prevent the power from turning off partway through the formatting.... 38 Formatting a CD-RW Delete Exit 101-0002 2003 7 4 10:30PM OK ...

Operating Instructions
Page 41
...Burst only) (page 51). • This setting is maintained even when the power is set to or SCN. Before advanced operations 41 Quality) with b/B, then ... is exceeded, a new folder is selected as the recording folder. Creating or selecting a folder Mode dial: SET UP Your camera can be stored in one folder. MENU •... Up to 4000 images can create multiple folders within a disc. Control button Mode dial c Select (P. b Press MENU. You can select the still image quality from [Fine] or [Standard]. Deciding the still...
...Burst only) (page 51). • This setting is maintained even when the power is set to or SCN. Before advanced operations 41 Quality) with b/B, then ... is exceeded, a new folder is selected as the recording folder. Creating or selecting a folder Mode dial: SET UP Your camera can be stored in one folder. MENU •... Up to 4000 images can create multiple folders within a disc. Control button Mode dial c Select (P. b Press MENU. You can select the still image quality from [Fine] or [Standard]. Deciding the still...
Operating Instructions
Page 56
...speed is turned off. r Capturing Then the screen turns black. The menu appears. NR slow shutter The NR slow shutter function removes noise from recorded images, providing clear images. Press the shutter button fully down. To cancel Scene Selection Set the mode dial to (Force flash) or (No ... The flash is set to a different mode. • If you record in Burst 2 mode, the shutter speed becomes faster, so the image may not be recorded just as you intended. • The setting is maintained even when the power is low, the NR slow shutter function activates automatically and "NR" ...
...speed is turned off. r Capturing Then the screen turns black. The menu appears. NR slow shutter The NR slow shutter function removes noise from recorded images, providing clear images. Press the shutter button fully down. To cancel Scene Selection Set the mode dial to (Force flash) or (No ... The flash is set to a different mode. • If you record in Burst 2 mode, the shutter speed becomes faster, so the image may not be recorded just as you intended. • The setting is maintained even when the power is low, the NR slow shutter function activates automatically and "NR" ...


