
Operating Instructions
Page 6
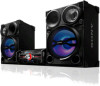
Top view 4 qf qd 4 qs qa qk ql 6US Unit - Front view 1 23 4 5 4 6 7 qj 8 9 9 qh q; qg - Guide to parts and controls This manual mainly explains operations using the unit, but the same operations can also be performed using the buttons on the remote control having the same or similar names.
Top view 4 qf qd 4 qs qa qk ql 6US Unit - Front view 1 23 4 5 4 6 7 qj 8 9 9 qh q; qg - Guide to parts and controls This manual mainly explains operations using the unit, but the same operations can also be performed using the buttons on the remote control having the same or similar names.
Operating Instructions
Page 7
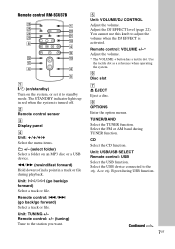
... F Disc slot G Z EJECT Eject a disc. CD Select the CD function. Continued l 7US Remote control RM-SCU37B wh 1 wg w; Remote control: +/- (tuning) Tune to standby mode. Select the FM or AM band during USB function. Remote control: ./> (go back/go forward) Select a track or file. Select the USB device connected.../BAND Select the TUNER function. You cannot use this knob to the A or B port during TUNER function. Unit: USB/USB SELECT Remote control: USB Select the USB function. Remote control: VOLUME +/-* Adjust the volume. * The VOLUME + button has a tactile dot.
... F Disc slot G Z EJECT Eject a disc. CD Select the CD function. Continued l 7US Remote control RM-SCU37B wh 1 wg w; Remote control: +/- (tuning) Tune to standby mode. Select the FM or AM band during USB function. Remote control: ./> (go back/go forward) Select a track or file. Select the USB device connected.../BAND Select the TUNER function. You cannot use this knob to the A or B port during TUNER function. Unit: USB/USB SELECT Remote control: USB Select the USB function. Remote control: VOLUME +/-* Adjust the volume. * The VOLUME + button has a tactile dot.
Operating Instructions
Page 8
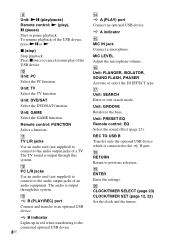
...device. 8US N A (PLAY) port Connect an optional USB device. S ENTER Enter the settings. J Unit: PC Select the PC function. Remote control: FUNCTION Select a function. B indicator Lights up in red when transferring to previous selection. MIC LEVEL Adjust the microphone volume. Unit: ...GROOVE Reinforce the bass. Unit: PRESET EQ Remote control: EQ Select the sound effect (page 21). The audio is output through this system. A indicator O MIC IN jack Connect a microphone...
...device. 8US N A (PLAY) port Connect an optional USB device. S ENTER Enter the settings. J Unit: PC Select the PC function. Remote control: FUNCTION Select a function. B indicator Lights up in red when transferring to previous selection. MIC LEVEL Adjust the microphone volume. Unit: ...GROOVE Reinforce the bass. Unit: PRESET EQ Remote control: EQ Select the sound effect (page 21). The audio is output through this system. A indicator O MIC IN jack Connect a microphone...
Operating Instructions
Page 11
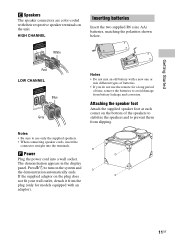
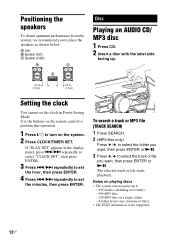
..., remove the batteries to avoid damage from slipping. Press "/1 to turn on the bottom of the speakers to stabilize the speakers and to use the remote for models equipped with their respective speaker terminals on the plug does not fit your wall outlet, detach it from the plug (only for a long...
..., remove the batteries to avoid damage from slipping. Press "/1 to turn on the bottom of the speakers to stabilize the speakers and to use the remote for models equipped with their respective speaker terminals on the plug does not fit your wall outlet, detach it from the plug (only for a long...
Operating Instructions
Page 12
Use the buttons on the remote control to perform this operation. 1 Press "/1 to turn on a single folder. - 8 folder levels (tree structure of files). • CD-TEXT information is not supported. 12US A ...
Use the buttons on the remote control to perform this operation. 1 Press "/1 to turn on a single folder. - 8 folder levels (tree structure of files). • CD-TEXT information is not supported. 12US A ...
Operating Instructions
Page 13
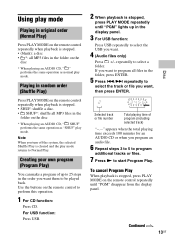
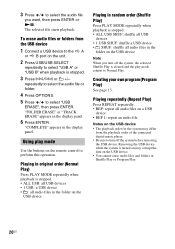
... ENTER. 5 Press ./> repeatedly to select the track or file you want , then press ENTER. Continued l 13US Disc Use the buttons on the remote control to start Program Play. Selected track or file number Total playing time of up in the display panel. 3 For USB function: Press USB repeatedly...tracks or files. 7 Press N to perform this operation. 1 For CD function: Press CD. Playing in random order (Shuffle Play) Press PLAY MODE on the remote control repeatedly when playback is stopped. • SHUF: shuffle a disc. • SHUF*: shuffle all MP3 files in the folder on the disc * When ...
... ENTER. 5 Press ./> repeatedly to select the track or file you want , then press ENTER. Continued l 13US Disc Use the buttons on the remote control to start Program Play. Selected track or file number Total playing time of up in the display panel. 3 For USB function: Press USB repeatedly...tracks or files. 7 Press N to perform this operation. 1 For CD function: Press CD. Playing in random order (Shuffle Play) Press PLAY MODE on the remote control repeatedly when playback is stopped. • SHUF: shuffle a disc. • SHUF*: shuffle all MP3 files in the folder on the disc * When ...
Operating Instructions
Page 14
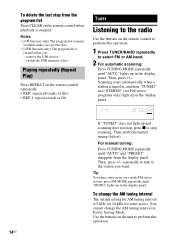
...Notes • (CD function only) The program list remains available until "AUTO" lights up in the display panel. Use the buttons on the remote control to perform this operation. 1 Press TUNER/BAND repeatedly to perform this operation. 14US Scanning stops automatically when a station is stopped. You cannot ...is 9 kHz (or 10 kHz for FM stereo programs only) light up in the display panel. Playing repeatedly (Repeat Play) Press REPEAT on the remote control repeatedly. • REP: repeat all tracks or files • REP 1: repeat a track or file Tuner Listening to the radio Use the...
...Notes • (CD function only) The program list remains available until "AUTO" lights up in the display panel. Use the buttons on the remote control to perform this operation. 1 Press TUNER/BAND repeatedly to perform this operation. 14US Scanning stops automatically when a station is stopped. You cannot ...is 9 kHz (or 10 kHz for FM stereo programs only) light up in the display panel. Playing repeatedly (Repeat Play) Press REPEAT on the remote control repeatedly. • REP: repeat all tracks or files • REP 1: repeat a track or file Tuner Listening to the radio Use the...
Operating Instructions
Page 15
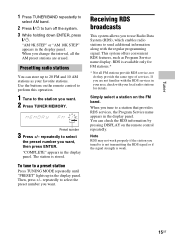
Use the buttons on the remote control to perform this operation. 1 Tune to the station you want. The station is available only for details. repeatedly to 20 FM and 10 AM ... band. "COMPLETE" appears in the display panel. Receiving RDS broadcasts This system allows you want . 2 Press TUNER MEMORY. Then, press +/- Simply select a station on the remote control repeatedly. repeatedly to select the preset number you to use Radio Data System (RDS), which enables radio stations to is not transmitting the RDS...
Use the buttons on the remote control to perform this operation. 1 Tune to the station you want. The station is available only for details. repeatedly to 20 FM and 10 AM ... band. "COMPLETE" appears in the display panel. Receiving RDS broadcasts This system allows you want . 2 Press TUNER MEMORY. Then, press +/- Simply select a station on the remote control repeatedly. repeatedly to select the preset number you to use Radio Data System (RDS), which enables radio stations to is not transmitting the RDS...
Operating Instructions
Page 17
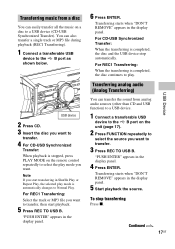
..." appears in the display panel. 4 Press ENTER. "PUSH ENTER" appears in the display panel. 6 Press ENTER. You can easily transfer all the music on the remote control repeatedly to select the play . For CD-USB Synchronized Transfer: When the transferring is automatically changes to Normal Play. USB device 2 Press CD. 3 Insert...
..." appears in the display panel. 4 Press ENTER. "PUSH ENTER" appears in the display panel. 6 Press ENTER. You can easily transfer all the music on the remote control repeatedly to select the play . For CD-USB Synchronized Transfer: When the transferring is automatically changes to Normal Play. USB device 2 Press CD. 3 Insert...
Operating Instructions
Page 18
... and files are generated within this "MUSIC" folder as the transferring source "TRACK001"* 18US Tip A new MP3 file is stopped, press PLAY MODE on the remote control repeatedly to "1 USB". You can easily transfer the audio files from a USB device to transfer, then start playback. 4 Press REC TO USB B. If you...
... and files are generated within this "MUSIC" folder as the transferring source "TRACK001"* 18US Tip A new MP3 file is stopped, press PLAY MODE on the remote control repeatedly to "1 USB". You can easily transfer the audio files from a USB device to transfer, then start playback. 4 Press REC TO USB B. If you...
Operating Instructions
Page 20
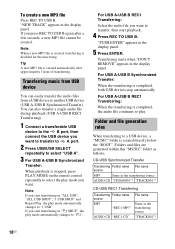
... devices • 1 USB SHUF: shuffle a USB device • SHUF: shuffle all audio files on a USB device • REP 1: repeat an audio file Notes on the remote control to perform this operation. Removing the USB device while the system is turned on may differ from the USB device 1 Connect a USB device to...
... devices • 1 USB SHUF: shuffle a USB device • SHUF: shuffle all audio files on a USB device • REP 1: repeat an audio file Notes on the remote control to perform this operation. Removing the USB device while the system is turned on may differ from the USB device 1 Connect a USB device to...
Operating Instructions
Page 21
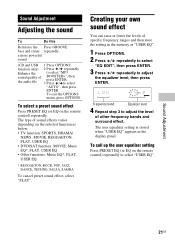
...(CD and USB 1 Press OPTIONS. Creating your own sound effect You can raise or lower the levels of sound effects varies depending on the remote control) repeatedly. The type of specific frequency ranges and then store the setting in the display panel. To call up the user equalizer setting Press... PRESET EQ (or EQ on the remote control) repeatedly to adjust the level of the audio file BOOSTER+", then press ENTER. 3 Press / to adjust the equalizer level, then press ENTER....
...(CD and USB 1 Press OPTIONS. Creating your own sound effect You can raise or lower the levels of sound effects varies depending on the remote control) repeatedly. The type of specific frequency ranges and then store the setting in the display panel. To call up the user equalizer setting Press... PRESET EQ (or EQ on the remote control) repeatedly to adjust the level of the audio file BOOSTER+", then press ENTER. 3 Press / to adjust the equalizer level, then press ENTER....
Operating Instructions
Page 22
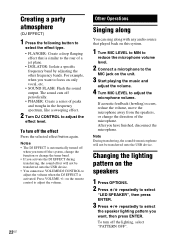
...; ISOLATOR: Isolate a specific frequency band by adjusting the other frequency bands. The sound cuts off the effect Press the selected effect button again. on the remote control to adjust the volume. 22US Other Operations Singing along You can sing along with any audio source that is similar to the roar of...
...; ISOLATOR: Isolate a specific frequency band by adjusting the other frequency bands. The sound cuts off the effect Press the selected effect button again. on the remote control to adjust the volume. 22US Other Operations Singing along You can sing along with any audio source that is similar to the roar of...

Operating Instructions
Page 23
...Play Timer and the Recording Timer will not play or transfer. • Do not operate the system from the time the system turns on the remote control to start from a preset radio station into a USB device at the same time. Use the button on until the playback or transferring starts.... 23US Other Operations To cancel Sleep Timer Press SLEEP on the remote control repeatedly to select "TIMER OFF", then press ENTER. To cancel the timer Press CLOCK/TIMER SELECT, press ./> repeatedly to select "SLEEP OFF"....
...Play Timer and the Recording Timer will not play or transfer. • Do not operate the system from the time the system turns on the remote control to start from a preset radio station into a USB device at the same time. Use the button on until the playback or transferring starts.... 23US Other Operations To cancel Sleep Timer Press SLEEP on the remote control repeatedly to select "TIMER OFF", then press ENTER. To cancel the timer Press CLOCK/TIMER SELECT, press ./> repeatedly to select "SLEEP OFF"....
Operating Instructions
Page 24
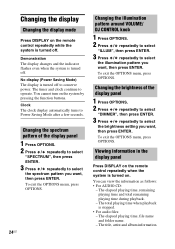
...after a few seconds. The elapsed playing time, file name and folder name. - Viewing information in the display panel Press DISPLAY on the remote control repeatedly when the system is turned on the system by pressing the function buttons. To exit the OPTIONS menu, press OPTIONS. Changing the... display Changing the display mode Press DISPLAY on the remote control repeatedly while the system is turned off to conserve power. Demonstration The display changes and the indicator flashes even when the system ...
...after a few seconds. The elapsed playing time, file name and folder name. - Viewing information in the display panel Press DISPLAY on the remote control repeatedly when the system is turned on the system by pressing the function buttons. To exit the OPTIONS menu, press OPTIONS. Changing the... display Changing the display mode Press DISPLAY on the remote control repeatedly while the system is turned off to conserve power. Demonstration The display changes and the indicator flashes even when the system ...
Operating Instructions
Page 25
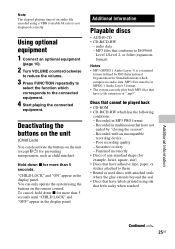
... that cannot be in the display panel. Hold down x for more than 5 seconds. Recorded in the display panel. You can deactivate the buttons on the remote control. MP3 files that have adhesive tape, paper, or sticker attached to the connected equipment. 4 Start playing the connected equipment.
... that cannot be in the display panel. Hold down x for more than 5 seconds. Recorded in the display panel. You can deactivate the buttons on the remote control. MP3 files that have adhesive tape, paper, or sticker attached to the connected equipment. 4 Start playing the connected equipment.
Operating Instructions
Page 27
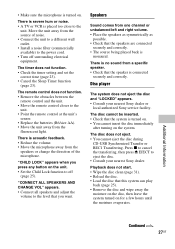
.... • Move the remote control closer to off surrounding electrical equipment. "CHILD LOCK" appears when you want. Speakers Sound comes from the source of the microphone. Disc player The system does not eject the disc and "LOCKED" appears. • Consult your nearest Sony dealer. The disc does ...or local authorized Sony service facility. Playback does not start. • Wipe the disc clean (page 31). • Reload the disc. • Load the disc that you press any button on the unit. • Set the Child Lock function to the unit. • Point the remote control at the ...
.... • Move the remote control closer to off surrounding electrical equipment. "CHILD LOCK" appears when you want. Speakers Sound comes from the source of the microphone. Disc player The system does not eject the disc and "LOCKED" appears. • Consult your nearest Sony dealer. The disc does ...or local authorized Sony service facility. Playback does not start. • Wipe the disc clean (page 31). • Reload the disc. • Load the disc that you press any button on the unit. • Set the Child Lock function to the unit. • Point the remote control at the ...
Operating Instructions
Page 33
... × 720 mm × 500 mm (20 1/8 in × 28 3/8 in × 19 3/4 in ) Mass (excl. speakers) (Approx.) 10.0 kg (22 lb 1 oz) Supplied accessories Remote control (1) R6 (Size AA) batteries (2) FM lead/AM loop antenna (1) Speaker foot (8) Design and specifications are subject to -noise ratio More than 90 dB Dynamic...
... × 720 mm × 500 mm (20 1/8 in × 28 3/8 in × 19 3/4 in ) Mass (excl. speakers) (Approx.) 10.0 kg (22 lb 1 oz) Supplied accessories Remote control (1) R6 (Size AA) batteries (2) FM lead/AM loop antenna (1) Speaker foot (8) Design and specifications are subject to -noise ratio More than 90 dB Dynamic...


