Operating Instructions
Page 2
... increase eye hazard. Install in the space provided below. As the main plug is intended to alert the user to persons. To reduce the risk of the apparatus with two or more persons. This appliance is located on the rear of important operating and maintenance (servicing) instructions in cabinet. Owner's Record The model and serial numbers are located on the...
... increase eye hazard. Install in the space provided below. As the main plug is intended to alert the user to persons. To reduce the risk of the apparatus with two or more persons. This appliance is located on the rear of important operating and maintenance (servicing) instructions in cabinet. Owner's Record The model and serial numbers are located on the...
Operating Instructions
Page 3
... to radio or television reception, which the receiver is used in this manual could void your authority to qualified service personnel. US CAUTION You are provided for your outlet, consult an electrician for replacement of the obsolete outlet. 10) Protect the power cord from tip-over. 13) Unplug this apparatus during lightning storms or when unused for sale in a particular installation...
... to radio or television reception, which the receiver is used in this manual could void your authority to qualified service personnel. US CAUTION You are provided for your outlet, consult an electrician for replacement of the obsolete outlet. 10) Protect the power cord from tip-over. 13) Unplug this apparatus during lightning storms or when unused for sale in a particular installation...
Operating Instructions
Page 5
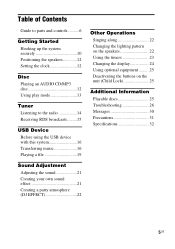
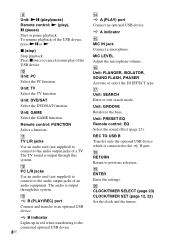
... the speakers 12 Setting the clock 12 Disc Playing an AUDIO CD/MP3 disc 12 Using play mode 13 Tuner Listening to the radio 14 Receiving RDS broadcasts.........15 USB Device Before using the USB device with this system 16 Transferring music 16 Playing a file 19 Sound Adjustment Adjusting the sound 21 Creating your own sound effect 21 Creating a party atmosphere (DJ EFFECT 22 Other Operations Singing along 22 Changing the lighting pattern...
... the speakers 12 Setting the clock 12 Disc Playing an AUDIO CD/MP3 disc 12 Using play mode 13 Tuner Listening to the radio 14 Receiving RDS broadcasts.........15 USB Device Before using the USB device with this system 16 Transferring music 16 Playing a file 19 Sound Adjustment Adjusting the sound 21 Creating your own sound effect 21 Creating a party atmosphere (DJ EFFECT 22 Other Operations Singing along 22 Changing the lighting pattern...
Operating Instructions
Page 7
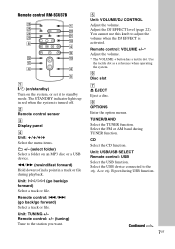
... device. B Remote control sensor C Display panel D Unit: / / / Select the menu items. +/- (select folder) Select a folder on the system, or set it to standby mode. Remote control: +/- (tuning) Tune to adjust the volume when the DJ EFFECT is turned off. H OPTIONS Enter the option menus. CD Select the CD function. Select the USB device connected to find a point in red when the system is activated. TUNER/BAND Select the TUNER function. Unit: USB/USB SELECT Remote control: USB Select the USB function. Unit...
... device. B Remote control sensor C Display panel D Unit: / / / Select the menu items. +/- (select folder) Select a folder on the system, or set it to standby mode. Remote control: +/- (tuning) Tune to adjust the volume when the DJ EFFECT is turned off. H OPTIONS Enter the option menus. CD Select the CD function. Select the USB device connected to find a point in red when the system is activated. TUNER/BAND Select the TUNER function. Unit: USB/USB SELECT Remote control: USB Select the USB function. Unit...
Operating Instructions
Page 8
.... J Unit: PC Select the PC function. Unit: GAME Select the GAME function. The audio is output through this system. P Unit: FLANGER, ISOLATOR, SOUND FLASH, PHASER Activate or select the DJ EFFECT type. Unit: TV Select the TV function. B indicator Lights up in red when transferring to previous selection. A indicator O MIC IN jack Connect a microphone. Press x twice to the audio output jacks of the USB device, press NX or N. MIC LEVEL Adjust the microphone volume. x (stop) Stop...
.... J Unit: PC Select the PC function. Unit: GAME Select the GAME function. The audio is output through this system. P Unit: FLANGER, ISOLATOR, SOUND FLASH, PHASER Activate or select the DJ EFFECT type. Unit: TV Select the TV function. B indicator Lights up in red when transferring to previous selection. A indicator O MIC IN jack Connect a microphone. Press x twice to the audio output jacks of the USB device, press NX or N. MIC LEVEL Adjust the microphone volume. x (stop) Stop...
Operating Instructions
Page 10
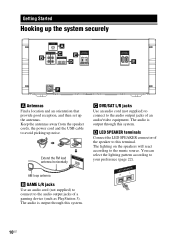
... speaker cords, the power cord and the USB cable to the audio output jacks of an audio/video equipment. The lighting on the speakers will react according to your preference (page 22). D LED SPEAKER terminals Connect the LED SPEAKER connector of a gaming device (such as PlayStation 3). The audio is output through this system. Getting Started Hooking up the system securely ANTENNA FM/AM A B GAME DVD/SAT L L R R C LED SPEAKER R L E SPEAKERS HIGH CHANNEL R L D IMPEDANCE USE 4 Ω SPEAKERS LOW CHANNEL R L IMPEDANCE USE 4 Ω E F A Antennas...
... speaker cords, the power cord and the USB cable to the audio output jacks of an audio/video equipment. The lighting on the speakers will react according to your preference (page 22). D LED SPEAKER terminals Connect the LED SPEAKER connector of a gaming device (such as PlayStation 3). The audio is output through this system. Getting Started Hooking up the system securely ANTENNA FM/AM A B GAME DVD/SAT L L R R C LED SPEAKER R L E SPEAKERS HIGH CHANNEL R L D IMPEDANCE USE 4 Ω SPEAKERS LOW CHANNEL R L IMPEDANCE USE 4 Ω E F A Antennas...
Operating Instructions
Page 12
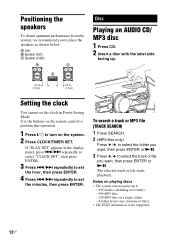
..., then press ENTER or NX. Use the buttons on the remote control to perform this operation. 1 Press "/1 to - 999 folders (including root folder). - 999 MP3 files. - 250 MP3 files on the system. 2 Press CLOCK/TIMER SET. A Unit B Speaker (left) C Speaker (right) B C A Disc Playing an AUDIO CD/ MP3 disc 1 Press CD. 2 Insert a disc with the label side facing up to turn on a single folder. - 8 folder...
..., then press ENTER or NX. Use the buttons on the remote control to perform this operation. 1 Press "/1 to - 999 folders (including root folder). - 999 MP3 files. - 250 MP3 files on the system. 2 Press CLOCK/TIMER SET. A Unit B Speaker (left) C Speaker (right) B C A Disc Playing an AUDIO CD/ MP3 disc 1 Press CD. 2 Insert a disc with the label side facing up to turn on a single folder. - 8 folder...
Operating Instructions
Page 14
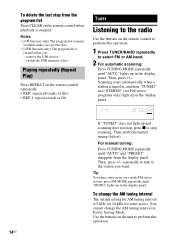
... display panel. Playing repeatedly (Repeat Play) Press REPEAT on the remote control repeatedly. • REP: repeat all tracks or files • REP 1: repeat a track or file Tuner Listening to the radio Use the buttons on a weak FM stereo station, press FM MODE repeatedly until "AUTO" lights up and scanning does not stop, press x to the station you : - You cannot change the AM tuning interval The default setting for FM stereo programs only) light...
... display panel. Playing repeatedly (Repeat Play) Press REPEAT on the remote control repeatedly. • REP: repeat all tracks or files • REP 1: repeat a track or file Tuner Listening to the radio Use the buttons on a weak FM stereo station, press FM MODE repeatedly until "AUTO" lights up and scanning does not stop, press x to the station you : - You cannot change the AM tuning interval The default setting for FM stereo programs only) light...
Operating Instructions
Page 15
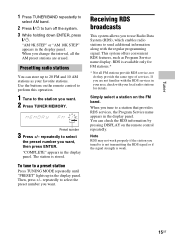
... radio stations for FM stations.* * Not all the AM preset stations are not familiar with the RDS services in your area, check with the regular programming signal. Tuner 1 Press TUNER/BAND repeatedly to select AM band. 2 Press "/1 to a preset station Press TUNING MODE repeatedly until "PRESET" lights up to a station that provides RDS services, the Program Service name appears in the display panel. If you want . Use the buttons on the remote control to perform this operation. 1 Tune to select...
... radio stations for FM stations.* * Not all the AM preset stations are not familiar with the RDS services in your area, check with the regular programming signal. Tuner 1 Press TUNER/BAND repeatedly to select AM band. 2 Press "/1 to a preset station Press TUNING MODE repeatedly until "PRESET" lights up to a station that provides RDS services, the Program Service name appears in the display panel. If you want . Use the buttons on the remote control to perform this operation. 1 Tune to select...
Operating Instructions
Page 20
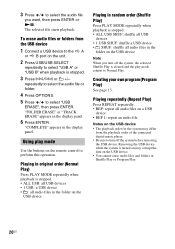
... / to select the audio file you turn off the system, the selected Shuffle Play is cleared and the play mode Use the buttons on the unit. 2 Press USB/USB SELECT repeatedly to select "USB A" or "USB B" when playback is stopped. 3 Press l/L or +/- "COMPLETE" appears in the display panel. 6 Press ENTER. To erase audio files or folders from the playback order of the connected digital music player. • Be...
... / to select the audio file you turn off the system, the selected Shuffle Play is cleared and the play mode Use the buttons on the unit. 2 Press USB/USB SELECT repeatedly to select "USB A" or "USB B" when playback is stopped. 3 Press l/L or +/- "COMPLETE" appears in the display panel. 6 Press ENTER. To erase audio files or folders from the playback order of the connected digital music player. • Be...
Operating Instructions
Page 21
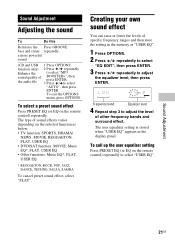
.... To select a preset sound effect Press PRESET EQ (or EQ on the remote control) repeatedly to adjust the equalizer level, then press ENTER. The type of the audio file BOOSTER+", then press ENTER. 3 Press / to select "AUTO", then press ENTER. To exit the OPTIONS menu, press OPTIONS. Sound Adjustment 21US function only) 2 Press / repeatedly Enhance the to adjust the level of specific frequency ranges and then store the setting in the display panel. Frequency band Equalizer level...
.... To select a preset sound effect Press PRESET EQ (or EQ on the remote control) repeatedly to adjust the equalizer level, then press ENTER. The type of the audio file BOOSTER+", then press ENTER. 3 Press / to select "AUTO", then press ENTER. To exit the OPTIONS menu, press OPTIONS. Sound Adjustment 21US function only) 2 Press / repeatedly Enhance the to adjust the level of specific frequency ranges and then store the setting in the display panel. Frequency band Equalizer level...
Operating Instructions
Page 22
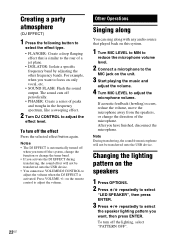
... adjust the volume. 22US Other Operations Singing along You can sing along with any audio source that is activated. To turn off the system, change the function or change the direction of the microphone. Changing the lighting pattern on the speakers 1 Press OPTIONS. 2 Press / repeatedly to select "LED SPEAKER", then press ENTER. 3 Press / repeatedly to select the speaker lighting pattern you want to focus on only vocal, etc. • SOUND FLASH: Flash...
... adjust the volume. 22US Other Operations Singing along You can sing along with any audio source that is activated. To turn off the system, change the function or change the direction of the microphone. Changing the lighting pattern on the speakers 1 Press OPTIONS. 2 Press / repeatedly to select "LED SPEAKER", then press ENTER. 3 Press / repeatedly to select the speaker lighting pattern you want to focus on only vocal, etc. • SOUND FLASH: Flash...

Operating Instructions
Page 23
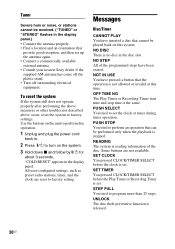
... remaining time before the preset time. Recording Timer: You can wake up to disc, tuner or USB device at the preset time or if "STANDBY" flashes in step 4 to start from a specific track or file, create your own program (page 13). For Recording Timer: Tune to the preset radio station (page 15). 2 Press CLOCK/TIMER SET. 3 Press ./> repeatedly to select "PLAY SET" or "REC SET", then press ENTER. 4 Set the time to set...
... remaining time before the preset time. Recording Timer: You can wake up to disc, tuner or USB device at the preset time or if "STANDBY" flashes in step 4 to start from a specific track or file, create your own program (page 13). For Recording Timer: Tune to the preset radio station (page 15). 2 Press CLOCK/TIMER SET. 3 Press ./> repeatedly to select "PLAY SET" or "REC SET", then press ENTER. 4 Set the time to set...

Operating Instructions
Page 26
... nearest Sony dealer. Set the clock (page 12) and timer (page 23) again. There is no microphone sound. • Adjust the microphone volume. • Make sure the microphone is disconnected or a power failure occurred. After checking the above items and fixing any (page 10). • Turn on playing multisession discs • This system can also be played back. 26US Troubleshooting Should you using only the supplied speakers...
... nearest Sony dealer. Set the clock (page 12) and timer (page 23) again. There is no microphone sound. • Adjust the microphone volume. • Make sure the microphone is disconnected or a power failure occurred. After checking the above items and fixing any (page 10). • Turn on playing multisession discs • This system can also be played back. 26US Troubleshooting Should you using only the supplied speakers...
Operating Instructions
Page 27
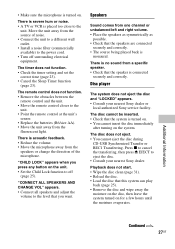
Speakers Sound comes from a specific speaker. • Check that the speaker is connected securely and correctly. The disc cannot be inserted. • Check that you press any button on the system. Additional Information Continued l 27US • Make sure the microphone is turned on for a few hours until the moisture evaporates. "CONNECT ALL SPEAKERS AND CHANGE VOL" appears. • Connect all speakers and adjust the volume to the level that...
Speakers Sound comes from a specific speaker. • Check that the speaker is connected securely and correctly. The disc cannot be inserted. • Check that you press any button on the system. Additional Information Continued l 27US • Make sure the microphone is turned on for a few hours until the moisture evaporates. "CONNECT ALL SPEAKERS AND CHANGE VOL" appears. • Connect all speakers and adjust the volume to the level that...
Operating Instructions
Page 28
... deal with bass sounds at high volume, the speaker vibration may have entered during the erase operation. When you listen to skip. Audio files or folders on the system. • The music data itself contains noise, or the sound is not connected correctly. Noise may cause the sound to a track with this system are using an unsupported USB device. Numbers (0 to Z) - Then...
... deal with bass sounds at high volume, the speaker vibration may have entered during the erase operation. When you listen to skip. Audio files or folders on the system. • The music data itself contains noise, or the sound is not connected correctly. Noise may cause the sound to a track with this system are using an unsupported USB device. Numbers (0 to Z) - Then...
Operating Instructions
Page 29
... and Professional format cannot be played back. • USB device formatted with copyright protection (Digital Rights Management) cannot be played back by passwords, etc. Send audio files with the level of 8 folders only. • Files that is displayed for an extended time, or it takes a long time before playback starts. • The reading process can play mode to a depth of electrical current...
... and Professional format cannot be played back. • USB device formatted with copyright protection (Digital Rights Management) cannot be played back by passwords, etc. Send audio files with the level of 8 folders only. • Files that is displayed for an extended time, or it takes a long time before playback starts. • The reading process can play mode to a depth of electrical current...
Operating Instructions
Page 30
... still does not operate properly after performing the above measures or other troubles not described above occur, reset the system to turn on the unit to perform this time. Use the buttons on the system. 3 Hold down x and follow by "/1 for about 3 seconds. Tuner Severe hum or noise, or stations cannot be received. ("TUNED" or "STEREO" flashes in the display panel.) • Connect the antenna properly. •...
... still does not operate properly after performing the above measures or other troubles not described above occur, reset the system to turn on the unit to perform this time. Use the buttons on the system. 3 Hold down x and follow by "/1 for about 3 seconds. Tuner Severe hum or noise, or stations cannot be received. ("TUNED" or "STEREO" flashes in the display panel.) • Connect the antenna properly. •...
Operating Instructions
Page 32
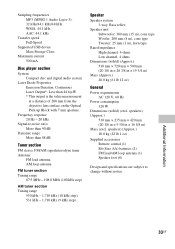
... 120 V, 60 Hz Power output (rated): High channel 300 W + 300 W (at 4 :, 1 kHz, 1% THD) Low channel 300 W + 300 W (at 4 :, 100 Hz, 1% THD) RMS output power (reference): High channel 500 W + 500 W (per channel at 4 :, 100 Hz) Inputs PC (AUDIO IN) L/R, TV (AUDIO IN) L/R, DVD/SAT (AUDIO IN) L/R, GAME (AUDIO IN) L/R Voltage 2 V, impedance 47 k: MIC Sensitivity 1 mV, impedance 10 k: A, B port: Type A USB section Supported bit rate MP3 (MPEG 1 Audio Layer-3): 32 kbps - 320...
... 120 V, 60 Hz Power output (rated): High channel 300 W + 300 W (at 4 :, 1 kHz, 1% THD) Low channel 300 W + 300 W (at 4 :, 100 Hz, 1% THD) RMS output power (reference): High channel 500 W + 500 W (per channel at 4 :, 100 Hz) Inputs PC (AUDIO IN) L/R, TV (AUDIO IN) L/R, DVD/SAT (AUDIO IN) L/R, GAME (AUDIO IN) L/R Voltage 2 V, impedance 47 k: MIC Sensitivity 1 mV, impedance 10 k: A, B port: Type A USB section Supported bit rate MP3 (MPEG 1 Audio Layer-3): 32 kbps - 320...
Operating Instructions
Page 33
... Disc player section System Compact disc and digital audio system Laser Diode Properties Emission Duration: Continuous Laser Output*: Less than 88 dB Tuner section FM stereo, FM/AM superheterodyne tuner Antenna: FM lead antenna AM loop antenna FM tuner section Tuning range 87.5 MHz - 108.0 MHz (100 kHz step) AM tuner section Tuning range 530 kHz - 1,710 kHz (10 kHz step) 531 kHz - 1,710 kHz (9 kHz step) Speaker Speaker system 3-way, Bass...
... Disc player section System Compact disc and digital audio system Laser Diode Properties Emission Duration: Continuous Laser Output*: Less than 88 dB Tuner section FM stereo, FM/AM superheterodyne tuner Antenna: FM lead antenna AM loop antenna FM tuner section Tuning range 87.5 MHz - 108.0 MHz (100 kHz step) AM tuner section Tuning range 530 kHz - 1,710 kHz (10 kHz step) 531 kHz - 1,710 kHz (9 kHz step) Speaker Speaker system 3-way, Bass...


