Operating Instructions
Page 5
... 14 Receiving RDS broadcasts.........15 USB Device Before using the USB device with this system 16 Transferring music 16 Playing a file 19 Sound Adjustment Adjusting the sound 21 Creating your own sound effect 21 Creating a party atmosphere (DJ EFFECT 22 Other Operations Singing along 22 Changing the lighting pattern on the speakers 22...
... 14 Receiving RDS broadcasts.........15 USB Device Before using the USB device with this system 16 Transferring music 16 Playing a file 19 Sound Adjustment Adjusting the sound 21 Creating your own sound effect 21 Creating a party atmosphere (DJ EFFECT 22 Other Operations Singing along 22 Changing the lighting pattern on the speakers 22...
Operating Instructions
Page 8
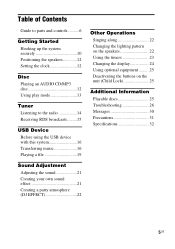
... output through this system. P Unit: FLANGER, ISOLATOR, SOUND FLASH, PHASER Activate or select the DJ EFFECT type. Q Unit: SEARCH Enter or exit search mode. J Unit: PC Select the PC function. Unit: DVD/SAT ... function. B indicator Lights up in red when transferring to previous selection. MIC LEVEL Adjust the microphone volume. Unit: PRESET EQ Remote control: EQ Select the sound effect (page 21). R RETURN Return to the connected optional USB device. 8US N A (PLAY) port Connect an optional USB device. K TV L/R jacks Use an audio cord...
... output through this system. P Unit: FLANGER, ISOLATOR, SOUND FLASH, PHASER Activate or select the DJ EFFECT type. Q Unit: SEARCH Enter or exit search mode. J Unit: PC Select the PC function. Unit: DVD/SAT ... function. B indicator Lights up in red when transferring to previous selection. MIC LEVEL Adjust the microphone volume. Unit: PRESET EQ Remote control: EQ Select the sound effect (page 21). R RETURN Return to the connected optional USB device. 8US N A (PLAY) port Connect an optional USB device. K TV L/R jacks Use an audio cord...
Operating Instructions
Page 16
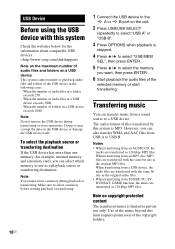
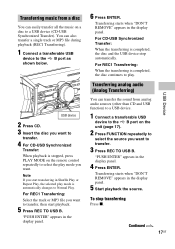
... Transferring music You can transfer music from an AUDIO CD, the tracks are transferred as a playback source or transferring destination. Notes • When transferring from a sound source to a USB device. When transferring from USB A to the A or B port on copyright-protected content The transferred music is MP3. Use of the music...
... Transferring music You can transfer music from an AUDIO CD, the tracks are transferred as a playback source or transferring destination. Notes • When transferring from a sound source to a USB device. When transferring from USB A to the A or B port on copyright-protected content The transferred music is MP3. Use of the music...
Operating Instructions
Page 17
... completed, the disc continues to Normal Play. Continued l 17US USB Device Note If you want to the B port as shown below. You can transfer the sound from a disc You can easily transfer all the music on the remote control repeatedly to select the play mode you start playback. 5 Press REC TO...
... completed, the disc continues to Normal Play. Continued l 17US USB Device Note If you want to the B port as shown below. You can transfer the sound from a disc You can easily transfer all the music on the remote control repeatedly to select the play mode you start playback. 5 Press REC TO...

Operating Instructions
Page 19
... but are assigned serially thereafter. Continued l 19US USB Device Notes on transferring • While transferring from an MP3 disc, AUDIO CD or USB device, no sound is output. • CD-TEXT information is added after the display "Creating Library" or "Creating Database" on the Walkman® has disappeared. The audio files...
... but are assigned serially thereafter. Continued l 19US USB Device Notes on transferring • While transferring from an MP3 disc, AUDIO CD or USB device, no sound is output. • CD-TEXT information is added after the display "Creating Library" or "Creating Database" on the Walkman® has disappeared. The audio files...
Operating Instructions
Page 21
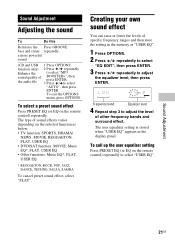
...up the user equalizer setting Press PRESET EQ (or EQ on the remote control) repeatedly to adjust the level of sound effects varies depending on the remote control) repeatedly. Sound Adjustment 21US Frequency band Equalizer level 4 Repeat step 3 to select "USER EQ". function only) 2 Press / ... then press ENTER. 3 Press / to adjust the equalizer level, then press ENTER. a more powerful sound (CD and USB 1 Press OPTIONS. To exit the OPTIONS menu, press OPTIONS. To select a preset sound effect Press PRESET EQ (or EQ on the selected function as "USER EQ". 1 Press OPTIONS. 2...
...up the user equalizer setting Press PRESET EQ (or EQ on the remote control) repeatedly to adjust the level of sound effects varies depending on the remote control) repeatedly. Sound Adjustment 21US Frequency band Equalizer level 4 Repeat step 3 to select "USER EQ". function only) 2 Press / ... then press ENTER. 3 Press / to adjust the equalizer level, then press ENTER. a more powerful sound (CD and USB 1 Press OPTIONS. To exit the OPTIONS menu, press OPTIONS. To select a preset sound effect Press PRESET EQ (or EQ on the selected function as "USER EQ". 1 Press OPTIONS. 2...
Operating Instructions
Page 22
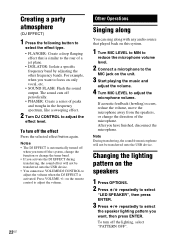
...USB device. After you have finished, disconnect the microphone. Note During transferring, the sound from the speakers, or change the tuner band. • If you activate the DJ EFFECT during transferring, the sound effect will not be transferred onto the USB device. • You cannot use ...effect. 2 Turn DJ CONTROL to adjust the microphone volume. To turn off the system, change the function or change the direction of the microphone. The sound cuts off the lighting, select "PATTERN OFF". To turn off periodically. • PHASER: Create a series of a jet plane. • ISOLATOR: ...
...USB device. After you have finished, disconnect the microphone. Note During transferring, the sound from the speakers, or change the tuner band. • If you activate the DJ EFFECT during transferring, the sound effect will not be transferred onto the USB device. • You cannot use ...effect. 2 Turn DJ CONTROL to adjust the microphone volume. To turn off the system, change the function or change the direction of the microphone. The sound cuts off the lighting, select "PATTERN OFF". To turn off periodically. • PHASER: Create a series of a jet plane. • ISOLATOR: ...

Operating Instructions
Page 23
... will not play or transfer. • Do not operate the system from the time the system turns on the remote control repeatedly to select the sound source you use either with the Sleep Timer, the Sleep Timer has priority. To cancel the timer Press CLOCK/TIMER SELECT, press ./> repeatedly to...in step 4 to set the clock. You cannot activate both the Play Timer and the Recording Timer at a specified time. 1 For Play Timer: Prepare the sound source, and then press VOLUME +/- Play Timer: You can transfer music from a specific track or file, create your own program (page 13). Press SLEEP ...
... will not play or transfer. • Do not operate the system from the time the system turns on the remote control repeatedly to select the sound source you use either with the Sleep Timer, the Sleep Timer has priority. To cancel the timer Press CLOCK/TIMER SELECT, press ./> repeatedly to...in step 4 to set the clock. You cannot activate both the Play Timer and the Recording Timer at a specified time. 1 For Play Timer: Prepare the sound source, and then press VOLUME +/- Play Timer: You can transfer music from a specific track or file, create your own program (page 13). Press SLEEP ...

Operating Instructions
Page 26
...parts may not be playable by some parts during Recording Timer. General The clock or timer setting is canceled. • The power cord is no sound. • Adjust the volume. • Check the speaker connections (page 10). • Check the connection of the unit? Notes on playing ...anything blocking the ventilation holes of the optional equipment, if any problems, plug in the first session. If the problem persist, consult your nearest Sony dealer. Set the clock (page 12) and timer (page 23) again. Please be retained. Music discs encoded with digital audio material on...
...parts may not be playable by some parts during Recording Timer. General The clock or timer setting is canceled. • The power cord is no sound. • Adjust the volume. • Check the speaker connections (page 10). • Check the connection of the unit? Notes on playing ...anything blocking the ventilation holes of the optional equipment, if any problems, plug in the first session. If the problem persist, consult your nearest Sony dealer. Set the clock (page 12) and timer (page 23) again. Please be retained. Music discs encoded with digital audio material on...
Operating Instructions
Page 27
...cord. • Turn off (page 25). Disc player The system does not eject the disc and "LOCKED" appears. • Consult your nearest Sony dealer. There is severe hum or noise. • A TV or VCR is connected securely and correctly. Move the unit away from the fluorescent light... equipment. There is monaural. The disc does not eject. • You cannot eject the disc during CD-USB Synchronized Transfer or REC1 Transferring. Speakers Sound comes from the speakers or change the direction of noise. • Connect the unit to a different wall outlet. • Install a noise filter...
...cord. • Turn off (page 25). Disc player The system does not eject the disc and "LOCKED" appears. • Consult your nearest Sony dealer. There is severe hum or noise. • A TV or VCR is connected securely and correctly. Move the unit away from the fluorescent light... equipment. There is monaural. The disc does not eject. • You cannot eject the disc during CD-USB Synchronized Transfer or REC1 Transferring. Speakers Sound comes from the speakers or change the direction of noise. • Connect the unit to a different wall outlet. • Install a noise filter...
Operating Instructions
Page 28
...erase operations are using an unsupported USB device. Refer to the operating instructions supplied with the USB device on how to deal with bass sounds at high volume, the speaker vibration may have entered during the erase operation. Delete the partiallytransferred file, and perform transferring again. If...the USB device. If the USB device has a power switch, turn on the system. • The music data itself contains noise, or the sound is not Version 1(1.0/1.1) and Version 2(2.2/2.3). • The character code that conforms to a track with this does not fix the problem, the USB ...
...erase operations are using an unsupported USB device. Refer to the operating instructions supplied with the USB device on how to deal with bass sounds at high volume, the speaker vibration may have entered during the erase operation. Delete the partiallytransferred file, and perform transferring again. If...the USB device. If the USB device has a power switch, turn on the system. • The music data itself contains noise, or the sound is not Version 1(1.0/1.1) and Version 2(2.2/2.3). • The character code that conforms to a track with this does not fix the problem, the USB ...


