Operating Instructions
Page 2
WARNING To reduce the risk of the unit. Should you call upon your Sony dealer regarding this product. Do not expose batteries or apparatus with the manufacturer's instructions. 8) Do not install near water. 6) Clean only with newspapers, tablecloths, curtains, ... be sure to persons. CAUTION The use this apparatus to excessive heat such as a CLASS 1 LASER product. When unpacking or handling a big and/or heavy speaker, be of sufficient magnitude to constitute a risk of fire or electric shock, do not expose this apparatus near any ventilation openings. Do not place the...
WARNING To reduce the risk of the unit. Should you call upon your Sony dealer regarding this product. Do not expose batteries or apparatus with the manufacturer's instructions. 8) Do not install near water. 6) Clean only with newspapers, tablecloths, curtains, ... be sure to persons. CAUTION The use this apparatus to excessive heat such as a CLASS 1 LASER product. When unpacking or handling a big and/or heavy speaker, be of sufficient magnitude to constitute a risk of fire or electric shock, do not expose this apparatus near any ventilation openings. Do not place the...
Operating Instructions
Page 5
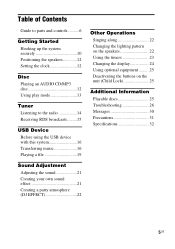
Table of Contents Guide to parts and controls ..........6 Getting Started Hooking up the system securely 10 Positioning the speakers 12 Setting the clock 12 Disc Playing an AUDIO CD/MP3 disc 12 Using play mode 13 Tuner Listening to the radio 14 Receiving ...sound 21 Creating your own sound effect 21 Creating a party atmosphere (DJ EFFECT 22 Other Operations Singing along 22 Changing the lighting pattern on the speakers 22 Using the timers 23 Changing the display 24 Using optional equipment ......... 25 Deactivating the buttons on the unit (Child Lock 25 Additional Information ...
Table of Contents Guide to parts and controls ..........6 Getting Started Hooking up the system securely 10 Positioning the speakers 12 Setting the clock 12 Disc Playing an AUDIO CD/MP3 disc 12 Using play mode 13 Tuner Listening to the radio 14 Receiving ...sound 21 Creating your own sound effect 21 Creating a party atmosphere (DJ EFFECT 22 Other Operations Singing along 22 Changing the lighting pattern on the speakers 22 Using the timers 23 Changing the display 24 Using optional equipment ......... 25 Deactivating the buttons on the unit (Child Lock 25 Additional Information ...
Operating Instructions
Page 10
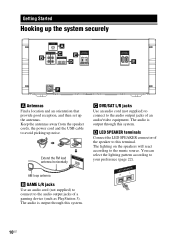
... react according to your preference (page 22). Keep the antennas away from the speaker cords, the power cord and the USB cable to this system. D LED SPEAKER terminals Connect the LED SPEAKER connector of the speaker to avoid picking up the antennas. Extend the FM lead antenna horizontally C DVD/SAT L/R jacks Use an audio...
... react according to your preference (page 22). Keep the antennas away from the speaker cords, the power cord and the USB cable to this system. D LED SPEAKER terminals Connect the LED SPEAKER connector of the speaker to avoid picking up the antennas. Extend the FM lead antenna horizontally C DVD/SAT L/R jacks Use an audio...
Operating Instructions
Page 11
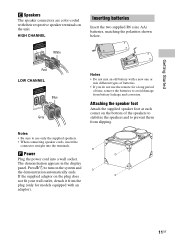
...mix an old battery with a new one or mix different types of batteries. • If you do not use only the supplied speakers. • When connecting speaker cords, insert the connector straight into a wall socket. If the supplied adaptor on the bottom of time, remove the batteries to ...prevent them from slipping. Attaching the speaker foot Attach the supplied speaker foot at each corner on the plug does not fit your wall outlet, detach it from battery leakage and corrosion. F Power ...
...mix an old battery with a new one or mix different types of batteries. • If you do not use only the supplied speakers. • When connecting speaker cords, insert the connector straight into a wall socket. If the supplied adaptor on the bottom of time, remove the batteries to ...prevent them from slipping. Attaching the speaker foot Attach the supplied speaker foot at each corner on the plug does not fit your wall outlet, detach it from battery leakage and corrosion. F Power ...
Operating Instructions
Page 12
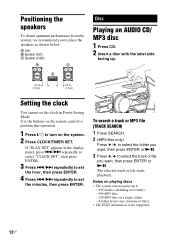
A Unit B Speaker (left) C Speaker (right) B C A Disc Playing an AUDIO CD/ MP3 disc 1 Press CD. 2 Insert a disc with the label side facing up to select the track or file you ... to set the minutes, then press ENTER. Use the buttons on the remote control to perform this operation. 1 Press "/1 to place the speakers as shown below. Positioning the speakers To obtain optimum performance from the system, we recommend you to turn on the system. 2 Press CLOCK/TIMER SET. If "PLAY SET" appears...
A Unit B Speaker (left) C Speaker (right) B C A Disc Playing an AUDIO CD/ MP3 disc 1 Press CD. 2 Insert a disc with the label side facing up to select the track or file you ... to set the minutes, then press ENTER. Use the buttons on the remote control to perform this operation. 1 Press "/1 to place the speakers as shown below. Positioning the speakers To obtain optimum performance from the system, we recommend you to turn on the system. 2 Press CLOCK/TIMER SET. If "PLAY SET" appears...
Operating Instructions
Page 22
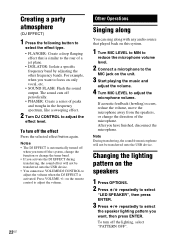
...to MIN to reduce the microphone volume level. 2 Connect a microphone to the MIC jack on the speakers 1 Press OPTIONS. 2 Press / repeatedly to select "LED SPEAKER", then press ENTER. 3 Press / repeatedly to select the speaker lighting pattern you want to focus on only vocal, etc. • SOUND FLASH: Flash the ...sound output. Note During transferring, the sound from the speakers, or change the tuner band. • If you activate the DJ EFFECT during transferring, the sound effect will not be transferred onto the USB...
...to MIN to reduce the microphone volume level. 2 Connect a microphone to the MIC jack on the speakers 1 Press OPTIONS. 2 Press / repeatedly to select "LED SPEAKER", then press ENTER. 3 Press / repeatedly to select the speaker lighting pattern you want to focus on only vocal, etc. • SOUND FLASH: Flash the ...sound output. Note During transferring, the sound from the speakers, or change the tuner band. • If you activate the DJ EFFECT during transferring, the sound effect will not be transferred onto the USB...

Operating Instructions
Page 26
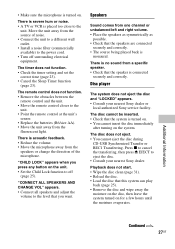
.... If "PROTECT" appears in AUDIO CD format, only the first session will be played back. 26US Troubleshooting Should you using only the supplied speakers? • Is anything blocking the ventilation holes of the optional equipment, if any problems, plug in the troubleshooting checklist below and take the ...After checking the above items and fixing any (page 10). • Turn on the other side. If the issue persists, consult your nearest Sony dealer. However, since the audio material side does not conform to the CD standard and may be playable by some that among those discs, ...
.... If "PROTECT" appears in AUDIO CD format, only the first session will be played back. 26US Troubleshooting Should you using only the supplied speakers? • Is anything blocking the ventilation holes of the optional equipment, if any problems, plug in the troubleshooting checklist below and take the ...After checking the above items and fixing any (page 10). • Turn on the other side. If the issue persists, consult your nearest Sony dealer. However, since the audio material side does not conform to the CD standard and may be playable by some that among those discs, ...
Operating Instructions
Page 27
... the remote control and the unit. • Move the remote control closer to eject the disc. • Consult your nearest Sony dealer or local authorized Sony service facility. There is turned on. • You cannot insert the disc immediately after turning on the unit. • Set... the disc. • Load the disc that you press any button on the system. The disc cannot be inserted. • Check that the speakers are connected securely and correctly. • The source being played back is turned on for a few hours until the moisture evaporates. Additional Information Continued...
... the remote control and the unit. • Move the remote control closer to eject the disc. • Consult your nearest Sony dealer or local authorized Sony service facility. There is turned on. • You cannot insert the disc immediately after turning on the unit. • Set... the disc. • Load the disc that you press any button on the system. The disc cannot be inserted. • Check that the speakers are connected securely and correctly. • The source being played back is turned on for a few hours until the moisture evaporates. Additional Information Continued...
Operating Instructions
Page 28
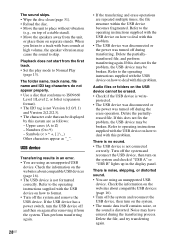
... files or folders on separate stands. Check the information on top of a stable stand). • Move the speakers away from the system. When you listen to deal with bass sounds at high volume, the speaker vibration may have entered during transferring. Symbols Other characters appear as follows: - Then perform transferring again. 28US...
... files or folders on separate stands. Check the information on top of a stable stand). • Move the speakers away from the system. When you listen to deal with bass sounds at high volume, the speaker vibration may have entered during transferring. Symbols Other characters appear as follows: - Then perform transferring again. 28US...
Operating Instructions
Page 32
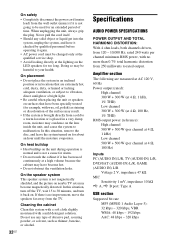
..., dusty, dirty, or humid or lacking adequate ventilation, or subject to vibration, direct sunlight or a bright light. • Be careful when placing the unit or speakers on surfaces that are measured at AC 120 V, 60 Hz Power output (rated): High channel 300 W + 300 W (at 4 :, 1 kHz, 1% THD) Low channel 300 W + 300... inside the unit, and cause the system to be harmful to rated output. When unplugging the unit, always grip the plug. On the speaker system This speaker system is not magnetically shielded, and the picture on . In this situation, turn off the TV, wait 15 to 30 minutes, and ...
..., dusty, dirty, or humid or lacking adequate ventilation, or subject to vibration, direct sunlight or a bright light. • Be careful when placing the unit or speakers on surfaces that are measured at AC 120 V, 60 Hz Power output (rated): High channel 300 W + 300 W (at 4 :, 1 kHz, 1% THD) Low channel 300 W + 300... inside the unit, and cause the system to be harmful to rated output. When unplugging the unit, always grip the plug. On the speaker system This speaker system is not magnetically shielded, and the picture on . In this situation, turn off the TV, wait 15 to 30 minutes, and ...
Operating Instructions
Page 33
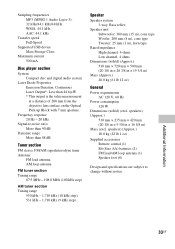
...- 108.0 MHz (100 kHz step) AM tuner section Tuning range 530 kHz - 1,710 kHz (10 kHz step) 531 kHz - 1,710 kHz (9 kHz step) Speaker Speaker system 3-way, Bass reflex Speaker unit Subwoofer: 380 mm (15 in), cone type Woofer: 200 mm (8 in), cone type Tweeter: 25 mm (1 in), horn type Rated impedance High...: 4 ohms Low channel: 4 ohms Dimensions (w/h/d) (Approx.) 510 mm × 720 mm × 500 mm (20 1/8 in × 28 3/8 in × 19 3/4 in ) Mass (excl. speakers) (Approx.) 510 mm × 235 mm × 420 mm (20 1/8 in × 9 3/8 in × 16 5/8 in ) Mass (Approx.) 28.0 kg (61 lb 12 oz) General...
...- 108.0 MHz (100 kHz step) AM tuner section Tuning range 530 kHz - 1,710 kHz (10 kHz step) 531 kHz - 1,710 kHz (9 kHz step) Speaker Speaker system 3-way, Bass reflex Speaker unit Subwoofer: 380 mm (15 in), cone type Woofer: 200 mm (8 in), cone type Tweeter: 25 mm (1 in), horn type Rated impedance High...: 4 ohms Low channel: 4 ohms Dimensions (w/h/d) (Approx.) 510 mm × 720 mm × 500 mm (20 1/8 in × 28 3/8 in × 19 3/4 in ) Mass (excl. speakers) (Approx.) 510 mm × 235 mm × 420 mm (20 1/8 in × 9 3/8 in × 16 5/8 in ) Mass (Approx.) 28.0 kg (61 lb 12 oz) General...


