Warranty Card
Page 1
...service problem, or for removal and installation is provided during the initial 90 day period for all accessories are for one (1) year (color picture tube - In-home diagnostic warranty service is available from the Product. This warranty does not cover Products sold AS IS or WITH ALL ...IMPLIED WARRANTY ON THIS PRODUCT. This warranty is invalid if the factory applied serial number has been altered or removed from Sony authorized service facilities or a Sony Service Center at no charge, new or rebuilt replacements in exchange for defective parts for a period of purchase, labor ...
...service problem, or for removal and installation is provided during the initial 90 day period for all accessories are for one (1) year (color picture tube - In-home diagnostic warranty service is available from the Product. This warranty does not cover Products sold AS IS or WITH ALL ...IMPLIED WARRANTY ON THIS PRODUCT. This warranty is invalid if the factory applied serial number has been altered or removed from Sony authorized service facilities or a Sony Service Center at no charge, new or rebuilt replacements in exchange for defective parts for a period of purchase, labor ...

Marketing Specifications
Page 1
Product Information KV-36FV300 KV-32FV300 KV-27FV300 FD Trinitron® WEGA® TV KEY FEATURES • FD Trinitron® Picture Tube • 3-D Digital Comb Filter • Clear Edge VM™ Wideband Velocity Modulation • DynaBlack™ Picture Enhancement • Two Tuner Picture In Picture • Auto 16...• Demo Mode • Energy Star® Compliant • Favorite Channel With Preview • Two Tuner Picture In Picture • Picture Freeze • Channel Jump • On Screen Display English/Spanish/French • Program Palette™ Presets &#...
Product Information KV-36FV300 KV-32FV300 KV-27FV300 FD Trinitron® WEGA® TV KEY FEATURES • FD Trinitron® Picture Tube • 3-D Digital Comb Filter • Clear Edge VM™ Wideband Velocity Modulation • DynaBlack™ Picture Enhancement • Two Tuner Picture In Picture • Auto 16...• Demo Mode • Energy Star® Compliant • Favorite Channel With Preview • Two Tuner Picture In Picture • Picture Freeze • Channel Jump • On Screen Display English/Spanish/French • Program Palette™ Presets &#...

Marketing Specifications
Page 2
...be formatted on the previous subsequent video frames. All rights reserved. Product Information KV-36FV300 KV-32FV300 KV-27FV300 FD Trinitron® WEGA® TV KEY TECHNOLOGY 3D Digital Comb Filter Sony's premier comb filter design compares each horizontal scanning line with the lines above ...image on 27-36" FV models), results in noticeable audio improvement in video noise DynaBlack™ Picture Enhancement Is composed of higher frequency sources such as DVD and DSS. Displays anamorphic widescreen content in part without affecting the overall picture, leading to improved...
...be formatted on the previous subsequent video frames. All rights reserved. Product Information KV-36FV300 KV-32FV300 KV-27FV300 FD Trinitron® WEGA® TV KEY TECHNOLOGY 3D Digital Comb Filter Sony's premier comb filter design compares each horizontal scanning line with the lines above ...image on 27-36" FV models), results in noticeable audio improvement in video noise DynaBlack™ Picture Enhancement Is composed of higher frequency sources such as DVD and DSS. Displays anamorphic widescreen content in part without affecting the overall picture, leading to improved...

Primary User Manual
Page 4
... service the set yourself since opening the cabinet may result in fire, electric shock, or other hazards. Unauthorized substitutions may expose you are specified in a picture tube implosion. This is installed, follow the precautions below. Be sure the antenna system is grounded so as a bookcase or built-in damage and will...
... service the set yourself since opening the cabinet may result in fire, electric shock, or other hazards. Unauthorized substitutions may expose you are specified in a picture tube implosion. This is installed, follow the precautions below. Be sure the antenna system is grounded so as a bookcase or built-in damage and will...
Primary User Manual
Page 6
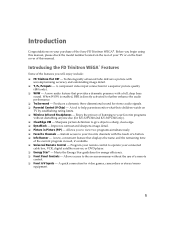
Contents Introduction Introducing the FD Trinitron WEGA® Features 1 About this Manual...2 Batteries for the Remote Control 2 Front Panel Menu Controls ...2 Using the Remote Controls ...3 Connecting Your TV TV Rear Panel ...8 Basic ... ...11 Connecting Additional Equipment 13 Using Basic Functions Setting Up the TV Automatically 21 Quick Start to the Menus ...22 Using Picture in Picture (PIP) with Remote Y181 24 Using Picture in Picture (PIP) with Remote Y182 26 Setups that Affect Your Ability to Use PIP 28 Using Wireless Headphones ...29 Using the Menus...
Contents Introduction Introducing the FD Trinitron WEGA® Features 1 About this Manual...2 Batteries for the Remote Control 2 Front Panel Menu Controls ...2 Using the Remote Controls ...3 Connecting Your TV TV Rear Panel ...8 Basic ... ...11 Connecting Additional Equipment 13 Using Basic Functions Setting Up the TV Automatically 21 Quick Start to the Menus ...22 Using Picture in Picture (PIP) with Remote Y181 24 Using Picture in Picture (PIP) with Remote Y182 26 Setups that Affect Your Ability to Use PIP 28 Using Wireless Headphones ...29 Using the Menus...
Primary User Manual
Page 8
...KV-32FV300 and KV-36FV300 only). ❏ ClearEdge VM - Sharpens picture definition to help parents monitor what their children watch on TV by establishing rating limits. ❏ Wireless Infrared Headphones - Meets the Energy Star guidelines for stereo audio signals. ❏ Parental Control (V-Chip) - Introducing the FD Trinitron WEGA...® Features Some of the features you to operate your TV or on the front cover of the Sony FD Trinitron WEGA®. Program your remote control to view two programs simultaneously...
...KV-32FV300 and KV-36FV300 only). ❏ ClearEdge VM - Sharpens picture definition to help parents monitor what their children watch on TV by establishing rating limits. ❏ Wireless Infrared Headphones - Meets the Energy Star guidelines for stereo audio signals. ❏ Parental Control (V-Chip) - Introducing the FD Trinitron WEGA...® Features Some of the features you to operate your TV or on the front cover of the Sony FD Trinitron WEGA®. Program your remote control to view two programs simultaneously...
Primary User Manual
Page 10
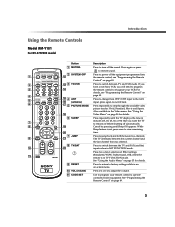
Introduction Using the Remote Controls Model RM-Y181 For KV-27FV300 model A B C D E F G H / I J K Button 1 MUTING 2 SYSTEM OFF L M 3 TV/VCR N O 4 ANT P (antenna) Q 5 PICTURE MODE R 6 SLEEP S T 7 JUMP U 8 TV/SAT V 9 RESET q; If you have a non-Sony VCR, you want the TV to turn off the equipment programmed into the remote control,... See "Using the Audio Menu" on page 49. 3 Use to power off the sound. Press to step through the available video picture modes: Vivid, Standard, Movie and Sports. For details, see "Programming the Remote Control" on page 34 for details. Press to ...
Introduction Using the Remote Controls Model RM-Y181 For KV-27FV300 model A B C D E F G H / I J K Button 1 MUTING 2 SYSTEM OFF L M 3 TV/VCR N O 4 ANT P (antenna) Q 5 PICTURE MODE R 6 SLEEP S T 7 JUMP U 8 TV/SAT V 9 RESET q; If you have a non-Sony VCR, you want the TV to turn off the equipment programmed into the remote control,... See "Using the Audio Menu" on page 49. 3 Use to power off the sound. Press to step through the available video picture modes: Vivid, Standard, Movie and Sports. For details, see "Programming the Remote Control" on page 34 for details. Press to ...
Primary User Manual
Page 11
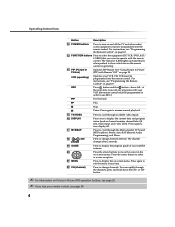
...your VCR. at any programs with Remote Y181" on and off . Press to change channels. The channel changes after 2 seconds. See "Using Picture in Picture (PIP) with your satellite antenna. N Play. Press again to select or access an option. X Pause. ql GUIDE w; Press to display the... Sound (MTS) options: Stereo, Auto SAP (Second Audio Programming), and Mono. Press the arrow buttons to move the cursor in Picture) Operates PIP feature. Press again to exit the menu at the same time to record any time. Operating Instructions Button Description qs ...
...your VCR. at any programs with Remote Y181" on and off . Press to change channels. The channel changes after 2 seconds. See "Using Picture in Picture (PIP) with your satellite antenna. N Play. Press again to select or access an option. X Pause. ql GUIDE w; Press to display the... Sound (MTS) options: Stereo, Auto SAP (Second Audio Programming), and Mono. Press the arrow buttons to move the cursor in Picture) Operates PIP feature. Press again to exit the menu at the same time to record any time. Operating Instructions Button Description qs ...
Primary User Manual
Page 12
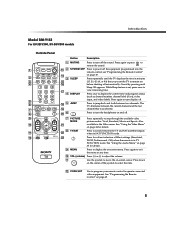
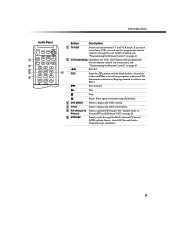
... Press repeatedly to step through the available video picture modes: Vivid, Standard, Movie and Sports. VOL (volume) Press (+) or (-) to restore the sound. Press again or press to adjust the volume. q; w; 6 Press to turn display off the sound. Introduction Model RM-Y182 For KV-32FV300, KV-36FV300 models Outside Panel 1 2 3 4 5 6 7 8 9 0 qa qs Button Description...
... Press repeatedly to step through the available video picture modes: Vivid, Standard, Movie and Sports. VOL (volume) Press (+) or (-) to restore the sound. Press again or press to adjust the volume. q; w; 6 Press to turn display off the sound. Introduction Model RM-Y182 For KV-32FV300, KV-36FV300 models Outside Panel 1 2 3 4 5 6 7 8 9 0 qa qs Button Description...
Primary User Manual
Page 13
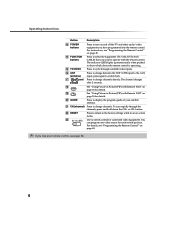
..." on page 26 for details. GUIDE Press to display the program guide of your remote control, see page 54. 6 ql See "Using Picture in an on-screen menu. wa CH (channel) Press to change channels directly. You can program one video source for connected video equipment. ...- wd AV 1 2 3 DVD Use to switch control for each switch position. ws RESET Press to return to the factory settings while in Picture (PIP) with Remote Y182" on page 26 for details. To scan rapidly through available video inputs. Operating Instructions Button Description qd POWER buttons Press...
..." on page 26 for details. GUIDE Press to display the program guide of your remote control, see page 54. 6 ql See "Using Picture in an on-screen menu. wa CH (channel) Press to change channels directly. You can program one video source for connected video equipment. ...- wd AV 1 2 3 DVD Use to switch control for each switch position. ws RESET Press to return to the factory settings while in Picture (PIP) with Remote Y182" on page 26 for details. To scan rapidly through available video inputs. Operating Instructions Button Description qd POWER buttons Press...
Primary User Manual
Page 14
... Press to cycle through the Multi-channel TV Sound (MTS) options: Stereo, Auto SAP (Second Audio Programming), and Mono. 7 If you have a non-Sony VCR, you will need to program the remote control to use REC.) M Fast-forward. N Play. Press again to resume normal playback. 3 DVD MENU... DVD's menu. 4 TITLE Press to display the DVD's Title menu. 5 PIP (Picture in Picture (PIP) with your VCR (the remote control must be programmed in order to recognize your VCR. See "Using Picture in Picture) 6 MTS/SAP Press to record any programs with Remote Y182" on page 49. ...
... Press to cycle through the Multi-channel TV Sound (MTS) options: Stereo, Auto SAP (Second Audio Programming), and Mono. 7 If you have a non-Sony VCR, you will need to program the remote control to use REC.) M Fast-forward. N Play. Press again to resume normal playback. 3 DVD MENU... DVD's menu. 4 TITLE Press to display the DVD's Title menu. 5 PIP (Picture in Picture (PIP) with your VCR (the remote control must be programmed in order to recognize your VCR. See "Using Picture in Picture) 6 MTS/SAP Press to record any programs with Remote Y182" on page 49. ...
Primary User Manual
Page 15
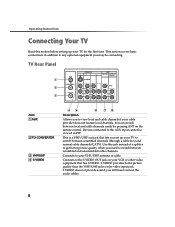
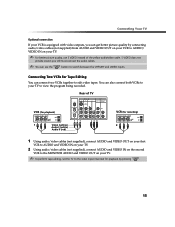
... does not feature local channels. Connects to view local and cable channels if your TV for the first time. S VIDEO provides better picture quality than the VHF/UHF jacks or the video input jack. you may be viewed in PIP. Operating Instructions Connecting Your TV Read ...this jack instead of a splitter to get better picture quality when you need to any optional equipment you still must connect the audio cables. 8 Devices connected to switch between scrambled channels (through ...
... does not feature local channels. Connects to view local and cable channels if your TV for the first time. S VIDEO provides better picture quality than the VHF/UHF jacks or the video input jack. you may be viewed in PIP. Operating Instructions Connecting Your TV Read ...this jack instead of a splitter to get better picture quality when you need to any optional equipment you still must connect the audio cables. 8 Devices connected to switch between scrambled channels (through ...
Primary User Manual
Page 16
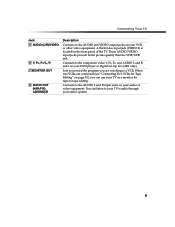
... TV. Connects to the component video Y, PB, PR, and AUDIO L and R jacks on your audio or video equipment. These AUDIO/VIDEO input jacks provide better picture quality than the VHF/UHF jack. Lets you record the program you can listen to your TV's audio through your VCR or other video equipment...
... TV. Connects to the component video Y, PB, PR, and AUDIO L and R jacks on your audio or video equipment. These AUDIO/VIDEO input jacks provide better picture quality than the VHF/UHF jack. Lets you record the program you can listen to your TV's audio through your VCR or other video equipment...
Primary User Manual
Page 20
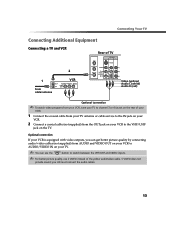
... If your VCR is equipped with video outputs, you still must connect the audio cables. 13 S VIDEO does not provide sound; you can get better picture quality by connecting audio/video cables (not supplied) from the OUT jack on your TV. ✍ You can use the button to switch between the... VHF/UHF and VIDEO inputs. ✍ For better picture quality, use S VIDEO instead of your VCR). 1 Connect the coaxial cable from your TV antenna or cable service to the IN jack on your VCR...
... If your VCR is equipped with video outputs, you still must connect the audio cables. 13 S VIDEO does not provide sound; you can get better picture quality by connecting audio/video cables (not supplied) from the OUT jack on your TV. ✍ You can use the button to switch between the... VHF/UHF and VIDEO inputs. ✍ For better picture quality, use S VIDEO instead of your VCR). 1 Connect the coaxial cable from your TV antenna or cable service to the IN jack on your VCR...
Primary User Manual
Page 22
Connecting Two VCRs for Tape Editing You can get better picture quality by connecting audio/video cables (not supplied) from AUDIO and VIDEO OUT on your VCR to AUDIO/ VIDEO IN on your TV to view ... cables (not supplied), connect AUDIO and VIDEO IN on the second VCR to the MONITOR AUDIO and VIDEO OUT on your TV. ✍ For better picture quality, use the button to switch between the VHF/UHF and VIDEO inputs. Connecting Your TV Optional connection If your VCR is equipped with video...
Connecting Two VCRs for Tape Editing You can get better picture quality by connecting audio/video cables (not supplied) from AUDIO and VIDEO OUT on your VCR to AUDIO/ VIDEO IN on your TV to view ... cables (not supplied), connect AUDIO and VIDEO IN on the second VCR to the MONITOR AUDIO and VIDEO OUT on your TV. ✍ For better picture quality, use the button to switch between the VHF/UHF and VIDEO inputs. Connecting Your TV Optional connection If your VCR is equipped with video...

Primary User Manual
Page 23
... AUDIO and VIDEO IN on your TV. ✍ You can use the button to switch between the VHF/UHF and VIDEO inputs. ✍ For better picture quality, use S VIDEO instead of the yellow audio/video cable. S VIDEO does not provide sound;
... AUDIO and VIDEO IN on your TV. ✍ You can use the button to switch between the VHF/UHF and VIDEO inputs. ✍ For better picture quality, use S VIDEO instead of the yellow audio/video cable. S VIDEO does not provide sound;
Primary User Manual
Page 25
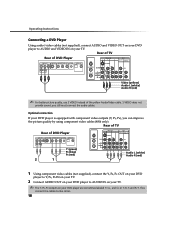
Rear of TV Rear of DVD Player 1 3 4 MONITOR AUDIO OUT (VAR/FIX) Video (yellow) Audio L (white) Audio R (red) ✍ For better picture quality, use S VIDEO instead of DVD Player 1 3 4 MONITOR AUDIO OUT (VAR/FIX) Y (green) PB (blue) PR (red) 2 1 Audio L (white) Audio R (red) 1 Using ... connection If your DVD player is equipped with component video outputs (Y, PB, PR), you still must connect the audio cables. you can improve the picture quality by using component video cables (480i only). Rear of TV Rear of the yellow Audio/Video cable. S VIDEO does not provide sound; If...
Rear of TV Rear of DVD Player 1 3 4 MONITOR AUDIO OUT (VAR/FIX) Video (yellow) Audio L (white) Audio R (red) ✍ For better picture quality, use S VIDEO instead of DVD Player 1 3 4 MONITOR AUDIO OUT (VAR/FIX) Y (green) PB (blue) PR (red) 2 1 Audio L (white) Audio R (red) 1 Using ... connection If your DVD player is equipped with component video outputs (Y, PB, PR), you still must connect the audio cables. you can improve the picture quality by using component video cables (480i only). Rear of TV Rear of the yellow Audio/Video cable. S VIDEO does not provide sound; If...
Primary User Manual
Page 26
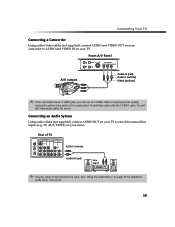
... Audio System Using audio cables (not supplied), connect AUDIO OUT on page 35 for sound. See "Using the Audio Menu" on your stereo to improve picture quality; Front A/V Panel S VIDEO Front A/V Panel A/V output Audio R (red) Audio L (white) Video (yellow) ✍ If the camcorder has an S VIDEO jack, you can use an...
... Audio System Using audio cables (not supplied), connect AUDIO OUT on page 35 for sound. See "Using the Audio Menu" on your stereo to improve picture quality; Front A/V Panel S VIDEO Front A/V Panel A/V output Audio R (red) Audio L (white) Video (yellow) ✍ If the camcorder has an S VIDEO jack, you can use an...
Primary User Manual
Page 29
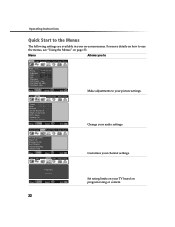
...: End: Video Audio Channel Parent Timer Setup Basic Change your channel settings. Menu Allows you to Video Audio Channel Parent Timer Setup Basic Mode : Vivid Picture Brightness Color Hue Sharpness Color Temp. : Cool ClearEdge VM: High DynaBlack: High Move: Select: End: Video Audio Channel Parent Timer Setup Basic Make adjustments to...: End: Set rating limits on your TV based on page 33. Operating Instructions Quick Start to the Menus The following settings are available in your picture settings.
...: End: Video Audio Channel Parent Timer Setup Basic Change your channel settings. Menu Allows you to Video Audio Channel Parent Timer Setup Basic Mode : Vivid Picture Brightness Color Hue Sharpness Color Temp. : Cool ClearEdge VM: High DynaBlack: High Move: Select: End: Video Audio Channel Parent Timer Setup Basic Make adjustments to...: End: Set rating limits on your TV based on page 33. Operating Instructions Quick Start to the Menus The following settings are available in your picture settings.

Primary User Manual
Page 30
Select closed captioning options, label video inputs, adjust tilt correction, enhance your picture resolution for your TV and program scheduled viewing using Timer 1 and Timer 2. Set the menus to Set the clock on your DVD (16:9 Enhanced), select ...: English 16:9 Enhanced: Auto Demo Move: Select: End: Video Audio Channel Parent Timer Setup Basic Press to enter Basic Menu Move: Select: End: Basic Menu Picture Caption Vision: Off Effect: TruSurround Advanced Menu Adjust Picture white level Move: Select: End: Allows you to display a simplified menu of the menus.
Select closed captioning options, label video inputs, adjust tilt correction, enhance your picture resolution for your TV and program scheduled viewing using Timer 1 and Timer 2. Set the menus to Set the clock on your DVD (16:9 Enhanced), select ...: English 16:9 Enhanced: Auto Demo Move: Select: End: Video Audio Channel Parent Timer Setup Basic Press to enter Basic Menu Move: Select: End: Basic Menu Picture Caption Vision: Off Effect: TruSurround Advanced Menu Adjust Picture white level Move: Select: End: Allows you to display a simplified menu of the menus.


