
Operating Instructions
Page 2
... Serial No. Operation is no guarantee that may cause harmful interference to radio communications. However, there is subject to the following Sony LCD Monitor only with other outlet unless the blades can be fully inserted. "PLAYSTATION" is a registered trademark and "PS3" is ...particular installation. KLV-40ZX1M SU-WL700 SU-FL71M Use with the following measures: s Reorient or relocate the receiving antenna. To Customers Sufficient expertise is a trademark of the following WALL-MOUNT BRACKET or TV-stand. Be sure to subcontract the installation to a Sony dealer or...
... Serial No. Operation is no guarantee that may cause harmful interference to radio communications. However, there is subject to the following Sony LCD Monitor only with other outlet unless the blades can be fully inserted. "PLAYSTATION" is a registered trademark and "PS3" is ...particular installation. KLV-40ZX1M SU-WL700 SU-FL71M Use with the following measures: s Reorient or relocate the receiving antenna. To Customers Sufficient expertise is a trademark of the following WALL-MOUNT BRACKET or TV-stand. Be sure to subcontract the installation to a Sony dealer or...

Operating Instructions
Page 3
... Using LCD Monitor Settings Picture Settings...16 Sound Settings ...18 Screen Settings ...19 HDMI Settings...20 Monitor Settings ...20 PC Settings ...21 Optional Accessories Using with the Wall-Mount Bracket/Speaker System 22 Using with the Floor Stand/Speaker System 24 Other Information US Troubleshooting ...26 Specifications ...28 Customer Support http://www.sony...
... Using LCD Monitor Settings Picture Settings...16 Sound Settings ...18 Screen Settings ...19 HDMI Settings...20 Monitor Settings ...20 PC Settings ...21 Optional Accessories Using with the Wall-Mount Bracket/Speaker System 22 Using with the Floor Stand/Speaker System 24 Other Information US Troubleshooting ...26 Specifications ...28 Customer Support http://www.sony...

Operating Instructions
Page 5
... Unit Be sure to follow these guidelines to hold it securely. Table-Top Stand Accessory box LCD monitor 2 Place the Table-Top Stand on the LCD panel. Installing the Unit This Unit can be mounted on a wall using a WallMount Bracket or placed on the rear of the panel. (Continued...shocks, vibration, or excessive force. For product protection and safety reasons, Sony strongly recommends that you use the screws provided with the display. ~ • Do not remove the blue tape that secures the plate on a TV stand (each sold separately). Getting Started Getting Started 1. The screws ...
... Unit Be sure to follow these guidelines to hold it securely. Table-Top Stand Accessory box LCD monitor 2 Place the Table-Top Stand on the LCD panel. Installing the Unit This Unit can be mounted on a wall using a WallMount Bracket or placed on the rear of the panel. (Continued...shocks, vibration, or excessive force. For product protection and safety reasons, Sony strongly recommends that you use the screws provided with the display. ~ • Do not remove the blue tape that secures the plate on a TV stand (each sold separately). Getting Started Getting Started 1. The screws ...

Operating Instructions
Page 6
... US Attach the two bottom screws first, then the top two screws. 2 Top screws 1 Bottom screws ~ • If an electric screwdriver is to be wall-mounted of installed on the table with two or more people. Be sure to the Table-Top Stand using the supplied screws. F mark Packing sheet, etc.... 2 Remove the four screws from the Table-Top Stand for the Wall-Mount Bracket or Floor Stand. • When you carry the LCD monitor, move the monitor with a mat laid below. • Hold the Table-Top Stand firmly with two or more people.
... US Attach the two bottom screws first, then the top two screws. 2 Top screws 1 Bottom screws ~ • If an electric screwdriver is to be wall-mounted of installed on the table with two or more people. Be sure to the Table-Top Stand using the supplied screws. F mark Packing sheet, etc.... 2 Remove the four screws from the Table-Top Stand for the Wall-Mount Bracket or Floor Stand. • When you carry the LCD monitor, move the monitor with a mat laid below. • Hold the Table-Top Stand firmly with two or more people.

Operating Instructions
Page 7
... around the set . Installed on how to use the Wall-Mount Bracket compatible to your LCD Monitor has adequate air circulation. For details, see page 22. • For product protection and safety reasons, Sony strongly recommends that face the screen with the WallMount Bracket when ... Use spot lighting directed down from small children. Preparation for Wall-Mount Bracket This model is ready to be performed by a Sony dealer or licensed contractor. • Sufficient expertise is required in installing this LCD monitor, especially to determine the strength of the wall for withstanding ...
... around the set . Installed on how to use the Wall-Mount Bracket compatible to your LCD Monitor has adequate air circulation. For details, see page 22. • For product protection and safety reasons, Sony strongly recommends that face the screen with the WallMount Bracket when ... Use spot lighting directed down from small children. Preparation for Wall-Mount Bracket This model is ready to be performed by a Sony dealer or licensed contractor. • Sufficient expertise is required in installing this LCD monitor, especially to determine the strength of the wall for withstanding ...

Operating Instructions
Page 9
... protection, follow all three measures recommended above. 9 US Getting Started Anchor the Unit to the Wall Remove the two screws from the top-most wall-mount holes located on the rear of the unit (pass the rope through the wall-anchor, then attach to the other M6 anchor bolt) Wall...-mount holes Anchor bolts Rope or chain Wallanchor ~ • Securing the unit to the stand without securing it and the stand to the wall provides minimum ...
... protection, follow all three measures recommended above. 9 US Getting Started Anchor the Unit to the Wall Remove the two screws from the top-most wall-mount holes located on the rear of the unit (pass the rope through the wall-anchor, then attach to the other M6 anchor bolt) Wall...-mount holes Anchor bolts Rope or chain Wallanchor ~ • Securing the unit to the stand without securing it and the stand to the wall provides minimum ...

Operating Instructions
Page 22
... the accessories together with the installation steps in the instruction manual of the LCD Monitor. 2 Place spacers (black - Installing With the Unit. The following optional accessories, such as the Wall-Mount Bracket (as of Wall-Mount Bracket. 1 Make sure that the Table-Top Stand is removed (if ...step 6 in this manual for secure installation. When using only the Wall-Mount Bracket Go to the LCD Monitor when unpacking. Optional Accessories This unit is designed for use the LCD Monitor with the Wall-Mount Bracket. Spacers (black) (4) Sound does not output from the rear of ...
... the accessories together with the installation steps in the instruction manual of the LCD Monitor. 2 Place spacers (black - Installing With the Unit. The following optional accessories, such as the Wall-Mount Bracket (as of Wall-Mount Bracket. 1 Make sure that the Table-Top Stand is removed (if ...step 6 in this manual for secure installation. When using only the Wall-Mount Bracket Go to the LCD Monitor when unpacking. Optional Accessories This unit is designed for use the LCD Monitor with the Wall-Mount Bracket. Spacers (black) (4) Sound does not output from the rear of ...

Operating Instructions
Page 23
...to 4-7. 23 US Screws (supplied with your Speaker System). Drop the HDMI cable from the right edge of the LCD Monitor. Mounting Bracket 7 Connect the AC power cord (supplied with your LCD Monitor) and the HDMI cable (supplied with your Speaker System) When installing the Speaker System Fix the power cord ...with the two hooks, and drop the cord down from the left or right edge of the LCD Monitor. 8 Follow the instruction manual supplied with the Wall-Mount Bracket to continue installing this unit on the wall. ~ • You cannot connect cables to the...
...to 4-7. 23 US Screws (supplied with your Speaker System). Drop the HDMI cable from the right edge of the LCD Monitor. Mounting Bracket 7 Connect the AC power cord (supplied with your LCD Monitor) and the HDMI cable (supplied with your Speaker System) When installing the Speaker System Fix the power cord ...with the two hooks, and drop the cord down from the left or right edge of the LCD Monitor. 8 Follow the instruction manual supplied with the Wall-Mount Bracket to continue installing this unit on the wall. ~ • You cannot connect cables to the...

Operating Instructions
Page 25
... the center. 7 Follow the instruction manual supplied with the Wall-Mount Bracket to continue the installation. ~ • You cannot connect cables to the LCD Monitor after it is wall-mounted or installed on the Floor Stand. • When installing the LCD Monitor to a wall or the Floor Stand, lift the unit ...I J. 5 Fix the Speaker System with the cloth under the unit. Insert this part under the Bracket I J. Screws M6 × 20 (supplied with your LCD Monitor) Optional Accessories 25 US Tighten the upper two screws (temporarily fixed in the junction part for the stand of the...
... the center. 7 Follow the instruction manual supplied with the Wall-Mount Bracket to continue the installation. ~ • You cannot connect cables to the LCD Monitor after it is wall-mounted or installed on the Floor Stand. • When installing the LCD Monitor to a wall or the Floor Stand, lift the unit ...I J. 5 Fix the Speaker System with the cloth under the unit. Insert this part under the Bracket I J. Screws M6 × 20 (supplied with your LCD Monitor) Optional Accessories 25 US Tighten the upper two screws (temporarily fixed in the junction part for the stand of the...
Operating Instructions
Page 28
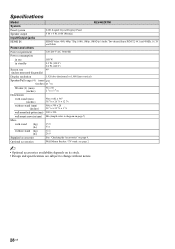
Specifications Model System KLV-40ZX1M Panel system Speaker output Input/Output jacks LCD (Liquid Crystal Display) Panel 5 W + 5 W, ...50/60 Hz Power consumption in use 188 W in standby 0.3 W (120 V) 0.4 W (240 V) Screen size 40 (inches measured diagonally) Display resolution 1,920 dots (horizontal) × 1,080 lines (vertical) Speaker/Full range (4) (...5/8 × 1 1/8 300 × 300 M6 (length: refer to change without notice. 28 US Wall-Mount Bracket / TV stand: see page 2 ~ • Optional accessories availability depends on its stock. • Design and specifications are...
Specifications Model System KLV-40ZX1M Panel system Speaker output Input/Output jacks LCD (Liquid Crystal Display) Panel 5 W + 5 W, ...50/60 Hz Power consumption in use 188 W in standby 0.3 W (120 V) 0.4 W (240 V) Screen size 40 (inches measured diagonally) Display resolution 1,920 dots (horizontal) × 1,080 lines (vertical) Speaker/Full range (4) (...5/8 × 1 1/8 300 × 300 M6 (length: refer to change without notice. 28 US Wall-Mount Bracket / TV stand: see page 2 ~ • Optional accessories availability depends on its stock. • Design and specifications are...


