
Operating Instructions
Page 3
...contractors and pay adequate attention to direct illumination or direct sunlight. WARNING To reduce the risk of the FCC rules. KLV-32U100M KLV-40U100M SONY WALL-MOUNT BRACKET MODEL NO. Telephone Number: 858-942-2230 This device complies with the instructions, may cause instability...Use the following Sony appliance(s) only with the limits for several days, disconnect the power by turning the equipment off and on the apparatus. It is encouraged to try to the presence of Conformity Trade Name: SONY Model: KLV-32U100M/KLV-40U100M Responsible Party: Sony Electronics Inc....
...contractors and pay adequate attention to direct illumination or direct sunlight. WARNING To reduce the risk of the FCC rules. KLV-32U100M KLV-40U100M SONY WALL-MOUNT BRACKET MODEL NO. Telephone Number: 858-942-2230 This device complies with the instructions, may cause instability...Use the following Sony appliance(s) only with the limits for several days, disconnect the power by turning the equipment off and on the apparatus. It is encouraged to try to the presence of Conformity Trade Name: SONY Model: KLV-32U100M/KLV-40U100M Responsible Party: Sony Electronics Inc....

Operating Instructions
Page 4
...ventilation openings. ENERGY STAR® is incorporated under USP4638258, 4482866. A grounding type plug has two blades and a third grounding prong. To Sony Dealers For installation of the polarized or grounding-type plug. WOW technology is a U.S. Install in the WOW mode. BBE High Definition Sound is... or when unused for replacement of time. 14) Refer all servicing to Apple Computer, Inc., registered in any heat sources such as power-supply cord or plug is a trademark licensed to qualified service personnel. "BBE" and BBE symbol are trademarks of HDMI Licensing LLC....
...ventilation openings. ENERGY STAR® is incorporated under USP4638258, 4482866. A grounding type plug has two blades and a third grounding prong. To Sony Dealers For installation of the polarized or grounding-type plug. WOW technology is a U.S. Install in the WOW mode. BBE High Definition Sound is... or when unused for replacement of time. 14) Refer all servicing to Apple Computer, Inc., registered in any heat sources such as power-supply cord or plug is a trademark licensed to qualified service personnel. "BBE" and BBE symbol are trademarks of HDMI Licensing LLC....

Operating Instructions
Page 5
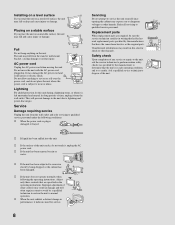
... If the AC power cord is equipped with a wet hand, it in a fire. If you are unable to insert the plug fully into the unit through the cabinet slots as vases, shall be connected to have a suitable outlet installed. Wiring For your dealer or Sony service center to grasp... the plug when disconnecting the AC power cord. s Unplug the AC power cord when cleaning this can result in fire or electric shock. When the unit is loose, it ...
... If the AC power cord is equipped with a wet hand, it in a fire. If you are unable to insert the plug fully into the unit through the cabinet slots as vases, shall be connected to have a suitable outlet installed. Wiring For your dealer or Sony service center to grasp... the plug when disconnecting the AC power cord. s Unplug the AC power cord when cleaning this can result in fire or electric shock. When the unit is loose, it ...
Operating Instructions
Page 8
...subject to perform routine safety checks (as the original parts. s If the unit does not operate normally when following conditions: s When the power cord or plug is left unattended and unused for long periods of time, unplug it indicates need for this unit during a lightning storm, or... when it , unplug the AC power cord. This will often require extensive work by the manufacturer) to determine that have the same characteristics as specified by a qualified technician to ...
...subject to perform routine safety checks (as the original parts. s If the unit does not operate normally when following conditions: s When the power cord or plug is left unattended and unused for long periods of time, unplug it indicates need for this unit during a lightning storm, or... when it , unplug the AC power cord. This will often require extensive work by the manufacturer) to determine that have the same characteristics as specified by a qualified technician to ...

Operating Instructions
Page 9
...17 Satellite Receiver 18 VCR and Cable 19 HD Equipment 20 DVD Player 22 HDMI-Equipped Device 24 DVI-HDTV-Equipped Device 25 Personal Computer 26 Camcorder or Video Game Equipment 27 Using the Unit Button Descriptions 28 Special... on the Remote Control........... 29 Using the Wide Screen Mode 29 Using the Freeze Function 30 Using the Power Saving Function 30 Using the Sleep Function 31 Using the Settings Overview of the Settings 32 Using the Picture...Setup Settings 40 Selecting Setup Options 40 Other Information Troubleshooting 42 Contacting Sony 43 Specifications 44 Index 45 9
...17 Satellite Receiver 18 VCR and Cable 19 HD Equipment 20 DVD Player 22 HDMI-Equipped Device 24 DVI-HDTV-Equipped Device 25 Personal Computer 26 Camcorder or Video Game Equipment 27 Using the Unit Button Descriptions 28 Special... on the Remote Control........... 29 Using the Wide Screen Mode 29 Using the Freeze Function 30 Using the Power Saving Function 30 Using the Sleep Function 31 Using the Settings Overview of the Settings 32 Using the Picture...Setup Settings 40 Selecting Setup Options 40 Other Information Troubleshooting 42 Contacting Sony 43 Specifications 44 Index 45 9

Operating Instructions
Page 13
... Description 1 MENU Press to adjust the volume. If your headphones. For details, see page 41. Use it as up/down buttons. 5 POWER Press to turn on and off the unit. 6 Headphones jack Connects to your headphones do not match the jack, use a suitable plug adaptor (not supplied). 7 ...
... Description 1 MENU Press to adjust the volume. If your headphones. For details, see page 41. Use it as up/down buttons. 5 POWER Press to turn on and off the unit. 6 Headphones jack Connects to your headphones do not match the jack, use a suitable plug adaptor (not supplied). 7 ...

Operating Instructions
Page 14
Introducing the Unit Item 8 STANDBY LED 9 POWER LED 0 (IR) Infrared Receiver Description Lights up in the standby mode for PC inputs. Receives IR signals from the remote control. 14 Lights up in red when in green when the unit is turned on.
Introducing the Unit Item 8 STANDBY LED 9 POWER LED 0 (IR) Infrared Receiver Description Lights up in the standby mode for PC inputs. Receives IR signals from the remote control. 14 Lights up in red when in green when the unit is turned on.
Operating Instructions
Page 16
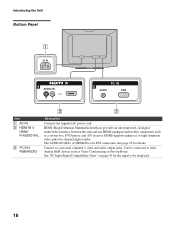
... IN 4 AUDIO IN RL PC IN 5 AUDIO RGB Jack 1 AC IN 2 HDMI IN 4 HDMI/ R-AUDIO IN-L 3 PC IN 5 RGB/AUDIO Description Connects the supplied AC power cord. See "PC Input Signal Compatibility Chart" on page 39 for the signal to be connected to a personal computer's video and audio output jacks. See...
... IN 4 AUDIO IN RL PC IN 5 AUDIO RGB Jack 1 AC IN 2 HDMI IN 4 HDMI/ R-AUDIO IN-L 3 PC IN 5 RGB/AUDIO Description Connects the supplied AC power cord. See "PC Input Signal Compatibility Chart" on page 39 for the signal to be connected to a personal computer's video and audio output jacks. See...

Operating Instructions
Page 20
... 1080i formats. Connecting the Unit HD Equipment z If your equipment's AUDIO output jacks to the unit's AUDIO input jacks. Note that this unit displays all power sources before making any connections. 1 Using a component video cable, connect your equipment's YPBPR output jacks to receive the broadcasting signals are digital cable box, digital...
... 1080i formats. Connecting the Unit HD Equipment z If your equipment's AUDIO output jacks to the unit's AUDIO input jacks. Note that this unit displays all power sources before making any connections. 1 Using a component video cable, connect your equipment's YPBPR output jacks to receive the broadcasting signals are digital cable box, digital...

Operating Instructions
Page 26
...and the STANDBY LED lights in the Setup settings when no signal is recommended to the computer before connecting the supplied HD15-HD15 cable. The power turns off when you can view and listen to select the PC input (Video 5). To turn it may be necessary to use the ...the computer. Connecting the Unit Personal Computer z When connecting to an Apple Macintosh computer, use an adapter (not supplied). Press V5 on , press the power button again. For some Apple Macintosh computers, it on the remote control. z If the picture is input. The PC will exit standby mode when signal...
...and the STANDBY LED lights in the Setup settings when no signal is recommended to the computer before connecting the supplied HD15-HD15 cable. The power turns off when you can view and listen to select the PC input (Video 5). To turn it may be necessary to use the ...the computer. Connecting the Unit Personal Computer z When connecting to an Apple Macintosh computer, use an adapter (not supplied). Press V5 on , press the power button again. For some Apple Macintosh computers, it on the remote control. z If the picture is input. The PC will exit standby mode when signal...

Operating Instructions
Page 28
...off . If Sleep Timer is selected. See "Selecting Picture Options" on before shutting off the unit. Press repeatedly to remain on page 33. The power saving modes can be also accessed in minutes (15, 30, 45, 60, 90 or 120) that you want the unit to cycle through the...Off. Press repeatedly to insert the E first." The sound modes can be canceled after a few seconds or press again to adjust the volume. See Power Saving on page 35. See "Selecting Sound Options" on page 41. Press to immediately cancel the display. Some functions will be also accessed in the...
...off . If Sleep Timer is selected. See "Selecting Picture Options" on before shutting off the unit. Press repeatedly to remain on page 33. The power saving modes can be also accessed in minutes (15, 30, 45, 60, 90 or 120) that you want the unit to cycle through the...Off. Press repeatedly to insert the E first." The sound modes can be canceled after a few seconds or press again to adjust the volume. See Power Saving on page 35. See "Selecting Sound Options" on page 41. Press to immediately cancel the display. Some functions will be also accessed in the...
Operating Instructions
Page 30
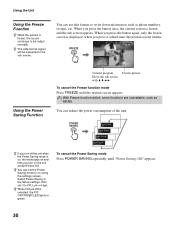
...b. Frozen picture To cancel the Freeze function mode Press FREEZE until "Power Saving: Off" appears. 30 You can set it a third time, the normal screen returns. POWER SAVING Power Saving : Off Power Saving : Low Power Saving : High Power Saving : Picture Off z If you turn on using the settings ...screen. z You can reduce the power consumption of the unit. When you press it to Off...
...b. Frozen picture To cancel the Freeze function mode Press FREEZE until "Power Saving: Off" appears. 30 You can set it a third time, the normal screen returns. POWER SAVING Power Saving : Off Power Saving : Low Power Saving : High Power Saving : Picture Off z If you turn on using the settings ...screen. z You can reduce the power consumption of the unit. When you press it to Off...

Operating Instructions
Page 31
To cancel Sleep Timer Press SLEEP repeatedly until "Sleep Timer : Off" appears or turn the unit power to off . z "Sleep Timer: Power will be turned off" appears one minute before the unit shuts off then turn on the unit again. Using the Unit 31 z You can set ...
To cancel Sleep Timer Press SLEEP repeatedly until "Sleep Timer : Off" appears or turn the unit power to off . z "Sleep Timer: Power will be turned off" appears one minute before the unit shuts off then turn on the unit again. Using the Unit 31 z You can set ...
Operating Instructions
Page 32
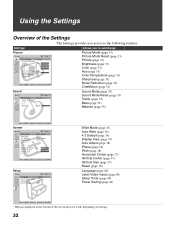
...: Vertical Size: Reset: Video 1 Wide Zoom On Wide Zoom Normal 0 0 0 Select : Enter: Back: Exit: MENU Setup Setup Language: Label Video Inputs Sleep Timer Power Saving: Video 1 English Off Off Wide Mode (page 36) Auto Wide (page 36) 4:3 Default (page 36) Display Area (page 37) Auto Adjust (page 38) Phase...) Vertical Center (page 37) Vertical Size (page 37) Reset (page 38) Language (page 40) Label Video Inputs (page 40) Sleep Timer (page 40) Power Saving (page 41) Select : Enter: Back: Exit: MENU * Buttons displayed at the bottom of the screen may not work, depending on settings. 32
...: Vertical Size: Reset: Video 1 Wide Zoom On Wide Zoom Normal 0 0 0 Select : Enter: Back: Exit: MENU Setup Setup Language: Label Video Inputs Sleep Timer Power Saving: Video 1 English Off Off Wide Mode (page 36) Auto Wide (page 36) 4:3 Default (page 36) Display Area (page 37) Auto Adjust (page 38) Phase...) Vertical Center (page 37) Vertical Size (page 37) Reset (page 38) Language (page 40) Label Video Inputs (page 40) Sleep Timer (page 40) Power Saving (page 41) Select : Enter: Back: Exit: MENU * Buttons displayed at the bottom of the screen may not work, depending on settings. 32

Operating Instructions
Page 35
... audio image by producing deep and rich bass tones and clear treble tones, enabling you to increase or decrease lower-pitched sounds. Adjust to enjoy powerful sound effects like those in Sound Mode. 35 Press V v to the default setting. Using the Settings Sound Video 1 Sound Mode: DyDnyanmamicic Sound Mode Reset Standard...
... audio image by producing deep and rich bass tones and clear treble tones, enabling you to increase or decrease lower-pitched sounds. Adjust to enjoy powerful sound effects like those in Sound Mode. 35 Press V v to the default setting. Using the Settings Sound Video 1 Sound Mode: DyDnyanmamicic Sound Mode Reset Standard...
Operating Instructions
Page 40
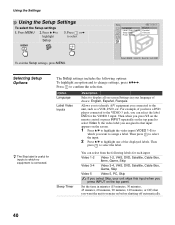
... input. 2 Press V/v to remain on the top panel. Allows you to identify A/V equipment you want to assign a label. Setup Language: Label Video Inputs Sleep Timer Power Saving: Video 1 English Español FOrfaf nçais Off Select : Enter: Back: Exit: MENU Selecting Setup Options z The Skip label is useful for inputs...
... input. 2 Press V/v to remain on the top panel. Allows you to identify A/V equipment you want to assign a label. Setup Language: Label Video Inputs Sleep Timer Power Saving: Video 1 English Español FOrfaf nçais Off Select : Enter: Back: Exit: MENU Selecting Setup Options z The Skip label is useful for inputs...
Operating Instructions
Page 41
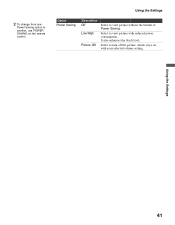
Audio stays on the remote control. Select to view picture without the benefit of Power Saving. Using the Settings 41 z To change from one Power Saving option to another, use POWER SAVING on with reduced power consumption. It also enhances the black level. Using the Settings Option Power Saving Description Off Low/High Picture Off Select to turn off the picture. Select to view picture with your selected volume setting.
Audio stays on the remote control. Select to view picture without the benefit of Power Saving. Using the Settings 41 z To change from one Power Saving option to another, use POWER SAVING on with reduced power consumption. It also enhances the black level. Using the Settings Option Power Saving Description Off Low/High Picture Off Select to turn off the picture. Select to view picture with your selected volume setting.

Operating Instructions
Page 42
... set -top box/VCR antenna cable away from the playback/recording of a VCR. Other Information Troubleshooting Problem Possible Remedies No picture. No picture. ❑ Check Power Saving settings (page 41). Striped noise during ❑ This is not ❑ Adjust the Picture Mode options in front of the unit or at the...
... set -top box/VCR antenna cable away from the playback/recording of a VCR. Other Information Troubleshooting Problem Possible Remedies No picture. No picture. ❑ Check Power Saving settings (page 41). Striped noise during ❑ This is not ❑ Adjust the Picture Mode options in front of the unit or at the...
Operating Instructions
Page 44
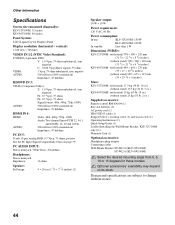
...from 0, 5, 10 or 15 degrees for these models. Other Information Specifications Screen size (measured diagonally): KLV-32U100M: 32 inches KLV-40U100M: 40 inches Panel System: LCD (Liquid Crystal Display) Panel Display resolution (horizontal × vertical): 1,366 dots × 768 ... × 20 cm (1 5/8 × 7 7/8 inches) (2) Speaker output: 10 W + 10 W Power requirement: 120 V AC, 60 Hz Power consumption: In use: KLV-32U100M: 150 W KLV-40U100M: 220 W In standby: Less than 1 W Dimensions (W/H/D): KLV-32U100M: (with stand) 798 × 580 × 220 mm (31 1/2 × 22 7/8 × 8...
...from 0, 5, 10 or 15 degrees for these models. Other Information Specifications Screen size (measured diagonally): KLV-32U100M: 32 inches KLV-40U100M: 40 inches Panel System: LCD (Liquid Crystal Display) Panel Display resolution (horizontal × vertical): 1,366 dots × 768 ... × 20 cm (1 5/8 × 7 7/8 inches) (2) Speaker output: 10 W + 10 W Power requirement: 120 V AC, 60 Hz Power consumption: In use: KLV-32U100M: 150 W KLV-40U100M: 220 W In standby: Less than 1 W Dimensions (W/H/D): KLV-32U100M: (with stand) 798 × 580 × 220 mm (31 1/2 × 22 7/8 × 8...

Operating Instructions
Page 45
... Bass 35 Brightness 33, 34 C CineMotion 10, 33 Color 33 Color Temperature 33, 34 Connections Camcorder or video game equipment 27 DVD player 22 DVI-HDTV-equipped device 25 HD equipment 20 HDMI-equipped device 24 Personal computer 26 Satellite receiver 18 VCR and cable 19 D Display Area 37 DISPLAY button... OFF/TIMER LED 13 Picture 33, 34 PICTURE button 28 Picture Mode 33, 34 Picture Mode Reset 33, 34 Pitch 38 POWER button 13, 28 POWER LED 14 Power Saving 30, 41 POWER SAVING button 28 R Reset 38 S S VIDEO jack 15 Settings Picture 32, 33 Screen 32, 36 Setup 32, 40 Sound 32, 35...
... Bass 35 Brightness 33, 34 C CineMotion 10, 33 Color 33 Color Temperature 33, 34 Connections Camcorder or video game equipment 27 DVD player 22 DVI-HDTV-equipped device 25 HD equipment 20 HDMI-equipped device 24 Personal computer 26 Satellite receiver 18 VCR and cable 19 D Display Area 37 DISPLAY button... OFF/TIMER LED 13 Picture 33, 34 PICTURE button 28 Picture Mode 33, 34 Picture Mode Reset 33, 34 Pitch 38 POWER button 13, 28 POWER LED 14 Power Saving 30, 41 POWER SAVING button 28 R Reset 38 S S VIDEO jack 15 Settings Picture 32, 33 Screen 32, 36 Setup 32, 40 Sound 32, 35...

