
Operating Instructions
Page 3
... with an extension cord, receptacle or other WALL-MOUNT BRACKET may be determined by turning the equipment off and on, the user is designed, for several days, disconnect the power by one way. Be sure to subcontract the installation to Sony dealers or licensed contractors and pay adequate attention to constitute a risk of Conformity Trade Name: SONY Model: KLV-32U100M/KLV-40U100M Responsible Party...
... with an extension cord, receptacle or other WALL-MOUNT BRACKET may be determined by turning the equipment off and on, the user is designed, for several days, disconnect the power by one way. Be sure to subcontract the installation to Sony dealers or licensed contractors and pay adequate attention to constitute a risk of Conformity Trade Name: SONY Model: KLV-32U100M/KLV-40U100M Responsible Party...

Operating Instructions
Page 5
... this manual for a long period of time, it in a fire. Unplug the AC power plug and clean it is damaged, stop using a chemically pretreated cloth, please follow the instruction provided on the AC power cord. s Clean the cabinet of an internal malfunction that could create a fire hazard. s Be sure to have the outlet changed. Contact your dealer or Sony service center...
... this manual for a long period of time, it in a fire. Unplug the AC power plug and clean it is damaged, stop using a chemically pretreated cloth, please follow the instruction provided on the AC power cord. s Clean the cabinet of an internal malfunction that could create a fire hazard. s Be sure to have the outlet changed. Contact your dealer or Sony service center...

Operating Instructions
Page 6
..., even for some time after a few moments. s The LCD contains a small amount of the unit. Also, do not operate the unit. These phenomena improve as its light source. s Avoid spraying insect repellent with volatile material to catch your eyes or mouth. For replacement, consult qualified service personnel. Installation Installation s When installing or removing the unit on the cables. Wall mount installation requires the use plugged sets near a bathtub...
..., even for some time after a few moments. s The LCD contains a small amount of the unit. Also, do not operate the unit. These phenomena improve as its light source. s Avoid spraying insect repellent with volatile material to catch your eyes or mouth. For replacement, consult qualified service personnel. Installation Installation s When installing or removing the unit on the cables. Wall mount installation requires the use plugged sets near a bathtub...

Operating Instructions
Page 9
... and Cable 19 HD Equipment 20 DVD Player 22 HDMI-Equipped Device 24 DVI-HDTV-Equipped Device 25 Personal Computer 26 Camcorder or Video Game Equipment 27 Using the Unit Button Descriptions 28 Special Buttons on the Remote Control........... 29 Using the Wide Screen Mode 29 Using the Freeze Function 30 Using the Power Saving Function 30 Using the Sleep Function 31 Using the Settings Overview of the Settings 32 Using the Picture Settings 33 Selecting Picture...
... and Cable 19 HD Equipment 20 DVD Player 22 HDMI-Equipped Device 24 DVI-HDTV-Equipped Device 25 Personal Computer 26 Camcorder or Video Game Equipment 27 Using the Unit Button Descriptions 28 Special Buttons on the Remote Control........... 29 Using the Wide Screen Mode 29 Using the Freeze Function 30 Using the Power Saving Function 30 Using the Sleep Function 31 Using the Settings Overview of the Settings 32 Using the Picture Settings 33 Selecting Picture...

Operating Instructions
Page 10
... broadcasts in wide screen (16:9) mode. s Component Video Input: Offers the best video quality for models KLV-32U100M and KLV-40U100M. See page 44 for purchasing this unit and any HDMI-equipped audio/video component, such as a set -top box (1080i, 720p, 480p and 480i) connections. This manual is for DVD (480p and 480i), and digital set -top box, DVD player, and A/V receiver. s HDMI (High-Definition Multimedia Interface): Provides an uncompressed, all-digital audio/video interface between this Sony HDTV Ready LCD unit.
... broadcasts in wide screen (16:9) mode. s Component Video Input: Offers the best video quality for models KLV-32U100M and KLV-40U100M. See page 44 for purchasing this unit and any HDMI-equipped audio/video component, such as a set -top box (1080i, 720p, 480p and 480i) connections. This manual is for DVD (480p and 480i), and digital set -top box, DVD player, and A/V receiver. s HDMI (High-Definition Multimedia Interface): Provides an uncompressed, all-digital audio/video interface between this Sony HDTV Ready LCD unit.

Operating Instructions
Page 11
Depending on the wall. 11 When Mounting on a Wall See the Instruction Guide supplied with the wall-mount bracket on how to the stand, and screw the belt with a wood screw (supplied). 2 Attach the support belt to mount the unit on the material used for the stand you chose for this unit, the supplied wood screw may not be suitable. You will need screws that are 3 to 4 mm (1/8 to prevent the unit...
Depending on the wall. 11 When Mounting on a Wall See the Instruction Guide supplied with the wall-mount bracket on how to the stand, and screw the belt with a wood screw (supplied). 2 Attach the support belt to mount the unit on the material used for the stand you chose for this unit, the supplied wood screw may not be suitable. You will need screws that are 3 to 4 mm (1/8 to prevent the unit...

Operating Instructions
Page 18
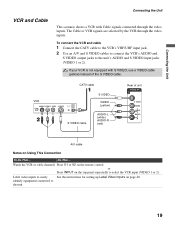
...with component video cables, see page 20. Satellite Receiver Satellite antenna cable S VIDEO cable S VIDEO VIDEO (yellow) A/V cable AUDIO-L (white) AUDIO-R (red) Rear of the S VIDEO cable. Press V1 or V2 on Using This Connection To Do This ... z If you connect the Digital Satellite Receiver with S VIDEO, use a VIDEO cable (yellow) instead of unit VIDEO IN 1 S VIDEO VIDEO L (MONO) AUDIO R Notes on the remote control. To connect a satellite receiver 1 Connect the satellite antenna cable to the satellite receiver's satellite input jack. 2 Use an A/V and S VIDEO cables to connect...
...with component video cables, see page 20. Satellite Receiver Satellite antenna cable S VIDEO cable S VIDEO VIDEO (yellow) A/V cable AUDIO-L (white) AUDIO-R (red) Rear of the S VIDEO cable. Press V1 or V2 on Using This Connection To Do This ... z If you connect the Digital Satellite Receiver with S VIDEO, use a VIDEO cable (yellow) instead of unit VIDEO IN 1 S VIDEO VIDEO L (MONO) AUDIO R Notes on the remote control. To connect a satellite receiver 1 Connect the satellite antenna cable to the satellite receiver's satellite input jack. 2 Use an A/V and S VIDEO cables to connect...
Operating Instructions
Page 19
... V2 on the top panel repeatedly to easily See the instructions for setting up Label Video Inputs on Using This Connection To Do This ... The Cable or VCR signals are selected by the VCR through the video inputs. If your VCR is not equipped with Cable signals connected through the video inputs. Do This ... identify equipment connected to the unit's AUDIO and S VIDEO input jacks (VIDEO 1 or 2). or Press INPUT on the remote control.
... V2 on the top panel repeatedly to easily See the instructions for setting up Label Video Inputs on Using This Connection To Do This ... The Cable or VCR signals are selected by the VCR through the video inputs. If your VCR is not equipped with Cable signals connected through the video inputs. Do This ... identify equipment connected to the unit's AUDIO and S VIDEO input jacks (VIDEO 1 or 2). or Press INPUT on the remote control.
Operating Instructions
Page 23
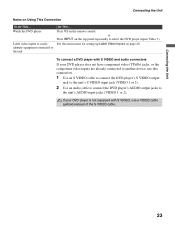
... Unit Connecting the Unit Notes on the remote control. See the instructions for setting up Label Video Inputs on the top panel repeatedly to the unit's AUDIO input jacks (VIDEO 1 or 2). Watch the DVD player Label video inputs to easily identify equipment connected to the unit Do This ... If your DVD player does not have component video (YPBPR) jacks, or the component video inputs are already connected to another device, use a VIDEO cable (yellow) instead of the S VIDEO cable...
... Unit Connecting the Unit Notes on the remote control. See the instructions for setting up Label Video Inputs on the top panel repeatedly to the unit's AUDIO input jacks (VIDEO 1 or 2). Watch the DVD player Label video inputs to easily identify equipment connected to the unit Do This ... If your DVD player does not have component video (YPBPR) jacks, or the component video inputs are already connected to another device, use a VIDEO cable (yellow) instead of the S VIDEO cable...

Operating Instructions
Page 24
... HDMI connector Use an HDMI cable to connect the device's HDMI output connector to select the HDMI-equipped device input (Video 4). Use the PC IN (RGB) connector instead when connecting a PC. or Press INPUT on the top panel repeatedly to the unit's HDMI IN connector on the remote control. Watch the device Label video inputs to easily identify equipment connected to the unit's HDMI input. See the instructions for setting up Label Video Inputs on Using This Connection...
... HDMI connector Use an HDMI cable to connect the device's HDMI output connector to select the HDMI-equipped device input (Video 4). Use the PC IN (RGB) connector instead when connecting a PC. or Press INPUT on the top panel repeatedly to the unit's HDMI IN connector on the remote control. Watch the device Label video inputs to easily identify equipment connected to the unit's HDMI input. See the instructions for setting up Label Video Inputs on Using This Connection...

Operating Instructions
Page 25
... audio cables must be connected to provide sound when a DVI to connect the device's DVI- Rear of unit IN 4 AUDIO IN RL Audio cable AUDIO-R (red) AUDIO-L (white) DVI to select the DVI-HDTV-equipped device input (Video 4). Press V4 on Using This Connection To Do This ... HDTV output connector to the unit's HDMI IN connector on the top panel repeatedly to HDMI adapter or cable Notes on the remote control. or Press INPUT on the rear panel. Connecting the Unit Connecting...
... audio cables must be connected to provide sound when a DVI to connect the device's DVI- Rear of unit IN 4 AUDIO IN RL Audio cable AUDIO-R (red) AUDIO-L (white) DVI to select the DVI-HDTV-equipped device input (Video 4). Press V4 on Using This Connection To Do This ... HDTV output connector to the unit's HDMI IN connector on the top panel repeatedly to HDMI adapter or cable Notes on the remote control. or Press INPUT on the rear panel. Connecting the Unit Connecting...

Operating Instructions
Page 26
... cable (analog RGB, supplied) Audio output terminal To D-Sub output terminal Notes on the unit. See the instructions for setting up Label Video Inputs on the remote control. It is recommended to select Skip in Video 5 of Label Video Inputs in the PC Screen settings on the unit. or Press INPUT on , press the power button again. Rear of the computer. The power turns off when you can view and listen to the PC's video...
... cable (analog RGB, supplied) Audio output terminal To D-Sub output terminal Notes on the unit. See the instructions for setting up Label Video Inputs on the remote control. It is recommended to select Skip in Video 5 of Label Video Inputs in the PC Screen settings on the unit. or Press INPUT on , press the power button again. Rear of the computer. The power turns off when you can view and listen to the PC's video...

Operating Instructions
Page 28
... displays the time in the Setup settings. Insert two size AA batteries (supplied) by pressing DISPLAY. If Sleep Timer is selected. Press repeatedly to cycle through the available picture modes: Vivid, Standard, Custom. Press repeatedly to cycle through the power saving modes: Off, Low, High, Picture Off. Press to write down information such as a reference when operating the unit. The wide screen mode settings can use this feature to turn...
... displays the time in the Setup settings. Insert two size AA batteries (supplied) by pressing DISPLAY. If Sleep Timer is selected. Press repeatedly to cycle through the available picture modes: Vivid, Standard, Custom. Press repeatedly to cycle through the power saving modes: Off, Low, High, Picture Off. Press to write down information such as a reference when operating the unit. The wide screen mode settings can use this feature to turn...

Operating Instructions
Page 38
... screen flickers. A black frame will appear on the top panel until Video 5 (PC) appears. Select to automatically adjust the display position and phase of the picture when the unit receives an input signal from the connected PC. Allows you to -vertical aspect ratio. Screen Wide Mode: Auto Wide: 4:3 Default: Display Area: Auto Adjust: Phase: Pitch: Horizontal Center: Vertical Center: Vertical Size: Reset: Normal 0 0 0 0 Video 5 Select : Enter: Back: Exit: MENU You can change the settings...
... screen flickers. A black frame will appear on the top panel until Video 5 (PC) appears. Select to automatically adjust the display position and phase of the picture when the unit receives an input signal from the connected PC. Allows you to -vertical aspect ratio. Screen Wide Mode: Auto Wide: 4:3 Default: Display Area: Auto Adjust: Phase: Pitch: Horizontal Center: Vertical Center: Vertical Size: Reset: Normal 0 0 0 0 Video 5 Select : Enter: Back: Exit: MENU You can change the settings...

Operating Instructions
Page 42
... sound. picture is too bright/Color is caused by video head interference. Audio noise. ❑ Keep the set -top box/VCR antenna cable away from other connecting cords. unit. ❑ Leave a space of 30 cm (11 7/8 inches) between the video equipment and the unit. ❑ Press V1 to V5 on the remote control (page 28) or press INPUT repeatedly on the top panel (page 13). Other Information Troubleshooting Problem...
... sound. picture is too bright/Color is caused by video head interference. Audio noise. ❑ Keep the set -top box/VCR antenna cable away from other connecting cords. unit. ❑ Leave a space of 30 cm (11 7/8 inches) between the video equipment and the unit. ❑ Press V1 to V5 on the remote control (page 28) or press INPUT repeatedly on the top panel (page 13). Other Information Troubleshooting Problem...
Operating Instructions
Page 44
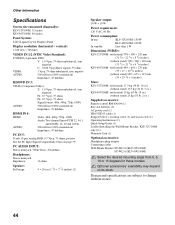
...positive See the PC Input Signal Compatibility Chart on its stock. Design and specifications are subject to change without stand) 25 kg (55 lb. 2 oz.) Supplied accessories: Remote control RM-YA004 (1) Size AA batteries (2) AC power cord (1) HD15-HD15 cable (1) Support belt (1), securing screw (1) and wood screw (1) Operating Instructions (1) Quick Setup Guide (1) Leaflet (Installing the Wall-Mount Bracket, KLV-32U100M only) (1) Warranty Card (1) Optional accessories: Headphones plug adaptor Connecting cables Wall-Mount Bracket SU-WL31 (KLV-32U100M) SU-WL51 (KLV-40U100M) Select the desired...
...positive See the PC Input Signal Compatibility Chart on its stock. Design and specifications are subject to change without stand) 25 kg (55 lb. 2 oz.) Supplied accessories: Remote control RM-YA004 (1) Size AA batteries (2) AC power cord (1) HD15-HD15 cable (1) Support belt (1), securing screw (1) and wood screw (1) Operating Instructions (1) Quick Setup Guide (1) Leaflet (Installing the Wall-Mount Bracket, KLV-32U100M only) (1) Warranty Card (1) Optional accessories: Headphones plug adaptor Connecting cables Wall-Mount Bracket SU-WL31 (KLV-32U100M) SU-WL51 (KLV-40U100M) Select the desired...

Operating Instructions
Page 45
... 4:3 Default 36 A AC IN 16 Auto Adjust 38 Auto Wide 36 B Balance 35 Bass 35 Brightness 33, 34 C CineMotion 10, 33 Color 33 Color Temperature 33, 34 Connections Camcorder or video game equipment 27 DVD player 22 DVI-HDTV-equipped device 25 HD equipment 20 HDMI-equipped device 24 Personal computer 26 Satellite receiver 18 VCR and cable 19 D Display Area 37 DISPLAY button 28 F Freeze 30 FREEZE button...
... 4:3 Default 36 A AC IN 16 Auto Adjust 38 Auto Wide 36 B Balance 35 Bass 35 Brightness 33, 34 C CineMotion 10, 33 Color 33 Color Temperature 33, 34 Connections Camcorder or video game equipment 27 DVD player 22 DVI-HDTV-equipped device 25 HD equipment 20 HDMI-equipped device 24 Personal computer 26 Satellite receiver 18 VCR and cable 19 D Display Area 37 DISPLAY button 28 F Freeze 30 FREEZE button...
Limited Warranty (US Only)
Page 1
... Limited Warranty does not cover SONY products sold AS IS or WITH ALL FAULTS or consumables (such as set up adjustments or signal reception issues; (iv) limitations of technology, or (v) modification of or to its option, (i) repair the product using new or refurbished parts or (ii) replace the product with the Product. Otherwise, to the software. Instructions: In-home diagnostic warranty service is required...
... Limited Warranty does not cover SONY products sold AS IS or WITH ALL FAULTS or consumables (such as set up adjustments or signal reception issues; (iv) limitations of technology, or (v) modification of or to its option, (i) repair the product using new or refurbished parts or (ii) replace the product with the Product. Otherwise, to the software. Instructions: In-home diagnostic warranty service is required...
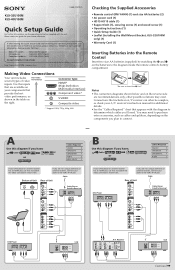
Quick Setup Guide
Page 1
... need . If you have ; A Use this diagram if you plan to the VCR's RF IN jack. Connector type HDMI* (High-Definition Multimedia Interface) Component video* S VIDEO Composite video * Support 1080i, 720p, 480p, 480i Checking the Supplied Accessories • Remote control (RM-YA004) (1) and size AA batteries (2) • AC power cord (1) • HD15-HD15 cable (1) • Support belt (1), securing screw (1) and wood screw (1) • Operating Instructions (1) • Quick Setup Guide (1) • Leaflet (Installing the Wall-Mount Bracket, KLV-32U100M only) (1) • Warranty...
... need . If you have ; A Use this diagram if you plan to the VCR's RF IN jack. Connector type HDMI* (High-Definition Multimedia Interface) Component video* S VIDEO Composite video * Support 1080i, 720p, 480p, 480i Checking the Supplied Accessories • Remote control (RM-YA004) (1) and size AA batteries (2) • AC power cord (1) • HD15-HD15 cable (1) • Support belt (1), securing screw (1) and wood screw (1) • Operating Instructions (1) • Quick Setup Guide (1) • Leaflet (Installing the Wall-Mount Bracket, KLV-32U100M only) (1) • Warranty...
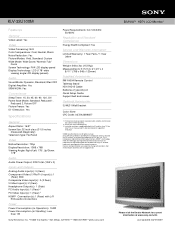
Marketing Specifications
Page 2
... LCD display panels) Audio Sound Mode: Dynamic, Standard, Effect OFF Digital Amplifier: Yes SRS® WOW: Yes Convenience Sleep Timer: 15, 30, 45, 60, 90, 120, Off Power Save Mode: Standard, Reduced 1, Reduced 2, Picture OFF Picture Freeze: Yes ID-1 Detection: Yes Specifications General Aspect Ratio: 16:9* Screen Size: 32 inch class (31.5 inches measured diagonally) Television Type: Flat Panel Video Native Resolution: 720p Display Resolution: 1366 x 768 Viewing Angle: Right/Left: 178° , Up/Down: 178° Audio Audio Power Output...
... LCD display panels) Audio Sound Mode: Dynamic, Standard, Effect OFF Digital Amplifier: Yes SRS® WOW: Yes Convenience Sleep Timer: 15, 30, 45, 60, 90, 120, Off Power Save Mode: Standard, Reduced 1, Reduced 2, Picture OFF Picture Freeze: Yes ID-1 Detection: Yes Specifications General Aspect Ratio: 16:9* Screen Size: 32 inch class (31.5 inches measured diagonally) Television Type: Flat Panel Video Native Resolution: 720p Display Resolution: 1366 x 768 Viewing Angle: Right/Left: 178° , Up/Down: 178° Audio Audio Power Output...

