Operating Instructions
Page 4
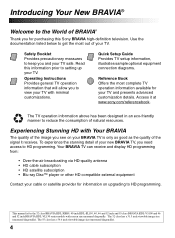
Read this Sony BRAVIA high-definition television. The TV operation information above has been designed in an eco-friendly manner to keep you and your TV safe. Experiencing Stunning HD with minimal customizations. Operating Instructions Provides general TV operation information that will allow you to view your TV with Your... to get the most complete TV operation information available for the 32 class BRAVIA KDL-XBR9, 40 inch KDL-SL150, 40, 46 and 52 inch and 55 class BRAVIA KDL-V5100 and 46 and 52 inch BRAVIA KDL-VL150 series models with screen size measured diagonally. To experience...
Read this Sony BRAVIA high-definition television. The TV operation information above has been designed in an eco-friendly manner to keep you and your TV safe. Experiencing Stunning HD with minimal customizations. Operating Instructions Provides general TV operation information that will allow you to view your TV with Your... to get the most complete TV operation information available for the 32 class BRAVIA KDL-XBR9, 40 inch KDL-SL150, 40, 46 and 52 inch and 55 class BRAVIA KDL-V5100 and 46 and 52 inch BRAVIA KDL-VL150 series models with screen size measured diagonally. To experience...

Operating Instructions
Page 5
... available). ➢ Favorites: Your favorite channels and inputs are at www.sony.com/referencebook. 5 Backlight - TV Feature Highlights Your new BRAVIA High Definition LCD TV will see black bars on the big screen and listen to make your new BRAVIA HDTV easier on your BRAVIA screen, maintaining a crisp, clear, vivid picture. 4:3 (standard-definition) source Most standard...
... available). ➢ Favorites: Your favorite channels and inputs are at www.sony.com/referencebook. 5 Backlight - TV Feature Highlights Your new BRAVIA High Definition LCD TV will see black bars on the big screen and listen to make your new BRAVIA HDTV easier on your BRAVIA screen, maintaining a crisp, clear, vivid picture. 4:3 (standard-definition) source Most standard...
Operating Instructions
Page 6
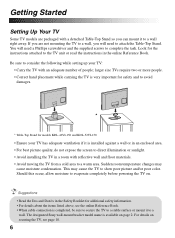
...moisture condensation. The designated Sony wall-mount bracket model name is available on securing the TV, see the online Reference Book. • When cable connection is installed against a wall or in an enclosed area. • For best picture quality, do not expose the screen to evaporate completely before ...powering the TV on. • Read the Dos and Don'ts in the Safety Booklet for models KDL-46VL150 and KDL-52VL150 • ...
...moisture condensation. The designated Sony wall-mount bracket model name is available on securing the TV, see the online Reference Book. • When cable connection is installed against a wall or in an enclosed area. • For best picture quality, do not expose the screen to evaporate completely before ...powering the TV on. • Read the Dos and Don'ts in the Safety Booklet for models KDL-46VL150 and KDL-52VL150 • ...
Operating Instructions
Page 7
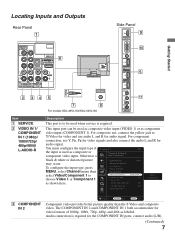
... Video/Component 1 black & white or distorted picture Cable/Antenna Cable may occur. Sound Add Digital Channels To configure the input type, press Screen MENU, select Channel menu then Auto Program Manage Channels Manage Inputs select Video/Component 1 to Y/Video for video and use audio L and...input type if Component 1 VCR the input is required. Audio connection is required for HDMI On Device List Device Auto Power Off Off TV Auto Power On Off Video 1 Component 1 Signal Diagnostics Setup 3 COMPONENT IN 2 Change RETURN Back MENU Exit Component video provides better ...
... Video/Component 1 black & white or distorted picture Cable/Antenna Cable may occur. Sound Add Digital Channels To configure the input type, press Screen MENU, select Channel menu then Auto Program Manage Channels Manage Inputs select Video/Component 1 to Y/Video for video and use audio L and...input type if Component 1 VCR the input is required. Audio connection is required for HDMI On Device List Device Auto Power Off Off TV Auto Power On Off Video 1 Component 1 Signal Diagnostics Setup 3 COMPONENT IN 2 Change RETURN Back MENU Exit Component video provides better ...
Operating Instructions
Page 11
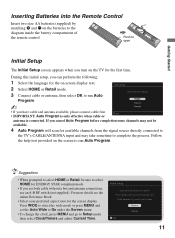
... optimizes the picture for the on-screen display text. 2 Select HOME or Retail mode. 3 Connect cable or antenna, then select OK to run Auto Program. • When prompted to select HOME or Retail, be available. 4 Auto Program will scan for the first time. During this TV. Follow the help text provided on... the screen to run Auto Program. Press WIDE to select the wide mode or press MENU and set the Auto Wide to On under...
... optimizes the picture for the on-screen display text. 2 Select HOME or Retail mode. 3 Connect cable or antenna, then select OK to run Auto Program. • When prompted to select HOME or Retail, be available. 4 Auto Program will scan for the first time. During this TV. Follow the help text provided on... the screen to run Auto Program. Press WIDE to select the wide mode or press MENU and set the Auto Wide to On under...

Operating Instructions
Page 12
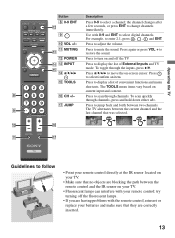
...Wide Mode settings. See page 15 for details. 5 WIDE Press repeatedly to pause playback. Use them as a reference when operating the TV. m (fast reverse): Press to display information about channel/program or input you are used to play a program in a few ...will be connected by pressing MENU and go back to the previous screen or exit from the screen when displaying menu items and settings. 7 MENU Press to exit from your TV (see the online Reference Book for HDMI equipment). Operating the TV Remote Control Button Description 1 2 3 DISPLAY CC POWER 4 5...
...Wide Mode settings. See page 15 for details. 5 WIDE Press repeatedly to pause playback. Use them as a reference when operating the TV. m (fast reverse): Press to display information about channel/program or input you are used to play a program in a few ...will be connected by pressing MENU and go back to the previous screen or exit from the screen when displaying menu items and settings. 7 MENU Press to exit from your TV (see the online Reference Book for HDMI equipment). Operating the TV Remote Control Button Description 1 2 3 DISPLAY CC POWER 4 5...
Operating Instructions
Page 13
... with the remote control, reinsert or replace your batteries and make sure that was selected. JUMP JUMP qa qj Guidelines to turn on -screen cursor. Press again or press VOL + to display the list of convenient functions and menu shortcuts. Press to restore the sound. To ...scan quickly through channels, press and hold down either +/-. The TV alternates between the current channel and the last channel that they are blocking the path between two channels. qj JUMP 9 0 qh Description Press ...
... with the remote control, reinsert or replace your batteries and make sure that was selected. JUMP JUMP qa qj Guidelines to turn on -screen cursor. Press again or press VOL + to display the list of convenient functions and menu shortcuts. Press to restore the sound. To ...scan quickly through channels, press and hold down either +/-. The TV alternates between the current channel and the last channel that they are blocking the path between two channels. qj JUMP 9 0 qh Description Press ...

Operating Instructions
Page 14
...through channels, press and hold down buttons. 7 + VOLUME - Senses room light level and adjusts the screen brightness accordingly. When the timer is turned off the TV. 6 + CHANNEL - In the menu screen, these buttons serve as up in red when the function PC Power Management is activated and there is... no signal received while in the PC input (see contacting Sony information on the front cover). 4 POWER ...
...through channels, press and hold down buttons. 7 + VOLUME - Senses room light level and adjusts the screen brightness accordingly. When the timer is turned off the TV. 6 + CHANNEL - In the menu screen, these buttons serve as up in red when the function PC Power Management is activated and there is... no signal received while in the PC input (see contacting Sony information on the front cover). 4 POWER ...

Operating Instructions
Page 16
...The Wide Mode feature allows you are watching it. 2 Highlight Remove from high-definition source such as component video input, HDMI input and digital TV. • Full Pixel is available with 480i or 480p sources only as they are highlighted, press V/v to cycle through the available modes..... Removing from Favorites 1 Press TOOLS to remove the current channel or input while you to select the screen display of your TV channels from Favorites (see page 11). Changing the Wide Screen Mode Press WIDE repeatedly to move between saved selections in its icon and press . Full pixel ~ &#...
...The Wide Mode feature allows you are watching it. 2 Highlight Remove from high-definition source such as component video input, HDMI input and digital TV. • Full Pixel is available with 480i or 480p sources only as they are highlighted, press V/v to cycle through the available modes..... Removing from Favorites 1 Press TOOLS to remove the current channel or input while you to select the screen display of your TV channels from Favorites (see page 11). Changing the Wide Screen Mode Press WIDE repeatedly to move between saved selections in its icon and press . Full pixel ~ &#...
Operating Instructions
Page 17
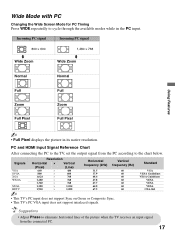
... VESA CEA-861 • Adjust Phase to eliminate horizontal lines of the picture when the TV receives an input signal from the PC according to the chart below. Wide Mode with PC Changing the Wide Screen Mode for PC Timing Press WIDE repeatedly to cycle through the available modes while in its....5 37.9 48.4 47.8 47.7 64.0 67.5 Vertical frequency (Hz) 60 60 60 60 60 60 60 • This TV's PC input does not support Sync on Green or Composite Sync. • This TV's PC VGA input does not support interlaced signals. PC and HDMI Input Signal Reference Chart After connecting the PC...
... VESA CEA-861 • Adjust Phase to eliminate horizontal lines of the picture when the TV receives an input signal from the PC according to the chart below. Wide Mode with PC Changing the Wide Screen Mode for PC Timing Press WIDE repeatedly to cycle through the available modes while in its....5 37.9 48.4 47.8 47.7 64.0 67.5 Vertical frequency (Hz) 60 60 60 60 60 60 60 • This TV's PC input does not support Sync on Green or Composite Sync. • This TV's PC VGA input does not support interlaced signals. PC and HDMI Input Signal Reference Chart After connecting the PC...
Operating Instructions
Page 18
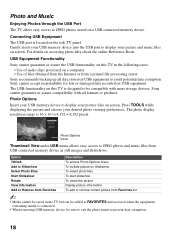
...Files Start Slideshow Rotate View Information Add or Remove from a printed file processing center. The photo display resolution range is located on screen. Sony recommends backing up all formats or products. Photo Options Insert your USB memory device to prevent data corruption. 18 Press TOOLS while ...displaying the picture and choose your picture files on the side TV panel. Connecting USB Equipment The USB port is 16 × 16 to JPEG photos and music files from Favorites list ~ •...
...Files Start Slideshow Rotate View Information Add or Remove from a printed file processing center. The photo display resolution range is located on screen. Sony recommends backing up all formats or products. Photo Options Insert your USB memory device to prevent data corruption. 18 Press TOOLS while ...displaying the picture and choose your picture files on the side TV panel. Connecting USB Equipment The USB port is 16 × 16 to JPEG photos and music files from Favorites list ~ •...
Operating Instructions
Page 20
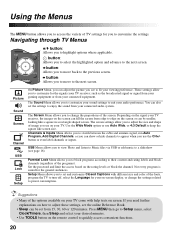
... content and rating labels and block channels (regardless of image you see on -screen display, or change the proportions of TV settings for your on your TV come with different size and color of the fonts, program the TV to turn off, select the Language for you to customize the settings. Navigating...hide channels to enjoy the sound from edge to edge on the remote control to the previous screen. such as the broadcasted signal or signal from your audio preference. Depending on the signal your TV receives, the images on how to suit your gaming equipment or from 15, 30, 60 ...
... content and rating labels and block channels (regardless of image you see on -screen display, or change the proportions of TV settings for your on your TV come with different size and color of the fonts, program the TV to turn off, select the Language for you to customize the settings. Navigating...hide channels to enjoy the sound from edge to edge on the remote control to the previous screen. such as the broadcasted signal or signal from your audio preference. Depending on the signal your TV receives, the images on how to suit your gaming equipment or from 15, 30, 60 ...

Operating Instructions
Page 22
...may include thumbdrives, hard disks and some MP3 players and cameras. Screen size (inches measured diagonally) 31.5 (32 class) 40 46 52 54.6 (55 class) Display resolution 1,920 dots (horizontal) &#....2 Supplied accessories Remote control RM-YD028 (1) / Size AA batteries (2) / Cable holder (1 attached to the TV) / Operating Instructions (1) / Quick Setup Guide (1) / Warranty Card (1) / Safety and Regulatory Booklet (1) ... 2 - 69 Analog Cable: 1 - 135 / Digital Cable: 1 - 135 Panel system LCD (Liquid Crystal Display) Panel Speaker output 10 W + 10 W Input/Output jacks CABLE/ANTENNA ...
...may include thumbdrives, hard disks and some MP3 players and cameras. Screen size (inches measured diagonally) 31.5 (32 class) 40 46 52 54.6 (55 class) Display resolution 1,920 dots (horizontal) &#....2 Supplied accessories Remote control RM-YD028 (1) / Size AA batteries (2) / Cable holder (1 attached to the TV) / Operating Instructions (1) / Quick Setup Guide (1) / Warranty Card (1) / Safety and Regulatory Booklet (1) ... 2 - 69 Analog Cable: 1 - 135 / Digital Cable: 1 - 135 Panel system LCD (Liquid Crystal Display) Panel Speaker output 10 W + 10 W Input/Output jacks CABLE/ANTENNA ...
Operating Instructions
Page 23
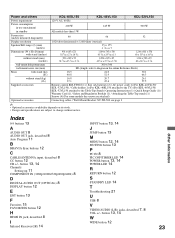
... standby 120 V AC, 60 Hz 200 W All models less than 1 W. 245 W 300 W Screen size (inches measured diagonally) Display resolution Speaker/Full range (2) (mm) (inches) Dimensions (W ×...mm) Mass with stand (kg) (lb.) without stand (kg) (lb.) Supplied accessories Optional accessories 40 46 52 1,920 dots (horizontal) × 1,080 lines (vertical) 35 × 175 1 7/16 × 7...power cord (1) (For KDL-46VL150/ KDL-52VL150) / Cable holder (1) (For KDL-40SL150 attached to the TV) (For KDL-46VL150/ KDL-52VL150 attached to the Table-Top Stand) / Operating Instructions (1) / Quick Setup...
... standby 120 V AC, 60 Hz 200 W All models less than 1 W. 245 W 300 W Screen size (inches measured diagonally) Display resolution Speaker/Full range (2) (mm) (inches) Dimensions (W ×...mm) Mass with stand (kg) (lb.) without stand (kg) (lb.) Supplied accessories Optional accessories 40 46 52 1,920 dots (horizontal) × 1,080 lines (vertical) 35 × 175 1 7/16 × 7...power cord (1) (For KDL-46VL150/ KDL-52VL150) / Cable holder (1) (For KDL-40SL150 attached to the TV) (For KDL-46VL150/ KDL-52VL150 attached to the Table-Top Stand) / Operating Instructions (1) / Quick Setup...


