Operating Instructions
Page 4
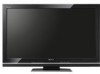
...cable or satellite provider for the 32 class BRAVIA KDL-XBR9, 40 inch KDL-SL150, 40, 46 and 52 inch and 55 class BRAVIA KDL-V5100 and 46 and 52 inch BRAVIA KDL-VL150 series models with Your BRAVIA The quality of the image you see on upgrading to ...HD programming. Read this Sony BRAVIA high-definition television. The 55 class has a 54.6 inch viewable image size (measured diagonally). 4 Experiencing Stunning HD with screen size measured diagonally. To experience the stunning detail of your new BRAVIA TV, you for your TV. Use the documentation listed below to ...
...cable or satellite provider for the 32 class BRAVIA KDL-XBR9, 40 inch KDL-SL150, 40, 46 and 52 inch and 55 class BRAVIA KDL-V5100 and 46 and 52 inch BRAVIA KDL-VL150 series models with Your BRAVIA The quality of the image you see on upgrading to ...HD programming. Read this Sony BRAVIA high-definition television. The 55 class has a 54.6 inch viewable image size (measured diagonally). 4 Experiencing Stunning HD with screen size measured diagonally. To experience the stunning detail of your new BRAVIA TV, you for your TV. Use the documentation listed below to ...

Operating Instructions
Page 5
...Reference Book at your fingertips for easy access to programs and inputs (page 15). ➢ Auto Wide Mode: Set your TV to auto adjust the screen based on the signal resolution (page 16). ➢ USB Digital Photo and Music Player: Connect your USB storage device ...complicated operation. When a 4:3 image is not available). ➢ Favorites: Your favorite channels and inputs are at www.sony.com/referencebook. 5 TV Feature Highlights Your new BRAVIA High Definition LCD TV will dazzle you with stunning 1080p image quality but won't confuse you will see page 18). ➢ ECO Settings:...
...Reference Book at your fingertips for easy access to programs and inputs (page 15). ➢ Auto Wide Mode: Set your TV to auto adjust the screen based on the signal resolution (page 16). ➢ USB Digital Photo and Music Player: Connect your USB storage device ...complicated operation. When a 4:3 image is not available). ➢ Favorites: Your favorite channels and inputs are at www.sony.com/referencebook. 5 TV Feature Highlights Your new BRAVIA High Definition LCD TV will dazzle you with stunning 1080p image quality but won't confuse you will see page 18). ➢ ECO Settings:...
Operating Instructions
Page 6
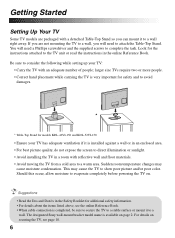
...8226; For best picture quality, do not expose the screen to direct illumination or sunlight. • Avoid installing the TV in a room with reflective wall and floor materials. • Avoid moving the TV from a cold area to a warm area. larger size TVs require two or more people. • Correct hand ...placement while carrying the TV is completed, be sure to secure the TV to a stable surface or mount it to a wall right away. The designated Sony wall-mount bracket model name is available on securing the TV, see the online Reference Book. • When cable...
...8226; For best picture quality, do not expose the screen to direct illumination or sunlight. • Avoid installing the TV in a room with reflective wall and floor materials. • Avoid moving the TV from a cold area to a warm area. larger size TVs require two or more people. • Correct hand ...placement while carrying the TV is completed, be sure to secure the TV to a stable surface or mount it to a wall right away. The designated Sony wall-mount bracket model name is available on securing the TV, see the online Reference Book. • When cable...
Operating Instructions
Page 7
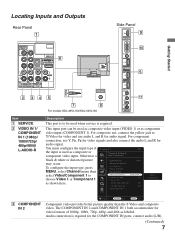
...video input (COMPONENT 1). For component connection, use audio L and R for audio signal. Sound Add Digital Channels To configure the input type, press Screen MENU, select Channel menu then Auto Program Manage Channels Manage Inputs select Video/Component 1 to Y/Video for video and use Y, PB, PR for...the input type if Component 1 VCR the input is used when service is required for HDMI On Device List Device Auto Power Off Off TV Auto Power On Off Video 1 Component 1 Signal Diagnostics Setup 3 COMPONENT IN 2 Change RETURN Back MENU Exit Component video provides better ...
...video input (COMPONENT 1). For component connection, use audio L and R for audio signal. Sound Add Digital Channels To configure the input type, press Screen MENU, select Channel menu then Auto Program Manage Channels Manage Inputs select Video/Component 1 to Y/Video for video and use Y, PB, PR for...the input type if Component 1 VCR the input is used when service is required for HDMI On Device List Device Auto Power Off Off TV Auto Power On Off Video 1 Component 1 Signal Diagnostics Setup 3 COMPONENT IN 2 Change RETURN Back MENU Exit Component video provides better ...
Operating Instructions
Page 11
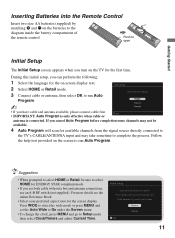
...before completion some channels may take sometime to complete the process. Push to open Initial Setup The Initial Setup screen appears when you can perform the following: 1 Select the language for the on the TV for the first time. Initial Setup Please select your preferred aspect ratio for the... screen display. Home Retail Set 11 Set • IMPORTANT: Auto Program is only effective when cable or antenna is connected....
...before completion some channels may take sometime to complete the process. Push to open Initial Setup The Initial Setup screen appears when you can perform the following: 1 Select the language for the on the TV for the first time. Initial Setup Please select your preferred aspect ratio for the... screen display. Home Retail Set 11 Set • IMPORTANT: Auto Program is only effective when cable or antenna is connected....

Operating Instructions
Page 12
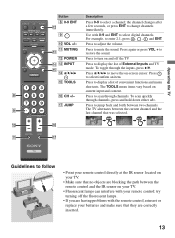
... CC display, see page 15 for a cinemalike experience and the audio will be connected by pressing MENU and go back to the previous screen or exit from the screen when displaying menu items and settings. 7 MENU Press to play a program at a normal speed. Some other buttons on page 20. ...exit. The information banner will show the remaining time of the current program you are watching. Use them as a reference when operating the TV. Press again to turn on all Control for details. 5 WIDE Press repeatedly to display information about channel/program or input you are used ...
... CC display, see page 15 for a cinemalike experience and the audio will be connected by pressing MENU and go back to the previous screen or exit from the screen when displaying menu items and settings. 7 MENU Press to play a program at a normal speed. Some other buttons on page 20. ...exit. The information banner will show the remaining time of the current program you are watching. Use them as a reference when operating the TV. Press again to turn on all Control for details. 5 WIDE Press repeatedly to display information about channel/program or input you are used ...
Operating Instructions
Page 13
...enter 2.1, press 2 , , 1 and ENT. try turning off the TV. To toggle through channels. Press to adjust the volume. Press to display a list of External Inputs and TV mode. The TOOLS menu items vary based on -screen cursor. For example, to follow • Point your remote control directly... at the IR sensor located on your TV. • Fluorescent lamps can interfere with your TV. • Make sure that was ...
...enter 2.1, press 2 , , 1 and ENT. try turning off the TV. To toggle through channels. Press to adjust the volume. Press to display a list of External Inputs and TV mode. The TOOLS menu items vary based on -screen cursor. For example, to follow • Point your remote control directly... at the IR sensor located on your TV. • Fluorescent lamps can interfere with your TV. • Make sure that was ...

Operating Instructions
Page 14
... input (see "Using the Menus" on and off . Press to display the list of external inputs. In the menu screen, this LED will remain lit even if the TV is turned on. 5 POWER Press to scan through the inputs, press the buttons CHANNEL +/-. For details, see contacting... Sony information on the front cover). 4 POWER LED Lights up /down either +/-. TV Controls and Indicators For all models except KDL-46VL150/KDL-52VL150 1 For models KDL-46VL150/ KDL-52VL150 PIC ...
... input (see "Using the Menus" on and off . Press to display the list of external inputs. In the menu screen, this LED will remain lit even if the TV is turned on. 5 POWER Press to scan through the inputs, press the buttons CHANNEL +/-. For details, see contacting... Sony information on the front cover). 4 POWER LED Lights up /down either +/-. TV Controls and Indicators For all models except KDL-46VL150/KDL-52VL150 1 For models KDL-46VL150/ KDL-52VL150 PIC ...

Operating Instructions
Page 16
... current channel or input while you to an item, highlight its native resolution. 16 You can manually change the Wide Mode setting while watching TV by pressing the WIDE button on the original source, a black frame or black bars may surround the picture. Full Zoom Zoom Full pixel ...This mode is not available. How to set to the Screen menu. Removing from high-definition source such as component video input, HDMI input and digital TV. • Full Pixel is available with 480i or 480p sources only as they are watching it. ...
... current channel or input while you to an item, highlight its native resolution. 16 You can manually change the Wide Mode setting while watching TV by pressing the WIDE button on the original source, a black frame or black bars may surround the picture. Full Zoom Zoom Full pixel ...This mode is not available. How to set to the Screen menu. Removing from high-definition source such as component video input, HDMI input and digital TV. • Full Pixel is available with 480i or 480p sources only as they are watching it. ...
Operating Instructions
Page 17
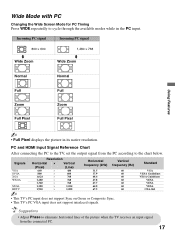
... signals. Standard VGA VESA Guidelines VESA Guidelines VESA VESA VESA CEA-861 • Adjust Phase to eliminate horizontal lines of the picture when the TV receives an input signal from the PC according to the chart below. PC and HDMI Input Signal Reference Chart After connecting the PC to the... TV, set the output signal from the connected PC. 17 Wide Mode with PC Changing the Wide Screen Mode for PC Timing Press WIDE repeatedly to cycle through the available modes while in its native...
... signals. Standard VGA VESA Guidelines VESA Guidelines VESA VESA VESA CEA-861 • Adjust Phase to eliminate horizontal lines of the picture when the TV receives an input signal from the PC according to the chart below. PC and HDMI Input Signal Reference Chart After connecting the PC to the... TV, set the output signal from the connected PC. 17 Wide Mode with PC Changing the Wide Screen Mode for PC Timing Press WIDE repeatedly to cycle through the available modes while in its native...
Operating Instructions
Page 18
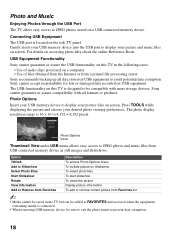
...remove current picture from a printed file processing center. For details on USB equipment. Sony recommends backing up all formats or products. Gently insert your picture files on this TV in the TV but can be added to FAVORITES and accessed when the equipment containing media is ...damaged data recorded on accessing photo files check the online Reference Book. The USB functionality on screen. USB Equipment Functionality Sony cannot guarantee or assure the USB functionality on this TV is located on a USB connected memory device. Connecting USB Equipment The USB port is ...
...remove current picture from a printed file processing center. For details on USB equipment. Sony recommends backing up all formats or products. Gently insert your picture files on this TV in the TV but can be added to FAVORITES and accessed when the equipment containing media is ...damaged data recorded on accessing photo files check the online Reference Book. The USB functionality on screen. USB Equipment Functionality Sony cannot guarantee or assure the USB functionality on this TV is located on a USB connected memory device. Connecting USB Equipment The USB port is ...
Operating Instructions
Page 20
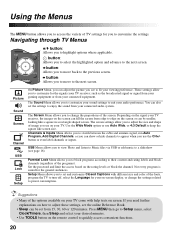
... allows you to change the settings related to power consumption. • Many of the options available on your TV receives, the images on the screen can fill the screen from your TV. Channels & Inputs Menu allows you to switch between the cable and antenna signal, run Auto Program, Add Digital ... block programs according to highlight options where applicable. Using the Menus The MENU button allows you to access the variety of TV settings for you to the next screen. You can adjust the picture you see to adjust these settings, see on the rating levels or block the channel. ...
... allows you to change the settings related to power consumption. • Many of the options available on your TV receives, the images on the screen can fill the screen from your TV. Channels & Inputs Menu allows you to switch between the cable and antenna signal, run Auto Program, Add Digital ... block programs according to highlight options where applicable. Using the Menus The MENU button allows you to access the variety of TV settings for you to the next screen. You can adjust the picture you see to adjust these settings, see on the rating levels or block the channel. ...

Operating Instructions
Page 22
...: 2 - 69 Analog Cable: 1 - 135 / Digital Cable: 1 - 135 Panel system LCD (Liquid Crystal Display) Panel Speaker output 10 W + 10 W Input/Output jacks CABLE/ANTENNA 75...245 W 295 W 300 W in both constant and variable rate. Screen size (inches measured diagonally) 31.5 (32 class) 40 46 52 54.6 (55 class) Display resolution 1,920 dots (horizontal) ×...75.2 Supplied accessories Remote control RM-YD028 (1) / Size AA batteries (2) / Cable holder (1 attached to the TV) / Operating Instructions (1) / Quick Setup Guide (1) / Warranty Card (1) / Safety and Regulatory Booklet (1) /...
...: 2 - 69 Analog Cable: 1 - 135 / Digital Cable: 1 - 135 Panel system LCD (Liquid Crystal Display) Panel Speaker output 10 W + 10 W Input/Output jacks CABLE/ANTENNA 75...245 W 295 W 300 W in both constant and variable rate. Screen size (inches measured diagonally) 31.5 (32 class) 40 46 52 54.6 (55 class) Display resolution 1,920 dots (horizontal) ×...75.2 Supplied accessories Remote control RM-YD028 (1) / Size AA batteries (2) / Cable holder (1 attached to the TV) / Operating Instructions (1) / Quick Setup Guide (1) / Warranty Card (1) / Safety and Regulatory Booklet (1) /...
Operating Instructions
Page 23
... standby 120 V AC, 60 Hz 200 W All models less than 1 W. 245 W 300 W Screen size (inches measured diagonally) Display resolution Speaker/Full range (2) (mm) (inches) Dimensions (W ×...mm) Mass with stand (kg) (lb.) without stand (kg) (lb.) Supplied accessories Optional accessories 40 46 52 1,920 dots (horizontal) × 1,080 lines (vertical) 35 × 175 1 7/16 × 7...power cord (1) (For KDL-46VL150/ KDL-52VL150) / Cable holder (1) (For KDL-40SL150 attached to the TV) (For KDL-46VL150/ KDL-52VL150 attached to the Table-Top Stand) / Operating Instructions (1) / Quick Setup...
... standby 120 V AC, 60 Hz 200 W All models less than 1 W. 245 W 300 W Screen size (inches measured diagonally) Display resolution Speaker/Full range (2) (mm) (inches) Dimensions (W ×...mm) Mass with stand (kg) (lb.) without stand (kg) (lb.) Supplied accessories Optional accessories 40 46 52 1,920 dots (horizontal) × 1,080 lines (vertical) 35 × 175 1 7/16 × 7...power cord (1) (For KDL-46VL150/ KDL-52VL150) / Cable holder (1) (For KDL-40SL150 attached to the TV) (For KDL-46VL150/ KDL-52VL150 attached to the Table-Top Stand) / Operating Instructions (1) / Quick Setup...


