Operating Instructions
Page 3
...Experience . . . .5 TV Feature Highlights 5 Getting Started Setting Up Your TV 6 Locating Inputs and Outputs 7 Connecting Other Equipment 9 Bundling the Connecting Cables 10 Securing the TV 10 Inserting Batteries into the... Remote Control 11 Initial Setup 11 Operating the TV Remote Control Button Description 12 TV... PC 17 Photo and Music 18 Using the Menus Navigating through TV Menus 20 Other Information How to Care for Your BRAVIA 21 ...
...Experience . . . .5 TV Feature Highlights 5 Getting Started Setting Up Your TV 6 Locating Inputs and Outputs 7 Connecting Other Equipment 9 Bundling the Connecting Cables 10 Securing the TV 10 Inserting Batteries into the... Remote Control 11 Initial Setup 11 Operating the TV Remote Control Button Description 12 TV... PC 17 Photo and Music 18 Using the Menus Navigating through TV Menus 20 Other Information How to Care for Your BRAVIA 21 ...

Operating Instructions
Page 5
... but won't confuse you get started enjoying your favorite music (see black bars on your pocketbook and the environment. TV Feature Highlights Your new BRAVIA High Definition LCD TV will see page 18). ➢ ECO Settings: This model includes a number of features designed to make your new... www.sony.com/referencebook. 5 This feature reduces power consumption by turning off the backlight. • Check more comfortable viewing in more details on the online Reference Book at your fingertips for easy access to programs and inputs (page 15). ➢ Auto Wide Mode: Set your TV to ...
... but won't confuse you get started enjoying your favorite music (see black bars on your pocketbook and the environment. TV Feature Highlights Your new BRAVIA High Definition LCD TV will see page 18). ➢ ECO Settings: This model includes a number of features designed to make your new... www.sony.com/referencebook. 5 This feature reduces power consumption by turning off the backlight. • Check more comfortable viewing in more details on the online Reference Book at your fingertips for easy access to programs and inputs (page 15). ➢ Auto Wide Mode: Set your TV to ...
Operating Instructions
Page 7
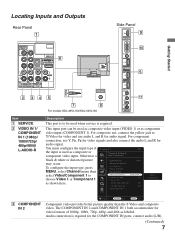
... 1 VCR the input is required for the COMPONENT IN ports, connect audio (L/R). (Continued) 7 The COMPONENT IN 2 and COMPONENT IN 1 both accommodate for audio signal. For component connection, use Y, PB, PR for video signals and also connect the audio L and R for HDMI On Device List Device Auto Power Off Off TV Auto Power...
... 1 VCR the input is required for the COMPONENT IN ports, connect audio (L/R). (Continued) 7 The COMPONENT IN 2 and COMPONENT IN 1 both accommodate for audio signal. For component connection, use Y, PB, PR for video signals and also connect the audio L and R for HDMI On Device List Device Auto Power Off Off TV Auto Power...
Operating Instructions
Page 8
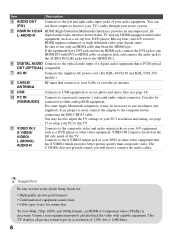
... cable or adapter) jack, and connect the audio jack to the AUDIO IN (L/R) jacks below the HDMI IN 1. 6 DIGITAL AUDIO Connects to the optical audio input of a digital audio equipment that is located on your A/V equipment such as a set-top box, DVD player, Blu-ray Disc, and A/V receiver. Can...) provides an uncompressed, all picture format types in a resolution of 1,920 dots × 1,080 lines. 8 Connects to the left side panel of the TV. Item Description 4 AUDIO OUT (FIX) Connects to the S VIDEO output jack of your DVD or other video equipment that has S VIDEO which provides better ...
... cable or adapter) jack, and connect the audio jack to the AUDIO IN (L/R) jacks below the HDMI IN 1. 6 DIGITAL AUDIO Connects to the optical audio input of a digital audio equipment that is located on your A/V equipment such as a set-top box, DVD player, Blu-ray Disc, and A/V receiver. Can...) provides an uncompressed, all picture format types in a resolution of 1,920 dots × 1,080 lines. 8 Connects to the left side panel of the TV. Item Description 4 AUDIO OUT (FIX) Connects to the S VIDEO output jack of your DVD or other video equipment that has S VIDEO which provides better ...
Operating Instructions
Page 11
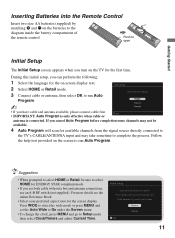
... antenna available, please connect cable first. "Retail" optimizes the picture for available channels from the signal source directly connected to the TV's CABLE/ANTENNA input and may not be sure to Setup menu then select Clock/Timers and adjust Current Time. Set • IMPORTANT: Auto Program ...is only effective when cable or antenna is connected. During this TV. Home Retail Set 11 "Home" optimizes the picture for normal home use...
... antenna available, please connect cable first. "Retail" optimizes the picture for available channels from the signal source directly connected to the TV's CABLE/ANTENNA input and may not be sure to Setup menu then select Clock/Timers and adjust Current Time. Set • IMPORTANT: Auto Program ...is only effective when cable or antenna is connected. During this TV. Home Retail Set 11 "Home" optimizes the picture for normal home use...

Operating Instructions
Page 12
Operating the TV Remote Control Button Description 1 2 3 DISPLAY CC POWER 4 5 WIDE INPUT 6 7 TOOLS ~ • The 5, PLAY and CH + buttons ...equipment). THEATER: Press to exit. These buttons are used to display information about channel/program or input you are watching. SYNC MENU: Displays the menu of the current program you are watching when... audio system. Button Description 1 DISPLAY 2 CC 3 BRAVIA Sync Press to control the connected equipment with TV functions and settings. N PLAY: Press to pause playback. Your BRAVIA Sync audio system must be switched to...
Operating the TV Remote Control Button Description 1 2 3 DISPLAY CC POWER 4 5 WIDE INPUT 6 7 TOOLS ~ • The 5, PLAY and CH + buttons ...equipment). THEATER: Press to exit. These buttons are used to display information about channel/program or input you are watching. SYNC MENU: Displays the menu of the current program you are watching when... audio system. Button Description 1 DISPLAY 2 CC 3 BRAVIA Sync Press to control the connected equipment with TV functions and settings. N PLAY: Press to pause playback. Your BRAVIA Sync audio system must be switched to...
Operating Instructions
Page 13
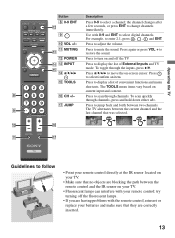
...path between two channels. Press to restore the sound. Press to select a channel; Operating the TV DISPLAY CC POWER Button 8 0-9 ENT qs 9 0 VOL +/- WIDE INPUT qa MUTING qd qs POWER qf qd INPUT TOOLS qg qf V/v/B/b qg TOOLS 8 qh CH +/- qj JUMP 9 0 qh Description Press ...adjust the volume. Press to enter 2.1, press 2 , , 1 and ENT. Press to display a list of External Inputs and TV mode. The TOOLS menu items vary based on your TV. • Fluorescent lamps can interfere with 0-9 and ENT to follow • Point your remote control directly at the...
...path between two channels. Press to restore the sound. Press to select a channel; Operating the TV DISPLAY CC POWER Button 8 0-9 ENT qs 9 0 VOL +/- WIDE INPUT qa MUTING qd qs POWER qf qd INPUT TOOLS qg qf V/v/B/b qg TOOLS 8 qh CH +/- qj JUMP 9 0 qh Description Press ...adjust the volume. Press to enter 2.1, press 2 , , 1 and ENT. Press to display a list of External Inputs and TV mode. The TOOLS menu items vary based on your TV. • Fluorescent lamps can interfere with 0-9 and ENT to follow • Point your remote control directly at the...

Operating Instructions
Page 14
...channels. In the menu screen, this button serves to confirm the selection or setting. 9 MENU Press to turn on . 5 POWER Press to display menu with TV functions and settings (see the online Reference Book. Do not put anything near the sensor or the nearby general area (as shown above), as up...). 3 STANDBY LED Lights up in red when the function PC Power Management is activated and there is no signal received while in the PC input (see contacting Sony information on the front cover). 4 POWER LED Lights up in amber when the Timer or Sleep functions are set , this may be affected. 2 ...
...channels. In the menu screen, this button serves to confirm the selection or setting. 9 MENU Press to turn on . 5 POWER Press to display menu with TV functions and settings (see the online Reference Book. Do not put anything near the sensor or the nearby general area (as shown above), as up...). 3 STANDBY LED Lights up in red when the function PC Power Management is activated and there is no signal received while in the PC input (see contacting Sony information on the front cover). 4 POWER LED Lights up in amber when the Timer or Sleep functions are set , this may be affected. 2 ...
Operating Instructions
Page 15
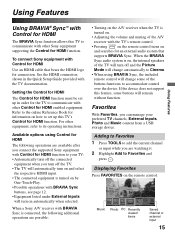
...of the buttons functions to accommodate control over the device. To connect Sony equipment with BRAVIA Sync buttons, see page 12. • Equipment listed under External Inputs will turn off the TV. • The TV will turn on automatically when selected. Favorites With Favorites, you are ... with BRAVIA Sync is connected, the following operations are available after you connect the supported Sony equipment with Control for HDMI function to your preferred TV channels, External Inputs, Photo and Music content from a USB storage device. Using Features Using Features Using BRAVIA®...
...of the buttons functions to accommodate control over the device. To connect Sony equipment with BRAVIA Sync buttons, see page 12. • Equipment listed under External Inputs will turn off the TV. • The TV will turn on automatically when selected. Favorites With Favorites, you are ... with BRAVIA Sync is connected, the following operations are available after you connect the supported Sony equipment with Control for HDMI function to your preferred TV channels, External Inputs, Photo and Music content from a USB storage device. Using Features Using Features Using BRAVIA®...

Operating Instructions
Page 16
...Favorites (see page 11). Wide Mode The Wide Mode feature allows you to select the screen display of your TV channels from Favorites 1 Press TOOLS to remove the current channel or input while you are highlighted, press V/v to move between them. 3 To tune to an item, highlight its...only as they are standard-definition and not from high-definition source such as component video input, HDMI input and digital TV. • Full Pixel is available only for 720p, 1080i and 1080p formats excluding Cable/Antenna input. • Full Pixel displays the picture in a carousel-like fashion. 2 When ...
...Favorites (see page 11). Wide Mode The Wide Mode feature allows you to select the screen display of your TV channels from Favorites 1 Press TOOLS to remove the current channel or input while you are highlighted, press V/v to move between them. 3 To tune to an item, highlight its...only as they are standard-definition and not from high-definition source such as component video input, HDMI input and digital TV. • Full Pixel is available only for 720p, 1080i and 1080p formats excluding Cable/Antenna input. • Full Pixel displays the picture in a carousel-like fashion. 2 When ...
Operating Instructions
Page 17
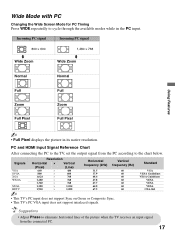
Standard VGA VESA Guidelines VESA Guidelines VESA VESA VESA CEA-861 • Adjust Phase to eliminate horizontal lines of the picture when the TV receives an input signal from the PC according to the chart below. Wide Mode with PC Changing the Wide Screen Mode for PC Timing Press WIDE ... 60 60 60 60 60 60 60 • This TV's PC input does not support Sync on Green or Composite Sync. • This TV's PC VGA input does not support interlaced signals. PC and HDMI Input Signal Reference Chart After connecting the PC to the TV, set the output signal from the connected PC. 17
Standard VGA VESA Guidelines VESA Guidelines VESA VESA VESA CEA-861 • Adjust Phase to eliminate horizontal lines of the picture when the TV receives an input signal from the PC according to the chart below. Wide Mode with PC Changing the Wide Screen Mode for PC Timing Press WIDE ... 60 60 60 60 60 60 60 • This TV's PC input does not support Sync on Green or Composite Sync. • This TV's PC VGA input does not support interlaced signals. PC and HDMI Input Signal Reference Chart After connecting the PC to the TV, set the output signal from the connected PC. 17
Operating Instructions
Page 20
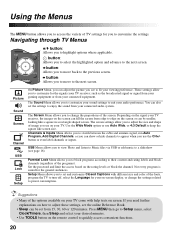
...screen size. The screen settings allow you use Auto Wide, or 4:3 Default to keep the square like a square in a rectangle shaped screen. Channels & Inputs Menu allows you to switch between the cable and antenna signal, run Auto Program, Add Digital Channels, or you can be set and customize Closed... turn off, select the Language for your on-screen display, or change the proportions of the screen. Navigating through TV Menus WIDE INPUT TOOLS MENU V/v button: Allows you to block programs according to their content and rating labels and block channels (regardless of the programs). ...
...screen size. The screen settings allow you use Auto Wide, or 4:3 Default to keep the square like a square in a rectangle shaped screen. Channels & Inputs Menu allows you to switch between the cable and antenna signal, run Auto Program, Add Digital Channels, or you can be set and customize Closed... turn off, select the Language for your on-screen display, or change the proportions of the screen. Navigating through TV Menus WIDE INPUT TOOLS MENU V/v button: Allows you to block programs according to their content and rating labels and block channels (regardless of the programs). ...
Operating Instructions
Page 21
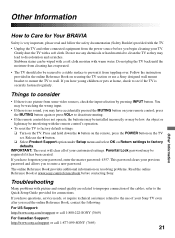
... Care for connections. You may be wiped with a soft cloth moisten with a soft cloth. Do not use a Sony designed wall mount bracket to mount the TV to wall. Stubborn stains can be watching the wrong input. • If there is very important, please read the online Reference Book, contact the following: For US...
... Care for connections. You may be wiped with a soft cloth moisten with a soft cloth. Do not use a Sony designed wall mount bracket to mount the TV to wall. Stubborn stains can be watching the wrong input. • If there is very important, please read the online Reference Book, contact the following: For US...

Operating Instructions
Page 22
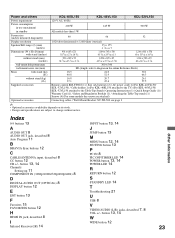
...1 - 135 / Digital Cable: 1 - 135 Panel system LCD (Liquid Crystal Display) Panel Speaker output 10 W + 10 W Input/Output jacks CABLE/ANTENNA 75-ohm external terminal for RF inputs VIDEO IN 1/2 S VIDEO (4-pin mini DIN) (VIDEO 2... 7/8 × 25 1/8 × 3 3/4 44 1/4 × 28 5/8 × 3 7/8 49 3/4 × 32 1/2 × 4 5/8 52 5/8 × 33 7/8 × 4 5/8 wall-mount hole pattern (mm) 200 × 200 300 × 300 400 × 300 wall-mount ... Base line DCT, Non-differential Huffman coding) and EXIF 2.2. This TV does not support MTP or PTP protocols used by some MP3 players and ...
...1 - 135 / Digital Cable: 1 - 135 Panel system LCD (Liquid Crystal Display) Panel Speaker output 10 W + 10 W Input/Output jacks CABLE/ANTENNA 75-ohm external terminal for RF inputs VIDEO IN 1/2 S VIDEO (4-pin mini DIN) (VIDEO 2... 7/8 × 25 1/8 × 3 3/4 44 1/4 × 28 5/8 × 3 7/8 49 3/4 × 32 1/2 × 4 5/8 52 5/8 × 33 7/8 × 4 5/8 wall-mount hole pattern (mm) 200 × 200 300 × 300 400 × 300 wall-mount ... Base line DCT, Non-differential Huffman coding) and EXIF 2.2. This TV does not support MTP or PTP protocols used by some MP3 players and ...
Operating Instructions
Page 23
...(mm) Mass with stand (kg) (lb.) without stand (kg) (lb.) Supplied accessories Optional accessories 40 46 52 1,920 dots (horizontal) × 1,080 lines (vertical) 35 × 175 1 7/16 × 7 991... power cord (1) (For KDL-46VL150/ KDL-52VL150) / Cable holder (1) (For KDL-40SL150 attached to the TV) (For KDL-46VL150/ KDL-52VL150 attached to the Table-Top Stand) / Operating Instructions (1) / Quick Setup Guide... 8 AUDIO OUT jack, described 8 Auto Program 11 B BRAVIA Sync buttons 12 C CABLE/ANTENNA input, described 8 CC button 12 CH +/- button 13, 14 Channels Setting up 11 COMPONENT IN ...
...(mm) Mass with stand (kg) (lb.) without stand (kg) (lb.) Supplied accessories Optional accessories 40 46 52 1,920 dots (horizontal) × 1,080 lines (vertical) 35 × 175 1 7/16 × 7 991... power cord (1) (For KDL-46VL150/ KDL-52VL150) / Cable holder (1) (For KDL-40SL150 attached to the TV) (For KDL-46VL150/ KDL-52VL150 attached to the Table-Top Stand) / Operating Instructions (1) / Quick Setup Guide... 8 AUDIO OUT jack, described 8 Auto Program 11 B BRAVIA Sync buttons 12 C CABLE/ANTENNA input, described 8 CC button 12 CH +/- button 13, 14 Channels Setting up 11 COMPONENT IN ...


