
Operating Instructions
Page 3
Setting Up the Channel List - Initial Setup 19 Using the TV Features Remote Control and TV Controls/ Indicators 20 Inserting Batteries into the Remote Control 20 Remote Control and TV Controls 20 Indicators 24 Using P&P Feature 25 To Display the Sub Window 25 To Change Inputs or Channels in the Window 25 To Exit from ... Quick Setup Guide (separate volume) Provides a variety of BRAVIA™ The Four Steps to the World of optional equipment connection diagrams. Customer Support http://www.sony.com/tvsupport On-line Registration United States http://productregistration...
Setting Up the Channel List - Initial Setup 19 Using the TV Features Remote Control and TV Controls/ Indicators 20 Inserting Batteries into the Remote Control 20 Remote Control and TV Controls 20 Indicators 24 Using P&P Feature 25 To Display the Sub Window 25 To Change Inputs or Channels in the Window 25 To Exit from ... Quick Setup Guide (separate volume) Provides a variety of BRAVIA™ The Four Steps to the World of optional equipment connection diagrams. Customer Support http://www.sony.com/tvsupport On-line Registration United States http://productregistration...

Operating Instructions
Page 9
... manual is an easy way to select programming and adjust settings on your remote control to access the XMB™. HOME Product Support Clock/Timers Settings Sound Screen Video Options Category Object Bar Media Category Bar TV From the horizontal Media Category Bar you can control: • Settings: timer... players or other inputs can also be selected from the Category Object Bar for the 40 and 46 inch BRAVIA KDL-V Series models with screen size measured diagonally. 9 Press the HOME button on the TV screen. TV Home Menu: XMB™ (XrossMediaBar) The XMB™ is a menu of BRAVIA...
... manual is an easy way to select programming and adjust settings on your remote control to access the XMB™. HOME Product Support Clock/Timers Settings Sound Screen Video Options Category Object Bar Media Category Bar TV From the horizontal Media Category Bar you can control: • Settings: timer... players or other inputs can also be selected from the Category Object Bar for the 40 and 46 inch BRAVIA KDL-V Series models with screen size measured diagonally. 9 Press the HOME button on the TV screen. TV Home Menu: XMB™ (XrossMediaBar) The XMB™ is a menu of BRAVIA...

Operating Instructions
Page 18
...26. For other Sony HDMI Control equipment must be selected from either sides depending on the XMB™ when selected, see the HDMI connection shown in the Quick Setup Guide provided with HDMI Control capability is supported. HDMI Control Available with the TV's remote control. ~ •...; The A/V receiver cannot be setup. Setting the HDMI Control In order for the HDMI Control function to operate, the TV and other equipment, refer to the operating instruction for ...
...26. For other Sony HDMI Control equipment must be selected from either sides depending on the XMB™ when selected, see the HDMI connection shown in the Quick Setup Guide provided with HDMI Control capability is supported. HDMI Control Available with the TV's remote control. ~ •...; The A/V receiver cannot be setup. Setting the HDMI Control In order for the HDMI Control function to operate, the TV and other equipment, refer to the operating instruction for ...
Operating Instructions
Page 19
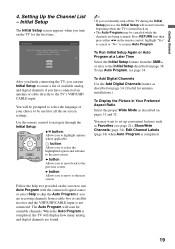
...You will be canceled while the channels are being scanned. Use the remote control to navigate through the Initial Setup: V/v button: Allows you to move to the TV's VHF/UHF/ CABLE input. button: Allows you turn off the TV during the Initial Setup process, the Initial Setup will display how many ...channels. To Add Digital Channels Use the Add Digital Channels feature as Favorites (see page 34. Press RETURN first then press either B/b on the remote control, highlight "Yes" to cancel or "No" to set up convenient features such as described on the screen to the next screen. You ...
...You will be canceled while the channels are being scanned. Use the remote control to navigate through the Initial Setup: V/v button: Allows you to move to the TV's VHF/UHF/ CABLE input. button: Allows you turn off the TV during the Initial Setup process, the Initial Setup will display how many ...channels. To Add Digital Channels Use the Add Digital Channels feature as Favorites (see page 34. Press RETURN first then press either B/b on the remote control, highlight "Yes" to cancel or "No" to set up convenient features such as described on the screen to the next screen. You ...
Operating Instructions
Page 20
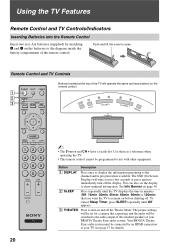
... the battery compartment of your TV (see page 17 for a cinema like experience and the audio will operate the same as a reference when operating the TV. • This remote control cannot be programmed to show minimal information. Remote Control and TV Controls Buttons located at the ...top of the TV will be connected by matching e and E on and off the Theater ...
... the battery compartment of your TV (see page 17 for a cinema like experience and the audio will operate the same as a reference when operating the TV. • This remote control cannot be programmed to show minimal information. Remote Control and TV Controls Buttons located at the ...top of the TV will be connected by matching e and E on and off the Theater ...
Operating Instructions
Page 24
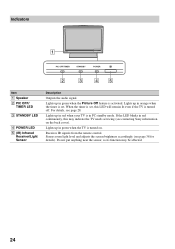
..., see page 38 for details). Do not put anything near the sensor, as its function may indicate the TV needs servicing (see contacting Sony information on . Lights up in red when your TV is set , this may be affected. 24 Lights up in red continuously, this LED will remain lit even... Description Outputs the audio signal. Receives IR signals from the remote control. Lights up in PC standby mode. Senses room light level and adjusts the screen brightness accordingly (see page 28. Lights up in orange when the timer is in green when the TV is turned on the back cover).
..., see page 38 for details). Do not put anything near the sensor, as its function may indicate the TV needs servicing (see contacting Sony information on . Lights up in red when your TV is set , this may be affected. 24 Lights up in red continuously, this LED will remain lit even... Description Outputs the audio signal. Receives IR signals from the remote control. Lights up in PC standby mode. Senses room light level and adjusts the screen brightness accordingly (see page 28. Lights up in orange when the timer is in green when the TV is turned on the back cover).
Operating Instructions
Page 26
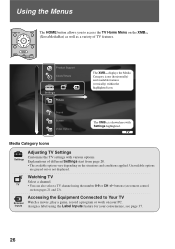
.... • The available options vary depending on the XMB™ (XrossMediaBar) as well as a variety of TV features. Unavailable options are grayed out or not displayed. TV • You can also select a TV channel using the Label Inputs feature for your PC. buttons (see page 37. 26...Inputs Assign a label using the number 0-9 or CH +/- Watching TV Select a channel. Using the Menus The HOME button allows you to Your TV External Watch a movie, play a game, record a program or work on your convenience, see remote control section pages 21 and 23). Sound Screen Video Options The ...
.... • The available options vary depending on the XMB™ (XrossMediaBar) as well as a variety of TV features. Unavailable options are grayed out or not displayed. TV • You can also select a TV channel using the Label Inputs feature for your PC. buttons (see page 37. 26...Inputs Assign a label using the number 0-9 or CH +/- Watching TV Select a channel. Using the Menus The HOME button allows you to Your TV External Watch a movie, play a game, record a program or work on your convenience, see remote control section pages 21 and 23). Sound Screen Video Options The ...
Operating Instructions
Page 28
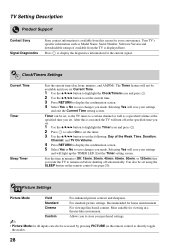
... button to highlight the Clock/Timers icon and press . 2 Use the V/v/B/b button to set using the SLEEP button on the remote control (see page 20). Exit the Timer setting screen. Most suitable for home entertainment. Picture Settings Picture Mode Vivid For enhanced picture...save your convenience. Standard For standard picture settings. TV Setting Description Product Support Contact Sony Signal Diagnostics Sony contact information is available from the TV is executed the TV will turn off automatically. Press to remain on the remote control to directly toggle the modes. 28 Sets...
... button to highlight the Clock/Timers icon and press . 2 Use the V/v/B/b button to set using the SLEEP button on the remote control (see page 20). Exit the Timer setting screen. Most suitable for home entertainment. Picture Settings Picture Mode Vivid For enhanced picture...save your convenience. Standard For standard picture settings. TV Setting Description Product Support Contact Sony Signal Diagnostics Sony contact information is available from the TV is executed the TV will turn off automatically. Press to remain on the remote control to directly toggle the modes. 28 Sets...

Operating Instructions
Page 30
...to the default values. Off Select for spoken dialog. Conversely, if you can also be accessed by pressing OPTIONS on the remote control, then selecting Picture from Wide or Standard. Select High or Low for dark picture scenes. Black Corrector Enhances black ... a greater sense of the picture for all the advanced settings to the default values. Sound Settings Available Sound settings depend on the remote control. Standard Suitable for normal stereo or mono reception. Increases or decreases higher-pitched sounds. Advanced C.E. Automatically optimizes the backlight and ...
...to the default values. Off Select for spoken dialog. Conversely, if you can also be accessed by pressing OPTIONS on the remote control, then selecting Picture from Wide or Standard. Select High or Low for dark picture scenes. Black Corrector Enhances black ... a greater sense of the picture for all the advanced settings to the default values. Sound Settings Available Sound settings depend on the remote control. Standard Suitable for normal stereo or mono reception. Increases or decreases higher-pitched sounds. Advanced C.E. Automatically optimizes the backlight and ...
Operating Instructions
Page 31
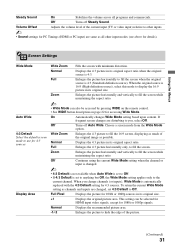
... as all programs and commercials. Off Turns off Auto Wide. Full Enlarges the picture horizontally to hide the edge of the current input (TV or video input) relative to Off. On Automatically changes Wide Mode setting based upon content. Full Pixel Displays the picture for 1080i or...horizontally and vertically to fill the screen while maintaining the aspect ratio. ~ • Wide Mode can be accessed by pressing WIDE on the remote control. • See WIDE button description on page 22 for 1080i or 1080p signals. This setting can also be selected for HDMI input ...
... as all programs and commercials. Off Turns off Auto Wide. Full Enlarges the picture horizontally to hide the edge of the current input (TV or video input) relative to Off. On Automatically changes Wide Mode setting based upon content. Full Pixel Displays the picture for 1080i or...horizontally and vertically to fill the screen while maintaining the aspect ratio. ~ • Wide Mode can be accessed by pressing WIDE on the remote control. • See WIDE button description on page 22 for 1080i or 1080p signals. This setting can also be selected for HDMI input ...
Operating Instructions
Page 32
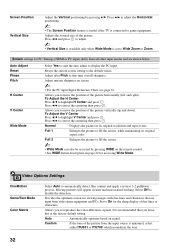
...To Adjust the V Center Press V/v to highlight H Center and press . Screen Position Vertical Size Adjust the Vertical positioning by pressing WIDE on the remote control. • See WIDE button description on page 22 for accessing Wide Mode. Press B/b to adjust the Horizontal positioning. ~ • The ...Screen Position feature is useful if the TV is unnatural, select either ITU601 or ITU709, which normalizes the tone. 32 Screen settings for viewing images with fine lines and characters that...
...To Adjust the V Center Press V/v to highlight H Center and press . Screen Position Vertical Size Adjust the Vertical positioning by pressing WIDE on the remote control. • See WIDE button description on page 22 for accessing Wide Mode. Press B/b to adjust the Horizontal positioning. ~ • The ...Screen Position feature is useful if the TV is unnatural, select either ITU601 or ITU709, which normalizes the tone. 32 Screen settings for viewing images with fine lines and characters that...
Operating Instructions
Page 33
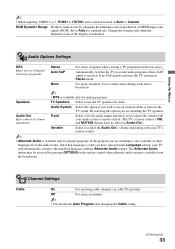
...available from the audio tracks, and if that language is what you are disabling the TV speakers. Audio System Select this option you wish to control the Audio Out's volume and muting with your TV's remote control. ~ • Alternate Audio is available only for digital programs. If the ...reproduction of volume adjustment Fixed Select to fix the audio output and allow you to adjust the volume with your audio system's remote control. (The TV's remote control's VOL and MUTING buttons have selected in stereo. By selecting this option if you are watching is also available in other...
...available from the audio tracks, and if that language is what you are disabling the TV speakers. Audio System Select this option you wish to control the Audio Out's volume and muting with your TV's remote control. ~ • Alternate Audio is available only for digital programs. If the ...reproduction of volume adjustment Fixed Select to fix the audio output and allow you to adjust the volume with your audio system's remote control. (The TV's remote control's VOL and MUTING buttons have selected in stereo. By selecting this option if you are watching is also available in other...
Operating Instructions
Page 34
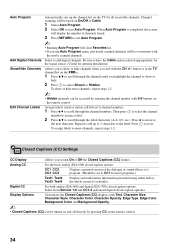
... Add Digital Channels Show/Hide Channels Edit Channel Labels Automatically sets up to 7 characters to the label. button or in the TV channel list on the remote control. CC1, CC2, CC3, CC4 Displays a printed version of the dialogue or sound effects of channels found. 3 Press ... Display Allows you run Auto Program again, previously scanned channels will be turned on the remote control. 34 Channel scanning will display the number of a program. (Should be based on the TV for most programs.) Text1, Text2, Text3, Text4 Displays network/station information presented using either...
... Add Digital Channels Show/Hide Channels Edit Channel Labels Automatically sets up to 7 characters to the label. button or in the TV channel list on the remote control. CC1, CC2, CC3, CC4 Displays a printed version of the dialogue or sound effects of channels found. 3 Press ... Display Allows you run Auto Program again, previously scanned channels will be turned on the remote control. 34 Channel scanning will display the number of a program. (Should be based on the TV for most programs.) Text1, Text2, Text3, Text4 Displays network/station information presented using either...
Operating Instructions
Page 35
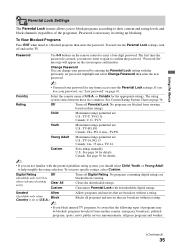
...Country Select the country name of the programs). Child Maximum ratings permitted are: U.S.: TV-Y, TV-G, G Canada: C, G, TV-Y Youth Maximum ratings permitted are: U.S.: TV-PG, PG Canada: C8+, PG, 8 ans+, TV-PG Young Adult Maximum ratings permitted are blocked from viewing. Clears the downloaded ratings... details. ~ • If you are broadcast without a rating. • If you block unrated TV programs, be blocked: programs broadcast from viewing based on the remote control to enter a four-digit password. To set password, highlight and select Change Password then enter ...
...Country Select the country name of the programs). Child Maximum ratings permitted are: U.S.: TV-Y, TV-G, G Canada: C, G, TV-Y Youth Maximum ratings permitted are: U.S.: TV-PG, PG Canada: C8+, PG, 8 ans+, TV-PG Young Adult Maximum ratings permitted are blocked from viewing. Clears the downloaded ratings... details. ~ • If you are broadcast without a rating. • If you block unrated TV programs, be blocked: programs broadcast from viewing based on the remote control to enter a four-digit password. To set password, highlight and select Change Password then enter ...
Operating Instructions
Page 38
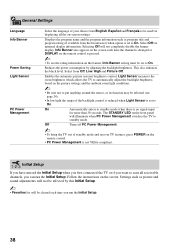
...241;ol and Français to be cleared each time the channel is changed or DISPLAY on the remote control is set to On. The STANDBY LED on the remote control. • PC Power Management is no signal input for minimal display information. Follow the instructions on ...-screen settings. Select Off for more than 30 seconds. Selecting Off will illuminate when PC Power Management switches the TV to standby mode when there...
...241;ol and Français to be cleared each time the channel is changed or DISPLAY on the remote control is set to On. The STANDBY LED on the remote control. • PC Power Management is no signal input for minimal display information. Follow the instructions on ...-screen settings. Select Off for more than 30 seconds. Selecting Off will illuminate when PC Power Management switches the TV to standby mode when there...

Operating Instructions
Page 39
...twin lead, move the excess lead away from some video sources • Check the connection between the optional video equipment and the TV. • Press INPUT on the remote control (see page 23). • Press HOME on the signal content. See Quick Setup Guide (supplied) to Low or High,...antenna, make sure that Cable in the Channel settings is locked to one of the following numbers: http://www.sony.com/tvsupport 1-800-222-SONY(7669) for US Support 1-877-899-SONY(7669) for Canadian Support Condition Explanation/Solution No picture No picture • Check the Power Saving settings (...
...twin lead, move the excess lead away from some video sources • Check the connection between the optional video equipment and the TV. • Press INPUT on the remote control (see page 23). • Press HOME on the signal content. See Quick Setup Guide (supplied) to Low or High,...antenna, make sure that Cable in the Channel settings is locked to one of the following numbers: http://www.sony.com/tvsupport 1-800-222-SONY(7669) for US Support 1-877-899-SONY(7669) for Canadian Support Condition Explanation/Solution No picture No picture • Check the Power Saving settings (...
Operating Instructions
Page 40
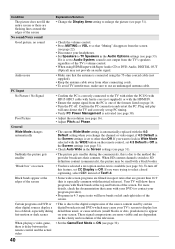
...Suddenly the picture gets smaller • The picture gets smaller during the commercials, this feature, set to other connecting cords. • To avoid TV interference, make sure to display less loss of detail, especially during detail than Off. When playing a video game, there is due to appear fast...in the Screen settings (see page 31). • Check Auto Wide in the Audio Options settings (see page 32). 40 For more visible and are dependent on the remote control, set to lock in aspect ratios that the antenna is activated (see page 31). If it is set 4:3 Default...
...Suddenly the picture gets smaller • The picture gets smaller during the commercials, this feature, set to other connecting cords. • To avoid TV interference, make sure to display less loss of detail, especially during detail than Off. When playing a video game, there is due to appear fast...in the Screen settings (see page 31). • Check Auto Wide in the Audio Options settings (see page 32). 40 For more visible and are dependent on the remote control, set to lock in aspect ratios that the antenna is activated (see page 31). If it is set 4:3 Default...

Operating Instructions
Page 41
...not operate • Check the polarity of the batteries or replace the batteries. • Point the remote control at the remote control sensor located at the front of the TV. • Fluorescent lamps can interfere with your cable company for more information. • The digital cable...digital cable channels are not being displayed • Certain cable companies have limitations on the TV. (The TV will clear all of digital cable channels. While holding down V on the remote control, press POWER settings on the broadcast of your customized settings including the Parental Lock setting...
...not operate • Check the polarity of the batteries or replace the batteries. • Point the remote control at the remote control sensor located at the front of the TV. • Fluorescent lamps can interfere with your cable company for more information. • The digital cable...digital cable channels are not being displayed • Certain cable companies have limitations on the TV. (The TV will clear all of digital cable channels. While holding down V on the remote control, press POWER settings on the broadcast of your customized settings including the Parental Lock setting...
Operating Instructions
Page 43
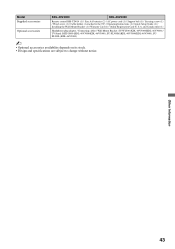
...), SU-FL300M (KDL-40V3000/KDL-46V3000), SUFL300L (KDL-46V3000) ~ • Optional accessories availability depends on its stock. • Design and specifications are subject to the TV) / Operating Instructions (1) / Quick Setup Guide (1) / Installing the Wall-Mount Bracket (1) / Warranty Card (1) / Online Registration Card (U.S.A. Other Information 43 Model Supplied accessories Optional accessories KDL-40V3000...
...), SU-FL300M (KDL-40V3000/KDL-46V3000), SUFL300L (KDL-46V3000) ~ • Optional accessories availability depends on its stock. • Design and specifications are subject to the TV) / Operating Instructions (1) / Quick Setup Guide (1) / Installing the Wall-Mount Bracket (1) / Warranty Card (1) / Online Registration Card (U.S.A. Other Information 43 Model Supplied accessories Optional accessories KDL-40V3000...
Service Manual
Page 1
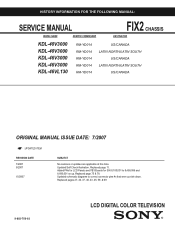
Added PNs for LCD Panels and FB3 Boards for S/N 8,100,001 to correct connector pins #s that were up . Updated schematic diagrams to 8,499,999 and 8,600,001 on up side down. HISTORY INFORMATION FOR THE FOLLOWING MANUAL: SERVICE MANUAL FIX2 CHASSIS MODEL NAME REMOTE COMMANDER DESTINATION KDL-40V3000 KDL-40V3000 KDL-46V3000 KDL... No revisions or updates are applicable at this time. Updated Self Check illustration. Replaced page 11. Replaced page 75 & 78. Replaced pages 27, 34, 37, 40, 43, 45, 59, & 69. 9-883-756-03 LCD DIGITAL COLOR TELEVISION
Added PNs for LCD Panels and FB3 Boards for S/N 8,100,001 to correct connector pins #s that were up . Updated schematic diagrams to 8,499,999 and 8,600,001 on up side down. HISTORY INFORMATION FOR THE FOLLOWING MANUAL: SERVICE MANUAL FIX2 CHASSIS MODEL NAME REMOTE COMMANDER DESTINATION KDL-40V3000 KDL-40V3000 KDL-46V3000 KDL... No revisions or updates are applicable at this time. Updated Self Check illustration. Replaced page 11. Replaced page 75 & 78. Replaced pages 27, 34, 37, 40, 43, 45, 59, & 69. 9-883-756-03 LCD DIGITAL COLOR TELEVISION


