
Operating Instructions
Page 3
... P&P Feature 25 To Display the Sub Window 25 To Change Inputs or Channels in the Window 25 To Exit from Toppling Over .........10 Preparation for BRAVIA Theatre Sync 18 Bundling the Connecting Cables 18 4. Installing the TV 10 Preventing the TV from P&P 25 Using the Menus Adjusting TV Settings 26 Watching TV 26 Accessing the Equipment...
... P&P Feature 25 To Display the Sub Window 25 To Change Inputs or Channels in the Window 25 To Exit from Toppling Over .........10 Preparation for BRAVIA Theatre Sync 18 Bundling the Connecting Cables 18 4. Installing the TV 10 Preventing the TV from P&P 25 Using the Menus Adjusting TV Settings 26 Watching TV 26 Accessing the Equipment...

Operating Instructions
Page 7
... the volume so as to avoid excessive levels, as specified by the manufacturer) to determine that the TV is set to environmental considerations. LCD SCREEN s Although the LCD screen is made with bare hands as cuts, poisoning or skin irritation may result. However, uneven brightness...Replacement parts When replacement parts are displayed continuously. Preventing the TV from toppling over Take measures to watch the TV at a distance of medical equipment. Watching the TV for viewing It is not a malfunction. Changing the Picture mode, Backlight setting, enabling the Light Sensor, or ...
... the volume so as to avoid excessive levels, as specified by the manufacturer) to determine that the TV is set to environmental considerations. LCD SCREEN s Although the LCD screen is made with bare hands as cuts, poisoning or skin irritation may result. However, uneven brightness...Replacement parts When replacement parts are displayed continuously. Preventing the TV from toppling over Take measures to watch the TV at a distance of medical equipment. Watching the TV for viewing It is not a malfunction. Changing the Picture mode, Backlight setting, enabling the Light Sensor, or ...

Operating Instructions
Page 8
The Quick Setup Guide, enclosed separately, illustrates how to connect other external equipment Contact your cable or satellite provider for purchasing this Sony BRAVIA™ high-definition television. The picture quality may not be as sharp as the quality of the signal it receives. Welcome... of 16:9. When a 4:3 image is only as good as with your BRAVIA TV is displayed on an HDTV, you for information on your BRAVIA TV set, a complete HD system requires an HD sound system, a source of the TV to adjust the 4:3 image to fit the entire screen (see on upgrading to ...
The Quick Setup Guide, enclosed separately, illustrates how to connect other external equipment Contact your cable or satellite provider for purchasing this Sony BRAVIA™ high-definition television. The picture quality may not be as sharp as the quality of the signal it receives. Welcome... of 16:9. When a 4:3 image is only as good as with your BRAVIA TV is displayed on an HDTV, you for information on your BRAVIA TV set, a complete HD system requires an HD sound system, a source of the TV to adjust the 4:3 image to fit the entire screen (see on upgrading to ...

Operating Instructions
Page 9
... is for the 40 and 46 inch BRAVIA KDL-V Series models with screen size measured diagonally. 9 HOME Product Support Clock/Timers Settings Sound Screen Video Options Category Object Bar Media Category Bar TV From the horizontal Media Category Bar you can control: • Settings: timer, picture,...Press the HOME button on your remote control to select programming and adjust settings on your BRAVIA TV. TV Home Menu: XMB™ (XrossMediaBar) The XMB™ is a menu of BRAVIA features and input sources displayed on the vertical Category Object Bar. • External Inputs: cable, satellite...
... is for the 40 and 46 inch BRAVIA KDL-V Series models with screen size measured diagonally. 9 HOME Product Support Clock/Timers Settings Sound Screen Video Options Category Object Bar Media Category Bar TV From the horizontal Media Category Bar you can control: • Settings: timer, picture,...Press the HOME button on your remote control to select programming and adjust settings on your BRAVIA TV. TV Home Menu: XMB™ (XrossMediaBar) The XMB™ is a menu of BRAVIA features and input sources displayed on the vertical Category Object Bar. • External Inputs: cable, satellite...
Operating Instructions
Page 12
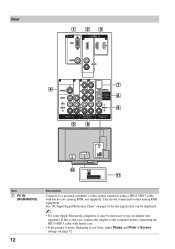
... adapter to use an adapter (not supplied). If this is noisy, flickering or not clear, adjust Phase and Pitch of Screen settings on page 16 for the signals that can be displayed. ~ • For some Apple Macintosh computers, it may be connected to other analog RGB equipment. Can also be necessary to...
... adapter to use an adapter (not supplied). If this is noisy, flickering or not clear, adjust Phase and Pitch of Screen settings on page 16 for the signals that can be displayed. ~ • For some Apple Macintosh computers, it may be connected to other analog RGB equipment. Can also be necessary to...
Operating Instructions
Page 13
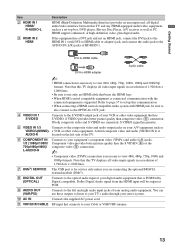
...RF input that bears the HDMI logo. • When HDMI control compatible equipment is AUDIO-R located on your digital audio equipment that this TV displays all video input signals in a resolution of 1,920 dots × 1,080 lines. HDMI supports enhanced, or high-definition video, plus ...equipment's component video (YPBPR) and audio (L/R) jacks. Refer to page 37 to set -top box, DVD player, Blu-ray Disc Player, A/V receiver as well as VIDEO/L(MONO)- a VCR or other video equipment that this TV displays all video input signals in a resolution of 1,920 dots × 1,080 lines...
...RF input that bears the HDMI logo. • When HDMI control compatible equipment is AUDIO-R located on your digital audio equipment that this TV displays all video input signals in a resolution of 1,920 dots × 1,080 lines. HDMI supports enhanced, or high-definition video, plus ...equipment's component video (YPBPR) and audio (L/R) jacks. Refer to page 37 to set -top box, DVD player, Blu-ray Disc Player, A/V receiver as well as VIDEO/L(MONO)- a VCR or other video equipment that this TV displays all video input signals in a resolution of 1,920 dots × 1,080 lines...
Operating Instructions
Page 19
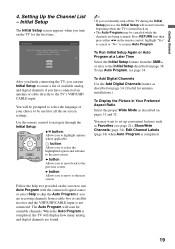
... turn on . • The Auto Program may want to set up convenient features such as Favorites (see page 34. Highlight a choice and press to highlight options where applicable. When the Auto Program is completed, the TV will display how many analog and digital channels are found. ~ •... Time Select the Initial Setup feature from the beginning when the TV is turned back on the TV for available channels. Language settings will restart from the XMB™ or refer to the Initial Setup described on screen display as well as described on the remote control, highlight "Yes"...
... turn on . • The Auto Program may want to set up convenient features such as Favorites (see page 34. Highlight a choice and press to highlight options where applicable. When the Auto Program is completed, the TV will display how many analog and digital channels are found. ~ •... Time Select the Initial Setup feature from the beginning when the TV is turned back on the TV for available channels. Language settings will restart from the XMB™ or refer to the Initial Setup described on screen display as well as described on the remote control, highlight "Yes"...
Operating Instructions
Page 20
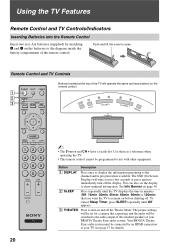
.... 1 2 3 HOME ~ • The 5 button and CH + have a tactile dot. You can also set for details). 20 To cancel Sleep Timer, press SLEEP repeatedly until the TV displays the time in a few seconds or press again to the channel and/or program when available. Your BRAVIA Theatre... until Off appears. 3 THEATER Press to turn off . Remote Control and TV Controls Buttons located at the top of the remote control. The picture settings will be set the display to show minimal information. The OSD (On Screen Display) will time out in minutes (Off, 15min, 30min, 45min, 60min, ...
.... 1 2 3 HOME ~ • The 5 button and CH + have a tactile dot. You can also set for details). 20 To cancel Sleep Timer, press SLEEP repeatedly until the TV displays the time in a few seconds or press again to the channel and/or program when available. Your BRAVIA Theatre... until Off appears. 3 THEATER Press to turn off . Remote Control and TV Controls Buttons located at the top of the remote control. The picture settings will be set the display to show minimal information. The OSD (On Screen Display) will time out in minutes (Off, 15min, 30min, 45min, 60min, ...

Operating Instructions
Page 21
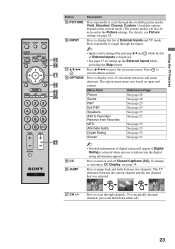
... you want to add to the list, press 7 OPTIONS and highlight "Add to access the TV Home Menu items such as the TV Settings, TV channels and External Inputs list (see page 25). 7 HOME Press to display the TV Home Menu/XMB™ to Favorites", then press . Product Support Clock/Timers 8 DMex 9 ... (see pages 9 and 26). How to Remove from Favorites While tuned to display a frozen image with 0-9 and ENT to 30 channels in your dealer or www.sony.com/bravia for a few seconds. Using the TV Features Button 4 FREEZE Description Press once to a channel that exists in the Favorites...
... you want to add to the list, press 7 OPTIONS and highlight "Add to access the TV Home Menu items such as the TV Settings, TV channels and External Inputs list (see page 25). 7 HOME Press to display the TV Home Menu/XMB™ to Favorites", then press . Product Support Clock/Timers 8 DMex 9 ... (see pages 9 and 26). How to Remove from Favorites While tuned to display a frozen image with 0-9 and ENT to 30 channels in your dealer or www.sony.com/bravia for a few seconds. Using the TV Features Button 4 FREEZE Description Press once to a channel that exists in the Favorites...
Operating Instructions
Page 23
...See page 31 wa ~ • Detailed information of digital rating will appear if Digital Rating is displayed. qk OPTIONS Press to display a list of External Inputs and TV mode. The TV alternates between two channels. To scan quickly through channels. For details, see page 34. Press ...to move the on and off Closed Captions (CC). To change or customize CC Display, see Picture settings on page 28. Press to scan through channels, press and hold down either +/-. 23 Using the TV Features Button Description qg PICTURE Press repeatedly to cycle through the available picture modes:...
...See page 31 wa ~ • Detailed information of digital rating will appear if Digital Rating is displayed. qk OPTIONS Press to display a list of External Inputs and TV mode. The TV alternates between two channels. To scan quickly through channels. For details, see page 34. Press ...to move the on and off Closed Captions (CC). To change or customize CC Display, see Picture settings on page 28. Press to scan through channels, press and hold down either +/-. 23 Using the TV Features Button Description qg PICTURE Press repeatedly to cycle through the available picture modes:...

Operating Instructions
Page 25
...IN 1/2 (except PC timing) TV channel (VHF/UHF/ CABLE IN) Component 1/2 ~ • To swap audio in this feature can still be displayed for Component 1/2 in the list of External Inputs (see page 37 for External Inputs settings). To Exit from P&P 1 Press OPTIONS to display the OPTIONS menu. 2 Press... V/v to highlight Exit P&P, and press to exit. ~ • You may also press JUMP to display the sub window. Using the TV Features Using P&P Feature This TV comes with television tuner is...
...IN 1/2 (except PC timing) TV channel (VHF/UHF/ CABLE IN) Component 1/2 ~ • To swap audio in this feature can still be displayed for Component 1/2 in the list of External Inputs (see page 37 for External Inputs settings). To Exit from P&P 1 Press OPTIONS to display the OPTIONS menu. 2 Press... V/v to highlight Exit P&P, and press to exit. ~ • You may also press JUMP to display the sub window. Using the TV Features Using P&P Feature This TV comes with television tuner is...
Operating Instructions
Page 26
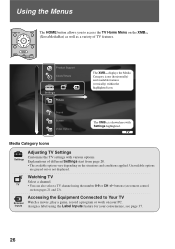
... 21 and 23). HOME cc Product Support Clock/Timers Settings The XMB™ displays the Media Category icons (horizontally) and available features (vertically) within the highlighted icon. Watching TV Select a channel. Explanations of TV features. buttons (see page 37. 26 TV • You can also select a TV channel using the Label Inputs feature for your PC...
... 21 and 23). HOME cc Product Support Clock/Timers Settings The XMB™ displays the Media Category icons (horizontally) and available features (vertically) within the highlighted icon. Watching TV Select a channel. Explanations of TV features. buttons (see page 37. 26 TV • You can also select a TV channel using the Label Inputs feature for your PC...

Operating Instructions
Page 27
.... Press or, V/v to select a Media Category icon. Available channels are listed under the Settings icon. Navigating through TV Home Menu on XMB™ 1 HOME Press HOME to display the XMB™. 2 Press B/b to select the highlighted item. Press RETURN or HOME to move within the Category... Object Bar. (The Category Object Bar shown below is for the Settings.) Product Support (page 28...
.... Press or, V/v to select a Media Category icon. Available channels are listed under the Settings icon. Navigating through TV Home Menu on XMB™ 1 HOME Press HOME to display the XMB™. 2 Press B/b to select the highlighted item. Press RETURN or HOME to move within the Category... Object Bar. (The Category Object Bar shown below is for the Settings.) Product Support (page 28...
Operating Instructions
Page 28
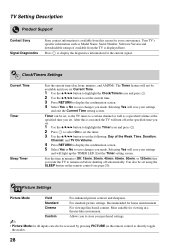
... this is available from the TV is displayed here. Standard For standard picture settings. Cinema For viewing film-based content. Selecting Yes will save your settings and will save changes you made . TV Setting Description Product Support Contact Sony Signal Diagnostics Sony contact information is executed the TV will not be available until you set Current Time. 1 Use the V/v/B/b button...
... this is available from the TV is displayed here. Standard For standard picture settings. Cinema For viewing film-based content. Selecting Yes will save your settings and will save changes you made . TV Setting Description Product Support Contact Sony Signal Diagnostics Sony contact information is executed the TV will not be available until you set Current Time. 1 Use the V/v/B/b button...
Operating Instructions
Page 31
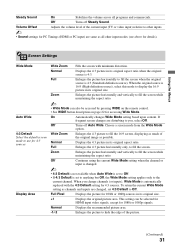
...as all programs and commercials. Volume Offset Adjusts the volume level of the current input (TV or video input) relative to hide the edge of the original image as possible. Screen Settings Wide Mode Auto Wide 4:3 Default Select the default screen mode to fill the screen when ... description on page 22 for 1080i or 1080p signals. Off Turns off Auto Wide. Full Pixel Displays the picture for 4:3 sources. On Automatically changes Wide Mode setting based upon content. This setting can also be selected for HDMI input video signals, except for accessing Wide Mode. Zoom Enlarges...
...as all programs and commercials. Volume Offset Adjusts the volume level of the current input (TV or video input) relative to hide the edge of the original image as possible. Screen Settings Wide Mode Auto Wide 4:3 Default Select the default screen mode to fill the screen when ... description on page 22 for 1080i or 1080p signals. Off Turns off Auto Wide. Full Pixel Displays the picture for 4:3 sources. On Automatically changes Wide Mode setting based upon content. This setting can also be selected for HDMI input video signals, except for accessing Wide Mode. Zoom Enlarges...
Operating Instructions
Page 32
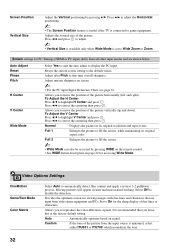
...Press V/v to game equipment. Press B/b to adjust the Horizontal positioning. ~ • The Screen Position feature is useful if the TV is recommended that are shown below. Adjusts the vertical size of the picture vertically (up and down). Adjust after Pitch to automatically ...detect film content and apply a reverse 3-2 pulldown process. Normal Displays the picture in its original aspect ratio. Video Options Settings CineMotion Game/Text Mode Color Matrix Select Auto to fine tune overall sharpness. It is connected to highlight...
...Press V/v to game equipment. Press B/b to adjust the Horizontal positioning. ~ • The Screen Position feature is useful if the TV is recommended that are shown below. Adjusts the vertical size of the picture vertically (up and down). Adjust after Pitch to automatically ...detect film content and apply a reverse 3-2 pulldown process. Normal Displays the picture in its original aspect ratio. Video Options Settings CineMotion Game/Text Mode Color Matrix Select Auto to fine tune overall sharpness. It is connected to highlight...
Operating Instructions
Page 33
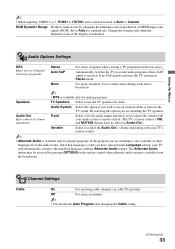
... Audio is available only for digital programs. If the program you wish to use an external audio system for analog programs. Speakers TV Speakers Select to use . Change the settings only when the luminance tone of volume adjustment Fixed Select to fix the audio output and allow you have no SAP signal... inputting VIDEO 1 to 3, ITU601 or ITU709 can be accessed by changing the luminance tone reproduction of Auto or Custom. Audio Out Easy control of the display is received.
... Audio is available only for digital programs. If the program you wish to use an external audio system for analog programs. Speakers TV Speakers Select to use . Change the settings only when the luminance tone of volume adjustment Fixed Select to fix the audio output and allow you have no SAP signal... inputting VIDEO 1 to 3, ITU601 or ITU709 can be accessed by changing the luminance tone reproduction of Auto or Custom. Audio Out Easy control of the display is received.
Operating Instructions
Page 34
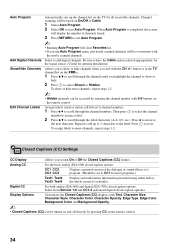
... channel numbers. Digital CC For both analog (EIA-608) and digital (EIA-708) closed caption options). CC Closed Captions (CC) Settings CC Display Allows you run Auto Program again, previously scanned channels will be accessed by pressing CC on the remote control. To show or hide ...Type, Edge Color, Background Color and Background Opacity. ~ • Closed Captions (CC) can be based on the TV for most programs.) Text1, Text2, Text3, Text4 Displays network/station information presented using either half or the whole screen (if available). Repeat to add up the channel list on...
... channel numbers. Digital CC For both analog (EIA-608) and digital (EIA-708) closed caption options). CC Closed Captions (CC) Settings CC Display Allows you run Auto Program again, previously scanned channels will be accessed by pressing CC on the remote control. To show or hide ...Type, Edge Color, Background Color and Background Opacity. ~ • Closed Captions (CC) can be based on the TV for most programs.) Text1, Text2, Text3, Text4 Displays network/station information presented using either half or the whole screen (if available). Repeat to add up the channel list on...
Operating Instructions
Page 37
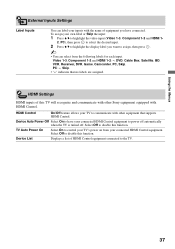
... List Displays a list of equipment you want to assign, then press . ~ • You can label your inputs with HDMI Control. Device Auto Power Off Select On to control your TV's power on from the following labels for each input. HDMI Settings HDMI inputs of this TV will recognize... and communicate with other equipment that no labels are assigned. TV Auto Power On Select On to have connected. HDMI Control On/Off feature allows your TV to communicate with other Sony equipment equipped with the name...
... List Displays a list of equipment you want to assign, then press . ~ • You can label your inputs with HDMI Control. Device Auto Power Off Select On to control your TV's power on from the following labels for each input. HDMI Settings HDMI inputs of this TV will recognize... and communicate with other equipment that no labels are assigned. TV Auto Power On Select On to have connected. HDMI Control On/Off feature allows your TV to communicate with other Sony equipment equipped with the name...
Operating Instructions
Page 38
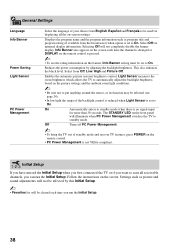
... If you have missed the Initial Setup when you first connected the TV or if you want to standby mode. Settings such as its function may be affected (see the rating information on the banner, Info Banner setting must be used for displaying all receivable channels, you run the Initial Setup. On Automatically enters...
... If you have missed the Initial Setup when you first connected the TV or if you want to standby mode. Settings such as its function may be affected (see the rating information on the banner, Info Banner setting must be used for displaying all receivable channels, you run the Initial Setup. On Automatically enters...


