Operating Instructions
Page 2
...accept any changes or modifications not expressly approved in a room where the floor and walls are designed to comply with the limits for help. Sony TV-Stand Model No. Owner's Record The model and serial numbers are located at temperatures below . This equipment generates, uses and can be ... Inc. It is encouraged to try to the presence of uninsulated "dangerous voltage" within the TV's enclosure that face the screen with opaque drapery. Sony TV Model No. Antenna grounding according to fit into an outlet on page 3. If this equipment in order to comply with the limits ...
...accept any changes or modifications not expressly approved in a room where the floor and walls are designed to comply with the limits for help. Sony TV-Stand Model No. Owner's Record The model and serial numbers are located at temperatures below . This equipment generates, uses and can be ... Inc. It is encouraged to try to the presence of uninsulated "dangerous voltage" within the TV's enclosure that face the screen with opaque drapery. Sony TV Model No. Antenna grounding according to fit into an outlet on page 3. If this equipment in order to comply with the limits ...
Operating Instructions
Page 4
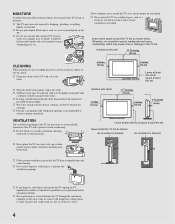
... shock, do not expose this much space around the set near a swimming pool, etc. Leave some space around the TV set to rain or moisture. s Wipe the LCD screen gently with cloth or other similar surface where ventilation openings may be inadequate and cause overheating, which may cause a fire... or damage to the TV set as they may be sure to unplug the power cord to proper ventilation. s Periodic ...
... shock, do not expose this much space around the set near a swimming pool, etc. Leave some space around the TV set to rain or moisture. s Wipe the LCD screen gently with cloth or other similar surface where ventilation openings may be inadequate and cause overheating, which may cause a fire... or damage to the TV set as they may be sure to unplug the power cord to proper ventilation. s Periodic ...
Operating Instructions
Page 7
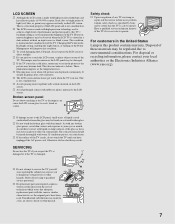
...a dark ambient without an input source or blank screen. The images may be uneven or the LCD panel may be observed when the LCD TV is normal and not a malfunction of the TV. s The LCD screen and enclosure get warm when the TV is made with high-precision technology and has effective...expose you to dangerous voltage levels or other hazards. 7 7 Avoid direct contact with any TV servicing or repair, ask the service technician to perform routine safety checks as specified by Sony and to certify that adequate replacement parts with the same or similar characteristics as the temperature ...
...a dark ambient without an input source or blank screen. The images may be uneven or the LCD panel may be observed when the LCD TV is normal and not a malfunction of the TV. s The LCD screen and enclosure get warm when the TV is made with high-precision technology and has effective...expose you to dangerous voltage levels or other hazards. 7 7 Avoid direct contact with any TV servicing or repair, ask the service technician to perform routine safety checks as specified by Sony and to certify that adequate replacement parts with the same or similar characteristics as the temperature ...

Operating Instructions
Page 9
...Contents Getting Started Welcome to the World of MENU ...25 Using the Picture Settings 25 Using the Sound Settings 26 Using the Screen Settings 27 Using the PC Settings 28 Using the Channel Settings 29 Using the Parental Lock Settings 30 Using the Setup Settings ... Antenna System 13 Satellite Receiver and Cable/Antenna 13 VCR, Cable and Antenna 14 When Connecting to Optional Equipment 15 Securing the TV...17 Preventing the TV from Toppling 17 Use a Sony TV Stand 17 Recommended Measures to Secure the TV 17 Bundling the Connecting Cables 19 Setting Up the Channel List -
...Contents Getting Started Welcome to the World of MENU ...25 Using the Picture Settings 25 Using the Sound Settings 26 Using the Screen Settings 27 Using the PC Settings 28 Using the Channel Settings 29 Using the Parental Lock Settings 30 Using the Setup Settings ... Antenna System 13 Satellite Receiver and Cable/Antenna 13 VCR, Cable and Antenna 14 When Connecting to Optional Equipment 15 Securing the TV...17 Preventing the TV from Toppling 17 Use a Sony TV Stand 17 Recommended Measures to Secure the TV 17 Bundling the Connecting Cables 19 Setting Up the Channel List -
Operating Instructions
Page 11
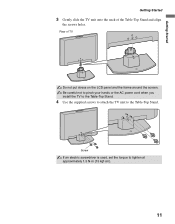
Be careful not to pinch your hands or the AC power cord when you install the TV to the Table-Top Stand. 4 Use the supplied screws to attach the TV unit to tighten at approximately 1.5 N·m {15 kgf·cm}. 11 Screw If an electric screwdriver is used, set the torque to the Table-Top Stand. Getting Started Getting Started 3 Gently slide the TV unit onto the neck of TV Do not put stress on the LCD panel and the frame around the screen. Rear of the Table-Top Stand and align the screws holes.
Be careful not to pinch your hands or the AC power cord when you install the TV to the Table-Top Stand. 4 Use the supplied screws to attach the TV unit to tighten at approximately 1.5 N·m {15 kgf·cm}. 11 Screw If an electric screwdriver is used, set the torque to the Table-Top Stand. Getting Started Getting Started 3 Gently slide the TV unit onto the neck of TV Do not put stress on the LCD panel and the frame around the screen. Rear of the Table-Top Stand and align the screws holes.
Operating Instructions
Page 12
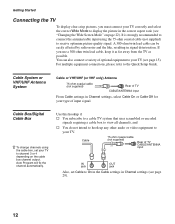
... Cable 75-ohm coaxial cable (not supplied) Rear of TV CABLE/ANTENNA input IN OUT jack jack Also, set your TV. You can be easily affected by radio noise and the like, resulting in Channel settings (see "Changing the Wide Screen Mode" on the cable box channel output. Auto Program ...will fix the channel automatically. Getting Started Connecting the TV To display clear crisp pictures, you use a 300-ohm twin lead cable, keep it as...
... Cable 75-ohm coaxial cable (not supplied) Rear of TV CABLE/ANTENNA input IN OUT jack jack Also, set your TV. You can be easily affected by radio noise and the like, resulting in Channel settings (see "Changing the Wide Screen Mode" on the cable box channel output. Auto Program ...will fix the channel automatically. Getting Started Connecting the TV To display clear crisp pictures, you use a 300-ohm twin lead cable, keep it as...
Operating Instructions
Page 20
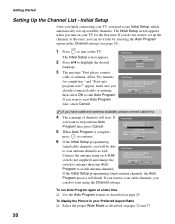
...If you want to set up available channels. Start auto program now? POWER 1 Press to start Auto Program. Initial Setup Please select your TV, you want to start Auto Program later, select Cancel. Connect the antenna using the Channel settings. If the Initial Setup programming found cable ... do not want to scan cable channels, you can do it later by selecting the Auto Program option in your TV for completion." Please wait. The Initial Setup screen appears when you can do it later using an A-B RF switch (not supplied) and change the switch to antenna...
...If you want to set up available channels. Start auto program now? POWER 1 Press to start Auto Program. Initial Setup Please select your TV, you want to start Auto Program later, select Cancel. Connect the antenna using the Channel settings. If the Initial Setup programming found cable ... do not want to scan cable channels, you can do it later by selecting the Auto Program option in your TV for completion." Please wait. The Initial Setup screen appears when you can do it later using an A-B RF switch (not supplied) and change the switch to antenna...
Operating Instructions
Page 21
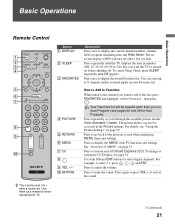
...page 25. Press to the channel you run Auto Program (see page 34. Use with TV functions and settings. z The 5 button and CH + have a tactile dot. You can also be cleared each time ...you want the TV to select digital channels. Press repeatedly to display the stored Favorites list. To change or customize ...Off appears. See "Overview of MENU" on page 25. Press again or press VOL + to the previous screen when displaying MENU items and settings. Press to display the MENU with 0-9 and ENT buttons to remain on and...
...page 25. Press to the channel you run Auto Program (see page 34. Use with TV functions and settings. z The 5 button and CH + have a tactile dot. You can also be cleared each time ...you want the TV to select digital channels. Press repeatedly to display the stored Favorites list. To change or customize ...Off appears. See "Overview of MENU" on page 25. Press again or press VOL + to the previous screen when displaying MENU items and settings. Press to display the MENU with 0-9 and ENT buttons to remain on and...
Operating Instructions
Page 22
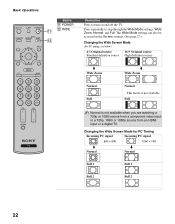
...turn on and off the TV. Changing the Wide Screen Mode for PC Timing Incoming PC signal Incoming PC signal 800 × 600 1280 × 768 m Normal m Normal Full 1 Full 1 Full 2 Full 2 22 The Wide Mode settings can also be accessed in the Screen settings. (See page 27.)... Changing the Wide Screen Mode (For PC timing, see below) 4:3 Original source 16:9 Original source Standard definition source High definition source m Wide Zoom Normal ...
...turn on and off the TV. Changing the Wide Screen Mode for PC Timing Incoming PC signal Incoming PC signal 800 × 600 1280 × 768 m Normal m Normal Full 1 Full 1 Full 2 Full 2 22 The Wide Mode settings can also be accessed in the Screen settings. (See page 27.)... Changing the Wide Screen Mode (For PC timing, see below) 4:3 Original source 16:9 Original source Standard definition source High definition source m Wide Zoom Normal ...
Operating Instructions
Page 23
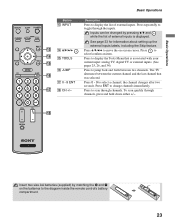
Press repeatedly to toggle through channels, press and hold down either +/-. Inputs can be changed by matching the e and E on -screen cursor. Press 0 - 9 to select/confirm an item. Basic Operations Description Press to the diagram inside the remote control's battery compartment. 23 See ... through the inputs. Press V/v/B/b to move the on the batteries to display the list of external inputs is associated with your current input: analog TV, digital TV or external inputs. (See pages 25, 26, and 34) Press to display the Tools Menu that was selected. Press to select a channel;...
Press repeatedly to toggle through channels, press and hold down either +/-. Inputs can be changed by matching the e and E on -screen cursor. Press 0 - 9 to select/confirm an item. Basic Operations Description Press to the diagram inside the remote control's battery compartment. 23 See ... through the inputs. Press V/v/B/b to move the on the batteries to display the list of external inputs is associated with your current input: analog TV, digital TV or external inputs. (See pages 25, 26, and 34) Press to display the Tools Menu that was selected. Press to select a channel;...
Operating Instructions
Page 24
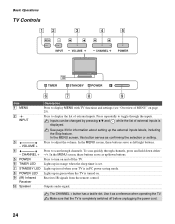
... feature. Press repeatedly to scan through the inputs. In the MENU screen, this button serves as left/right buttons. 4 - VOLUME + Press to turn on . In the MENU screen, these buttons serve as a reference when operating the TV. Use it as up/down either -/+. CHANNEL + 5 POWER 6... TIMER LED 7 STANDBY LED Press to toggle through channels. In the MENU screen, these buttons serve as confirming the selection or setting....
... feature. Press repeatedly to scan through the inputs. In the MENU screen, this button serves as left/right buttons. 4 - VOLUME + Press to turn on . In the MENU screen, these buttons serve as a reference when operating the TV. Use it as up/down either -/+. CHANNEL + 5 POWER 6... TIMER LED 7 STANDBY LED Press to toggle through channels. In the MENU screen, these buttons serve as confirming the selection or setting....
Operating Instructions
Page 25
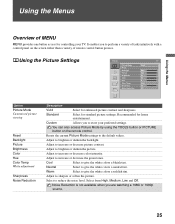
... Description Vivid Select for standard picture settings. You can also access Picture Mode by using the TOOLS button or PICTURE button on the screen rather than a variety of remote control button presses. Adjust to increase or decrease color intensity. Adjust to brighten or darken the backlight...the white colors a bluish tint. Adjust to increase or decrease picture contrast. Noise Reduction is not available when you to store your TV. It enables you to sharpen or soften the picture. Adjust to increase or decrease the green tones. Warm Select to reduce the noise...
... Description Vivid Select for standard picture settings. You can also access Picture Mode by using the TOOLS button or PICTURE button on the screen rather than a variety of remote control button presses. Adjust to increase or decrease color intensity. Adjust to brighten or darken the backlight...the white colors a bluish tint. Adjust to increase or decrease picture contrast. Noise Reduction is not available when you to store your TV. It enables you to sharpen or soften the picture. Adjust to increase or decrease the green tones. Warm Select to reduce the noise...
Operating Instructions
Page 27
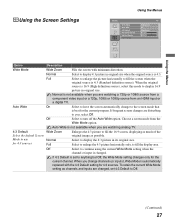
..., the Wide Mode setting changes only for the current program. When you , select Off. Using the Menus Using the Screen Settings Using the Menus Screen TV Wide Mode Auto Wide 4:3 Default Horizontal Center Vertical Center PC Settings Wide Zoom On Wide Zoom 0 0 Option Wide Mode... Auto Wide 4:3 Default Select the default Screen Mode to use for 4:3 sources Description Wide Zoom Fills the screen with the 4:3 Default setting for 4:3 sources. Choose a screen mode from an HDMI input or a digital TV. To retain the current Wide Mode setting as possible. Auto...
..., the Wide Mode setting changes only for the current program. When you , select Off. Using the Menus Using the Screen Settings Using the Menus Screen TV Wide Mode Auto Wide 4:3 Default Horizontal Center Vertical Center PC Settings Wide Zoom On Wide Zoom 0 0 Option Wide Mode... Auto Wide 4:3 Default Select the default Screen Mode to use for 4:3 sources Description Wide Zoom Fills the screen with the 4:3 Default setting for 4:3 sources. Choose a screen mode from an HDMI input or a digital TV. To retain the current Wide Mode setting as possible. Auto...
Operating Instructions
Page 28
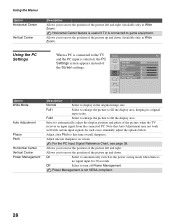
...size. Allows you to move the position of the picture left and right. Power Management is selected, the PC PC Settings Settings screen appears instead of the Screen settings. Note that Auto Adjustment may not work well with certain input signals. Wide Mode Auto Adjustment Phase Pitch Normal 0 0 ... Vertical Center Power Management Description Normal Select to display in Wide Zoom). Using the PC Settings When a PC is connected to the TV Screen PC and the PC input is not VESA-compliant. 28 Full2 Select to enlarge the picture to fine tune overall sharpness. Adjust after...
...size. Allows you to move the position of the picture left and right. Power Management is selected, the PC PC Settings Settings screen appears instead of the Screen settings. Note that Auto Adjustment may not work well with certain input signals. Wide Mode Auto Adjustment Phase Pitch Normal 0 0 ... Vertical Center Power Management Description Normal Select to display in Wide Zoom). Using the PC Settings When a PC is connected to the TV Screen PC and the PC input is not VESA-compliant. 28 Full2 Select to enlarge the picture to fine tune overall sharpness. Adjust after...
Operating Instructions
Page 33
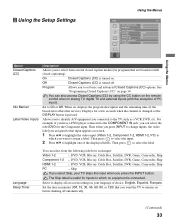
...basic and advanced Closed Captions (CC) options. The Skip label is useful for inputs to display all on-screen settings in your TV skips this service). Select to which you want the TV to select the label. Set to assign a label. Then when you press INPUT to change inputs, the... when in minutes (Off, 15, 30, 45, 60, 90, or 120) that are broadcast with the exception of PC input). Then press to remain on screen. 1 Press V/v to highlight the video input (Video 1-2, Component 1-2, HDMI 1-2, PC) to which no equipment is turned off automatically. (Continued) 33 See "...
...basic and advanced Closed Captions (CC) options. The Skip label is useful for inputs to display all on-screen settings in your TV skips this service). Select to which you want the TV to select the label. Set to assign a label. Then when you press INPUT to change inputs, the... when in minutes (Off, 15, 30, 45, 60, 90, or 120) that are broadcast with the exception of PC input). Then press to remain on screen. 1 Press V/v to highlight the video input (Video 1-2, Component 1-2, HDMI 1-2, PC) to which no equipment is turned off automatically. (Continued) 33 See "...

Operating Instructions
Page 34
...the remote control. Using the Menus Option Description Power Saving Select to reduce the power consumption by using either half or the whole screen (if available). This also enhances the black level. CC1, CC2, CC3, CC4 Displays a printed version of the dialogue or sound effects ...of your TV. Product Information Select to display the equipment information of a program. (Should be set digital closed caption options. Select from Off, Low and...
...the remote control. Using the Menus Option Description Power Saving Select to reduce the power consumption by using either half or the whole screen (if available). This also enhances the black level. CC1, CC2, CC3, CC4 Displays a printed version of the dialogue or sound effects ...of your TV. Product Information Select to display the equipment information of a program. (Should be set digital closed caption options. Select from Off, Low and...
Operating Instructions
Page 35
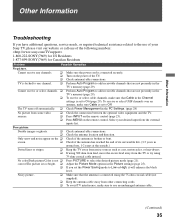
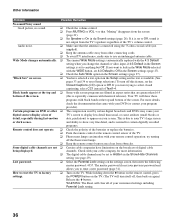
...or select UHF channels over an antenna, make sure Cable is set to On (page 29). The TV turns off automatically. ❑ Check Power Management in the TV's memory (page 29). Select your Sony TV, please visit our website or call one channel. ❑ Perform Auto Program to select the desired picture... are not presently in the Picture settings (page 25). Cannot receive any channels. ❑ Make sure the power cord is broken or bent. screen. ❑ Check if the antenna has reached the end of your desired input from some video sources. ❑ Check the connection between the ...
...or select UHF channels over an antenna, make sure Cable is set to On (page 29). The TV turns off automatically. ❑ Check Power Management in the TV's memory (page 29). Select your Sony TV, please visit our website or call one channel. ❑ Perform Auto Program to select the desired picture... are not presently in the Picture settings (page 25). Cannot receive any channels. ❑ Make sure the power cord is broken or bent. screen. ❑ Check if the antenna has reached the end of your desired input from some video sources. ❑ Check the connection between the ...
Operating Instructions
Page 36
... Hidden in the Show/Hide Channels setting (see page 29). For more information. ❑ The digital cable channel may cause your TV's large screen or dark scenes. Certain programs on your previous password and allows you change the channel or video input, if 4:3 Default in the... the remote control at the top and bottom of digital cable being displayed. "Black box" on screen. ❑ You have limitations on the TV. (The TV will clear all of the TV's volume control. Your TV will show very fine detail, and is normal for more details, check the documentation that "Muting...
... Hidden in the Show/Hide Channels setting (see page 29). For more information. ❑ The digital cable channel may cause your TV's large screen or dark scenes. Certain programs on your previous password and allows you change the channel or video input, if 4:3 Default in the... the remote control at the top and bottom of digital cable being displayed. "Black box" on screen. ❑ You have limitations on the TV. (The TV will clear all of the TV's volume control. Your TV will show very fine detail, and is normal for more details, check the documentation that "Muting...
Operating Instructions
Page 39
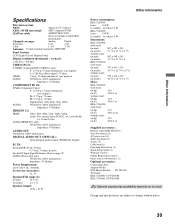
...flyer (1) Optional accessories: Connecting cables Support belt kit Wall-Mount Bracket: SU-WL500 TV-Stand: KDL-32L4000: SU-FL300M KDL-37L4000: SU-FL300M Optional accessories availability depends on... (100% modulation) Impedance: 47 kilohms Power Requirement: 120 V-240 V AC, 50/60 Hz Screen size (in inches): 32, 37 Speaker/Full range (2): (in mm) (in inches) 50 × 115 2 ×... 2-69 2-69 Cable 1-135 1-135 Antenna: 75-ohm external terminal for VHF/UHF Panel System: LCD (Liquid Crystal Display) Panel Display resolution (horizontal × vertical): 1,366 dots × 768 lines...
...flyer (1) Optional accessories: Connecting cables Support belt kit Wall-Mount Bracket: SU-WL500 TV-Stand: KDL-32L4000: SU-FL300M KDL-37L4000: SU-FL300M Optional accessories availability depends on... (100% modulation) Impedance: 47 kilohms Power Requirement: 120 V-240 V AC, 50/60 Hz Screen size (in inches): 32, 37 Speaker/Full range (2): (in mm) (in inches) 50 × 115 2 ×... 2-69 2-69 Cable 1-135 1-135 Antenna: 75-ohm external terminal for VHF/UHF Panel System: LCD (Liquid Crystal Display) Panel Display resolution (horizontal × vertical): 1,366 dots × 768 lines...
Operating Instructions
Page 40
... button 23 External Input Block 31 F Favorites 29 FAVORITES button 21 French Rating 32 H HDMI IN jack, described 15 Horizontal Center 28 Hue 25 I Info Banner 33 Infrared Receiver (IR) 24 INPUT button 23, 24 Installing the TV on a wall 37 J JUMP button 23 L Label Channels 29 Label Video Inputs 33 Language... Reset 25, 26, 36 RETURN button 21 S S VIDEO jack, described 16 Select Country 31 Settings Channel 29 Parental Lock 30 PC Settings 28 Picture 25 Screen 27 Setup 33 Sound 26 Sharpness 25 Show/Hide Channels 29 SLEEP button 21 Sleep Timer 33 Sound Mode 26 Speaker 26 STANDBY LED 24...
... button 23 External Input Block 31 F Favorites 29 FAVORITES button 21 French Rating 32 H HDMI IN jack, described 15 Horizontal Center 28 Hue 25 I Info Banner 33 Infrared Receiver (IR) 24 INPUT button 23, 24 Installing the TV on a wall 37 J JUMP button 23 L Label Channels 29 Label Video Inputs 33 Language... Reset 25, 26, 36 RETURN button 21 S S VIDEO jack, described 16 Select Country 31 Settings Channel 29 Parental Lock 30 PC Settings 28 Picture 25 Screen 27 Setup 33 Sound 26 Sharpness 25 Show/Hide Channels 29 SLEEP button 21 Sleep Timer 33 Sound Mode 26 Speaker 26 STANDBY LED 24...


