
Limited Warranty (US Only)
Page 1
... or parts, any enclosed software Limited Warranty. Any parts or product replaced under this Limited Warranty will , at its option, (i) repair the product using new or refurbished parts or (ii) replace the product with the Product. Some states do not allow limitations on how to obtain warranty service for your product, Visit SONY's Web Site: www.sony.com/support Or call the Sony Customer Information Service Center...
... or parts, any enclosed software Limited Warranty. Any parts or product replaced under this Limited Warranty will , at its option, (i) repair the product using new or refurbished parts or (ii) replace the product with the Product. Some states do not allow limitations on how to obtain warranty service for your product, Visit SONY's Web Site: www.sony.com/support Or call the Sony Customer Information Service Center...
Operating Instructions
Page 3
... to receive unscrambled digital cable television programming via subscription service to a cable service provider. KDL-52XBR2 KDL-52XBR3 Sony Wall-Mount Bracket Model No. SU-WL51 Use with §15.119 of the FCC rules. To Customers Sufficient expertise is intended to alert the user to the presence of important operating and maintenance (servicing) instructions in a particular installation. WARNING To reduce the risk of fire or electric shock, do not use spot lighting directed...
... to receive unscrambled digital cable television programming via subscription service to a cable service provider. KDL-52XBR2 KDL-52XBR3 Sony Wall-Mount Bracket Model No. SU-WL51 Use with §15.119 of the FCC rules. To Customers Sufficient expertise is intended to alert the user to the presence of important operating and maintenance (servicing) instructions in a particular installation. WARNING To reduce the risk of fire or electric shock, do not use spot lighting directed...
Operating Instructions
Page 5
... of the mast and supporting structure, grounding of the lead-in wire to make occasional snapping or popping sounds, particularly when being turned on or roll over the power cord. If the plug is subject to grasp the plug when disconnecting the power cord. s Clean the cabinet of antenna discharge unit, connection to have the outlet changed. s If using it can come in...
... of the mast and supporting structure, grounding of the lead-in wire to make occasional snapping or popping sounds, particularly when being turned on or roll over the power cord. If the plug is subject to grasp the plug when disconnecting the power cord. s Clean the cabinet of antenna discharge unit, connection to have the outlet changed. s If using it can come in...
Operating Instructions
Page 9
... and Cable Box/Digital Cable Box 15 When Connecting to Optional Equipment 16 Installing the TV ...18 Preventing the TV from Toppling Over 18 Bundling the Connecting Cables 18 When Installing on a Wall 19 Setting Up the Channel List - Contents Getting Started Welcome to the World of MENU ...31 Picture Settings...33 Sound Settings...35 Screen Settings ...37 Channel Settings...39 Parental Lock Settings 40 Setup Settings ...43 PC Settings ...46 Other Information Troubleshooting...48 PC Input Signal Reference Chart 51 Specifications ...52 Index...
... and Cable Box/Digital Cable Box 15 When Connecting to Optional Equipment 16 Installing the TV ...18 Preventing the TV from Toppling Over 18 Bundling the Connecting Cables 18 When Installing on a Wall 19 Setting Up the Channel List - Contents Getting Started Welcome to the World of MENU ...31 Picture Settings...33 Sound Settings...35 Screen Settings ...37 Channel Settings...39 Parental Lock Settings 40 Setup Settings ...43 PC Settings ...46 Other Information Troubleshooting...48 PC Input Signal Reference Chart 51 Specifications ...52 Index...
Operating Instructions
Page 15
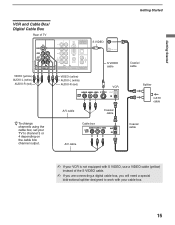
...L (MONO) AUDIO R 1 4 VIDEO IN RGB DIGITAL OUT (OPTICAL) Y PB PR L AUDIO R AUDIO 5 6 9 HD/DVD IN (1080p/1080i/720p/480p/480i) PC IN L AUDIO R AUDIO OUT (VAR/FIX) S VIDEO CABLE VHF/UHF S VIDEO cable VIDEO (yellow) AUDIO-L (white) AUDIO-R (red) VIDEO (yellow) AUDIO-L (white) AUDIO-R (red) VCR z To change channels using the cable box, set your cable box. 15 Getting Started Getting Started VCR and Cable Box/ Digital Cable Box Rear of the S VIDEO cable. ✍ If you are connecting a digital cable box, you will need a special bidirectional splitter designed to work with...
...L (MONO) AUDIO R 1 4 VIDEO IN RGB DIGITAL OUT (OPTICAL) Y PB PR L AUDIO R AUDIO 5 6 9 HD/DVD IN (1080p/1080i/720p/480p/480i) PC IN L AUDIO R AUDIO OUT (VAR/FIX) S VIDEO CABLE VHF/UHF S VIDEO cable VIDEO (yellow) AUDIO-L (white) AUDIO-R (red) VIDEO (yellow) AUDIO-L (white) AUDIO-R (red) VCR z To change channels using the cable box, set your cable box. 15 Getting Started Getting Started VCR and Cable Box/ Digital Cable Box Rear of the S VIDEO cable. ✍ If you are connecting a digital cable box, you will need a special bidirectional splitter designed to work with...
Operating Instructions
Page 17
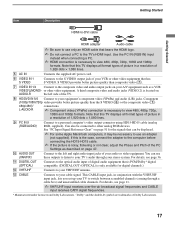
... formats. If this TV displays all format types of picture in a resolution of your TV's audio through a cable box) and unscrambled cable channels. Use the PC IN (RGB IN) input instead when connecting a PC. ✍ HDMI connection is located on page 51 for digital channels.) qs VHF/UHF Connects to your equipment's component video (YPBPR) and audio (L/R) jacks. Can also be necessary to use an adapter (not supplied). For details, see page 11. ✍ VHF/UHF input receives...
... formats. If this TV displays all format types of picture in a resolution of your TV's audio through a cable box) and unscrambled cable channels. Use the PC IN (RGB IN) input instead when connecting a PC. ✍ HDMI connection is located on page 51 for digital channels.) qs VHF/UHF Connects to your equipment's component video (YPBPR) and audio (L/R) jacks. Can also be necessary to use an adapter (not supplied). For details, see page 11. ✍ VHF/UHF input receives...

Operating Instructions
Page 19
Be sure to the instruction guide provided by Sony dealers or licensed contractors. ✍ Be sure to store the removed screws and Table-Top Stand in installing this task with the Wall-Mount Bracket (sold separately) to mount the TV on a wall, you carry out this TV, especially to lift the TV by using a wall-mount bracket (sold separately). For bracket installation, refer to use the specified Wall-Mount Bracket (see page 3). Follow the...
Be sure to the instruction guide provided by Sony dealers or licensed contractors. ✍ Be sure to store the removed screws and Table-Top Stand in installing this task with the Wall-Mount Bracket (sold separately) to mount the TV on a wall, you carry out this TV, especially to lift the TV by using a wall-mount bracket (sold separately). For bracket installation, refer to use the specified Wall-Mount Bracket (see page 3). Follow the...
Operating Instructions
Page 21
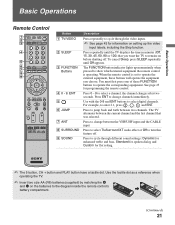
... input and the CABLE input. Press to cycle through the video inputs. ✍ See page 43 for information on the batteries to the diagram inside the remote control's battery compartment. , (Continued) 21 Press to select TruSurround XT audio effect or Off to turn this feature off . Use with the 0-9 and ENT buttons to select digital channels. Basic Operations Basic Operations Remote Control Button 1 TV/VIDEO 2 SLEEP 3 FUNCTION Buttons 4 0 - 9, ENT 5 6 JUMP 7 ANT 8 SURROUND 9 SOUND...
... input and the CABLE input. Press to cycle through the video inputs. ✍ See page 43 for information on the batteries to the diagram inside the remote control's battery compartment. , (Continued) 21 Press to select TruSurround XT audio effect or Off to turn this feature off . Use with the 0-9 and ENT buttons to select digital channels. Basic Operations Basic Operations Remote Control Button 1 TV/VIDEO 2 SLEEP 3 FUNCTION Buttons 4 0 - 9, ENT 5 6 JUMP 7 ANT 8 SURROUND 9 SOUND...
Operating Instructions
Page 24
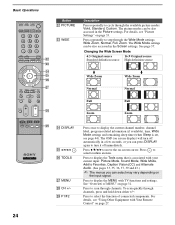
... channels. Basic Operations 24 Button ws PICTURE wd WIDE Description Press repeatedly to cycle through channels, press and hold down either +/-. For details, see page 44). See page 37. wl F1/F2 Press once to display the current channel number, channel label, program-related information (if available), time, Wide Mode settings and remaining sleep time (when Sleep is associated with your current input: Picture Mode, Sound Mode, Wide Mode, Add to Favorites, Caption...
... channels. Basic Operations 24 Button ws PICTURE wd WIDE Description Press repeatedly to cycle through channels, press and hold down either +/-. For details, see page 44). See page 37. wl F1/F2 Press once to display the current channel number, channel label, program-related information (if available), time, Wide Mode settings and remaining sleep time (when Sleep is associated with your current input: Picture Mode, Sound Mode, Wide Mode, Add to Favorites, Caption...
Operating Instructions
Page 29
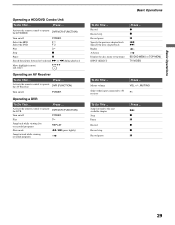
... POWER Operating a DVR To Do This ... Press ... z x X . > BD/DVD MENU or TOP MENU TV/VIDEO To Do This ... Master volume Select other input connected to operate the DVR DVR/VCR (FUNCTION) Turn on/off POWER Select the HDD F 1 Select the DVD F 2 Play H Stop x Pause X Search the picture forward or backward M or m during playback Move highlight (cursor) and select V v B b Operating an AV Receiver To Do This ... Activate the remote control...
... POWER Operating a DVR To Do This ... Press ... z x X . > BD/DVD MENU or TOP MENU TV/VIDEO To Do This ... Master volume Select other input connected to operate the DVR DVR/VCR (FUNCTION) Turn on/off POWER Select the HDD F 1 Select the DVD F 2 Play H Stop x Pause X Search the picture forward or backward M or m during playback Move highlight (cursor) and select V v B b Operating an AV Receiver To Do This ... Activate the remote control...
Operating Instructions
Page 31
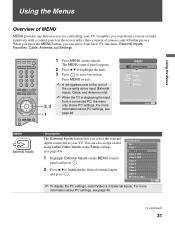
... information about PC settings, see page 46. TV/VIDEO SLEEP POWER TV POWER BD/DVD DVR/VCR SAT/CABLE TV FUNCTION ENT JUMP ANT FREEZE MODE SURROUND SOUND PICTURE WIDE DISPLAY GUIDE TOOLS MENU PREV REPLAY ADVANCE NEXT PLAY 2, 3 1 1 Press MENU on the screen rather than a variety of remote control button presses. Exit: MENU (Continued) 31 When you press the MENU button, you can also assign a label using Label Video Inputs in External Inputs. The MENU control panel appears. 2 Press...
... information about PC settings, see page 46. TV/VIDEO SLEEP POWER TV POWER BD/DVD DVR/VCR SAT/CABLE TV FUNCTION ENT JUMP ANT FREEZE MODE SURROUND SOUND PICTURE WIDE DISPLAY GUIDE TOOLS MENU PREV REPLAY ADVANCE NEXT PLAY 2, 3 1 1 Press MENU on the screen rather than a variety of remote control button presses. Exit: MENU (Continued) 31 When you press the MENU button, you can also assign a label using Label Video Inputs in External Inputs. The MENU control panel appears. 2 Press...
Operating Instructions
Page 33
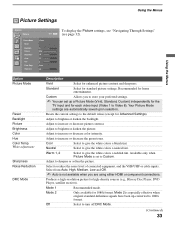
... Picture Mode settings are using either HDMI or component connections. Adjust to increase or decrease color intensity. Cool Select to brighten or darken the picture. Adjust to give the white colors a bluish tint. Adjust to reduce the noise level of connected equipment, and the VHF/UHF or cable inputs. Sharpness To display the Picture settings, see "Navigating Through Settings" Exit: MENU (see page 32). Standard Select for 1080i format. Mode 2 Only available for standard picture settings...
... Picture Mode settings are using either HDMI or component connections. Adjust to increase or decrease color intensity. Cool Select to brighten or darken the picture. Adjust to give the white colors a bluish tint. Adjust to reduce the noise level of connected equipment, and the VHF/UHF or cable inputs. Sharpness To display the Picture settings, see "Navigating Through Settings" Exit: MENU (see page 32). Standard Select for 1080i format. Mode 2 Only available for standard picture settings...
Operating Instructions
Page 37
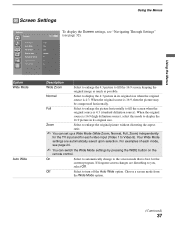
... to turn off the Auto Wide option. On Select to automatically change to the screen mode that is best for each mode, see page 32). Using the Menus Screen Settings Using the Menus Antenna Screen Wide Mode Auto Wide 4:3 Default Display Area Horizontal Center Vertical Center Vertical Size To display the Screen settings, see "Navigating Through Settings" Exit: MENU (see page 24. ✍ You can switch the Wide Mode settings by pressing the WIDE button on the remote control...
... to turn off the Auto Wide option. On Select to automatically change to the screen mode that is best for each mode, see page 32). Using the Menus Screen Settings Using the Menus Antenna Screen Wide Mode Auto Wide 4:3 Default Display Area Horizontal Center Vertical Center Vertical Size To display the Screen settings, see "Navigating Through Settings" Exit: MENU (see page 24. ✍ You can switch the Wide Mode settings by pressing the WIDE button on the remote control...

Operating Instructions
Page 39
... and Minor subchannel lists, press B/b. 2 To change a channel's setting to show a major digital channel, all receivable channels for the current TV input (either Antenna or Cable). Channel Settings Using the Menus Antenna Channel Favorite Channels Digital Channels Auto Program Show/Hide Channels Label Channels Diagnostics To display the Channel settings, see "Navigating Through Settings" Exit: MENU (see page 32. buttons to channel surf. 1 Press V/v to highlight the channel that you set to apply and save. Then press to select the channel number that you...
... and Minor subchannel lists, press B/b. 2 To change a channel's setting to show a major digital channel, all receivable channels for the current TV input (either Antenna or Cable). Channel Settings Using the Menus Antenna Channel Favorite Channels Digital Channels Auto Program Show/Hide Channels Label Channels Diagnostics To display the Channel settings, see "Navigating Through Settings" Exit: MENU (see page 32. buttons to channel surf. 1 Press V/v to highlight the channel that you set to apply and save. Then press to select the channel number that you...
Operating Instructions
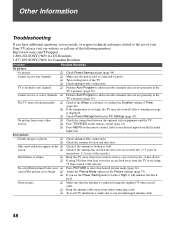
Page 48
...; Press PICTURE to use of your desired input from other connecting cords. ❑ To avoid TV interference, make sure to select the desired picture mode (page 24). No color/Dark picture/Color is not ❑ correct/The picture is locked to one channel. ❑ Perform Auto Program to the use an undamaged antenna cable. 48 Noisy picture. ❑ Make sure that the antenna is displayed. ❑ Check Power Management in the Picture settings (page...
...; Press PICTURE to use of your desired input from other connecting cords. ❑ To avoid TV interference, make sure to select the desired picture mode (page 24). No color/Dark picture/Color is not ❑ correct/The picture is locked to one channel. ❑ Perform Auto Program to the use an undamaged antenna cable. 48 Noisy picture. ❑ Make sure that the antenna is displayed. ❑ Check Power Management in the Picture settings (page...
Operating Instructions
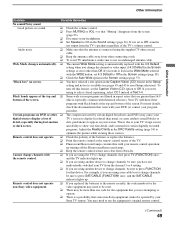
Page 49
... the picture while viewing these programs with black bands at the remote control sensor of the screen. (this feature, set to the remote recently, the code numbers for the equipment that you are using the TV to operate. ❑ There is a possibility that some non-Sony equipment cannot be sure you have selected a text option in the Caption Vision (CC) feature in the Setup setting and no sound. ❑...
... the picture while viewing these programs with black bands at the remote control sensor of the screen. (this feature, set to the remote recently, the code numbers for the equipment that you are using the TV to operate. ❑ There is a possibility that some non-Sony equipment cannot be sure you have selected a text option in the Caption Vision (CC) feature in the Setup setting and no sound. ❑...

Operating Instructions
Page 52
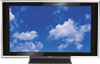
...; 32 5/8 × 5 inches) Mass: KDL-52XBR2: (with stand) 54.0 kg (119 lb. 1 oz.) (without stand) 46.5 kg (102 lb. 9 oz.) KDL-52XBR3: (with stand) 54.0 kg (119 lb. 1 oz.) (without stand) 46.5 kg (102 lb. 9 oz.) Supplied accessories: Remote control RM-YD010 (KDL-52XBR2) (1) RM-YD013 (KDL-52XBR3) (1) Size AA batteries (2) 75-ohm coaxial cable (1) AC power cord (1) HD15-HD15 cable (1) Support belt (1), securing screw (1) and wood screw (1) Cable holder (1) Operating Instructions (1) Quick Setup Guide (1) Warranty Card (1) Online Registration Card (U.S.A.
...; 32 5/8 × 5 inches) Mass: KDL-52XBR2: (with stand) 54.0 kg (119 lb. 1 oz.) (without stand) 46.5 kg (102 lb. 9 oz.) KDL-52XBR3: (with stand) 54.0 kg (119 lb. 1 oz.) (without stand) 46.5 kg (102 lb. 9 oz.) Supplied accessories: Remote control RM-YD010 (KDL-52XBR2) (1) RM-YD013 (KDL-52XBR3) (1) Size AA batteries (2) 75-ohm coaxial cable (1) AC power cord (1) HD15-HD15 cable (1) Support belt (1), securing screw (1) and wood screw (1) Cable holder (1) Operating Instructions (1) Quick Setup Guide (1) Warranty Card (1) Online Registration Card (U.S.A.
Operating Instructions
Page 53
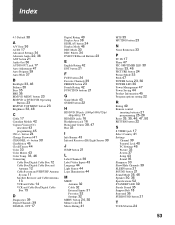
... POWER button 23, 30 POWER LED 30 Power Management 47 Power Saving 44 Product Information 45 Program options setting 22 R Rating 40 Remote control inserting batteries 21 programming 25-26 Reset 33, 35, 46, 47, 50 RETURN button 22 S S VIDEO jack 17 Select Country 41 Settings Channel 39 Parental Lock 40 PC Settings 46 Picture 33 Screen 37 Setup 43 Sound 35 Sharpness 33 Show/Hide Channels 39 SLEEP button 21 SOUND button 21 Sound Mode 35, 46 Speaker 30, 36 Specifications 52 STANDBY LED...
... POWER button 23, 30 POWER LED 30 Power Management 47 Power Saving 44 Product Information 45 Program options setting 22 R Rating 40 Remote control inserting batteries 21 programming 25-26 Reset 33, 35, 46, 47, 50 RETURN button 22 S S VIDEO jack 17 Select Country 41 Settings Channel 39 Parental Lock 40 PC Settings 46 Picture 33 Screen 37 Setup 43 Sound 35 Sharpness 33 Show/Hide Channels 39 SLEEP button 21 SOUND button 21 Sound Mode 35, 46 Speaker 30, 36 Specifications 52 STANDBY LED...
Marketing Specifications
Page 1
... ATSC Digital Tuner with combining carefully chosen components and circuits to use your PC, allowing you need to realize that an LCD TV is upconverted to begin with over 2 million pixels (more than just the panel; And BRAVIA V-Series televisions have them to 1080p. (Native 1080p input signals are the color creation and processing functions. Uncompromised picture quality starts with unscrambled digital cable (QAM) capability HDMI (High...
... ATSC Digital Tuner with combining carefully chosen components and circuits to use your PC, allowing you need to realize that an LCD TV is upconverted to begin with over 2 million pixels (more than just the panel; And BRAVIA V-Series televisions have them to 1080p. (Native 1080p input signals are the color creation and processing functions. Uncompromised picture quality starts with unscrambled digital cable (QAM) capability HDMI (High...
Marketing Specifications
Page 2
... Volume Control: Yes Dolby®: Dolby® Digital (AC3/ATSC only) Convenience Favorite Channel: Yes Speed Surf™ Channel Selection: Yes Parental Control (V-Chip): Yes Programmable Timer: Yes Sleep Timer: 15, 30, 45, 60, 90, Off Timer Events: Timer 1, Timer 2 Power Save Mode: Standard, Reduced, Picture Off Picture Freeze: Yes Input Skip: Yes Remote Control: Yes ID-1 Detection: Yes LightSensor™ : Yes Specifications General Aspect Ratio: 16:9 Television Type: Flat Panel LCD HDTV Audio Audio Power Output: 22W (11W x2) Inputs and Outputs Component Video...
... Volume Control: Yes Dolby®: Dolby® Digital (AC3/ATSC only) Convenience Favorite Channel: Yes Speed Surf™ Channel Selection: Yes Parental Control (V-Chip): Yes Programmable Timer: Yes Sleep Timer: 15, 30, 45, 60, 90, Off Timer Events: Timer 1, Timer 2 Power Save Mode: Standard, Reduced, Picture Off Picture Freeze: Yes Input Skip: Yes Remote Control: Yes ID-1 Detection: Yes LightSensor™ : Yes Specifications General Aspect Ratio: 16:9 Television Type: Flat Panel LCD HDTV Audio Audio Power Output: 22W (11W x2) Inputs and Outputs Component Video...


