Operating Instructions
Page 2
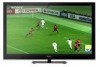
... and "PS3" is manufactured under license from Gemstar-TV Guide International, Inc. TV Guide, Picture/Sound, Light Sensor, Power Savings) can be responsible for any way liable for the 46 and 52 inch BRAVIA KDL-XBR10 series models with screen size measured diagonally. 2 and other related marks are trademarks of the program schedule information or other data in the TV Guide On Screen system. Patent No. 5,717,422 U.S. and/or its...
... and "PS3" is manufactured under license from Gemstar-TV Guide International, Inc. TV Guide, Picture/Sound, Light Sensor, Power Savings) can be responsible for any way liable for the 46 and 52 inch BRAVIA KDL-XBR10 series models with screen size measured diagonally. 2 and other related marks are trademarks of the program schedule information or other data in the TV Guide On Screen system. Patent No. 5,717,422 U.S. and/or its...
Operating Instructions
Page 3
... Power Cord 7 Using a Wall-Mount Bracket 8 Locating Inputs and Outputs 10 Connecting the Unit 12 Connecting Internet & DLNA Certified™ Networks 15 Connecting Other Equipment 16 Removing the Terminal Cover for Monitor 17 Installing the Unit Against a Wall or Enclosed Area 17 Securing the Monitor 18 Establishing the Wireless Communication Between the Monitor and Media Receiver 20 Running Initial Setup 21 Operating the TV Using the Remote Control 22 Remote Control Button Description 23 Unit Controls and Indicators 26 Programming the Remote Control 27 Manufacturer's Code List...
... Power Cord 7 Using a Wall-Mount Bracket 8 Locating Inputs and Outputs 10 Connecting the Unit 12 Connecting Internet & DLNA Certified™ Networks 15 Connecting Other Equipment 16 Removing the Terminal Cover for Monitor 17 Installing the Unit Against a Wall or Enclosed Area 17 Securing the Monitor 18 Establishing the Wireless Communication Between the Monitor and Media Receiver 20 Running Initial Setup 21 Operating the TV Using the Remote Control 22 Remote Control Button Description 23 Unit Controls and Indicators 26 Programming the Remote Control 27 Manufacturer's Code List...
Operating Instructions
Page 6
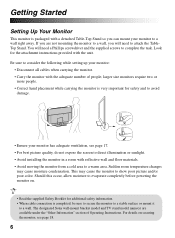
... supplied screws to a warm area. Sudden room temperature changes may cause the monitor to consider the following while setting up your monitor: • Disconnect all cables when carrying the monitor. • Carry the monitor with the adequate number of Operating Instructions. If you are available under the "Other Information" section of people; The designated Sony wall-mount bracket model and TV stand model name(s) are not mounting the monitor to a wall, you will need...
... supplied screws to a warm area. Sudden room temperature changes may cause the monitor to consider the following while setting up your monitor: • Disconnect all cables when carrying the monitor. • Carry the monitor with the adequate number of Operating Instructions. If you are available under the "Other Information" section of people; The designated Sony wall-mount bracket model and TV stand model name(s) are not mounting the monitor to a wall, you will need...
Operating Instructions
Page 8
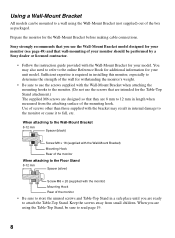
... monitor's weight. • Be sure to use the Wall-Mount Bracket model designed for the Wall-Mount Bracket before making cable connections. When attaching to the Wall-Mount Bracket 8-12 mm Spacer (black) Screw M6 × 16 (supplied with the Wall-Mount Bracket) Mounting Hook Rear of the box as packaged. Prepare the monitor for your unit model. You may also need to refer to the online Reference Book for additional information for the Table-Top Stand attachment.) The supplied M6 screws are using...
... monitor's weight. • Be sure to use the Wall-Mount Bracket model designed for the Wall-Mount Bracket before making cable connections. When attaching to the Wall-Mount Bracket 8-12 mm Spacer (black) Screw M6 × 16 (supplied with the Wall-Mount Bracket) Mounting Hook Rear of the box as packaged. Prepare the monitor for your unit model. You may also need to refer to the online Reference Book for additional information for the Table-Top Stand attachment.) The supplied M6 screws are using...

Operating Instructions
Page 10
... is required to view 480i, 480p, 720p, 1080i and 1080p video formats. This unit displays all video input signals in a resolution of monitor 1 qf 3 5 • An HDMI or Component video (YPBPR) connection is available only with HDMI connection. Locating Inputs and Outputs Front of media receiver 1 2 3 4 2 IN VIDEO 2 IN SERVICE ONLY VIDEO L (MONO) -AUDIO-R Rear of media receiver 5 6 78 9 1 CABLE/ ANTENNA 2 VIDEO IN 1 R AUDIO L PR PB Y COMPONENT IN (1080p/1080i/720p/480p/480i) R AUDIO L AUDIO OUT (VAR/FIX) AUDIO (OPTICAL) DIGITAL AUDIO OUT DMex/ SERVICE RGB PC IN...
... is required to view 480i, 480p, 720p, 1080i and 1080p video formats. This unit displays all video input signals in a resolution of monitor 1 qf 3 5 • An HDMI or Component video (YPBPR) connection is available only with HDMI connection. Locating Inputs and Outputs Front of media receiver 1 2 3 4 2 IN VIDEO 2 IN SERVICE ONLY VIDEO L (MONO) -AUDIO-R Rear of media receiver 5 6 78 9 1 CABLE/ ANTENNA 2 VIDEO IN 1 R AUDIO L PR PB Y COMPONENT IN (1080p/1080i/720p/480p/480i) R AUDIO L AUDIO OUT (VAR/FIX) AUDIO (OPTICAL) DIGITAL AUDIO OUT DMex/ SERVICE RGB PC IN...
Operating Instructions
Page 11
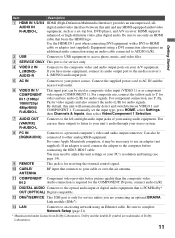
...may need to adjust the unit settings or your PC's resolution and timing (see page 14). 9 REMOTE This jack is for receiving the external control signal. 0 CABLE/ ANTENNA RF input that connects to use only an HDMI cable that is used as composite video input (VIDEO 1) or as a set the input type, press HOME, select Settings, then Channels & Inputs, then select Video/Component 1 Selection. 7 AUDIO OUT (VAR/FIX) R-AUDIO-L Connects to the composite video and audio output ports on your power source. qd DMex/SERVICE This USB port is required for audio signals. HDMI supports...
...may need to adjust the unit settings or your PC's resolution and timing (see page 14). 9 REMOTE This jack is for receiving the external control signal. 0 CABLE/ ANTENNA RF input that connects to use only an HDMI cable that is used as composite video input (VIDEO 1) or as a set the input type, press HOME, select Settings, then Channels & Inputs, then select Video/Component 1 Selection. 7 AUDIO OUT (VAR/FIX) R-AUDIO-L Connects to the composite video and audio output ports on your power source. qd DMex/SERVICE This USB port is required for audio signals. HDMI supports...

Operating Instructions
Page 12
... can enjoy high-definition programming by radio frequency interference, resulting in your media receiver via the HDMI or component video (with HDMI Connection Rear of media receiver 1 CABLE/ ANTENNA 2 VIDEO IN 1 R AUDIO L PR PB Y COMPONENT IN (1080p/1080i/720p/480p/480i) R AUDIO L AUDIO OUT (VAR/FIX) AUDIO (OPTICAL) DIGITAL AUDIO OUT DMex/ SERVICE RGB PC IN 1 R AUDIO L AUDIO IN 3 REMOTE 4 IN LAN HDMI cable CATV/Satellite antenna cable HD cable box/ HD satellite box 12 Rear of media receiver CABLE/ ANTENNA HD Cable Box/HD Satellite Box You can easily be affected...
... can enjoy high-definition programming by radio frequency interference, resulting in your media receiver via the HDMI or component video (with HDMI Connection Rear of media receiver 1 CABLE/ ANTENNA 2 VIDEO IN 1 R AUDIO L PR PB Y COMPONENT IN (1080p/1080i/720p/480p/480i) R AUDIO L AUDIO OUT (VAR/FIX) AUDIO (OPTICAL) DIGITAL AUDIO OUT DMex/ SERVICE RGB PC IN 1 R AUDIO L AUDIO IN 3 REMOTE 4 IN LAN HDMI cable CATV/Satellite antenna cable HD cable box/ HD satellite box 12 Rear of media receiver CABLE/ ANTENNA HD Cable Box/HD Satellite Box You can easily be affected...

Operating Instructions
Page 14
... timing when applied to use the signals in the above chart. In plug and play, signals with a DVI or HDMI output. (Refer to the supplied Quick Setup Guide.) Rear of media receiver 1 CABLE/ ANTENNA 2 VIDEO IN 1 R AUDIO L PR PB Y COMPONENT IN (1080p/1080i/720p/480p/480i) R AUDIO L AUDIO OUT (VAR/FIX) AUDIO (OPTICAL) DIGITAL AUDIO OUT DMex/ SERVICE RGB PC IN 1 R AUDIO L AUDIO IN 3 REMOTE 4 IN LAN HD15-HD15 cable (analog RGB) Audio cable (stereo mini plugs) PC Input Signal Reference Chart After connecting the PC to the unit, set...
... timing when applied to use the signals in the above chart. In plug and play, signals with a DVI or HDMI output. (Refer to the supplied Quick Setup Guide.) Rear of media receiver 1 CABLE/ ANTENNA 2 VIDEO IN 1 R AUDIO L PR PB Y COMPONENT IN (1080p/1080i/720p/480p/480i) R AUDIO L AUDIO OUT (VAR/FIX) AUDIO (OPTICAL) DIGITAL AUDIO OUT DMex/ SERVICE RGB PC IN 1 R AUDIO L AUDIO IN 3 REMOTE 4 IN LAN HD15-HD15 cable (analog RGB) Audio cable (stereo mini plugs) PC Input Signal Reference Chart After connecting the PC to the unit, set...
Operating Instructions
Page 20
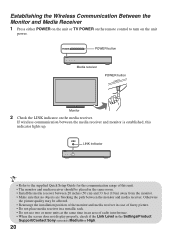
... room. • Install the media receiver between 20 inches (50 cm) and 33 feet (10 m) away from the monitor. • Make sure that no objects are blocking the path between the media receiver and monitor is Medium or High. 20 Establishing the Wireless Communication Between the Monitor and Media Receiver 1 Press either POWER on the unit or TV POWER on the remote control to the supplied Quick Setup Guide for the...
... room. • Install the media receiver between 20 inches (50 cm) and 33 feet (10 m) away from the monitor. • Make sure that no objects are blocking the path between the media receiver and monitor is Medium or High. 20 Establishing the Wireless Communication Between the Monitor and Media Receiver 1 Press either POWER on the unit or TV POWER on the remote control to the supplied Quick Setup Guide for the...
Operating Instructions
Page 21
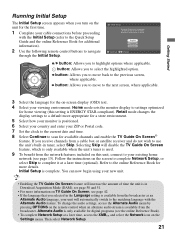
...; To complete Network Setup at a later time (optional). Bienvenue! Home mode sets the monitor display to settings optimized for home viewing (this unit, connect to your ZIP or Postal code. 7 Set the clock to the current date and time. 8 Select Continue to highlight options where applicable. If you to scan for available channels and enable the TV Guide On Screen® feature. Initial Setup is only available for digital programs (see...
...; To complete Network Setup at a later time (optional). Bienvenue! Home mode sets the monitor display to settings optimized for home viewing (this unit, connect to your ZIP or Postal code. 7 Set the clock to the current date and time. 8 Select Continue to highlight options where applicable. If you to scan for available channels and enable the TV Guide On Screen® feature. Initial Setup is only available for digital programs (see...
Operating Instructions
Page 23
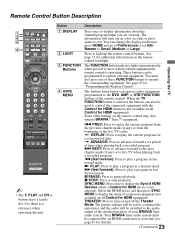
... set for HDMI device is operating. THEATER: Press to light up momentarily when pressed to pause playback. The picture settings will be used to play a program at a normal speed. Remote Control Button Description Operating the TV 1 2 3 4 DISPLAY LIGHT POWER TV POWER DVD AMP STB TV FUNCTION PREV REPLAY ADVANCE NEXT PLAY SYNC MENU PAUSE STOP THEATER SCENE CC WIDE VIDEO WIDGETS BRAVIA INTERNET VOL MUTING CH JUMP REC RECPAUSE RECSTOP BD/DVD TOP MENU MENU F1 F2 YELLOW BLUE RED GREEN...
... set for HDMI device is operating. THEATER: Press to light up momentarily when pressed to pause playback. The picture settings will be used to play a program at a normal speed. Remote Control Button Description Operating the TV 1 2 3 4 DISPLAY LIGHT POWER TV POWER DVD AMP STB TV FUNCTION PREV REPLAY ADVANCE NEXT PLAY SYNC MENU PAUSE STOP THEATER SCENE CC WIDE VIDEO WIDGETS BRAVIA INTERNET VOL MUTING CH JUMP REC RECPAUSE RECSTOP BD/DVD TOP MENU MENU F1 F2 YELLOW BLUE RED GREEN...

Operating Instructions
Page 25
... the current channel or input and the last channel or input that was selected. Operating the TV DISPLAY LIGHT POWER TV POWER DVD AMP STB TV FUNCTION PREV REPLAY ADVANCE NEXT PLAY SYNC MENU PAUSE STOP THEATER SCENE CC WIDE VIDEO WIDGETS BRAVIA INTERNET ws wd wf wg wh Button ws CC wd BRAVIA INTERNET WIDGETS wf INPUT wg V/v/B/b wh OPTIONS wj JUMP Description Press to display the list of inputs. Press to turn Closed Captions (CC) on...
... the current channel or input and the last channel or input that was selected. Operating the TV DISPLAY LIGHT POWER TV POWER DVD AMP STB TV FUNCTION PREV REPLAY ADVANCE NEXT PLAY SYNC MENU PAUSE STOP THEATER SCENE CC WIDE VIDEO WIDGETS BRAVIA INTERNET ws wd wf wg wh Button ws CC wd BRAVIA INTERNET WIDGETS wf INPUT wg V/v/B/b wh OPTIONS wj JUMP Description Press to display the list of inputs. Press to turn Closed Captions (CC) on...

Operating Instructions
Page 26
... red continuously, this may interfere with remote control operation. Lights up in green when the unit is set to toggle through the inputs. ~ • Inputs can be affected. Lights up the external inputs labels. Press to display TV Home Menu/XMB™ to turn on and off the unit. 0 Speaker Outputs audio signal. In the MENU screen, these buttons serve as it may indicate that the unit needs servicing (see Sony Customer Support information on . POWER STANDBY PIC OFF / TIMER...
... red continuously, this may interfere with remote control operation. Lights up in green when the unit is set to toggle through the inputs. ~ • Inputs can be affected. Lights up the external inputs labels. Press to display TV Home Menu/XMB™ to turn on and off the unit. 0 Speaker Outputs audio signal. In the MENU screen, these buttons serve as it may indicate that the unit needs servicing (see Sony Customer Support information on . POWER STANDBY PIC OFF / TIMER...
Operating Instructions
Page 33
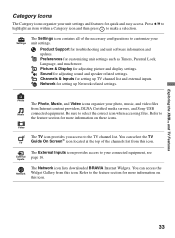
...quick and easy access. Settings The Settings icon contains all of the channels list from this icon. Product Support for adjusting picture and display settings. Picture & Display for troubleshooting and unit software information and updates. Preferences for setting up Network related settings. Network The Network icon lists downloaded BRAVIA Internet Widgets. Exploring the XMB™ and TV Features Category Icons The Category icons organize your connected equipment, see External Inputs page 16. Channels & Inputs for customizing unit settings such as Timers, Parental Lock...
...quick and easy access. Settings The Settings icon contains all of the channels list from this icon. Product Support for adjusting picture and display settings. Picture & Display for troubleshooting and unit software information and updates. Preferences for setting up Network related settings. Network The Network icon lists downloaded BRAVIA Internet Widgets. Exploring the XMB™ and TV Features Category Icons The Category icons organize your connected equipment, see External Inputs page 16. Channels & Inputs for customizing unit settings such as Timers, Parental Lock...
Operating Instructions
Page 43
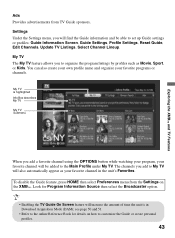
... be added to set up Guide settings or profiles: Guide Information Screen, Guide Settings, Profile Settings, Reset Guide, Edit Channels, Update TV Listings, Select Channel Lineup. see page 50 and 51. • Refer to the online Reference Book for Program Information Source then select the Broadcaster option. • Enabling the TV Guide On Screen feature will increase the amount of time the unit is highlighted Info Box describes My TV My TV Submenu When you...
... be added to set up Guide settings or profiles: Guide Information Screen, Guide Settings, Profile Settings, Reset Guide, Edit Channels, Update TV Listings, Select Channel Lineup. see page 50 and 51. • Refer to the online Reference Book for Program Information Source then select the Broadcaster option. • Enabling the TV Guide On Screen feature will increase the amount of time the unit is highlighted Info Box describes My TV My TV Submenu When you...

Operating Instructions
Page 44
... TV uses the current video on the Input menu. Inputs Press INPUT to display the Input menu and toggle through the External Inputs to Label an Input 1 From the Settings icon on the XMB™, select Channels & Inputs. Then, select Manage Inputs. How to select the video source. Refer to the online Reference Book for easy identification by the connected equipment name rather than the name of TV mode and other equipment connected to a screen...
... TV uses the current video on the Input menu. Inputs Press INPUT to display the Input menu and toggle through the External Inputs to Label an Input 1 From the Settings icon on the XMB™, select Channels & Inputs. Then, select Manage Inputs. How to select the video source. Refer to the online Reference Book for easy identification by the connected equipment name rather than the name of TV mode and other equipment connected to a screen...
Operating Instructions
Page 48
... moisture from the wall outlet before you need further assistance. 48 If you have forgotten your remote control; If you have accidentally pressed the MUTING button on troubleshooting. You may be watching the wrong input. • You may be interfering with the remote control's operation. • To reset the unit to factory default settings: 1 Turn on the unit. 2 While pressing V on the Remote Control, press POWER on the...
... moisture from the wall outlet before you need further assistance. 48 If you have forgotten your remote control; If you have accidentally pressed the MUTING button on troubleshooting. You may be watching the wrong input. • You may be interfering with the remote control's operation. • To reset the unit to factory default settings: 1 Turn on the unit. 2 While pressing V on the Remote Control, press POWER on the...
Operating Instructions
Page 49
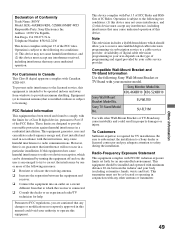
... receiver. ❑ Connect the equipment into an outlet on the type of programming and signal provided by one or more of this device. SU-FL71M Use with your cable service provider. However, there is encouraged to try to be determined by turning the equipment off and on, the user is no guarantee that any other Wall-Mount Brackets or TV-Stand may cause undesired operation. KDL-46XBR10 KDL-52XBR10 Sony Wall-Mount Bracket Model...
... receiver. ❑ Connect the equipment into an outlet on the type of programming and signal provided by one or more of this device. SU-FL71M Use with your cable service provider. However, there is encouraged to try to be determined by turning the equipment off and on, the user is no guarantee that any other Wall-Mount Brackets or TV-Stand may cause undesired operation. KDL-46XBR10 KDL-52XBR10 Sony Wall-Mount Bracket Model...
Operating Instructions
Page 51
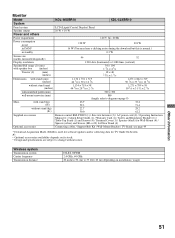
...62.2 Supplied accessories Remote control RM-YD029 (1) / Size AA batteries (2) / AC power cord (2) / Operating Instruction Manual (1) / Quick Setup Guide (1) / Warranty Card (1) / Safety and Regulatory Booklet (1) / Table-Top Stand (1) and Screws (4) / Terminal Cover (1) / Spacers (black) for Wall-Mount (4) / Spacers (silver) and Screws (M6 × 20) for Floor Stand (4) Optional accessories Connecting cables / Support Belt Kit / Wall-Mount Bracket / TV-Stand: see page 49 * Download Acquisition Mode (DAM) is used for software updates and/or collecting data for TV Guide On Screen. ~ •...
...62.2 Supplied accessories Remote control RM-YD029 (1) / Size AA batteries (2) / AC power cord (2) / Operating Instruction Manual (1) / Quick Setup Guide (1) / Warranty Card (1) / Safety and Regulatory Booklet (1) / Table-Top Stand (1) and Screws (4) / Terminal Cover (1) / Spacers (black) for Wall-Mount (4) / Spacers (silver) and Screws (M6 × 20) for Floor Stand (4) Optional accessories Connecting cables / Support Belt Kit / Wall-Mount Bracket / TV-Stand: see page 49 * Download Acquisition Mode (DAM) is used for software updates and/or collecting data for TV Guide On Screen. ~ •...
Operating Instructions
Page 52
... Receiver (IR) 26 INPUT button 25, 26 J JUMP button 25 L LAN 11 LIGHT button 23 Light Sensor 26 LINK indicator 26 Locating 10 52 M MUTING button 24 O OPTIONS button 25 P PC IN (RGB/AUDIO) 11 PIC OFF/TIMER indicator 26 POWER button 24, 26 POWER/STANDBY indicator 26 Programming the Remote Control 27 R REMOTE 11 RETURN button 24 S SCENE button 24 SERVICE ONLY 11 Speaker 26 SYNC MENU buttons 23 T Troubleshooting 48 TV POWER button 24 U USB 11 V VIDEO 2 IN L (MONO)-AUDIO-R 11 VIDEO IN 1/COMPONENT IN...
... Receiver (IR) 26 INPUT button 25, 26 J JUMP button 25 L LAN 11 LIGHT button 23 Light Sensor 26 LINK indicator 26 Locating 10 52 M MUTING button 24 O OPTIONS button 25 P PC IN (RGB/AUDIO) 11 PIC OFF/TIMER indicator 26 POWER button 24, 26 POWER/STANDBY indicator 26 Programming the Remote Control 27 R REMOTE 11 RETURN button 24 S SCENE button 24 SERVICE ONLY 11 Speaker 26 SYNC MENU buttons 23 T Troubleshooting 48 TV POWER button 24 U USB 11 V VIDEO 2 IN L (MONO)-AUDIO-R 11 VIDEO IN 1/COMPONENT IN...


