
Limited Warranty (US Only)
Page 1
... (i) acts of God, (ii) misuse, (iii) customer instruction, installation, set forth below. This Limited Warranty does not cover SONY products sold AS IS or WITH ALL FAULTS or consumables (such as set up adjustments or signal reception issues; (iv) limitations of...for commercial use) for thirty (30) inch (measured diagonally) or larger screen size television products through a SONY-authorized service facility. 2-693-552-01 x S LCD Television 18M LIMITED WARRANTY(US ONLY) SONY ELECTRONICS INC. ("SONY") warrants this product against defects in material or workmanship for the time periods ...
... (i) acts of God, (ii) misuse, (iii) customer instruction, installation, set forth below. This Limited Warranty does not cover SONY products sold AS IS or WITH ALL FAULTS or consumables (such as set up adjustments or signal reception issues; (iv) limitations of...for commercial use) for thirty (30) inch (measured diagonally) or larger screen size television products through a SONY-authorized service facility. 2-693-552-01 x S LCD Television 18M LIMITED WARRANTY(US ONLY) SONY ELECTRONICS INC. ("SONY") warrants this product against defects in material or workmanship for the time periods ...
Instructions
Page 8
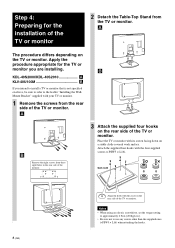
... for the TV or monitor you intend to install a TV or monitor that is not specified on the rear side of the TV or monitor. B KDL-40S2000/KDL-40S2010 A KLV-40U100M B If you are installing. Soft cloth 8 (GB) Align the hook with your TV or monitor. 1 Remove the screws from ...the TV or monitor. Attach the supplied four hooks with its screen facing down on a stable cloth-covered work surface. A The procedure differs depending on the rear ...
... for the TV or monitor you intend to install a TV or monitor that is not specified on the rear side of the TV or monitor. B KDL-40S2000/KDL-40S2010 A KLV-40U100M B If you are installing. Soft cloth 8 (GB) Align the hook with your TV or monitor. 1 Remove the screws from ...the TV or monitor. Attach the supplied four hooks with its screen facing down on a stable cloth-covered work surface. A The procedure differs depending on the rear ...
Instructions
Page 12
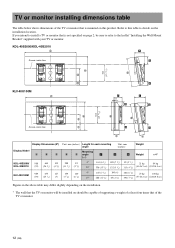
... you intend to install a TV or monitor that is mounted on the installation location. KDL-40S2000/KDL-40S2010 Screen centre line 393 (15 15/32) KLV-40U100M 10 393 (15 15/32) Screen centre line Display Dimensions (0º) Unit: mm (inches) Length for each mounting angle ... Mounting A B C D E angle F G H Weight × 4* () KDL-40S2000/ KDL-40S2010 988 664 103 288 83 (39) (26 1/4) (4 1/8) (11 3/8) (3 3/8) 0º 161 (6 3/8) 188 (7 1/2) 83 (3 3/8) 21 kg 84 kg 20º 336 (13 1/4) 132 (5 1/4) 115 (4 5/8) (46 lb 5 oz) (185 lb 4 oz) KLV-40U100M 989 653 127 (39)...
... you intend to install a TV or monitor that is mounted on the installation location. KDL-40S2000/KDL-40S2010 Screen centre line 393 (15 15/32) KLV-40U100M 10 393 (15 15/32) Screen centre line Display Dimensions (0º) Unit: mm (inches) Length for each mounting angle ... Mounting A B C D E angle F G H Weight × 4* () KDL-40S2000/ KDL-40S2010 988 664 103 288 83 (39) (26 1/4) (4 1/8) (11 3/8) (3 3/8) 0º 161 (6 3/8) 188 (7 1/2) 83 (3 3/8) 21 kg 84 kg 20º 336 (13 1/4) 132 (5 1/4) 115 (4 5/8) (46 lb 5 oz) (185 lb 4 oz) KLV-40U100M 989 653 127 (39)...
Operating Instructions
Page 3
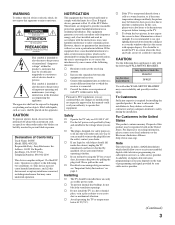
... that may not cause harmful interference, and (2) this device must accept any interference received, including interference that face the screen with opaque drapery. This equipment generates, uses and can radiate radio frequency energy and, if not installed and used in...15 of Conformity Trade Name: SONY Model: KDL-46V25L1 Responsible Party: Sony Electronics Inc. Installing s The TV should fall inside the cabinet, unplug the TV immediately and have it further. Pursuant to FCC regulations, you to receive unscrambled digital cable television programming via subscription service to...
... that may not cause harmful interference, and (2) this device must accept any interference received, including interference that face the screen with opaque drapery. This equipment generates, uses and can radiate radio frequency energy and, if not installed and used in...15 of Conformity Trade Name: SONY Model: KDL-46V25L1 Responsible Party: Sony Electronics Inc. Installing s The TV should fall inside the cabinet, unplug the TV immediately and have it further. Pursuant to FCC regulations, you to receive unscrambled digital cable television programming via subscription service to...
Operating Instructions
Page 5
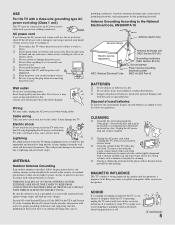
... power cord. s Do not pull the power cord. Disposal of used batteries according to provide some TVs to exchange it and ask your dealer or Sony service center to make occasional snapping or popping sounds, particularly when being turned on or off. (Continued) 5 To remove dust from the... screen, wipe it from heat sources. s Do not place the TV where the power cord is left unattended and unused for the grounding electrode. s Keep the ...
... power cord. s Do not pull the power cord. Disposal of used batteries according to provide some TVs to exchange it and ask your dealer or Sony service center to make occasional snapping or popping sounds, particularly when being turned on or off. (Continued) 5 To remove dust from the... screen, wipe it from heat sources. s Do not place the TV where the power cord is left unattended and unused for the grounding electrode. s Keep the ...
Operating Instructions
Page 7
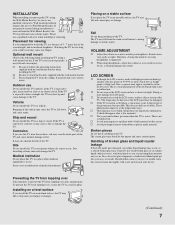
...doctor. Should either contact your eyes or mouth, rinse the contacted area thoroughly with rubber or plastic made with volatile material on the LCD screen. The TV may fall and cause injury or damage. This does not indicate a failure. s Avoid spraying insect repellent with high-precision...of 3 - 7 times that of broken glass and liquid crystal leakage If the LCD panel gets damaged, crystalline liquid leakage may occur, or scattered broken glass may damage the LCD panel. LCD SCREEN s Although the LCD screen is exposed to watch the TV at night. Broken pieces Do not throw anything ...
...doctor. Should either contact your eyes or mouth, rinse the contacted area thoroughly with rubber or plastic made with volatile material on the LCD screen. The TV may fall and cause injury or damage. This does not indicate a failure. s Avoid spraying insect repellent with high-precision...of 3 - 7 times that of broken glass and liquid crystal leakage If the LCD panel gets damaged, crystalline liquid leakage may occur, or scattered broken glass may damage the LCD panel. LCD SCREEN s Although the LCD screen is exposed to watch the TV at night. Broken pieces Do not throw anything ...

Operating Instructions
Page 9
... 15 Bundling the Connecting Cables 16 Adjusting the Viewing Angle of MENU ...23 Using the Picture Settings 26 Using the Sound Settings 28 Using the Screen Settings 29 Using the Setup Settings 31 Using the PC Settings...36 Using the Analog Setup Settings 37 Using the Digital Setup Settings 38 Other...
... 15 Bundling the Connecting Cables 16 Adjusting the Viewing Angle of MENU ...23 Using the Picture Settings 26 Using the Sound Settings 28 Using the Screen Settings 29 Using the Setup Settings 31 Using the PC Settings...36 Using the Analog Setup Settings 37 Using the Digital Setup Settings 38 Other...
Operating Instructions
Page 10
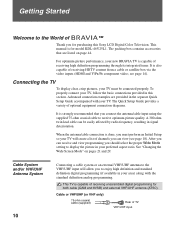
...BRAVIA TV is also capable of receiving HDTV content from a cable or satellite box via the video inputs (HDMI and Y/PB/PR component video; To properly connect your TV, follow the basic connections provided in this Sony LCD Digital Color Television...cable to display the picture in your preferred aspect ratio. This TV is for model KDL-46V25L1. After you can view (see page 14). Cable System and/or VHF/UHF ...(QAM and 8VSB) and external VHF/UHF antenna (ATSC). See "Changing the Wide Screen Mode" on page 44. When the antenna/cable connection is strongly recommended that are ...
...BRAVIA TV is also capable of receiving HDTV content from a cable or satellite box via the video inputs (HDMI and Y/PB/PR component video; To properly connect your TV, follow the basic connections provided in this Sony LCD Digital Color Television...cable to display the picture in your preferred aspect ratio. This TV is for model KDL-46V25L1. After you can view (see page 14). Cable System and/or VHF/UHF ...(QAM and 8VSB) and external VHF/UHF antenna (ATSC). See "Changing the Wide Screen Mode" on page 44. When the antenna/cable connection is strongly recommended that are ...
Operating Instructions
Page 17
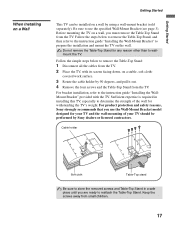
Getting Started When Installing on a Wall Getting Started This TV can be performed by Sony dealers or licensed contractors. For product protection and safety reasons, Sony strongly recommends that you use the specified Wall-Mount Bracket (see page 3). For bracket installation, refer to determine the ... the removed screws and Table-Top Stand in installing this TV, especially to the instruction guide "Installing the WallMount Bracket" provided with its screen facing down, on a wall by 90 degrees, and pull it out. 4 Remove the four screws and the Table-Top Stand from small...
Getting Started When Installing on a Wall Getting Started This TV can be performed by Sony dealers or licensed contractors. For product protection and safety reasons, Sony strongly recommends that you use the specified Wall-Mount Bracket (see page 3). For bracket installation, refer to determine the ... the removed screws and Table-Top Stand in installing this TV, especially to the instruction guide "Installing the WallMount Bracket" provided with its screen facing down, on a wall by 90 degrees, and pull it out. 4 Remove the four screws and the Table-Top Stand from small...

Operating Instructions
Page 18
appears. To add individual digital channels ❑ Use the Digital Channels feature as described on -screen display language. The Initial Setup screen appears when you can do not want to highlight "OK" then press . Then the message "Continue programming digital channels?" Then press . The message "...you can run Auto Program again at this time, you want to set up . Getting Started Setting Up the Channel List - The Initial Setup screen appears. 2 Press V/v to create a list of available analog and digital channels. The message "First please connect cable/antenna.
appears. To add individual digital channels ❑ Use the Digital Channels feature as described on -screen display language. The Initial Setup screen appears when you can do not want to highlight "OK" then press . Then the message "Continue programming digital channels?" Then press . The message "...you can run Auto Program again at this time, you want to set up . Getting Started Setting Up the Channel List - The Initial Setup screen appears. 2 Press V/v to create a list of available analog and digital channels. The message "First please connect cable/antenna.
Operating Instructions
Page 20
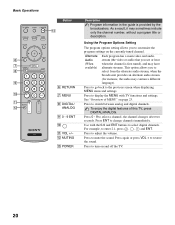
.... Press to display the MENU with the 0-9 and ENT buttons to customize the program settings on and off the TV. 20 Press to the previous screen when displaying MENU items and settings. Press to change channels immediately. Basic Operations 6 7 8 9 0 qa qs Button qd 6 RETURN 7 MENU 8 DIGITAL/ ANALOG 9 0 - 9 ENT 0 qa VOL +/- Using...
.... Press to display the MENU with the 0-9 and ENT buttons to customize the program settings on and off the TV. 20 Press to the previous screen when displaying MENU items and settings. Press to change channels immediately. Basic Operations 6 7 8 9 0 qa qs Button qd 6 RETURN 7 MENU 8 DIGITAL/ ANALOG 9 0 - 9 ENT 0 qa VOL +/- Using...

Operating Instructions
Page 21
... and slide to select/confirm an item. When the TV receives a 720p, 1080i or 1080p signal, Normal cannot be also accessed in the Screen settings. Press once to scan through channels. Press to display the Tools Menu that was selected among the digital or analog channels. See page...Press repeatedly to step through channels, press and hold down either +/-. Insert two size AA batteries (supplied) by matching the e and E on -screen cursor. The TV alternates between two channels. Press to display the current channel number, channel label, time and Wide Mode settings. The Wide Mode ...
... and slide to select/confirm an item. When the TV receives a 720p, 1080i or 1080p signal, Normal cannot be also accessed in the Screen settings. Press once to scan through channels. Press to display the Tools Menu that was selected among the digital or analog channels. See page...Press repeatedly to step through channels, press and hold down either +/-. Insert two size AA batteries (supplied) by matching the e and E on -screen cursor. The TV alternates between two channels. Press to display the current channel number, channel label, time and Wide Mode settings. The Wide Mode ...
Operating Instructions
Page 22
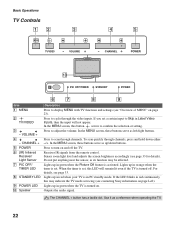
... Receiver/ Light Sensor 7 PIC OFF/ TIMER LED 8 STANDBY LED 9 POWER LED 0 Speaker Description Press to display MENU with TV functions and settings (see contacting Sony information on . Press to confirm the selection or setting. When the timer is set a certain input to turn on page 23). Use it as its... function may indicate the TV needs servicing (see "Overview of MENU" on and off . In the MENU screen, this LED will not appear. Lights up /down either -/+. Lights up in green when the Picture Off feature is turned off the TV. Basic ...
... Receiver/ Light Sensor 7 PIC OFF/ TIMER LED 8 STANDBY LED 9 POWER LED 0 Speaker Description Press to display MENU with TV functions and settings (see contacting Sony information on . Press to confirm the selection or setting. When the timer is set a certain input to turn on page 23). Use it as its... function may indicate the TV needs servicing (see "Overview of MENU" on and off . In the MENU screen, this LED will not appear. Lights up /down either -/+. Lights up in green when the Picture Off feature is turned off the TV. Basic ...

Operating Instructions
Page 23
... panel appears. 2 Press V/v to highlight the item. 3 Press to select an option. 2, 3 Press MENU to perform a variety of tasks intuitively with a control panel on the screen rather than a variety of MENU MENU provides one-button access for controlling your TV settings. 1 Press MENU on the remote. Using the Menus Using the...
... panel appears. 2 Press V/v to highlight the item. 3 Press to select an option. 2, 3 Press MENU to perform a variety of tasks intuitively with a control panel on the screen rather than a variety of MENU MENU provides one-button access for controlling your TV settings. 1 Press MENU on the remote. Using the Menus Using the...

Operating Instructions
Page 25
The options you enter the settings menu. Using the Menus 25 Settings and adjustments can adjust vary depending on various settings starts from the Settings menu. The information on the situation. Navigating Through Settings 1 Press MENU. 2 Select . 3 Highlight the item: Picture, Sound, Screen, Setup, PC Settings, Analog Setup, Digital Setup. 4 Press to select an option. Unavailable options are grayed out or not displayed. To exit Settings, press MENU. MENU Settings Using the Menus Description The Settings feature lets you can be performed from page 26.
The options you enter the settings menu. Using the Menus 25 Settings and adjustments can adjust vary depending on various settings starts from the Settings menu. The information on the situation. Navigating Through Settings 1 Press MENU. 2 Select . 3 Highlight the item: Picture, Sound, Screen, Setup, PC Settings, Analog Setup, Digital Setup. 4 Press to select an option. Unavailable options are grayed out or not displayed. To exit Settings, press MENU. MENU Settings Using the Menus Description The Settings feature lets you can be performed from page 26.

Operating Instructions
Page 29
...original size. To retain the current Wide Mode setting as possible. Wide Zoom Select to enlarge the 4:3 picture, to fill the 16:9 screen, keeping the original image as much as channels and inputs are changed . Current Input Settings will be applied to All Inputs (ex:...When you are disturbing to only the Current Input (ex: TV is showing Video 1. Changes to the screen mode based upon program's content. Normal is not available when you change to screen settings affect only Video 1). On Select to automatically change channels (or inputs), Wide Mode is 4:3 ...
...original size. To retain the current Wide Mode setting as possible. Wide Zoom Select to enlarge the 4:3 picture, to fill the 16:9 screen, keeping the original image as much as channels and inputs are changed . Current Input Settings will be applied to All Inputs (ex:...When you are disturbing to only the Current Input (ex: TV is showing Video 1. Changes to the screen mode based upon program's content. Normal is not available when you change to screen settings affect only Video 1). On Select to automatically change channels (or inputs), Wide Mode is 4:3 ...

Operating Instructions
Page 31
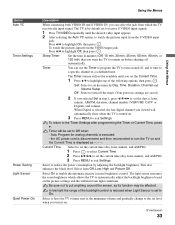
... the Setup Settings Using the Menus Option Language Caption Vision Info Banner Description Select to display all on-screen settings in your language of a program. (Should be accessed using either half or the whole screen (if available). CC1, CC2, CC3, CC4 Displays a printed version of the dialog or sound effects of choice...
... the Setup Settings Using the Menus Option Language Caption Vision Info Banner Description Select to display all on-screen settings in your language of a program. (Should be accessed using either half or the whole screen (if available). CC1, CC2, CC3, CC4 Displays a printed version of the dialog or sound effects of choice...

Operating Instructions
Page 32
... entering it again. No programs are blocked from the following labels for inputs to which you want to assign a label. To set ratings manually. on screen. 1 Press V/v to highlight the video input (Video 1-8) to create a custom five-character label. ratings (see page 35). Then press to help simplify the rating selection...
... entering it again. No programs are blocked from the following labels for inputs to which you want to assign a label. To set ratings manually. on screen. 1 Press V/v to highlight the video input (Video 1-8) to create a custom five-character label. ratings (see page 35). Then press to help simplify the rating selection...
Operating Instructions
Page 33
... the following options, then press . Timer You can select the jack from Off, Low, High and Picture Off. To return to enable the automatic picture (screen) brightness control. Current Time Select to set the current time (day, hour, minute, and AM/PM). 1 Press to select Current Time. 2 Press V/v/B/b to set to...
... the following options, then press . Timer You can select the jack from Off, Low, High and Picture Off. To return to enable the automatic picture (screen) brightness control. Current Time Select to set the current time (day, hour, minute, and AM/PM). 1 Press to select Current Time. 2 Press V/v/B/b to set to...
Operating Instructions
Page 36
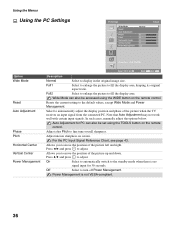
... the position of the picture left and right. Power Management is no signal input for PC can also be set using the WIDE button on screen. Wide Mode can also be accessed using the TOOLS button on the remote control. For the PC Input Signal Reference Chart, see page 43. Press...
... the position of the picture left and right. Power Management is no signal input for PC can also be set using the WIDE button on screen. Wide Mode can also be accessed using the TOOLS button on the remote control. For the PC Input Signal Reference Chart, see page 43. Press...


