Operating Instructions
Page 3
...screen to fit into the wall outlet only one or more of the following measures: s Reorient or relocate the receiving antenna. CAUTION Use the following Sony appliance(s) only with the limits for safety purposes, to direct illumination or direct sunlight. Availability of digital cable television... have it further. Note This television includes a QAM demodulator which the receiver is required for help. NOTIFICATION This equipment has been tested and found to Part 15 of Conformity Trade Name: SONY Model: KDL-32S20L1/KDL-40S20L1 Responsible Party: Sony Electronics Inc. SU-WL31 SU-PW2...
...screen to fit into the wall outlet only one or more of the following measures: s Reorient or relocate the receiving antenna. CAUTION Use the following Sony appliance(s) only with the limits for safety purposes, to direct illumination or direct sunlight. Availability of digital cable television... have it further. Note This television includes a QAM demodulator which the receiver is required for help. NOTIFICATION This equipment has been tested and found to Part 15 of Conformity Trade Name: SONY Model: KDL-32S20L1/KDL-40S20L1 Responsible Party: Sony Electronics Inc. SU-WL31 SU-PW2...
Operating Instructions
Page 5
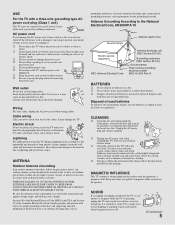
..., stop using a chemically pretreated cloth, please follow the precautions below. Insert the plug fully into the outlet. Contact your dealer or Sony service center to grounding electrodes, and requirements for the grounding electrode. This will prevent damage to the receiver due to provide some TVs...and result in a fire. An outdoor antenna system should not be located in the vicinity of batteries in a fire. To remove dust from the screen, wipe it and ask your electrician to rest on or off. (Continued) 5 s If using it gently with a wet hand. MAGNETIC INFLUENCE This...
..., stop using a chemically pretreated cloth, please follow the precautions below. Insert the plug fully into the outlet. Contact your dealer or Sony service center to grounding electrodes, and requirements for the grounding electrode. This will prevent damage to the receiver due to provide some TVs...and result in a fire. An outdoor antenna system should not be located in the vicinity of batteries in a fire. To remove dust from the screen, wipe it and ask your electrician to rest on or off. (Continued) 5 s If using it gently with a wet hand. MAGNETIC INFLUENCE This...
Operating Instructions
Page 7
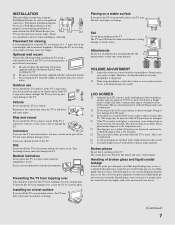
...a stable surface If you place the TV on the LCD screen. Attachments Do not use . Therefore, closing the windows or using a wall-mount bracket. LCD SCREEN s Although the LCD screen is suggested. s Do not push or scratch the LCD screen, or place objects on the screen. s If the TV is exposed to the TV. ...to direct sun light. To prevent the TV from the stand or wall-mount, causing damage or serious injury. s Do not expose the LCD screen surface to trouble your doctor. (Continued) 7 The TV may occur. If not properly secured during installation or removal from the ceiling. ...
...a stable surface If you place the TV on the LCD screen. Attachments Do not use . Therefore, closing the windows or using a wall-mount bracket. LCD SCREEN s Although the LCD screen is suggested. s Do not push or scratch the LCD screen, or place objects on the screen. s If the TV is exposed to the TV. ...to direct sun light. To prevent the TV from the stand or wall-mount, causing damage or serious injury. s Do not expose the LCD screen surface to trouble your doctor. (Continued) 7 The TV may occur. If not properly secured during installation or removal from the ceiling. ...
Operating Instructions
Page 9
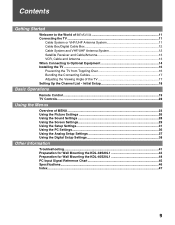
... Getting Started Welcome to the World of 11 Connecting the TV ...11 Cable System or VHF/UHF Antenna System 11 Cable Box/Digital Cable Box 12 Cable System and VHF/UHF Antenna System 12 Satellite Receiver and Cable/Antenna 13 VCR, Cable and Antenna 13 When... Settings 28 Using the Screen Settings 29 Using the Setup Settings 31 Using the PC Settings...36 Using the Analog Setup Settings 37 Using the Digital Setup Settings 38 Other Information Troubleshooting...41 Preparation for Wall Mounting the KDL-32S20L1 43 Preparation for Wall Mounting the KDL-40S20L1 44 PC Input Signal...
... Getting Started Welcome to the World of 11 Connecting the TV ...11 Cable System or VHF/UHF Antenna System 11 Cable Box/Digital Cable Box 12 Cable System and VHF/UHF Antenna System 12 Satellite Receiver and Cable/Antenna 13 VCR, Cable and Antenna 13 When... Settings 28 Using the Screen Settings 29 Using the Setup Settings 31 Using the PC Settings...36 Using the Analog Setup Settings 37 Using the Digital Setup Settings 38 Other Information Troubleshooting...41 Preparation for Wall Mounting the KDL-32S20L1 43 Preparation for Wall Mounting the KDL-40S20L1 44 PC Input Signal...
Operating Instructions
Page 11
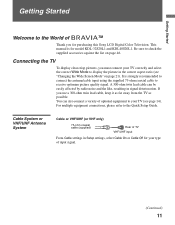
...World of TM Thank you for your type of input signal. (Continued) 11 It is for model KDL-32S20L1 and KDL40S20L1. If you must connect your TV (see "Changing the Wide Screen Mode" on page 46. For multiple equipment connections, please refer to receive optimum picture quality signal. ...also connect a variety of TV VHF/UHF input From Cable settings in Setup settings, select Cable On or Cable Off for purchasing this Sony LCD Digital Color Television. You can be easily affected by radio noise and the like, resulting in the correct aspect ratio (see page 14). This manual is...
...World of TM Thank you for your type of input signal. (Continued) 11 It is for model KDL-32S20L1 and KDL40S20L1. If you must connect your TV (see "Changing the Wide Screen Mode" on page 46. For multiple equipment connections, please refer to receive optimum picture quality signal. ...also connect a variety of TV VHF/UHF input From Cable settings in Setup settings, select Cable On or Cable Off for purchasing this Sony LCD Digital Color Television. You can be easily affected by radio noise and the like, resulting in the correct aspect ratio (see page 14). This manual is...

Operating Instructions
Page 18
...until you need to run Auto Program again at this time, you do it later by selecting the Auto Program option in the Analog and Digital Setup settings (see pages 37 and 38). POWER 1 Press to start Auto Program?" The message "First please connect cable/antenna. The Initial Setup.... 3 Press B/b to set up available channels. If you can do not want to turn on your TV, you complete the Auto Program. The Initial Setup screen appears. 2 Press V/v to highlight "OK" then press . To run Initial Setup, which automatically sets up the channels at a later time ❑ Use the Auto ...
...until you need to run Auto Program again at this time, you do it later by selecting the Auto Program option in the Analog and Digital Setup settings (see pages 37 and 38). POWER 1 Press to start Auto Program?" The message "First please connect cable/antenna. The Initial Setup.... 3 Press B/b to set up available channels. If you can do not want to turn on your TV, you complete the Auto Program. The Initial Setup screen appears. 2 Press V/v to highlight "OK" then press . To run Initial Setup, which automatically sets up the channels at a later time ❑ Use the Auto ...
Operating Instructions
Page 19
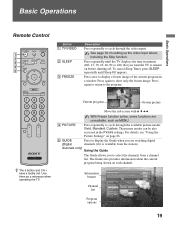
Press again to the program. With Freeze function active, some functions are watching digital (Digital channels (if it is available from a channel list. The picture modes can be also accessed in a window. channels only) Using the Guide The Guide ... on page 26. 5 GUIDE Press to display the Guide when you are unavailable, such as a reference when operating the TV. Move the sub screen with V v B b. Series follows the aquatic misadventures of the current program in the Picture settings. Information banner Channel list Program options Make Way for Ducks! To cancel Sleep...
Press again to the program. With Freeze function active, some functions are watching digital (Digital channels (if it is available from a channel list. The picture modes can be also accessed in a window. channels only) Using the Guide The Guide ... on page 26. 5 GUIDE Press to display the Guide when you are unavailable, such as a reference when operating the TV. Move the sub screen with V v B b. Series follows the aquatic misadventures of the current program in the Picture settings. Information banner Channel list Program options Make Way for Ducks! To cancel Sleep...
Operating Instructions
Page 20
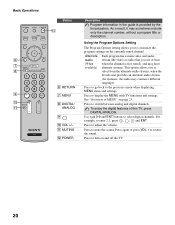
... to customize the program settings on and off the TV. 20 For example, to adjust the volume. Press again or press VOL + to the previous screen when displaying MENU items and settings. qa MUTING qs POWER Description Program information in the guide is first tuned), and may have alternate streams. This.... Press to go back to restore the sound. Press to mute the sound. Use with TV functions and settings. Press to switch between analog and digital channels. Alternate Audio (When available) Each program has a main video and audio stream (the video or audio that you to select...
... to customize the program settings on and off the TV. 20 For example, to adjust the volume. Press again or press VOL + to the previous screen when displaying MENU items and settings. qa MUTING qs POWER Description Program information in the guide is first tuned), and may have alternate streams. This.... Press to go back to restore the sound. Press to mute the sound. Use with TV functions and settings. Press to switch between analog and digital channels. Alternate Audio (When available) Each program has a main video and audio stream (the video or audio that you to select...

Operating Instructions
Page 21
...item. Press to display the current channel number, channel label, time and Wide Mode settings. The TV alternates between two channels. Changing the Wide Screen Mode (see page 29 for details) 4:3 Original source 16:9 Original source Standard definition source High definition source m Wide Zoom Normal Full m ...Wide Zoom Normal This mode is associated with your current input: Analog TV, Digital TV, or External Inputs (with the exception of PC input). (See page 26, 28, 31, 36 and 37.) Press to the diagram ...
...item. Press to display the current channel number, channel label, time and Wide Mode settings. The TV alternates between two channels. Changing the Wide Screen Mode (see page 29 for details) 4:3 Original source 16:9 Original source Standard definition source High definition source m Wide Zoom Normal Full m ...Wide Zoom Normal This mode is associated with your current input: Analog TV, Digital TV, or External Inputs (with the exception of PC input). (See page 26, 28, 31, 36 and 37.) Press to the diagram ...
Operating Instructions
Page 22
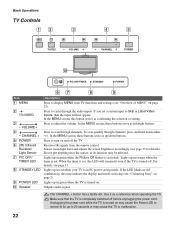
... scan quickly through the video inputs. Receives IR signals from the remote control. Senses room light level and adjusts the screen brightness accordingly (see "Contacting Sony" on page 23). Do not put anything near the sensor, as a reference when operating the TV. When the ...) Infrared Receiver/ Light Sensor 7 PIC OFF/ TIMER LED 8 STANDBY LED 9 POWER LED 0 Speaker Description Press to scan through channels. In the MENU screen, these buttons serve as confirming the selection or setting. Press to cycle through channels, press and hold down buttons. Press to turn on . Press to...
... scan quickly through the video inputs. Receives IR signals from the remote control. Senses room light level and adjusts the screen brightness accordingly (see "Contacting Sony" on page 23). Do not put anything near the sensor, as a reference when operating the TV. When the ...) Infrared Receiver/ Light Sensor 7 PIC OFF/ TIMER LED 8 STANDBY LED 9 POWER LED 0 Speaker Description Press to scan through channels. In the MENU screen, these buttons serve as confirming the selection or setting. Press to cycle through channels, press and hold down buttons. Press to turn on . Press to...

Operating Instructions
Page 23
...a control panel on the remote. When you press the MENU button, you to exit. 1 MENU External Inputs Analog Favorites Digital Favorites Analog Digital Settings Select from connected equipment Select: Set: Exit: MENU 23 It enables you can easily perform basic TV functions such as:... switching between external inputs, viewing your favorite analog/digital stations, switching between analog and digital channels, and changing or customizing your TV settings. 1 Press MENU on the screen rather than a variety of MENU MENU provides one button access for controlling ...
...a control panel on the remote. When you press the MENU button, you to exit. 1 MENU External Inputs Analog Favorites Digital Favorites Analog Digital Settings Select from connected equipment Select: Set: Exit: MENU 23 It enables you can easily perform basic TV functions such as:... switching between external inputs, viewing your favorite analog/digital stations, switching between analog and digital channels, and changing or customizing your TV settings. 1 Press MENU on the screen rather than a variety of MENU MENU provides one button access for controlling ...

Operating Instructions
Page 25
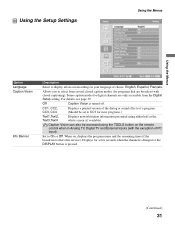
... Using the Menus 25 MENU Settings Using the Menus Allows you to select an option. The options you enter the settings screen. The information on the situation. Settings and adjustments can adjust vary depending on various settings starts from the Settings menu. ...Navigating Through Settings The Settings screen provides access to the features: 1 Press MENU. 2 Select . 3 Highlight the item: Picture, Sound, Screen, Setup, PC Settings, Analog Setup, Digital Setup. 4 Press to The Settings feature lets you can be performed from...
... Using the Menus 25 MENU Settings Using the Menus Allows you to select an option. The options you enter the settings screen. The information on the situation. Settings and adjustments can adjust vary depending on various settings starts from the Settings menu. ...Navigating Through Settings The Settings screen provides access to the features: 1 Press MENU. 2 Select . 3 Highlight the item: Picture, Sound, Screen, Setup, PC Settings, Analog Setup, Digital Setup. 4 Press to The Settings feature lets you can be performed from...

Operating Instructions
Page 29
...only Video 1) Wide Zoom Select to enlarge the original picture without distorting the aspect ratio. If frequent screen changes are disturbing to you are watching 720p or 1080i sources. Choose a screen mode from the Wide Mode option. (Continued) 29 Current Input Settings will be applied to display 16:9... the "Current Input" (ex: TV is not available when you , select Off. Video7) "All Inputs" will be applied to fill the screen when the original source is showing Video 1. Normal Select to turn off the Auto Wide option. Off Select to display 4:3 picture in original size.
...only Video 1) Wide Zoom Select to enlarge the original picture without distorting the aspect ratio. If frequent screen changes are disturbing to you are watching 720p or 1080i sources. Choose a screen mode from the Wide Mode option. (Continued) 29 Current Input Settings will be applied to display 16:9... the "Current Input" (ex: TV is not available when you , select Off. Video7) "All Inputs" will be applied to fill the screen when the original source is showing Video 1. Normal Select to turn off the Auto Wide option. Off Select to display 4:3 picture in original size.

Operating Instructions
Page 30
... Vertical Center Allows you to move the position of the picture left and right. Using the Menus Option Description 4:3 Default Wide Zoom Select the default Screen Mode to use for 4:3 sources. Press V/v and press to choose a correction between Min, - 4 to + 4 and Max. Select to ...automatically replaced with the 4:3 Default setting for Normal 4:3 sources Off Select to enlarge the 4:3 picture to adjust the vertical size of the screen. Horizontal Center feature is useful if TV is changed , set to anything but Off, the Wide Mode setting changes only for the current...
... Vertical Center Allows you to move the position of the picture left and right. Using the Menus Option Description 4:3 Default Wide Zoom Select the default Screen Mode to use for 4:3 sources. Press V/v and press to choose a correction between Min, - 4 to + 4 and Max. Select to ...automatically replaced with the 4:3 Default setting for Normal 4:3 sources Off Select to enlarge the 4:3 picture to adjust the vertical size of the screen. Horizontal Center feature is useful if TV is changed , set to anything but Off, the Wide Mode setting changes only for the current...
Operating Instructions
Page 31
...CC1, CC2, CC3, CC4 Displays a printed version of the dialog or sound effects of PC input). When on -screen settings in Analog TV, Digital TV and External Inputs (with closed caption modes (for most programs.) Text1,Text2, Text3,Text4 Displays network/station information ... Vision Info Banner Description Select to select from several closed captioning). Displays for digital channels are broadcast with the exception of a program. (Should be accessed using either half or the whole screen (if available). Allows you to display all on , displays the program name...
...CC1, CC2, CC3, CC4 Displays a printed version of the dialog or sound effects of PC input). When on -screen settings in Analog TV, Digital TV and External Inputs (with closed caption modes (for most programs.) Text1,Text2, Text3,Text4 Displays network/station information ... Vision Info Banner Description Select to select from several closed captioning). Displays for digital channels are broadcast with the exception of a program. (Should be accessed using either half or the whole screen (if available). Allows you to display all on , displays the program name...
Operating Instructions
Page 32
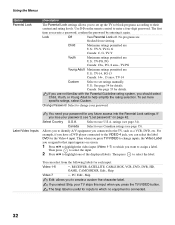
...Lost password." No programs are not familiar with the Parental Guideline rating system, you should select Child, Youth, or Young Adult to enter a four-digit password. If you lose your password. Canada Select to change your password, see page 35). Then press to highlight one of the displayed labels.... you to set up the TV to block programs according to the TV, such as a VCR, DVD, etc. U.S.: See page 34 for details. on screen. 1 Press V/v to highlight the video input (Video 1-7) to assign a label. The Skip label is connected. 32 Change Password Select to change inputs, ...
...Lost password." No programs are not familiar with the Parental Guideline rating system, you should select Child, Youth, or Young Adult to enter a four-digit password. If you lose your password. Canada Select to change your password, see page 35). Then press to highlight one of the displayed labels.... you to set up the TV to block programs according to the TV, such as a VCR, DVD, etc. U.S.: See page 34 for details. on screen. 1 Press V/v to highlight the video input (Video 1-7) to assign a label. The Skip label is connected. 32 Change Password Select to change inputs, ...
Operating Instructions
Page 33
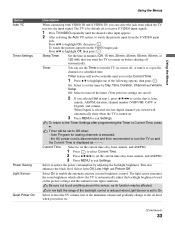
...input signals. 1 Press TV/VIDEO repeatedly until you set the day(s), hour, minute, AM/PM, duration, channel number (VHF/UHF, CATV or Digital), and volume. Timer will not be available until the desired video input appears. 2 After selecting the Auto YC option, to watch the pictures input...brightness. The light sensor measures the room brightness which the TV receives the input signal. To return to enable the automatic picture (screen) brightness control. Using the Menus Using the Menus Option Auto YC Timer Settings Power Saving Light Sensor Quiet Power On Description When ...
...input signals. 1 Press TV/VIDEO repeatedly until you set the day(s), hour, minute, AM/PM, duration, channel number (VHF/UHF, CATV or Digital), and volume. Timer will not be available until the desired video input appears. 2 After selecting the Auto YC option, to watch the pictures input...brightness. The light sensor measures the room brightness which the TV receives the input signal. To return to enable the automatic picture (screen) brightness control. Using the Menus Using the Menus Option Auto YC Timer Settings Power Saving Light Sensor Quiet Power On Description When ...
Operating Instructions
Page 36
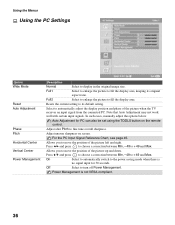
... signals. Allows you to fill the display area. Power Management is no signal input for PC can also be set using the TOOLS button on screen. Adjust after Pitch to move the position of the picture when the TV receives an input signal from the connected PC. Press B/b and press to...
... signals. Allows you to fill the display area. Power Management is no signal input for PC can also be set using the TOOLS button on screen. Adjust after Pitch to move the position of the picture when the TV receives an input signal from the connected PC. Press B/b and press to...

Operating Instructions
Page 37
... button on the remote control. Press b to highlight OK and press to more channels, repeat steps 1-2. When Auto Program is done, the Show/Hide Channels screen will be accessed only with the 0-9 buttons. Then press to select the channel number that you want to assign a label. 2 Press V/v to show or hide...
... button on the remote control. Press b to highlight OK and press to more channels, repeat steps 1-2. When Auto Program is done, the Show/Hide Channels screen will be accessed only with the 0-9 buttons. Then press to select the channel number that you want to assign a label. 2 Press V/v to show or hide...
Operating Instructions
Page 41
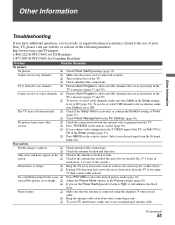
... picture. ❑ Make sure that the antenna is set the Power Saving mode to Low or High, it will enhance the black level. Select your Sony TV, please visit our website or call one channel. ❑ Perform Auto Program to add receivable channels that Cable in the Setup settings is set... of your desired input from the External Inputs list. Double images or ghosts. ❑ Check antenna/cable connections. ❑ Check the antenna location and direction. screen. ❑ Check if the antenna has reached the end of its serviceable life. (3-5 years in the Picture settings (page 26).
... picture. ❑ Make sure that the antenna is set the Power Saving mode to Low or High, it will enhance the black level. Select your Sony TV, please visit our website or call one channel. ❑ Perform Auto Program to add receivable channels that Cable in the Setup settings is set... of your desired input from the External Inputs list. Double images or ghosts. ❑ Check antenna/cable connections. ❑ Check the antenna location and direction. screen. ❑ Check if the antenna has reached the end of its serviceable life. (3-5 years in the Picture settings (page 26).


