Sony KDL-32EX720 Research
Related Manual Pages

Related Videos

Sony BRAVIA KDL32EX720 Commercial
Duration: 1:02
Total Views: 7,261
Duration: 1:02
Total Views: 7,261
Sony KDL 32EX720 IN5
Duration: 2:34
Total Views: 6,016
Duration: 2:34
Total Views: 6,016
SONY KDL-32EX720. ?????????? ?????
Duration: 3:24
Total Views: 2,799
Duration: 3:24
Total Views: 2,799
Sony KDL-32EX720 - test PC World
Duration: 2:58
Total Views: 45,268
Duration: 2:58
Total Views: 45,268
Review Sony 3D LED HDTV - KDL32EX720, KDL40EX720, KDL46EX720, KDL55EX720
Duration: 1:48
Total Views: 19
Duration: 1:48
Total Views: 19
Similar Questions

How Get Display Kdl 32ex720
Sir please contact me 00971501926399
Sir please contact me 00971501926399
(Posted by samiransamanta84 7 years ago)

System Board
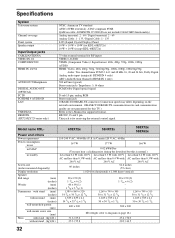
dear team I like buy Sony TV KDL-32EX720 system board pls give me some advice th
dear team I like buy Sony TV KDL-32EX720 system board pls give me some advice th
(Posted by Sathik76 7 years ago)

Www.sony-asia.com/support-model Bravia-kdl-55/46/40/32ex720
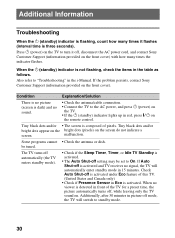
when i switch on the above model standby indicator is flashing 4 time (4 second duration).please giv...
when i switch on the above model standby indicator is flashing 4 time (4 second duration).please giv...
(Posted by shan31548 8 years ago)
Why Does My Tv Periodically Loses Power And The Screen Turns Black? I
My TV is losing power,the power saver light comes on the screen and I have it on the off modeThe scr...
My TV is losing power,the power saver light comes on the screen and I have it on the off modeThe scr...
(Posted by mmarkus 8 years ago)
