Operating Instructions
Page 2
..., to moisture condensation. s The plug is transported directly from the ceiling or to a warm location, or if the room temperature changes suddenly, the picture may cause undesired operation. s If the TV is designed, for help. SU-WL100 SU-WL500 Sony TV Stand Model No. - - It is a trademark licensed to safety during the installation. Availability of digital cable television programming in accordance with opaque drapery...
..., to moisture condensation. s The plug is transported directly from the ceiling or to a warm location, or if the room temperature changes suddenly, the picture may cause undesired operation. s If the TV is designed, for help. SU-WL100 SU-WL500 Sony TV Stand Model No. - - It is a trademark licensed to safety during the installation. Availability of digital cable television programming in accordance with opaque drapery...
Operating Instructions
Page 3
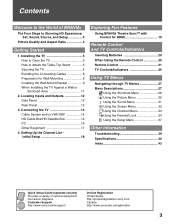
Setting Up the Channel List Initial Setup 18 Exploring Fun Features Using BRAVIA Theatre Sync™ with Control for Wall-Mounting 8 Installing the Wall-Mount Bracket 9 When Installing the TV Against a Wall or Enclosed Area 11 2. Connecting the TV 14 Cable System and/or VHF/UHF 14 HD Cable Box/HD Satellite Box 14 PC 16 Other Equipment 17 4. Locating Inputs and Outputs 12 Side Panel 12 Rear Panel 12 3. Contents Welcome to the World of BRAVIA®...
Setting Up the Channel List Initial Setup 18 Exploring Fun Features Using BRAVIA Theatre Sync™ with Control for Wall-Mounting 8 Installing the Wall-Mount Bracket 9 When Installing the TV Against a Wall or Enclosed Area 11 2. Connecting the TV 14 Cable System and/or VHF/UHF 14 HD Cable Box/HD Satellite Box 14 PC 16 Other Equipment 17 4. Locating Inputs and Outputs 12 Side Panel 12 Rear Panel 12 3. Contents Welcome to the World of BRAVIA®...
Operating Instructions
Page 6
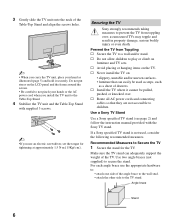
... TV to a wall and/or stand. s Route all AC power cords and connecting cables so that can adequately support the weight of the TV. Use two angle braces (not supplied) to the Table-Top Stand. 4 Stabilize the TV unit and the Table-Top Stand with the Sony TV stand. s Install the TV where ... and TV sets. s Never install the TV on the LCD panel and the frame around the screen. • Be careful to play or climb on the TV. Use a Sony TV Stand Use a Sony specified TV stand (see page 2) and follow the instruction manual provided with supplied 3 screws. ~ •If you install the TV ...
... TV to a wall and/or stand. s Route all AC power cords and connecting cables so that can adequately support the weight of the TV. Use two angle braces (not supplied) to the Table-Top Stand. 4 Stabilize the TV unit and the Table-Top Stand with the Sony TV stand. s Install the TV where ... and TV sets. s Never install the TV on the LCD panel and the frame around the screen. • Be careful to play or climb on the TV. Use a Sony TV Stand Use a Sony specified TV stand (see page 2) and follow the instruction manual provided with supplied 3 screws. ~ •If you install the TV ...
Operating Instructions
Page 8
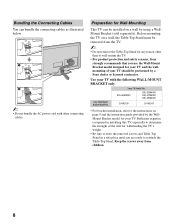
... not remove the Table-Top Stand for your TV should be performed by a Sony dealer or licensed contractor. Bundling the Connecting Cables You can be installed on page 9 and the instruction guide provided by the WallMount Bracket model for any reason other connecting cables. Preparation for Wall-Mounting This TV can bundle the connecting cables as illustrated below. ~ • Do not bundle the AC power cord with the following WALL-MOUNT BRACKET...
... not remove the Table-Top Stand for your TV should be performed by a Sony dealer or licensed contractor. Bundling the Connecting Cables You can be installed on page 9 and the instruction guide provided by the WallMount Bracket model for any reason other connecting cables. Preparation for Wall-Mounting This TV can bundle the connecting cables as illustrated below. ~ • Do not bundle the AC power cord with the following WALL-MOUNT BRACKET...
Operating Instructions
Page 9
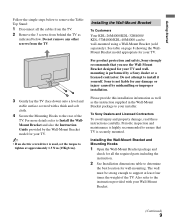
... to determine the best location for all the cables from the TV. 2 Remove the 3 screws from the TV. Installing the Wall-Mount Bracket and Mounting Hooks 1 Open the Wall-Mount Bracket package and check for wall-mounting. Sony is performed by mishandling or improper installation. 3 Gently lay the TV (face down) onto a level and stable surface covered with your TV. Installing the Wall-Mount Bracket To Customers Your KDL-26M4000/KDL-32M4000/ KDL-37M4000/KDL-40M4000 can...
... to determine the best location for all the cables from the TV. 2 Remove the 3 screws from the TV. Installing the Wall-Mount Bracket and Mounting Hooks 1 Open the Wall-Mount Bracket package and check for wall-mounting. Sony is performed by mishandling or improper installation. 3 Gently lay the TV (face down) onto a level and stable surface covered with your TV. Installing the Wall-Mount Bracket To Customers Your KDL-26M4000/KDL-32M4000/ KDL-37M4000/KDL-40M4000 can...
Operating Instructions
Page 13
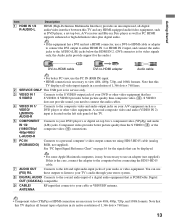
... adapter (not supplied). Component video provides better picture quality than composite video (4). HDMI supports enhanced or high-definition video plus digital audio. • If the equipment has a DVI and not a HDMI connector, use the PC IN (RGB IN) input. • HDMI connection is necessary to view 480i, 480p, 720p, and 1080i formats. A second composite video and audio (VIDEO IN 2) input is located on page 16 for the signals that this TV displays all format types of picture in a resolution...
... adapter (not supplied). Component video provides better picture quality than composite video (4). HDMI supports enhanced or high-definition video plus digital audio. • If the equipment has a DVI and not a HDMI connector, use the PC IN (RGB IN) input. • HDMI connection is necessary to view 480i, 480p, 720p, and 1080i formats. A second composite video and audio (VIDEO IN 2) input is located on page 16 for the signals that this TV displays all format types of picture in a resolution...

Operating Instructions
Page 14
... the HDMI or component video (with audio) input on the back of input signal you will need to use an optional AB RF Switch (not supplied) to high-definition cable service or highdefinition satellite service. Cable and VHF/UHF (or VHF only) If you want to watch both cable and antenna (over -the-air antenna programming, as shown. For the best possible picture, connect these components to receive optimum picture quality. 3. HD Cable Box/HD Satellite Box You...
... the HDMI or component video (with audio) input on the back of input signal you will need to use an optional AB RF Switch (not supplied) to high-definition cable service or highdefinition satellite service. Cable and VHF/UHF (or VHF only) If you want to watch both cable and antenna (over -the-air antenna programming, as shown. For the best possible picture, connect these components to receive optimum picture quality. 3. HD Cable Box/HD Satellite Box You...

Operating Instructions
Page 18
... sets up the channels at Channel menu as described on page 33. If you need to turn on the screen to choose a language. Setting Up the Channel List Initial Setup After you finish connecting your TV for available channels from signal source directly connected to the TV's CABLE/ANTENNA input. 5 When Auto Program is complete, select OK to run Auto Program at a later time ❑ Use the Auto Program feature at this time, you have cable and antenna available, please connect cable...
... sets up the channels at Channel menu as described on page 33. If you need to turn on the screen to choose a language. Setting Up the Channel List Initial Setup After you finish connecting your TV for available channels from signal source directly connected to the TV's CABLE/ANTENNA input. 5 When Auto Program is complete, select OK to run Auto Program at a later time ❑ Use the Auto Program feature at this time, you have cable and antenna available, please connect cable...
Operating Instructions
Page 25
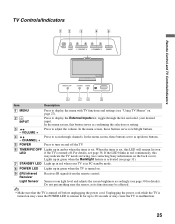
... standby mode. 8 POWER LED Lights up in red continuously, this button serves as up in red when your desired input. Lights up in green when the Backlight feature is activated (see contacting Sony information on may cause the TV to adjust the volume. Press to turn on page 27). In the menu screen, these buttons serve as confirming the selection or setting. VOLUME + 4 - Press to display the External Inputs list, toggle through channels. TV Controls/Indicators MENU Remote Control...
... standby mode. 8 POWER LED Lights up in red continuously, this button serves as up in red when your desired input. Lights up in green when the Backlight feature is activated (see contacting Sony information on may cause the TV to adjust the volume. Press to turn on page 27). In the menu screen, these buttons serve as confirming the selection or setting. VOLUME + 4 - Press to display the External Inputs list, toggle through channels. TV Controls/Indicators MENU Remote Control...
Operating Instructions
Page 33
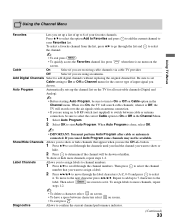
... you are using an A-B RF switch (not supplied) to go through the channel numbers. button. 1 Press V/v to scroll through the label characters (A-Z, 0-9) and press to On or Off in Channel menu for all receivable channels (Digital and Analog). • Before starting Auto Program, be shown or hidden. Be sure to set Cable setting to select it is connected. Auto Program Automatically sets up the channel list on Cable option in the Channel Menu. 1 Select Auto Program. 2 Select OK...
... you are using an A-B RF switch (not supplied) to go through the channel numbers. button. 1 Press V/v to scroll through the label characters (A-Z, 0-9) and press to On or Off in Channel menu for all receivable channels (Digital and Analog). • Before starting Auto Program, be shown or hidden. Be sure to set Cable setting to select it is connected. Auto Program Automatically sets up the channel list on Cable option in the Channel Menu. 1 Select Auto Program. 2 Select OK...
Operating Instructions
Page 37
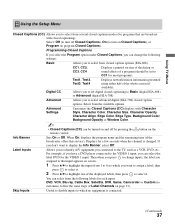
... set to CC1 for most programs). Skip Inputs Useful to disable inputs to which you want to the TV, such as a VCR, DVD, etc. Using TV Menus Using the Setup Menu Closed Captions (CC) Allows you to select from several closed captions modes (for programs that input appears on the remote control. If you have a DVD player connected to which no equipment is changed. You can be set digital closed caption options. Displays for a few seconds when the channel is connected...
... set to CC1 for most programs). Skip Inputs Useful to disable inputs to which you want to the TV, such as a VCR, DVD, etc. Using TV Menus Using the Setup Menu Closed Captions (CC) Allows you to select from several closed captions modes (for programs that input appears on the remote control. If you have a DVD player connected to which no equipment is changed. You can be set digital closed caption options. Displays for a few seconds when the channel is connected...

Operating Instructions
Page 39
.... Poor picture Double images or ghosts. ❑ Check antenna/cable connections. ❑ Check the antenna location and direction. Only snow and noise appear on the remote control. the screen. ❑ Check if the antenna has reached the end of its serviceable life. (3-5 years in the TV's memory (page 33). Perform Auto Program to add receivable channels that are not presently in normal use of your Sony TV...
.... Poor picture Double images or ghosts. ❑ Check antenna/cable connections. ❑ Check the antenna location and direction. Only snow and noise appear on the remote control. the screen. ❑ Check if the antenna has reached the end of its serviceable life. (3-5 years in the TV's memory (page 33). Perform Auto Program to add receivable channels that are not presently in normal use of your Sony TV...
Operating Instructions
Page 40
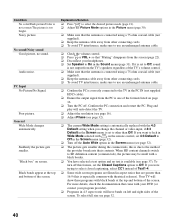
... the screen. PC Input No Picture/No Signal. "Black box" on the remote control, set to Off, sound is one of the formats listed on left and right sides of Text1-4. ❑ Some wide screen programs are greater than Off. Suddenly the picture gets smaller. If you change the channel or video input, if 4:3 Default in the Screen menu is due to select closed captioning, select CC1 instead of the screen. Condition No color/Dark picture/Color is...
... the screen. PC Input No Picture/No Signal. "Black box" on the remote control, set to Off, sound is one of the formats listed on left and right sides of Text1-4. ❑ Some wide screen programs are greater than Off. Suddenly the picture gets smaller. If you change the channel or video input, if 4:3 Default in the Screen menu is due to select closed captioning, select CC1 instead of the screen. Condition No color/Dark picture/Color is...
Operating Instructions
Page 42
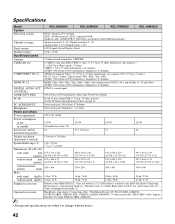
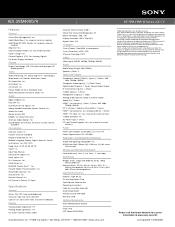
... / Wall-Mount Bracket: SU-WL100 (KDL-26M4000), SU-WL500 (KDL-32M4000, KDL-37M4000, and KDL-40M4000) / 75-ohm coaxial cable / HD15-HD15 cable / Support Belt Kit / TV Stand: RHT-S10 (KDL-40M4000) • Design and specifications are subject to the Table-Top Stand) / Operating Instructions (1) / Quick Setup Guide (1) / Warranty Card (1) / Online Registration Card (U.S.A. Specifications Model System KDL-26M4000 KDL-32M4000 KDL-37M4000 KDL-40M4000 Television system Channel coverage Panel system Speaker output Input/Output jacks Antenna VIDEO IN 1/2 COMPONENT IN 1/2 HDMI IN 1/2 DIGITAL...
... / Wall-Mount Bracket: SU-WL100 (KDL-26M4000), SU-WL500 (KDL-32M4000, KDL-37M4000, and KDL-40M4000) / 75-ohm coaxial cable / HD15-HD15 cable / Support Belt Kit / TV Stand: RHT-S10 (KDL-40M4000) • Design and specifications are subject to the Table-Top Stand) / Operating Instructions (1) / Quick Setup Guide (1) / Warranty Card (1) / Online Registration Card (U.S.A. Specifications Model System KDL-26M4000 KDL-32M4000 KDL-37M4000 KDL-40M4000 Television system Channel coverage Panel system Speaker output Input/Output jacks Antenna VIDEO IN 1/2 COMPONENT IN 1/2 HDMI IN 1/2 DIGITAL...
Operating Instructions
Page 43
... a wall 8, 9, 10, 11 J JUMP button 24 L Label Channels 33 Label Inputs 37 Language 38 Light Sensor Described 25 M Menu Channel 33 Parental Lock 34 Picture 30 Screen 32 Setup 37 Shortcuts 28 Sound 31 MENU button 22, 25 Movie Rating 36 MUTING button 22 P Parental Lock 28, 34 PC IN 13 PC-PIP 29 Phase 32 Picture 30 PICTURE button 21 Picture Mode 30 POWER button 22, 25 POWER LED 25 Product Support 38 R Rating 34 Remote Control 21, 22, 23, 24 Reset...
... a wall 8, 9, 10, 11 J JUMP button 24 L Label Channels 33 Label Inputs 37 Language 38 Light Sensor Described 25 M Menu Channel 33 Parental Lock 34 Picture 30 Screen 32 Setup 37 Shortcuts 28 Sound 31 MENU button 22, 25 Movie Rating 36 MUTING button 22 P Parental Lock 28, 34 PC IN 13 PC-PIP 29 Phase 32 Picture 30 PICTURE button 21 Picture Mode 30 POWER button 22, 25 POWER LED 25 Product Support 38 R Rating 34 Remote Control 21, 22, 23, 24 Reset...
Limited Warranty (US Only)
Page 1
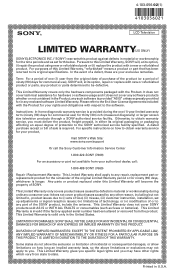
... Product for commercial use ; Instructions: In-home diagnostic warranty service is invalid if the factory-applied serial number has been altered or removed from your product, Visit SONY's Web Site: www.sony.com/support Or call the Sony Customer Information Service Center 1-800-222-SONY (7669) For an accessory or part not available from the product. it does not cover any repair, replacement part or replacement product for the...
... Product for commercial use ; Instructions: In-home diagnostic warranty service is invalid if the factory-applied serial number has been altered or removed from your product, Visit SONY's Web Site: www.sony.com/support Or call the Sony Customer Information Service Center 1-800-222-SONY (7669) For an accessory or part not available from the product. it does not cover any repair, replacement part or replacement product for the...

Quick Setup Guide
Page 1
... BRAVIA Operating Instructions Manual for the first time. 1 0/7%2 Press to turn on your remote control to the audio output of the attached speakers of channels is complete. Most HD signals use of your 1 Channel menu options appears. Sound settings will explain how to get HD programming to start scanning for Auto Program process at the Channel menu. Customize Sound and Picture Quality You can only be available. 3 Follow the help text provided on the Table-Top Stand. The Initial Setup screen...
... BRAVIA Operating Instructions Manual for the first time. 1 0/7%2 Press to turn on your remote control to the audio output of the attached speakers of channels is complete. Most HD signals use of your 1 Channel menu options appears. Sound settings will explain how to get HD programming to start scanning for Auto Program process at the Channel menu. Customize Sound and Picture Quality You can only be available. 3 Follow the help text provided on the Table-Top Stand. The Initial Setup screen...

Quick Setup Guide
Page 2
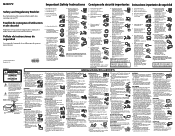
... Cable Types for Connection DVI-to-HDMI Composite Component Audio (L/R) Digital Audio (Coaxial) Mini-Pin Audio Audio (L/R) with Mini-Pin Digital Optical Audio Notes on Connection: ■ Your TV is for video signals only. The Audio jacks provide support for the audio.) ■ PIP function requires Cable/Antenna connection. ■ When receiving High-Definition content signal by over-the-air antenna, it is best to use a HDMI to DVI cable or adapter to connect the DVI output to either HDMI IN 1 or HDMI IN 2 input, and connect...
... Cable Types for Connection DVI-to-HDMI Composite Component Audio (L/R) Digital Audio (Coaxial) Mini-Pin Audio Audio (L/R) with Mini-Pin Digital Optical Audio Notes on Connection: ■ Your TV is for video signals only. The Audio jacks provide support for the audio.) ■ PIP function requires Cable/Antenna connection. ■ When receiving High-Definition content signal by over-the-air antenna, it is best to use a HDMI to DVI cable or adapter to connect the DVI output to either HDMI IN 1 or HDMI IN 2 input, and connect...
Safety and Regulatory Booklet
Page 1
... cart, stand, tripod, bracket, or table specified by the cord. ☐ Keep the power cord away from the wall outlet first. Volume Adjustment ☐ When using a chemically pretreated cloth, please follow the installation guide supplied with the Wall‑Mount Bracket when installing the TV. ☐ Be sure to your TV. LCD SCREEN ☐ Although the LCD screen is in a fire or electric shock. Changing the Picture mode, Backlight setting, enabling the Light Sensor, or turning on or...
... cart, stand, tripod, bracket, or table specified by the cord. ☐ Keep the power cord away from the wall outlet first. Volume Adjustment ☐ When using a chemically pretreated cloth, please follow the installation guide supplied with the Wall‑Mount Bracket when installing the TV. ☐ Be sure to your TV. LCD SCREEN ☐ Although the LCD screen is in a fire or electric shock. Changing the Picture mode, Backlight setting, enabling the Light Sensor, or turning on or...
Marketing Specifications (Red Model)
Page 2
... (PSIP, XDS) Sleep Timer: 15, 30, 45, 60, 90, Off Clock: Yes Input Skip: Manual Edit Channel Labels: Yes Label Inputs: Yes ID-1 Detection: Yes Initial Setup: Yes BRAVIA® Theatre Sync™ : Yes Theatre Mode (Theatre Button): Yes Show/Hide Channels: Yes Auto Shut-off: Yes Parental Control: Yes PIP (Picture in Picture): PC Input Specifications General Screen Size: 26" (measured diagonally) Television Type: Flat Panel LCD HDTV Type of Use: Consumer, Hotel (via external Module) Display Viewing Angle (Right/Left...
... (PSIP, XDS) Sleep Timer: 15, 30, 45, 60, 90, Off Clock: Yes Input Skip: Manual Edit Channel Labels: Yes Label Inputs: Yes ID-1 Detection: Yes Initial Setup: Yes BRAVIA® Theatre Sync™ : Yes Theatre Mode (Theatre Button): Yes Show/Hide Channels: Yes Auto Shut-off: Yes Parental Control: Yes PIP (Picture in Picture): PC Input Specifications General Screen Size: 26" (measured diagonally) Television Type: Flat Panel LCD HDTV Type of Use: Consumer, Hotel (via external Module) Display Viewing Angle (Right/Left...


