Operating Instructions
Page 3
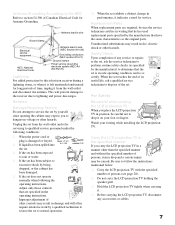
... connected to the grounding system of the building, as close to the point of cable entry as practical. This equipment generates, uses, and can be of sufficient magnitude to comply with your projection TV, keep the brightness and contrast functions at a high brightness or contrast setting, the image can cause the imprint of time at low settings. REFER SERVICING TO QUALIFIED SERVICE PERSONNEL. Note on the screen...
... connected to the grounding system of the building, as close to the point of cable entry as practical. This equipment generates, uses, and can be of sufficient magnitude to comply with your projection TV, keep the brightness and contrast functions at a high brightness or contrast setting, the image can cause the imprint of time at low settings. REFER SERVICING TO QUALIFIED SERVICE PERSONNEL. Note on the screen...
Operating Instructions
Page 4
... cable operator is recommended to a cable system providing such programming. This television also includes a QAM demodulator which should fall inside the cabinet, unplug the LCD projection TV immediately and have it checked by direct connection to use of receiving analog basic, digital basic and digital premium cable television programming by qualified service personnel before turning on the LCD projection TV. ❑ To obtain the best picture, do not block the ventilation openings. ❑ Do not install...
... cable operator is recommended to a cable system providing such programming. This television also includes a QAM demodulator which should fall inside the cabinet, unplug the LCD projection TV immediately and have it checked by direct connection to use of receiving analog basic, digital basic and digital premium cable television programming by qualified service personnel before turning on the LCD projection TV. ❑ To obtain the best picture, do not block the ventilation openings. ❑ Do not install...
Operating Instructions
Page 5
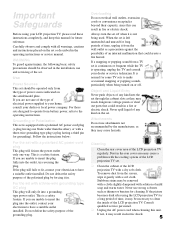
... of electrical power supplied to operate from the type of the LCD projection TV. For those sets designed to your home, consult your LCD projection TV, please read these instructions completely, and keep this manual for future reference. If the picture becomes dark after using your dealer or local power company. Important Safeguards Before using the LCD projection TV for a long period of time, it may be observed in the installation, use attachments not...
... of electrical power supplied to operate from the type of the LCD projection TV. For those sets designed to your home, consult your LCD projection TV, please read these instructions completely, and keep this manual for future reference. If the picture becomes dark after using your dealer or local power company. Important Safeguards Before using the LCD projection TV for a long period of time, it may be observed in the installation, use attachments not...
Operating Instructions
Page 7
... the LCD projection TV, disconnect any service or repairs to the set, ask the service technician to perform routine safety checks (as the original parts. This will often require extensive work by the manufacturer) to determine that are required, be careful not to drop it from the wall outlet and refer servicing to qualified service personnel under the following the operating instructions. Adjust only those controls...
... the LCD projection TV, disconnect any service or repairs to the set, ask the service technician to perform routine safety checks (as the original parts. This will often require extensive work by the manufacturer) to determine that are required, be careful not to drop it from the wall outlet and refer servicing to qualified service personnel under the following the operating instructions. Adjust only those controls...
Operating Instructions
Page 8
... the best picture quality, install your LCD projection TV according to avoid injury from behind the screen. The noise may hear a noticeable pop sound. Servicing is required when the apparatus has been damaged in red, • screen images become dark, • no image appears on the display after prolonged use caution when moving the cart/apparatus combination to "Recommended Viewing Area" on page 30. ❑ When installing your LCD projection TV, and...
... the best picture quality, install your LCD projection TV according to avoid injury from behind the screen. The noise may hear a noticeable pop sound. Servicing is required when the apparatus has been damaged in red, • screen images become dark, • no image appears on the display after prolonged use caution when moving the cart/apparatus combination to "Recommended Viewing Area" on page 30. ❑ When installing your LCD projection TV, and...
Operating Instructions
Page 9
... 46 DVD Player with S VIDEO and Audio Connectors 47 Camcorder 48 Audio Receiver 49 Digital Cable Box 50 Digital Satellite Receiver 51 Digital Satellite Receiver with HDMI Connector 52 Connecting a Device with an Optical IN Connector 54 Using the CONTROL S Feature 55 Using CableCARD 56 About Using CableCARD 56 Activating CableCARD Service 56 Removing the CableCARD 57 Setting Up the LCD Projection TV Channel List..58 Using Initial Setup 58 Using the Remote Control Overview 59 Inserting Batteries into the Remote Control ..........59 Button Descriptions 60 Programming the Remote...
... 46 DVD Player with S VIDEO and Audio Connectors 47 Camcorder 48 Audio Receiver 49 Digital Cable Box 50 Digital Satellite Receiver 51 Digital Satellite Receiver with HDMI Connector 52 Connecting a Device with an Optical IN Connector 54 Using the CONTROL S Feature 55 Using CableCARD 56 About Using CableCARD 56 Activating CableCARD Service 56 Removing the CableCARD 57 Setting Up the LCD Projection TV Channel List..58 Using Initial Setup 58 Using the Remote Control Overview 59 Inserting Batteries into the Remote Control ..........59 Button Descriptions 60 Programming the Remote...
Operating Instructions
Page 11
... begin using the program guide, Wide Screen Mode, Twin View, Favorite Channels and Freeze Function. 4 Using the Memory Stick Viewer This section shows you how to connect your new LCD projection TV, the packing box contains a remote control and two AA (R6) batteries. Similar controls are written for purchasing the Sony LCD projection TV. Introducing the Sony LCD Projection TV Introducing the Sony LCD Projection TV Presenting the Sony LCD Projection TV Thank you for the remote control. This manual is for models KDF-42WE655, KDF-50WE655, KDF55WF655 and KDF...
... begin using the program guide, Wide Screen Mode, Twin View, Favorite Channels and Freeze Function. 4 Using the Memory Stick Viewer This section shows you how to connect your new LCD projection TV, the packing box contains a remote control and two AA (R6) batteries. Similar controls are written for purchasing the Sony LCD projection TV. Introducing the Sony LCD Projection TV Introducing the Sony LCD Projection TV Presenting the Sony LCD Projection TV Thank you for the remote control. This manual is for models KDF-42WE655, KDF-50WE655, KDF55WF655 and KDF...
Operating Instructions
Page 12
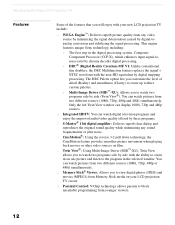
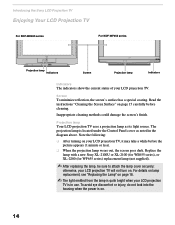
... signal's NTSC waveform with the near-HD equivalent by side with your LCD projection TV screen. ❑ Parental Control: V-Chip technology allows parents to the program in on one picture and listen to block unsuitable programming from younger viewers. 12 Only the left Twin View window can display 1080i, 720p and 480p sources. ❑ Integrated HDTV: You can watch digital television programs and enjoy the improved audio/video...
... signal's NTSC waveform with the near-HD equivalent by side with your LCD projection TV screen. ❑ Parental Control: V-Chip technology allows parents to the program in on one picture and listen to block unsuitable programming from younger viewers. 12 Only the left Twin View window can display 1080i, 720p and 480p sources. ❑ Integrated HDTV: You can watch digital television programs and enjoy the improved audio/video...
Operating Instructions
Page 13
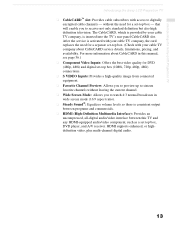
...:9 aspect ratio). ❑ Steady Sound®: Equalizes volume levels so there is inserted into the TV's rear panel CableCARD slot. After the service is activated with your cable TV company, is consistent output between programs and commercials. ❑ HDMI (High-Definition Multimedia Interface): Provides an uncompressed, all-digital audio/video interface between this manual, see page 56.) ❑ Component Video Inputs: Offers the best video quality for DVD (480p, 480i) and digital set -top box...
...:9 aspect ratio). ❑ Steady Sound®: Equalizes volume levels so there is inserted into the TV's rear panel CableCARD slot. After the service is activated with your cable TV company, is consistent output between programs and commercials. ❑ HDMI (High-Definition Multimedia Interface): Provides an uncompressed, all-digital audio/video interface between this manual, see page 56.) ❑ Component Video Inputs: Offers the best video quality for DVD (480p, 480i) and digital set -top box...
Operating Instructions
Page 14
... of your LCD projection TV will not turn on . 14 Note the following: ❑ After turning on page 15 carefully before the picture appears (1 minute or less). ❑ When the projection lamp wears out, the screen goes dark. To avoid eye discomfort or injury, do not look into the housing when the power is located under the Control Panel cover as its light source. Inappropriate cleaning methods could...
... of your LCD projection TV will not turn on . 14 Note the following: ❑ After turning on page 15 carefully before the picture appears (1 minute or less). ❑ When the projection lamp wears out, the screen goes dark. To avoid eye discomfort or injury, do not look into the housing when the power is located under the Control Panel cover as its light source. Inappropriate cleaning methods could...
Operating Instructions
Page 17
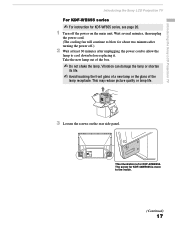
... touching the front glass of a new lamp or the glass of the box. ✍ Do not shake the lamp. Introducing the Sony LCD Projection TV Introducing the Sony LCD Projection TV For KDF-WE655 series ✍ For instruction for KDF-WF655 series, see page 20. 1 Turn off .) 2 Wait at least 30 minutes after turning the power off the power on the rear side panel. This illustration is more to cool down before replacing it.
... touching the front glass of a new lamp or the glass of the box. ✍ Do not shake the lamp. Introducing the Sony LCD Projection TV Introducing the Sony LCD Projection TV For KDF-WE655 series ✍ For instruction for KDF-WF655 series, see page 20. 1 Turn off .) 2 Wait at least 30 minutes after turning the power off the power on the rear side panel. This illustration is more to cool down before replacing it.
Operating Instructions
Page 20
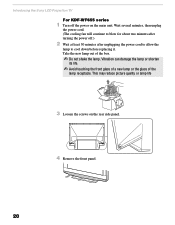
... main unit. Introducing the Sony LCD Projection TV For KDF-WF655 series 1 Turn off .) 2 Wait at least 30 minutes after turning the power off the power on the rear side panel. 20 4 Remove the front panel. Wait several minutes, then unplug the power cord. (The cooling fan will continue to blow for about two minutes after unplugging the power cord to allow the lamp to cool down before replacing it. STD/DUO PRO...
... main unit. Introducing the Sony LCD Projection TV For KDF-WF655 series 1 Turn off .) 2 Wait at least 30 minutes after turning the power off the power on the rear side panel. 20 4 Remove the front panel. Wait several minutes, then unplug the power cord. (The cooling fan will continue to blow for about two minutes after unplugging the power cord to allow the lamp to cool down before replacing it. STD/DUO PRO...
Operating Instructions
Page 26
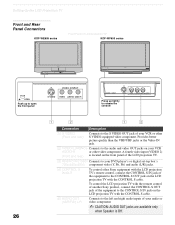
... audio inputs of your DVD player's or digital set-top box's 720p/480p/480i) component video (Y, PB, PR) and audio (L/R) jacks. 4 CONTROL S IN/OUT To control other Sony equipment with the CONTROL S cable. Setting Up the LCD Projection TV Front and Rear Panel Connectors KDF-WE655 series Front Panel of LCD projection TV KDF-WF655 series VIDEO 2 INPUT S-VIDEO VIDEO L(MONO) -AUDIO-R POWER STANDBY TIMER LAMP LAMP STD/DUO PRO POWER TIMER POWER/STANDBY OPEN Push up to open the front panel VIDEO 2 INPUT S-VIDEO VIDEO L(MONO) -AUDIO-R VIDEO 2 INPUT S VIDEO VIDEO L (MONO) R AUDIO...
... audio inputs of your DVD player's or digital set-top box's 720p/480p/480i) component video (Y, PB, PR) and audio (L/R) jacks. 4 CONTROL S IN/OUT To control other Sony equipment with the CONTROL S cable. Setting Up the LCD Projection TV Front and Rear Panel Connectors KDF-WE655 series Front Panel of LCD projection TV KDF-WF655 series VIDEO 2 INPUT S-VIDEO VIDEO L(MONO) -AUDIO-R POWER STANDBY TIMER LAMP LAMP STD/DUO PRO POWER TIMER POWER/STANDBY OPEN Push up to open the front panel VIDEO 2 INPUT S-VIDEO VIDEO L(MONO) -AUDIO-R VIDEO 2 INPUT S VIDEO VIDEO L (MONO) R AUDIO...
Operating Instructions
Page 27
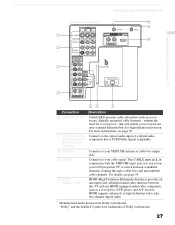
..., all-digital audio/video interface between this TV and any HDMI-equipped audio/video component, such as a set up your VHF/UHF antenna or cable box output jack. that is PCM/Dolby digital compatible. Connects to your LCD projection TV to the optical audio input of a digital audio component that will enable you set -top box, DVD player, and A/V receiver. Setting Up the LCD Projection TV Setting Up the LCD Projection TV 1 2 3 4 Rear of Dolby Laboratories. 27 without the need for a set-top box - Connects to switch between scrambled channels (coming through a cable box) and...
..., all-digital audio/video interface between this TV and any HDMI-equipped audio/video component, such as a set up your VHF/UHF antenna or cable box output jack. that is PCM/Dolby digital compatible. Connects to your LCD projection TV to the optical audio input of a digital audio component that will enable you set -top box, DVD player, and A/V receiver. Setting Up the LCD Projection TV Setting Up the LCD Projection TV 1 2 3 4 Rear of Dolby Laboratories. 27 without the need for a set-top box - Connects to switch between scrambled channels (coming through a cable box) and...
Operating Instructions
Page 50
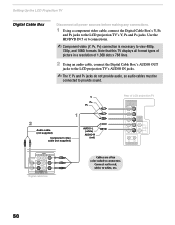
... supplied) Component video cable (not supplied) AUDIO-L (white) AUDIO-R (red) Rear of 1,368 dots x 768 lines. 2 Using an audio cable, connect the Digital Cable Box's AUDIO OUT jacks to the LCD projection TV's AUDIO IN jacks. ✍ The Y, PB and PR jacks do not provide audio, so audio cables must be connected to provide sound. Note that this TV displays all power sources before making any connections. 1 Using a component video cable, connect the Digital Cable Box's Y, PB and PR jacks to view 480p, 720p, and 1080i formats. Setting Up the LCD Projection TV Digital Cable Box...
... supplied) Component video cable (not supplied) AUDIO-L (white) AUDIO-R (red) Rear of 1,368 dots x 768 lines. 2 Using an audio cable, connect the Digital Cable Box's AUDIO OUT jacks to the LCD projection TV's AUDIO IN jacks. ✍ The Y, PB and PR jacks do not provide audio, so audio cables must be connected to provide sound. Note that this TV displays all power sources before making any connections. 1 Using a component video cable, connect the Digital Cable Box's Y, PB and PR jacks to view 480p, 720p, and 1080i formats. Setting Up the LCD Projection TV Digital Cable Box...
Operating Instructions
Page 119
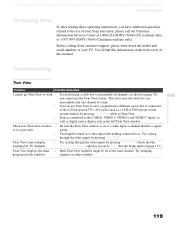
...). Other Information 119 Before calling Sony customer support, please write down the model and serial numbers of your TV. Try changing program in both windows channels in the second window by pressing TV/VIDEO. Troubleshooting Twin View Problem Possible Remedies I cannot get Twin View to work ❏ If you are using a cable box to the same channel. This is because the cable box can use Twin View to view a signal from a different source that has...
...). Other Information 119 Before calling Sony customer support, please write down the model and serial numbers of your TV. Try changing program in both windows channels in the second window by pressing TV/VIDEO. Troubleshooting Twin View Problem Possible Remedies I cannot get Twin View to work ❏ If you are using a cable box to the same channel. This is because the cable box can use Twin View to view a signal from a different source that has...
Operating Instructions
Page 123
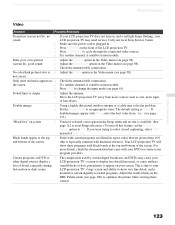
... another channel; "Black box" on DVD or ❏ The compression used by certain digital broadcasts and DVDs may solve the problem. ❏ Set the Image Shift to change the input mode (see page 61). Other Information 123 No color/dark picture/color is Auto. Call your program provider). Dotted lines or stripes ❏ Adjust the antenna. ❏ Move the LCD projection TV away from 1 to optimize the picture while viewing these programs with Auto, select the best value from noise sources...
... another channel; "Black box" on DVD or ❏ The compression used by certain digital broadcasts and DVDs may solve the problem. ❏ Set the Image Shift to change the input mode (see page 61). Other Information 123 No color/dark picture/color is Auto. Call your program provider). Dotted lines or stripes ❏ Adjust the antenna. ❏ Move the LCD projection TV away from 1 to optimize the picture while viewing these programs with Auto, select the best value from noise sources...
Operating Instructions
Page 124
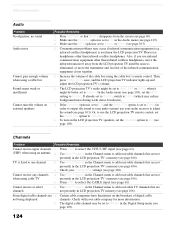
... antenna ❏ Use Auto Program in the Channel menu to add receivable channels that are ❏ Certain cable companies have limitations on the broadcast of digital cable not being displayed channels. Other Information Audio Problem Good picture, no sound Audio noise Cannot gain enough volume when using a cable box Sound seems weak or insufficient Cannot raise the volume on external speakers Possible Remedies ❏ Press MUTING so that Muting disappears from the LCD projection TV until the noise is used near the LCD projection TV. Channels Problem...
... antenna ❏ Use Auto Program in the Channel menu to add receivable channels that are ❏ Certain cable companies have limitations on the broadcast of digital cable not being displayed channels. Other Information Audio Problem Good picture, no sound Audio noise Cannot gain enough volume when using a cable box Sound seems weak or insufficient Cannot raise the volume on external speakers Possible Remedies ❏ Press MUTING so that Muting disappears from the LCD projection TV until the noise is used near the LCD projection TV. Channels Problem...
Operating Instructions
Page 130
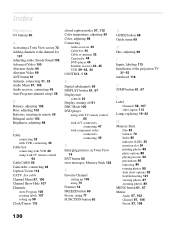
... View screen 72 Adding channels to the channel list 107 Adjusting audio, Steady Sound 102 Advanced Video 100 Alternate Audio 69 Alternate Video 69 ANT button 61 Antenna, connecting 31, 32 Audio Menu 97, 102 Audio receiver, connecting 49 Auto Program (channel setup) 58 B Balance, adjusting 102 Bass, adjusting 102 Batteries, inserting in remote 59 Bilingual audio 103 Brightness, adjusting 98 C Cable connecting 32 with VCR, connecting 39 Cable box connecting with VCR 40 using with component video connectors, connecting 46 E Enlarging pictures, in Twin View 74 ENT button 60 error messages...
... View screen 72 Adding channels to the channel list 107 Adjusting audio, Steady Sound 102 Advanced Video 100 Alternate Audio 69 Alternate Video 69 ANT button 61 Antenna, connecting 31, 32 Audio Menu 97, 102 Audio receiver, connecting 49 Auto Program (channel setup) 58 B Balance, adjusting 102 Bass, adjusting 102 Batteries, inserting in remote 59 Bilingual audio 103 Brightness, adjusting 98 C Cable connecting 32 with VCR, connecting 39 Cable box connecting with VCR 40 using with component video connectors, connecting 46 E Enlarging pictures, in Twin View 74 ENT button 60 error messages...

Operating Instructions
Page 131
... Password, changing 109 PICTURE button 60 Picture contrast, adjusting 98 Picture size, adjusting in Twin View 74 POWER ON/STAND BY indicator 25, 126 POWER/STANDBY 126 problems, troubleshooting 119- 125 Program Guide 69 Program Options menu 69 progressive 118 Protect 88 R Ratings setting 110 viewing blocked programs 109 Rear panel controls and connections 27 Remote control inserting batteries 59 programming 62-63 Removing channels from the channel list 107 RESET button 60 Resetting Audio options 102 Video options 98 S Satellite receiver connecting 43 using with TV remote control 64 Screen Menu...
... Password, changing 109 PICTURE button 60 Picture contrast, adjusting 98 Picture size, adjusting in Twin View 74 POWER ON/STAND BY indicator 25, 126 POWER/STANDBY 126 problems, troubleshooting 119- 125 Program Guide 69 Program Options menu 69 progressive 118 Protect 88 R Ratings setting 110 viewing blocked programs 109 Rear panel controls and connections 27 Remote control inserting batteries 59 programming 62-63 Removing channels from the channel list 107 RESET button 60 Resetting Audio options 102 Video options 98 S Satellite receiver connecting 43 using with TV remote control 64 Screen Menu...


