
User Guide
Page 2
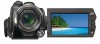
...illustration purposes are captured using a digital still camera, and therefore may appear different from images and screen indicators that actually appear on your camcorder. The HDR-XR520V is used for information quickly Click an item on how to use Adobe Reader. You can search for that is ... right edge of each page, and you will jump to the page for an item by keyword using Adobe Reader. Information on using your camcorder connected to the Operating Guide (a separate volume). Read the Handycam Handbook in addition to a computer will be found in the Operating Guide and...
...illustration purposes are captured using a digital still camera, and therefore may appear different from images and screen indicators that actually appear on your camcorder. The HDR-XR520V is used for information quickly Click an item on how to use Adobe Reader. You can search for that is ... right edge of each page, and you will jump to the page for an item by keyword using Adobe Reader. Information on using your camcorder connected to the Operating Guide (a separate volume). Read the Handycam Handbook in addition to a computer will be found in the Operating Guide and...

User Guide
Page 3
...Using the OPTION MENU 12 Menu lists 13 List of the HOME MENU 13 List of the OPTION MENU 14 Read this before operating your camcorder 15 Notes on using the Hard Disk Drive Handycam 16 Getting started Step 1: Charging the battery pack 18 Step 2: Turning the power on,... Using the Handycam Handbook 2 Searching for recording movies and photos 34 Zooming 34 Recording sound with more presence (5.1ch surround recording 34 Recording high quality photos during movie recording (Dual Rec 35 Recording in dark places (NightShot/LOW LUX 35 Recording in mirror mode 36 Recording fast action...
...Using the OPTION MENU 12 Menu lists 13 List of the HOME MENU 13 List of the OPTION MENU 14 Read this before operating your camcorder 15 Notes on using the Hard Disk Drive Handycam 16 Getting started Step 1: Charging the battery pack 18 Step 2: Turning the power on,... Using the Handycam Handbook 2 Searching for recording movies and photos 34 Zooming 34 Recording sound with more presence (5.1ch surround recording 34 Recording high quality photos during movie recording (Dual Rec 35 Recording in dark places (NightShot/LOW LUX 35 Recording in mirror mode 36 Recording fast action...

User Guide
Page 4
Table of Contents Useful Recording Techniques Acquiring location information (GPS) (HDR-XR500V/XR520V 39 Playback on the camcorder 41 Playing movies 41 Viewing photos 43 Useful functions for playing movies and photos 44 Searching for a desired scene by recording location... a movie 64 Using the Playlist of movies 65 Creating the Playlist 65 Playing the Playlist 66 Creating a disc with a DVD writer, recorder 67 Creating a high definition image quality (HD) disc with a DVD writer, etc. (USB cable connection 67 Creating a standard definition image quality (SD) disc with a recorder,...
Table of Contents Useful Recording Techniques Acquiring location information (GPS) (HDR-XR500V/XR520V 39 Playback on the camcorder 41 Playing movies 41 Viewing photos 43 Useful functions for playing movies and photos 44 Searching for a desired scene by recording location... a movie 64 Using the Playlist of movies 65 Creating the Playlist 65 Playing the Playlist 66 Creating a disc with a DVD writer, recorder 67 Creating a high definition image quality (HD) disc with a DVD writer, etc. (USB cable connection 67 Creating a standard definition image quality (SD) disc with a recorder,...

User Guide
Page 5
...time of recording and playback with each battery pack 119 Expected recording time of movies 120 Expected number of recordable photos 121 Using your camcorder abroad 122 File/folder structure on the internal hard disk and "Memory Stick PRO Duo" media ...124 Maintenance and precautions 125 About... the AVCHD format 125 About GPS (HDR-XR500V/XR520V 126 About "Memory Stick" media 127 About the "InfoLITHIUM" battery pack 129 About x.v.Color 130 About handling of Contents Useful Recording...
...time of recording and playback with each battery pack 119 Expected recording time of movies 120 Expected number of recordable photos 121 Using your camcorder abroad 122 File/folder structure on the internal hard disk and "Memory Stick PRO Duo" media ...124 Maintenance and precautions 125 About... the AVCHD format 125 About GPS (HDR-XR500V/XR520V 126 About "Memory Stick" media 127 About the "InfoLITHIUM" battery pack 129 About x.v.Color 130 About handling of Contents Useful Recording...

User Guide
Page 7
...67) HDMI OUT (mini) jack (51) Remote sensor/Infrared port Point the Wireless Remote Commander (p. 9) towards the remote sensor to operate your camcorder. Lens (G lens) Flash (79, 83) Camera recording lamp (98) The camera recording lamp lights up in ( ) are recording movies ...with your camcorder. The accessory can close the LCD panel with the LCD screen facing out. Refer to the end, and then tighten the screw. To remove an ...
...67) HDMI OUT (mini) jack (51) Remote sensor/Infrared port Point the Wireless Remote Commander (p. 9) towards the remote sensor to operate your camcorder. Lens (G lens) Flash (79, 83) Camera recording lamp (98) The camera recording lamp lights up in ( ) are recording movies ...with your camcorder. The accessory can close the LCD panel with the LCD screen facing out. Refer to the end, and then tighten the screw. To remove an ...
User Guide
Page 8
...; DISP (display) button (38) EASY button (24, 25) GPS switch (HDR-XR500V/XR520V) (39) Access lamp ("Memory Stick PRO Duo" media) (70) While the lamp is lit or flashing, the camcorder is reading or writing data. "Memory Stick Duo" media slot (70) Battery ...Viewfinder lens adjustment lever (31) (Movie)/ (Photo) lamps (21) ACCESS lamp (Hard disk) (18) While the lamp is lit or flashing, the camcorder is reading or writing data. /CHG (flash/charge) lamp (18) START/STOP button (25, 30) DC IN jack (18) ...
...; DISP (display) button (38) EASY button (24, 25) GPS switch (HDR-XR500V/XR520V) (39) Access lamp ("Memory Stick PRO Duo" media) (70) While the lamp is lit or flashing, the camcorder is reading or writing data. "Memory Stick Duo" media slot (70) Battery ...Viewfinder lens adjustment lever (31) (Movie)/ (Photo) lamps (21) ACCESS lamp (Hard disk) (18) While the lamp is lit or flashing, the camcorder is reading or writing data. /CHG (flash/charge) lamp (18) START/STOP button (25, 30) DC IN jack (18) ...

User Guide
Page 9
...CODE button (90) Displays the date and time, camera setting data, or coordinates (HDR-XR500V/XR520V) of the recorded images when you press this button during playback. When you...buttons When you press any of these buttons, the orange frame appears on the tab, inset your camcorder (p. 9). When no commands have been sent from the Wireless Remote Commander within a ...button (26, 32) The on-screen image when you press this case, replace the battery with a Sony CR2025 lithium battery. Wireless Remote Commander Notes Remove the insulation sheet before using To ...
...CODE button (90) Displays the date and time, camera setting data, or coordinates (HDR-XR500V/XR520V) of the recorded images when you press this button during playback. When you...buttons When you press any of these buttons, the orange frame appears on the tab, inset your camcorder (p. 9). When no commands have been sent from the Wireless Remote Commander within a ...button (26, 32) The on-screen image when you press this case, replace the battery with a Sony CR2025 lithium battery. Wireless Remote Commander Notes Remove the insulation sheet before using To ...

User Guide
Page 12
...advantage of two types of menus Using the HOME MENU When you right-click the mouse on the HOME MENU screen. (The bottom of your camcorder, etc. (HOME) (HOME) button Using the HELP function To see the descriptions on the HOME MENU, touch (HELP) on a computer. ...the item is not on the screen, touch /. To return to change the settings of Contents " HOME" and " OPTION" - Table of your camcorder at the time. 12 You can change in the context appears. (OPTION) Touch the desired category the menu item to be no tab...
...advantage of two types of menus Using the HOME MENU When you right-click the mouse on the HOME MENU screen. (The bottom of your camcorder, etc. (HOME) (HOME) button Using the HELP function To see the descriptions on the HOME MENU, touch (HELP) on a computer. ...the item is not on the screen, touch /. To return to change the settings of Contents " HOME" and " OPTION" - Table of your camcorder at the time. 12 You can change in the context appears. (OPTION) Touch the desired category the menu item to be no tab...
User Guide
Page 15
...shock or vibration to the camcorder When connecting your camcorder to another device with this before operating your camcorder Battery pack Table of Contents Useful Recording Techniques Supplied items The numbers in the correct way. See "About handling of an airplane (HDR-XR500V/XR520V). Viewfinder LCD ...screen Shoe cover The camcorder is set to OFF during take off and landing of your camcorder" (p. 130). Do not do not hold the camcorder by the jack covers. Pushing the plug ...
...shock or vibration to the camcorder When connecting your camcorder to another device with this before operating your camcorder Battery pack Table of Contents Useful Recording Techniques Supplied items The numbers in the correct way. See "About handling of an airplane (HDR-XR500V/XR520V). Viewfinder LCD ...screen Shoe cover The camcorder is set to OFF during take off and landing of your camcorder" (p. 130). Do not do not hold the camcorder by the jack covers. Pushing the plug ...

User Guide
Page 16
...warning. It is recommended that appear constantly in the viewfinder and on other devices Your camcorder is compatible with MPEG4 AVC/H.264 High Profile for high definition image quality (HD) recording. Index 16 However, there may be possible. ...camcorder if necessary (p. 22). Black point White, red, blue or green point Exposing the LCD screen, the viewfinder, or the lens to the copyright laws. DVD media containing AVCHD footage may be used for illustrating the operating procedures. Change the screen language before using a VCR, or a DVD/HDD...
...warning. It is recommended that appear constantly in the viewfinder and on other devices Your camcorder is compatible with MPEG4 AVC/H.264 High Profile for high definition image quality (HD) recording. Index 16 However, there may be possible. ...camcorder if necessary (p. 22). Black point White, red, blue or green point Exposing the LCD screen, the viewfinder, or the lens to the copyright laws. DVD media containing AVCHD footage may be used for illustrating the operating procedures. Change the screen language before using a VCR, or a DVD/HDD...
User Guide
Page 17
... from the hard disk completely. Images cannot be able to format the hard disk or music file storage area of the camcorder using the camcorder at high altitudes Do not turn on the recording media. Index 17 If the drop sensor catches a drop repeatedly, recording.../ playback may damage the hard disk drive of data occurs on the camcorder in such situations. Note on operating temperatures When the temperature of the camcorder becomes extremely high or extremely low, you repeat recording/deleting images for a long time, fragmentation of your...
... from the hard disk completely. Images cannot be able to format the hard disk or music file storage area of the camcorder using the camcorder at high altitudes Do not turn on the recording media. Index 17 If the drop sensor catches a drop repeatedly, recording.../ playback may damage the hard disk drive of data occurs on the camcorder in such situations. Note on operating temperatures When the temperature of the camcorder becomes extremely high or extremely low, you repeat recording/deleting images for a long time, fragmentation of your...
User Guide
Page 18
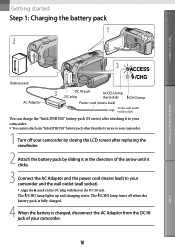
... screen after replacing the viewfinder. 2 Attach the battery pack by sliding it clicks. 3 Connect the AC Adaptor and the power cord (mains lead) to your camcorder. 1 Turn off when the battery pack is fully charged. 4 When the battery is charged, disconnect the AC Adaptor from the DC IN jack of the... arrow until it in the direction of your camcorder and the wall outlet (wall socket). Align the mark on the DC plug with that on the DC IN jack.
... screen after replacing the viewfinder. 2 Attach the battery pack by sliding it clicks. 3 Connect the AC Adaptor and the power cord (mains lead) to your camcorder. 1 Turn off when the battery pack is fully charged. 4 When the battery is charged, disconnect the AC Adaptor from the DC IN jack of the... arrow until it in the direction of your camcorder and the wall outlet (wall socket). Align the mark on the DC plug with that on the DC IN jack.

User Guide
Page 19
...the LCD screen. Battery pack NP-FH50 NP-FH60 (supplied) NP-FH70 NP-FH100 Charging time 135 135 170 390 Time measured with the camcorder at the upper left on the LCD screen. Even if the battery pack is attached, the battery pack is recommended. Slide the BATT (battery) ...Charging the battery pack abroad You can check the approximate amount of Contents See page 119 on recording and playing time. When your camcorder is on the battery pack When you remove the battery pack or disconnect the AC Adaptor, replace the viewfinder, close the LCD screen and...
...the LCD screen. Battery pack NP-FH50 NP-FH60 (supplied) NP-FH70 NP-FH100 Charging time 135 135 170 390 Time measured with the camcorder at the upper left on the LCD screen. Even if the battery pack is attached, the battery pack is recommended. Slide the BATT (battery) ...Charging the battery pack abroad You can check the approximate amount of Contents See page 119 on recording and playing time. When your camcorder is on the battery pack When you remove the battery pack or disconnect the AC Adaptor, replace the viewfinder, close the LCD screen and...
User Guide
Page 20
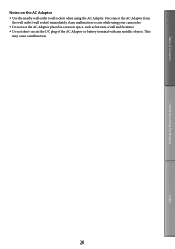
This may cause a malfunction. 20 Index Table of the AC Adaptor or battery terminal with any metallic objects. Disconnect the AC Adaptor from the wall outlet (wall socket) immediately if any malfunction occurs while using your camcorder. Do not use the AC Adaptor placed in a narrow space, such as between a wall and furniture. Do not short-circuit the DC plug of Contents Useful Recording Techniques Notes on the AC Adaptor Use the nearby wall outlet (wall socket) when using the AC Adaptor.
This may cause a malfunction. 20 Index Table of the AC Adaptor or battery terminal with any metallic objects. Disconnect the AC Adaptor from the wall outlet (wall socket) immediately if any malfunction occurs while using your camcorder. Do not use the AC Adaptor placed in a narrow space, such as between a wall and furniture. Do not short-circuit the DC plug of Contents Useful Recording Techniques Notes on the AC Adaptor Use the nearby wall outlet (wall socket) when using the AC Adaptor.
User Guide
Page 21
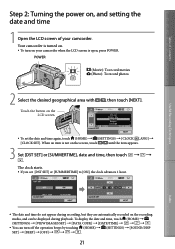
... CODE] [DATE/TIME You can be displayed during recording, but they are automatically recorded on the recording media, and can turn on your camcorder. Your camcorder is turned on. To turn off the operation beeps by touching (HOME) (SETTINGS) [SOUND/DISP SET] [BEEP] [OFF 21... area with / , then touch [NEXT]. Table of Contents Step 2: Turning the power on, and setting the date and time 1 Open the LCD screen of your camcorder when the LCD screen is open, press POWER.
... CODE] [DATE/TIME You can be displayed during recording, but they are automatically recorded on the recording media, and can turn on your camcorder. Your camcorder is turned on. To turn off the operation beeps by touching (HOME) (SETTINGS) [SOUND/DISP SET] [BEEP] [OFF 21... area with / , then touch [NEXT]. Table of Contents Step 2: Turning the power on, and setting the date and time 1 Open the LCD screen of your camcorder when the LCD screen is open, press POWER.
User Guide
Page 22
...screen or the viewfinder The power of the camcorder is turned on or off depending on the country/region selected for a few seconds, and the power is turned POWER You can change the on-screen displays to [OFF] (HDR-XR500V/XR520V). The clock may not be ...adjusted to the original position. Touch (HOME) (SETTINGS) [CLOCK/ LANG] [ LANGUAGE SET] a desired language 22 Index Table of Contents If the button you turn off your camcorder. LCD screen Open Closed...
...screen or the viewfinder The power of the camcorder is turned on or off depending on the country/region selected for a few seconds, and the power is turned POWER You can change the on-screen displays to [OFF] (HDR-XR500V/XR520V). The clock may not be ...adjusted to the original position. Touch (HOME) (SETTINGS) [CLOCK/ LANG] [ LANGUAGE SET] a desired language 22 Index Table of Contents If the button you turn off your camcorder. LCD screen Open Closed...
User Guide
Page 23
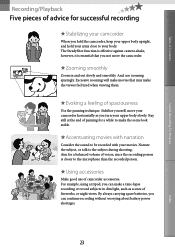
...your body. Accentuating movies with narration Consider the sound to the subject during shooting. By always carrying spare batteries, you not move your camcorder horizontally as scenes of fireworks, or night views. Narrate the subject, or talk to be recorded with your movies. Aim for a... balanced volume of spaciousness Use the panning technique. And, use of camcorder accessories. Excessive zooming will make movies that you can make the scene look stable. Using accessories Make good use zooming sparingly. Stabilize ...
...your body. Accentuating movies with narration Consider the sound to the subject during shooting. By always carrying spare batteries, you not move your camcorder horizontally as scenes of fireworks, or night views. Narrate the subject, or talk to be recorded with your movies. Aim for a... balanced volume of spaciousness Use the panning technique. And, use of camcorder accessories. Excessive zooming will make movies that you can make the scene look stable. Using accessories Make good use zooming sparingly. Stabilize ...
User Guide
Page 24
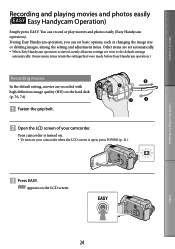
... the LCD screen of Contents Useful Recording Techniques Recording and playing movies and photos easily ( Easy Handycam Operation) Simply press EASY. Your camcorder is started, nearly all menu settings are reset to the default settings automatically. (Some menu items retain the settings that were made before...set basic options, such as changing the image size or deleting images, among the setting and adjustment items. Other items are recorded with high definition image quality (HD) on the LCD screen. 24 Index During Easy Handycam operation, you can record or play movies and photos...
... the LCD screen of Contents Useful Recording Techniques Recording and playing movies and photos easily ( Easy Handycam Operation) Simply press EASY. Your camcorder is started, nearly all menu settings are reset to the default settings automatically. (Some menu items retain the settings that were made before...set basic options, such as changing the image size or deleting images, among the setting and adjustment items. Other items are recorded with high definition image quality (HD) on the LCD screen. 24 Index During Easy Handycam operation, you can record or play movies and photos...

User Guide
Page 25
Shooting photos Open the LCD screen of Contents Useful Recording Techniques Press START/STOP to [HD SP] or [SD SP] (p. 74). appears on your camcorder. Your camcorder is turned on. To turn on the LCD screen. 25 Index Table of your camcorder when the LCD screen is already open, press POWER (p. 21). Press EASY. STBY] [REC] To stop recording, press START/STOP again. Tips The [REC MODE] is fixed to start recording.
Shooting photos Open the LCD screen of Contents Useful Recording Techniques Press START/STOP to [HD SP] or [SD SP] (p. 74). appears on your camcorder. Your camcorder is turned on. To turn on the LCD screen. 25 Index Table of your camcorder when the LCD screen is already open, press POWER (p. 21). Press EASY. STBY] [REC] To stop recording, press START/STOP again. Tips The [REC MODE] is fixed to start recording.

User Guide
Page 26
Table of your camcorder when the LCD screen is already open, press POWER (p. 21). 26 Index Flashes Lights up When disappears, the photo is turned on. To turn on the internal hard disk. Playing movies Open the LCD screen of Contents Useful Recording Techniques Press MODE to turn on your camcorder. Your camcorder is recorded on the (Photo) lamp. Press PHOTO lightly to adjust the focus, then press it fully.
Table of your camcorder when the LCD screen is already open, press POWER (p. 21). 26 Index Flashes Lights up When disappears, the photo is turned on. To turn on the internal hard disk. Playing movies Open the LCD screen of Contents Useful Recording Techniques Press MODE to turn on your camcorder. Your camcorder is recorded on the (Photo) lamp. Press PHOTO lightly to adjust the focus, then press it fully.


