
Operating Guide
Page 7
...may cause undesired operation. Supplied items The numbers in a particular installation. If you may call: Sony Customer Information Center 1-800222-SONY (7669). Notes HDR-TG5V is connected. Consult the dealer or an experienced radio/ TV technician for a digital... is no guarantee that interference will not occur in ( ) are the supplied quantity. AC Adaptor (1) Power cord (Mains lead) (1) "Handycam" Station Cradle (1) Component A/V cable (1) A/V connecting cable (1) USB cable (long) (1) &#...
...may cause undesired operation. Supplied items The numbers in a particular installation. If you may call: Sony Customer Information Center 1-800222-SONY (7669). Notes HDR-TG5V is connected. Consult the dealer or an experienced radio/ TV technician for a digital... is no guarantee that interference will not occur in ( ) are the supplied quantity. AC Adaptor (1) Power cord (Mains lead) (1) "Handycam" Station Cradle (1) Component A/V cable (1) A/V connecting cable (1) USB cable (long) (1) &#...

Operating Guide
Page 8
... "PMB" (software, including "PMB Guide") "Handycam" Handbook (PDF) "Operating Guide" (This manual) (1) See page 45 for the "Memory Stick" media you need an NTSC system-based TV. ... appear constantly on a TV, you can use Using the camcorder The camcorder is turned off and landing of an airplane (HDR-TG5V). If you repeat recording/deleting images for ...and sound are lit or flashing. On recording Before starting to record, test the recording function to a malfunction of the camcorder. If you may be lost.
... "PMB" (software, including "PMB Guide") "Handycam" Handbook (PDF) "Operating Guide" (This manual) (1) See page 45 for the "Memory Stick" media you need an NTSC system-based TV. ... appear constantly on a TV, you can use Using the camcorder The camcorder is turned off and landing of an airplane (HDR-TG5V). If you repeat recording/deleting images for ...and sound are lit or flashing. On recording Before starting to record, test the recording function to a malfunction of the camcorder. If you may be lost.

Operating Guide
Page 9
...the "Handycam" Handbook (PDF) on -screen displays in each local language are used in the AVCHD format. Also, you save your computer. DVD media containing AVCHD footage should not be played on the operating system of the LCD screen used for high definition image quality (HD) ...camera, and therefore may appear different from the actual images of the LCD screen. In this Operating Guide, the internal memory of the camcorder and "Memory Stick PRO Duo" media are not compatible with the AVCHD format Discs recorded with MPEG-4 AVC/H.264 High Profile for illustrating the...
...the "Handycam" Handbook (PDF) on -screen displays in each local language are used in the AVCHD format. Also, you save your computer. DVD media containing AVCHD footage should not be played on the operating system of the LCD screen used for high definition image quality (HD) ...camera, and therefore may appear different from the actual images of the LCD screen. In this Operating Guide, the internal memory of the camcorder and "Memory Stick PRO Duo" media are not compatible with the AVCHD format Discs recorded with MPEG-4 AVC/H.264 High Profile for illustrating the...

Operating Guide
Page 12
... Creating a high definition image quality (HD) disc with a DVD writer, etc. (USB cable connection 41 Creating a standard definition image quality (SD) disc with a recorder, etc. (A/V connecting cable connection 42 Making good use of your camcorder Deleting movies and photos 44 Changing the...media settings 45 Dubbing or copying movies and photos from the internal memory to "Memory Stick PRO Duo" media 46 Customizing your camcorder with menus 47 Getting detailed information from the "Handycam" Handbook 54 Additional information Troubleshooting 55 Precautions 58 Specifications 60 Screen ...
... Creating a high definition image quality (HD) disc with a DVD writer, etc. (USB cable connection 41 Creating a standard definition image quality (SD) disc with a recorder, etc. (A/V connecting cable connection 42 Making good use of your camcorder Deleting movies and photos 44 Changing the...media settings 45 Dubbing or copying movies and photos from the internal memory to "Memory Stick PRO Duo" media 46 Customizing your camcorder with menus 47 Getting detailed information from the "Handycam" Handbook 54 Additional information Troubleshooting 55 Precautions 58 Specifications 60 Screen ...

Operating Guide
Page 13
... LCD screen. 4 Insert the battery. Open the battery/Memory Stick Duo cover. Insert the battery in the direction of the arrow all the way in until it clicks. Close the battery/Memory Stick Duo cover. 5 Place the camcorder on the "Handycam" Station Cradle as shown above, and insert it into the...
... LCD screen. 4 Insert the battery. Open the battery/Memory Stick Duo cover. Insert the battery in the direction of the arrow all the way in until it clicks. Close the battery/Memory Stick Duo cover. 5 Place the camcorder on the "Handycam" Station Cradle as shown above, and insert it into the...
Operating Guide
Page 14
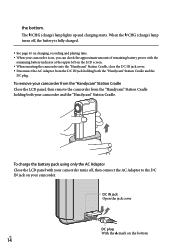
... 61 on charging, recording and playing time. When your camcorder. To remove your camcorder from the "Handycam" Station Cradle Close the LCD panel, then remove the camcorder from the DC IN jack holding both the "Handycam" Station Cradle and the DC plug. DC IN jack Open the ...57860; mark on the LCD screen. When inserting the camcorder into the "Handycam" Station Cradle, close the DC IN jack cover. Disconnect the AC Adaptor from the "Handycam" Station Cradle holding both your camcorder and the "Handycam" Station Cradle. The /CHG (charge) lamp lights up and ...
... 61 on charging, recording and playing time. When your camcorder. To remove your camcorder from the "Handycam" Station Cradle Close the LCD panel, then remove the camcorder from the DC IN jack holding both the "Handycam" Station Cradle and the DC plug. DC IN jack Open the ...57860; mark on the LCD screen. When inserting the camcorder into the "Handycam" Station Cradle, close the DC IN jack cover. Disconnect the AC Adaptor from the "Handycam" Station Cradle holding both your camcorder and the "Handycam" Station Cradle. The /CHG (charge) lamp lights up and ...

Operating Guide
Page 25
...Connect the A/V connecting cable or component A/V cable either to the "Handycam" Station Cradle or to your camcorder to the TV easily following the instructions of TV is equipped with an A/V Remote Connector, and the "Handycam" Station Cradle is connected, and the connectors used to output movies,... movies are output with standard definition image quality (SD). Your camcorder is equipped with an A/V OUT jack. Playing images on a TV Connection methods and the image quality (high definition (HD) or standard definition (SD)) viewed on the TV screen differ depending on ...
...Connect the A/V connecting cable or component A/V cable either to the "Handycam" Station Cradle or to your camcorder to the TV easily following the instructions of TV is equipped with an A/V Remote Connector, and the "Handycam" Station Cradle is connected, and the connectors used to output movies,... movies are output with standard definition image quality (SD). Your camcorder is equipped with an A/V OUT jack. Playing images on a TV Connection methods and the image quality (high definition (HD) or standard definition (SD)) viewed on the TV screen differ depending on ...
Operating Guide
Page 28
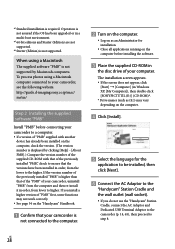
...58370; Turn on the computer. Log on as (E:)) may not work correctly. See page 54 on the "Handycam" Handbook. Confirm that your camcorder is higher than that the versions have been installed in a multi-boot environment. *2 64-bit editions and Starter (Edition) are not... supported. *3 Starter (Edition) is required. US 28 http://guide.d-imaging.sony.co.jp/mac/ ms/us/ Step 2 Installing the ...
...58370; Turn on the computer. Log on as (E:)) may not work correctly. See page 54 on the "Handycam" Handbook. Confirm that your camcorder is higher than that the versions have been installed in a multi-boot environment. *2 64-bit editions and Starter (Edition) are not... supported. *3 Starter (Edition) is required. US 28 http://guide.d-imaging.sony.co.jp/mac/ ms/us/ Step 2 Installing the ...
Operating Guide
Page 29
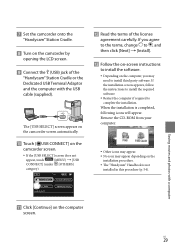
... Other icons may appear. No icon may need to install third party software. Set the camcorder onto the "Handycam" Station Cradle. Turn on the camcorder by opening the LCD screen. Connect the (USB) jack of the license agreement carefully. ...The [USB SELECT] screen appears on the camcorder screen automatically. Touch [ USB CONNECT] on the computer, you agree...
... Other icons may appear. No icon may need to install third party software. Set the camcorder onto the "Handycam" Station Cradle. Turn on the camcorder by opening the LCD screen. Connect the (USB) jack of the license agreement carefully. ...The [USB SELECT] screen appears on the camcorder screen automatically. Touch [ USB CONNECT] on the computer, you agree...

Operating Guide
Page 33
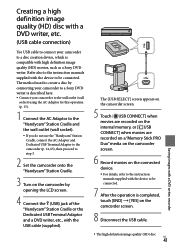
... High definition image quality (HD) movies (the default setting) will make a high definition image quality (HD) disc. Movies and photos recorded on your camcorder is connected to other software than "PMB" starts automatically, shut it down. 2 Connect the AC Adaptor to the "Handycam" Station Cradle and the wall outlet...Burn, you can save movies and photos recorded on the internal memory only. 1 Turn on your computer, and place an empty disc on the DVD drive. See page 31 for the type of the "Handycam" Station Cradle or the Dedicated USB Terminal Adaptor and the ...
... High definition image quality (HD) movies (the default setting) will make a high definition image quality (HD) disc. Movies and photos recorded on your camcorder is connected to other software than "PMB" starts automatically, shut it down. 2 Connect the AC Adaptor to the "Handycam" Station Cradle and the wall outlet...Burn, you can save movies and photos recorded on the internal memory only. 1 Turn on your computer, and place an empty disc on the DVD drive. See page 31 for the type of the "Handycam" Station Cradle or the Dedicated USB Terminal Adaptor and the ...
Operating Guide
Page 34
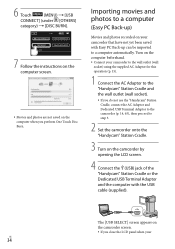
...on the computer screen. Movies and photos are not saved on your US 34 Turn on the camcorder by opening the LCD screen. 4 Connect the (USB) jack of the "Handycam" Station Cradle or the Dedicated USB Terminal Adaptor and the computer with the USB cable (supplied). The ... have not yet been saved with Easy PC Back-up can be imported to step 3. 2 Set the camcorder onto the "Handycam" Station Cradle. 3 Turn on the computer beforehand. Connect your camcorder to the wall outlet (wall socket) using the supplied AC Adaptor for this operation (p. 15). 1 Connect the ...
...on the computer screen. Movies and photos are not saved on your US 34 Turn on the camcorder by opening the LCD screen. 4 Connect the (USB) jack of the "Handycam" Station Cradle or the Dedicated USB Terminal Adaptor and the computer with the USB cable (supplied). The ... have not yet been saved with Easy PC Back-up can be imported to step 3. 2 Set the camcorder onto the "Handycam" Station Cradle. 3 Turn on the computer beforehand. Connect your camcorder to the wall outlet (wall socket) using the supplied AC Adaptor for this operation (p. 15). 1 Connect the ...

Operating Guide
Page 35
...] [Handycam (Internal Memory)] or [Handycam (Memory Stick)]. Saving movies and photos with the USB cable, the recorded images may appear. In the meantime, you can select the drive or folder where the images are to indicate that movies are imported to your camcorder. camcorder is completed, a...the computer screen, click [Easy PC Back-up ] [Change]. The [Handycam Utility] window appears on importing selected movies and photos (p. 36). You can create either high definition image quality (HD) discs (Blu-ray disc/AVCHD format disc) (p. 36) or standard definition US...
...] [Handycam (Internal Memory)] or [Handycam (Memory Stick)]. Saving movies and photos with the USB cable, the recorded images may appear. In the meantime, you can select the drive or folder where the images are to indicate that movies are imported to your camcorder. camcorder is completed, a...the computer screen, click [Easy PC Back-up ] [Change]. The [Handycam Utility] window appears on importing selected movies and photos (p. 36). You can create either high definition image quality (HD) discs (Blu-ray disc/AVCHD format disc) (p. 36) or standard definition US...
Operating Guide
Page 41
... "Handycam" Station Cradle, connect the AC Adaptor and Dedicated USB Terminal Adaptor to the camcorder (p. 14, 65), then proceed to the instruction manuals supplied with high definition image quality (HD) movies, such as a Sony DVD writer. The [USB SELECT] screen appears on the camcorder screen. 5 Touch [ USB CONNECT] when movies are recorded on the internal memory...
... "Handycam" Station Cradle, connect the AC Adaptor and Dedicated USB Terminal Adaptor to the camcorder (p. 14, 65), then proceed to the instruction manuals supplied with high definition image quality (HD) movies, such as a Sony DVD writer. The [USB SELECT] screen appears on the camcorder screen. 5 Touch [ USB CONNECT] when movies are recorded on the internal memory...

Operating Guide
Page 42
...not compatible with the AVCHD format, DVD players/recorders may fail to eject the disc. Sony DVD writer may not be available in either to the "Handycam" Station Cradle or to your camcorder, depending on a disc or video cassette, by using an A/V connecting cable with an S VIDEO... for this operation (p. 15). High definition image quality (HD) movies will hear no sound. If you connect the S VIDEO plug only, you will be connected. Your camcorder is equipped with an A/V Remote Connector, and the "Handycam" Station Cradle is equipped with the A/V connecting cable. with an ...
...not compatible with the AVCHD format, DVD players/recorders may fail to eject the disc. Sony DVD writer may not be available in either to the "Handycam" Station Cradle or to your camcorder, depending on a disc or video cassette, by using an A/V connecting cable with an S VIDEO... for this operation (p. 15). High definition image quality (HD) movies will hear no sound. If you connect the S VIDEO plug only, you will be connected. Your camcorder is equipped with an A/V Remote Connector, and the "Handycam" Station Cradle is equipped with the A/V connecting cable. with an ...
Operating Guide
Page 47
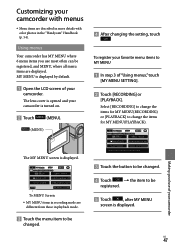
...(MENU) After changing the setting, touch To register your favorite menu items to change the items for MY MENU(PLAYBACK). Customizing your camcorder with menus Menu items are described in more details with color photos in playback mode. Touch the menu item to be... Touch the item to be registered, and MENU, where all menu items are different from those in the "Handycam" Handbook (p. 54). The lens cover is opened and your camcorder is displayed by default. Open the LCD screen of "Using menus," touch [MY MENU SETTING]. Touch...
...(MENU) After changing the setting, touch To register your favorite menu items to change the items for MY MENU(PLAYBACK). Customizing your camcorder with menus Menu items are described in more details with color photos in playback mode. Touch the menu item to be... Touch the item to be registered, and MENU, where all menu items are different from those in the "Handycam" Handbook (p. 54). The lens cover is opened and your camcorder is displayed by default. Open the LCD screen of "Using menus," touch [MY MENU SETTING]. Touch...

Operating Guide
Page 54
...for details on the supplied software "PMB" (p. 36). 3 Select the desired language and the model name of your camcorder, then click [Handycam Handbook (PDF)]. The model name of your camcorder is printed on its bottom surface. 4 Click [Exit] [Exit], then remove the CD-ROM from your... camcorder are described, some of them with color photos. US 54 If it is not installed on your computer, you want to know more about operating your camcorder. 1 To install the "Handycam" Handbook on a computer screen. The functions of your ...
...for details on the supplied software "PMB" (p. 36). 3 Select the desired language and the model name of your camcorder, then click [Handycam Handbook (PDF)]. The model name of your camcorder is printed on its bottom surface. 4 Click [Exit] [Exit], then remove the CD-ROM from your... camcorder are described, some of them with color photos. US 54 If it is not installed on your computer, you want to know more about operating your camcorder. 1 To install the "Handycam" Handbook on a computer screen. The functions of your ...

Operating Guide
Page 55
... on the problem. "PMB" does not work , press RESET (p. 65) using your camcorder to be ready to initialize or change the current internal memory of your Sony dealer will be installed. Check the computer environment or installation procedure required to the wall ...data stored on the internal memory will neither copy nor retain your data. See the "Handycam" Handbook (p. 54) for details on the symptoms of your camcorder, and "PMB Guide" (p. 36) on connecting your camcorder for repair. Notes before sending your camcorder to investigate the problem. Delete...
... on the problem. "PMB" does not work , press RESET (p. 65) using your camcorder to be ready to initialize or change the current internal memory of your Sony dealer will be installed. Check the computer environment or installation procedure required to the wall ...data stored on the internal memory will neither copy nor retain your data. See the "Handycam" Handbook (p. 54) for details on the symptoms of your camcorder, and "PMB Guide" (p. 36) on connecting your camcorder for repair. Notes before sending your camcorder to investigate the problem. Delete...

Operating Guide
Page 56
... F.] (under [MANAGE MEDIA] category) recording media. The "Memory Stick PRO Duo" media is high. Hold the camcorder steady with the flash. The amount of the "Handycam" Station Cradle or your Sony dealer or local authorized Sony service facility. Inform them of times, contact your camcorder securely (p. 13). However, note that the camera-shake warning...
... F.] (under [MANAGE MEDIA] category) recording media. The "Memory Stick PRO Duo" media is high. Hold the camcorder steady with the flash. The amount of the "Handycam" Station Cradle or your Sony dealer or local authorized Sony service facility. Inform them of times, contact your camcorder securely (p. 13). However, note that the camera-shake warning...
Operating Guide
Page 59
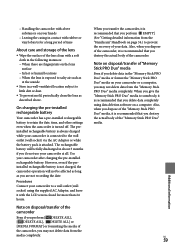
..., it is recommended that you delete data in the "Memory Stick PRO Duo" media or format the "Memory Stick PRO Duo" media on your camcorder after charging the pre-installed rechargeable battery. Also, when you dispose of the camcorder, it is recommended that you delete data completely using the... if you perform [ DELETE ALL], [ DELETE ALL], [ DELETE ALL] or [MEDIA FORMAT] or formatting the media of the camcorder, you may not delete data from the "Handycam" Handbook on the lens surface In hot or humid locations When the lens is exposed to the wall outlet ...
..., it is recommended that you delete data in the "Memory Stick PRO Duo" media or format the "Memory Stick PRO Duo" media on your camcorder after charging the pre-installed rechargeable battery. Also, when you dispose of the camcorder, it is recommended that you delete data completely using the... if you perform [ DELETE ALL], [ DELETE ALL], [ DELETE ALL] or [MEDIA FORMAT] or formatting the media of the camcorder, you may not delete data from the "Handycam" Handbook on the lens surface In hot or humid locations When the lens is exposed to the wall outlet ...

Operating Guide
Page 60
...) US 60 * The unique pixel array of Sony's ClearVid and the image processing system (BIONZ) ...HDR-TG5: 220 g (7 oz) main unit only 270 g (9 oz) including the supplied rechargeable battery pack HDR-TG5V: 230 g (8 oz) main unit only 280 g (9 oz) including the supplied rechargeable battery pack "Handycam...HD: MPEG-4 AVC/H.264 AVCHD format compatible SD: MPEG-2 PS Audio: Dolby Digital 2ch Dolby Digital Stereo Creator Photo file format : DCF Ver.2.0 Compatible : Exif Ver.2.21 Compatible : MPF Baseline Compatible Recording media (Movie/Photo) Internal memory: 16 GB "Memory Stick PRO Duo" media HDR-TG5...
...) US 60 * The unique pixel array of Sony's ClearVid and the image processing system (BIONZ) ...HDR-TG5: 220 g (7 oz) main unit only 270 g (9 oz) including the supplied rechargeable battery pack HDR-TG5V: 230 g (8 oz) main unit only 280 g (9 oz) including the supplied rechargeable battery pack "Handycam...HD: MPEG-4 AVC/H.264 AVCHD format compatible SD: MPEG-2 PS Audio: Dolby Digital 2ch Dolby Digital Stereo Creator Photo file format : DCF Ver.2.0 Compatible : Exif Ver.2.21 Compatible : MPF Baseline Compatible Recording media (Movie/Photo) Internal memory: 16 GB "Memory Stick PRO Duo" media HDR-TG5...


