
User Manual
Page 2
.... WARNING To reduce fire or shock hazard, do the following when either of this product, please contact your local Civic Office, your nearest Sony service station. By ensuring this equipment has a detachable fuse cover, be handed over to rain or moisture. See "Precautions" (p. 32). ...to discontinue midway (fail), restart the application or disconnect and connect the communication cable (USB, etc.) again. Never use • The camcorder is on its packaging indicates that this equipment for using connection cables shorter than 3 meters (9.8 feet). This product has been tested and ...
.... WARNING To reduce fire or shock hazard, do the following when either of this product, please contact your local Civic Office, your nearest Sony service station. By ensuring this equipment has a detachable fuse cover, be handed over to rain or moisture. See "Precautions" (p. 32). ...to discontinue midway (fail), restart the application or disconnect and connect the communication cable (USB, etc.) again. Never use • The camcorder is on its packaging indicates that this equipment for using connection cables shorter than 3 meters (9.8 feet). This product has been tested and ...

User Manual
Page 3
...under a nongravity condition, the block noise made when this manual • The images of the viewfinder (HDR-SR7E/ SR8E) and the LCD screen used for the contents of your camcorder. In this case, an indicator appears in this manual are based on HDRSR7E. • Design and specifications...hard disk completely. Note on operational temperatures • When the temperature of the camcorder becomes extremely high or extremely low, you may appear different from the actual images of the viewfinder (HDR-SR7E/SR8E) and the LCD screen. • Unless otherwise specially indicated, illustrations ...
...under a nongravity condition, the block noise made when this manual • The images of the viewfinder (HDR-SR7E/ SR8E) and the LCD screen used for the contents of your camcorder. In this case, an indicator appears in this manual are based on HDRSR7E. • Design and specifications...hard disk completely. Note on operational temperatures • When the temperature of the camcorder becomes extremely high or extremely low, you may appear different from the actual images of the viewfinder (HDR-SR7E/SR8E) and the LCD screen. • Unless otherwise specially indicated, illustrations ...
User Manual
Page 4
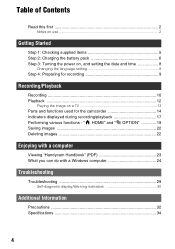
... the language setting 8 Step 4: Preparing for recording 9 Recording/Playback Recording 10 Playback 12 Playing the image on a TV 13 Parts and functions used for the camcorder 14 Indicators displayed during recording/playback 17 Performing various functions - " HOME" and " OPTION 19 Saving images 22 Deleting images 22 Enjoying with a computer Viewing "Handycam...
... the language setting 8 Step 4: Preparing for recording 9 Recording/Playback Recording 10 Playback 12 Playing the image on a TV 13 Parts and functions used for the camcorder 14 Indicators displayed during recording/playback 17 Performing various functions - " HOME" and " OPTION 19 Saving images 22 Deleting images 22 Enjoying with a computer Viewing "Handycam...

User Manual
Page 5
... (1) (p. 6) Handycam Station (1) (p. 6) Rechargeable battery pack NP-FH60 (1) (p. 6) Component video cable (1) (p. 13) A/V connecting cable (1) (p. 13) USB cable (1) (p. 27) 21-pin adaptor (1) For the models with your camcorder. The number in the parentheses indicates the number of that you have the following items supplied with the bottom surfaces only. Handycam Handbook (PDF) "Operating...
... (1) (p. 6) Handycam Station (1) (p. 6) Rechargeable battery pack NP-FH60 (1) (p. 6) Component video cable (1) (p. 13) A/V connecting cable (1) (p. 13) USB cable (1) (p. 27) 21-pin adaptor (1) For the models with your camcorder. The number in the parentheses indicates the number of that you have the following items supplied with the bottom surfaces only. Handycam Handbook (PDF) "Operating...

User Manual
Page 6
... DC plug is fully charged. To remove the battery pack Slide the POWER switch to the AC Adaptor and the wall socket. 5 Set the camcorder onto the Handycam Station securely. Be sure that the (Movie) lamp/ (Still) lamp (p. 8) is turned off when the battery pack is ...facing up and charging starts. b Notes • Your camcorder operates only with an "InfoLITHIUM" battery pack (H series). 1 Connect the AC Adaptor to your camcorder. Step 2: Charging the battery pack 3 4 Battery pack 5 DC IN jack POWER switch 5 1 /CHG lamp DC ...
... DC plug is fully charged. To remove the battery pack Slide the POWER switch to the AC Adaptor and the wall socket. 5 Set the camcorder onto the Handycam Station securely. Be sure that the (Movie) lamp/ (Still) lamp (p. 8) is turned off when the battery pack is ...facing up and charging starts. b Notes • Your camcorder operates only with an "InfoLITHIUM" battery pack (H series). 1 Connect the AC Adaptor to your camcorder. Step 2: Charging the battery pack 3 4 Battery pack 5 DC IN jack POWER switch 5 1 /CHG lamp DC ...

User Manual
Page 7
... for high definition image quality, and "SD" stands for the supplied battery pack Charging time: Approximate time (min.) required when you use your camcorder in a narrow space, such as the AC Adaptor is disconnected from the wall socket immediately if any malfunction occurs while using the AC Adaptor. ...• Times measured when using the camcorder at 25°C (77°F) (10°C to 30°C (50°F to [OFF]. *2 When the LCD backlight turns on /off . *4 When recording with any metallic objects. NP-FH60: HDR-SR5E HD SD (Unit:min.) HDR-SR7E/ SR8E HD SD Charging time 135 ...
... for high definition image quality, and "SD" stands for the supplied battery pack Charging time: Approximate time (min.) required when you use your camcorder in a narrow space, such as the AC Adaptor is disconnected from the wall socket immediately if any malfunction occurs while using the AC Adaptor. ...• Times measured when using the camcorder at 25°C (77°F) (10°C to 30°C (50°F to [OFF]. *2 When the LCD backlight turns on /off . *4 When recording with any metallic objects. NP-FH60: HDR-SR5E HD SD (Unit:min.) HDR-SR7E/ SR8E HD SD Charging time 135 ...

User Manual
Page 8
POWER switch When using the camcorder for the first time, the [CLOCK SET] screen appears on the LCD screen. 1 While pressing the green button, slide the POWER switch repeatedly in a specified ...
POWER switch When using the camcorder for the first time, the [CLOCK SET] screen appears on the LCD screen. 1 While pressing the green button, slide the POWER switch repeatedly in a specified ...

User Manual
Page 9
... seen on the LCD screen is clear. 9 Getting Started Step 4: Preparing for recording Adjusting the LCD panel Open the LCD panel 90 degrees to the camcorder (1), then rotate it until the image is poor. Viewfinder Viewfinder lens adjustment lever Move it to the best angle to record or play (2). 290 degrees...
... seen on the LCD screen is clear. 9 Getting Started Step 4: Preparing for recording Adjusting the LCD panel Open the LCD panel 90 degrees to the camcorder (1), then rotate it until the image is poor. Viewfinder Viewfinder lens adjustment lever Move it to the best angle to record or play (2). 290 degrees...

User Manual
Page 10
... the OFF (CHG) position. • (Movie): To record movies • (Still): To record still images 2 Start recording. Do not apply shock or vibration to your camcorder, and do not remove the battery or AC Adaptor. 10 appears beside / . b Notes • If the ACCESS lamp is lit or flashing after recording is...
... the OFF (CHG) position. • (Movie): To record movies • (Still): To record still images 2 Start recording. Do not apply shock or vibration to your camcorder, and do not remove the battery or AC Adaptor. 10 appears beside / . b Notes • If the ACCESS lamp is lit or flashing after recording is...

User Manual
Page 11
... up to recording standby mode. HDR-SR5E: approx. 11 hours and 50 minutes HDR-SR7E: approx. 17 hours and 50 minutes HDR-SR8E: approx. 30 hours • Use the supplied application software to a "Memory Stick Duo." To record still images on the camcorder will be damaged. You can ...change the recording media of still images to store recorded movies as follows (with or . HDR-SR5E: 480 ([4.0M]) HDR-SR7E/SR8E: 315 ([6.1M]) All numbers measured when using a "Memory Stick Duo" made by Sony Corporation. x To change ...
... up to recording standby mode. HDR-SR5E: approx. 11 hours and 50 minutes HDR-SR7E: approx. 17 hours and 50 minutes HDR-SR8E: approx. 30 hours • Use the supplied application software to a "Memory Stick Duo." To record still images on the camcorder will be damaged. You can ...change the recording media of still images to store recorded movies as follows (with or . HDR-SR5E: 480 ([4.0M]) HDR-SR7E/SR8E: 315 ([6.1M]) All numbers measured when using a "Memory Stick Duo" made by Sony Corporation. x To change ...

User Manual
Page 12
... 7 Displays still images on a "Memory Stick Duo" 8 Searches for images by date 9 (OPTION) * appears for details. 3 Start playback. The VISUAL INDEX screen appears on your camcorder. 2 Press (VIEW IMAGES) C (or A).
... 7 Displays still images on a "Memory Stick Duo" 8 Searches for images by date 9 (OPTION) * appears for details. 3 Start playback. The VISUAL INDEX screen appears on your camcorder. 2 Press (VIEW IMAGES) C (or A).
User Manual
Page 13
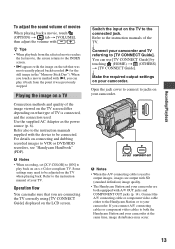
...DVD/HDD recorders, see "Handycam Handbook" (PDF). Switch the input on connecting and dubbing recorded images to the instruction manuals of your camcorder. Operation flow You can make sure that was previously stopped. Some settings may occur. 13 Connect the A/V connecting cable or component ...video cable either to the Handycam Station or to your camcorder and TV referring to be adjusted on your TV. Refer also to the instruction manuals supplied with A/V OUT jacks and COMPONENT OUT ...
...DVD/HDD recorders, see "Handycam Handbook" (PDF). Switch the input on connecting and dubbing recorded images to the instruction manuals of your camcorder. Operation flow You can make sure that was previously stopped. Some settings may occur. 13 Connect the A/V connecting cable or component ...video cable either to the Handycam Station or to your camcorder and TV referring to be adjusted on your TV. Refer also to the instruction manuals supplied with A/V OUT jacks and COMPONENT OUT ...

User Manual
Page 14
Move the power zoom lever slightly for a faster zoom. You can magnify still images from about 1.1 to 5 times the original size (Playback zoom). 14 • When you touch the screen during playback zoom, the point you touched will be displayed in ( ) are reference pages. Handycam Station 1 Power zoom lever To use the zoom, move the power zoom lever. Parts and functions used for the camcorder The numbers in the center of the displayed frame. 2 PHOTO button (10) 3 Eyecup (HDR-SR7E/SR8E) 4 Viewfinder (9) (HDR-SR7E/SR8E) Move it further for a slower zoom.
Move the power zoom lever slightly for a faster zoom. You can magnify still images from about 1.1 to 5 times the original size (Playback zoom). 14 • When you touch the screen during playback zoom, the point you touched will be displayed in ( ) are reference pages. Handycam Station 1 Power zoom lever To use the zoom, move the power zoom lever. Parts and functions used for the camcorder The numbers in the center of the displayed frame. 2 PHOTO button (10) 3 Eyecup (HDR-SR7E/SR8E) 4 Viewfinder (9) (HDR-SR7E/SR8E) Move it further for a slower zoom.

User Manual
Page 15
...power is complete. wa Speaker Sound comes out from the Remote Commander. 5 Viewfinder lens adjustment lever (9) (HDR-SR7E/SR8E) 6 ACCESS lamp (Hard disk) When the ACCESS lamp is lit or flashing, your camcorder is writing/reading data. 7 (flash) button You can magnify still images from about 1.1 to 5 ...lamp ("Memory Stick Duo") When the ACCESS lamp is lit or flashing, your camcorder is connected, it 180 degrees to optional accessories such as you touched will be displayed in /out. qd i (headphones) jack (HDR-SR7E/ SR8E) qf COMPONENT OUT jack Connect with the component video cable. wd ...
...power is complete. wa Speaker Sound comes out from the Remote Commander. 5 Viewfinder lens adjustment lever (9) (HDR-SR7E/SR8E) 6 ACCESS lamp (Hard disk) When the ACCESS lamp is lit or flashing, your camcorder is writing/reading data. 7 (flash) button You can magnify still images from about 1.1 to 5 ...lamp ("Memory Stick Duo") When the ACCESS lamp is lit or flashing, your camcorder is connected, it 180 degrees to optional accessories such as you touched will be displayed in /out. qd i (headphones) jack (HDR-SR7E/ SR8E) qf COMPONENT OUT jack Connect with the component video cable. wd ...

User Manual
Page 16
...function, press BACK LIGHT again. Sound picked up by connecting the camcorder to a computer. rh DISC BURN button Create a disc by the internal microphone is converted to 5.1ch surround sound and recorded. ra CAM CTRL dial (HDR-SR7E/SR8E) You can assign one menu item you press while the power... the settings (Reset), press RESET to initialize all the settings, including settings for backlit subjects, press BACK LIGHT to display .. rs MANUAL button (HDR-SR7E/SR8E) You can display the [DIAL SETTING] screen with the USB cable. el Lens (Carl Zeiss Lens) r; eg DISP/BATT INFO button You...
...function, press BACK LIGHT again. Sound picked up by connecting the camcorder to a computer. rh DISC BURN button Create a disc by the internal microphone is converted to 5.1ch surround sound and recorded. ra CAM CTRL dial (HDR-SR7E/SR8E) You can assign one menu item you press while the power... the settings (Reset), press RESET to initialize all the settings, including settings for backlit subjects, press BACK LIGHT to display .. rs MANUAL button (HDR-SR7E/SR8E) You can display the [DIAL SETTING] screen with the USB cable. el Lens (Carl Zeiss Lens) r; eg DISP/BATT INFO button You...

User Manual
Page 18
... Center Indicator E Meaning 5.1ch surround recording/playback Self-timer recording Flash, REDEYE REDUC MICREF LEVEL low WIDE SELECT Meaning Slide show set * HDR-SR7E/SR8E b Notes • The recording date and time is recorded automatically on the hard disk and "Memory Stick Duo." X VISUAL INDEX ...button Indicators when you can check them as [DATA CODE] during recording/playback to indicate the settings of your camcorder. n Backlight White balance SteadyShot off EXPOSURE/ SPOT METER AE SHIFT* WB SHIFT* TELE MACRO ZEBRA X.V.COLOR Face Index set NightShot Super ...
... Center Indicator E Meaning 5.1ch surround recording/playback Self-timer recording Flash, REDEYE REDUC MICREF LEVEL low WIDE SELECT Meaning Slide show set * HDR-SR7E/SR8E b Notes • The recording date and time is recorded automatically on the hard disk and "Memory Stick Duo." X VISUAL INDEX ...button Indicators when you can check them as [DATA CODE] during recording/playback to indicate the settings of your camcorder. n Backlight White balance SteadyShot off EXPOSURE/ SPOT METER AE SHIFT* WB SHIFT* TELE MACRO ZEBRA X.V.COLOR Face Index set NightShot Super ...

User Manual
Page 19
... context of the operation. To see the explanation of the function of (HELP) turns orange. For details, see "Handycam Handbook" (PDF). 1 While using your camcorder, touch (OPTION) on the screen, touch v/V to learn about. The bottom of each item on your convenience. z Tips • If the item is not...) MENU appears just like the pop-up window that appears when you touch an item, its explanation appears on the screen for your camcorder, then press (HOME) A (or B). 3 Touch the item you want to change the recording functions and the operating settings for further operation.
... context of the operation. To see the explanation of the function of (HELP) turns orange. For details, see "Handycam Handbook" (PDF). 1 While using your camcorder, touch (OPTION) on the screen, touch v/V to learn about. The bottom of each item on your convenience. z Tips • If the item is not...) MENU appears just like the pop-up window that appears when you touch an item, its explanation appears on the screen for your camcorder, then press (HOME) A (or B). 3 Touch the item you want to change the recording functions and the operating settings for further operation.

User Manual
Page 20
Items of your camcorder at the time. • Some items appear without a tab. • The (OPTION) MENU cannot be used during Easy Handycam operation (p. 11). If you want is ...
Items of your camcorder at the time. • Some items appear without a tab. • The (OPTION) MENU cannot be used during Easy Handycam operation (p. 11). If you want is ...

User Manual
Page 22
...as described below. Saving images on a computer You can save the image data to a disc with selected images You can save images recorded on the camcorder directly to some type of a computer. For details, see "Picture Motion Browser Guide." For details, see "Handycam Handbook" (PDF). 22 Deleting ...the images on a DVD or the hard disk of image you save images recorded on the camcorder on the camcorder as a DVD-R or a computer. Saving images using a computer By using "Picture Motion Browser" on the supplied CD-ROM, you can also...
...as described below. Saving images on a computer You can save the image data to a disc with selected images You can save images recorded on the camcorder directly to some type of a computer. For details, see "Picture Motion Browser Guide." For details, see "Handycam Handbook" (PDF). 22 Deleting ...the images on a DVD or the hard disk of image you save images recorded on the camcorder on the camcorder as a DVD-R or a computer. Saving images using a computer By using "Picture Motion Browser" on the supplied CD-ROM, you can also...

User Manual
Page 23
... the disc drive of your computer. Installation starts. To view "Handycam Handbook" (PDF), you need to view the handbook. For Windows users 1 Turn on your camcorder, see "Handycam Handbook" (PDF). Enjoying with a computer Viewing "Handycam Handbook" (PDF) For details on using your computer.
... the disc drive of your computer. Installation starts. To view "Handycam Handbook" (PDF), you need to view the handbook. For Windows users 1 Turn on your camcorder, see "Handycam Handbook" (PDF). Enjoying with a computer Viewing "Handycam Handbook" (PDF) For details on using your computer.


