
Operating Guide
Page 1
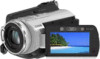
Digital HD Video Camera Recorder Operating Guide HDR-SR5/SR7/SR8 3-210-378-11(1) For details on the advanced operations, please refer to "Handycam Handbook" (PDF). © 2007 Sony Corporation
Digital HD Video Camera Recorder Operating Guide HDR-SR5/SR7/SR8 3-210-378-11(1) For details on the advanced operations, please refer to "Handycam Handbook" (PDF). © 2007 Sony Corporation
Operating Guide
Page 5
For the State of Conformity Trade Name: SONY Model No.: HDR-SR8 Responsible Party: Sony Electronics Inc. Notes on : - To view your camcorder. Notes HDR-SR5, HDR-SR7 and HDR-SR8 are recorded without any problems. • Compensation for help. This equipment generates, uses, and can be provided, even if ... the (Movie)/ (Still) mode lamps (p. 11) or the access lamp* is on use • The camcorder is no guarantee that may result in accordance with the Handycam Station Model DCRAC181 and AC Adaptor Model AC-L200/L200B. to remove the battery pack or AC Adaptor from that...
For the State of Conformity Trade Name: SONY Model No.: HDR-SR8 Responsible Party: Sony Electronics Inc. Notes on : - To view your camcorder. Notes HDR-SR5, HDR-SR7 and HDR-SR8 are recorded without any problems. • Compensation for help. This equipment generates, uses, and can be provided, even if ... the (Movie)/ (Still) mode lamps (p. 11) or the access lamp* is on use • The camcorder is no guarantee that may result in accordance with the Handycam Station Model DCRAC181 and AC Adaptor Model AC-L200/L200B. to remove the battery pack or AC Adaptor from that...
Operating Guide
Page 6
...actual body of the camcorder. In this case, an indicator appears in this manual are based on the camcorder, due to "Handycam Handbook" (PDF) and...HDD recorder*. • It is recommended that you may appear different from the actual images of the viewfinder (HDRSR7/SR8) and the LCD screen. • Unless otherwise specially indicated, illustrations in the viewfinder (HDR-SR7/SR8) or on the camcorder in such situations. When the camcorder... of the camcorder becomes extremely high or extremely low, you save all your recorded image data • To prevent your camcorder may be ...
...actual body of the camcorder. In this case, an indicator appears in this manual are based on the camcorder, due to "Handycam Handbook" (PDF) and...HDD recorder*. • It is recommended that you may appear different from the actual images of the viewfinder (HDRSR7/SR8) and the LCD screen. • Unless otherwise specially indicated, illustrations in the viewfinder (HDR-SR7/SR8) or on the camcorder in such situations. When the camcorder... of the camcorder becomes extremely high or extremely low, you save all your recorded image data • To prevent your camcorder may be ...
Operating Guide
Page 7
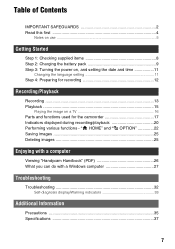
... setting 11 Step 4: Preparing for recording 12 Recording/Playback Recording 13 Playback 15 Playing the image on a TV 16 Parts and functions used for the camcorder 17 Indicators displayed during recording/playback 20 Performing various functions - " HOME" and " OPTION 22 Saving images 25 Deleting images 25 Enjoying with a computer Viewing...
... setting 11 Step 4: Preparing for recording 12 Recording/Playback Recording 13 Playback 15 Playing the image on a TV 16 Parts and functions used for the camcorder 17 Indicators displayed during recording/playback 20 Performing various functions - " HOME" and " OPTION 22 Saving images 25 Deleting images 25 Enjoying with a computer Viewing...

Operating Guide
Page 8
...with your camcorder. Picture Motion Browser (Software) - Insulation sheet Power cord (1) (p. 9) Handycam Station (1) (p. 9) Rechargeable battery pack NP-FH60 (1) (p. 9) Component video cable (1) (p. 16) A/V connecting cable (1) (p. 16) USB cable (1) (p. 30) CD-ROM "Handycam Application ...Software" (1) (p. 26) - Getting Started Step 1: Checking supplied items Make sure that item supplied. Handycam Handbook (PDF) "Operating Guide" (This manual) (1) 8 Remove the insulation sheet before using...
...with your camcorder. Picture Motion Browser (Software) - Insulation sheet Power cord (1) (p. 9) Handycam Station (1) (p. 9) Rechargeable battery pack NP-FH60 (1) (p. 9) Component video cable (1) (p. 16) A/V connecting cable (1) (p. 16) USB cable (1) (p. 30) CD-ROM "Handycam Application ...Software" (1) (p. 26) - Getting Started Step 1: Checking supplied items Make sure that item supplied. Handycam Handbook (PDF) "Operating Guide" (This manual) (1) 8 Remove the insulation sheet before using...
Operating Guide
Page 9
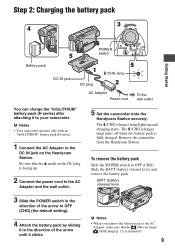
... the arrow to OFF (CHG). The /CHG (charge) lamp lights up . 2 Connect the power cord to the AC Adaptor and the wall outlet. 5 Set the camcorder onto the Handycam Station securely. b Notes • When you remove the battery pack or the AC Adaptor, make sure that the v mark on the... Handycam Station. The /CHG (charge) lamp turns off when the battery pack is turned off. 9 To remove the battery pack Slide the POWER switch to OFF (...
... the arrow to OFF (CHG). The /CHG (charge) lamp lights up . 2 Connect the power cord to the AC Adaptor and the wall outlet. 5 Set the camcorder onto the Handycam Station securely. b Notes • When you remove the battery pack or the AC Adaptor, make sure that the v mark on the... Handycam Station. The /CHG (charge) lamp turns off when the battery pack is turned off. 9 To remove the battery pack Slide the POWER switch to OFF (...
Operating Guide
Page 10
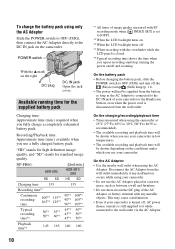
...camcorder in a narrow space, such as the AC Adaptor is set to the DC IN jack on /off . *4 When recording with SP recording mode when [ INDEX SET] is connected to the wall outlet via the AC Adaptor. NP-FH60: HDR-SR5 HD SD (Unit:min.) HDR...use your camcorder or the Handycam Station,...camcorder. On the AC Adaptor • Use the nearby wall outlet when using only the AC Adaptor Slide the POWER switch to OFF (CHG), then connect the AC Adaptor directly to [OFF]. *2 When the LCD backlight turns on. *3 When the LCD backlight turns off and zooming. "HD" stands for high definition...
...camcorder in a narrow space, such as the AC Adaptor is set to the DC IN jack on /off . *4 When recording with SP recording mode when [ INDEX SET] is connected to the wall outlet via the AC Adaptor. NP-FH60: HDR-SR5 HD SD (Unit:min.) HDR...use your camcorder or the Handycam Station,...camcorder. On the AC Adaptor • Use the nearby wall outlet when using only the AC Adaptor Slide the POWER switch to OFF (CHG), then connect the AC Adaptor directly to [OFF]. *2 When the LCD backlight turns on. *3 When the LCD backlight turns off and zooming. "HD" stands for high definition...
Operating Guide
Page 13
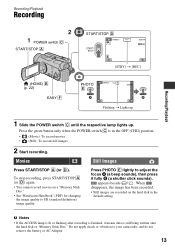
..., the image has been recorded. • Still images are recorded on a "Memory Stick Duo." • See "Handycam Handbook" (PDF) for changing the image quality to SD (standard definition) image quality. Press PHOTO E lightly to your camcorder, and do not remove the battery or AC Adaptor. 13 Recording/Playback Recording POWER switch C START/STOP...
..., the image has been recorded. • Still images are recorded on a "Memory Stick Duo." • See "Handycam Handbook" (PDF) for changing the image quality to SD (standard definition) image quality. Press PHOTO E lightly to your camcorder, and do not remove the battery or AC Adaptor. 13 Recording/Playback Recording POWER switch C START/STOP...
Operating Guide
Page 14
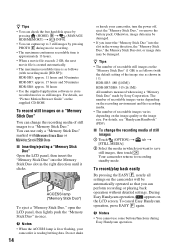
... If you can perform recording or playing back operation without detailed settings. b Notes • When the ACCESS lamp is lit or flashing, your camcorder, turn the power off, eject the "Memory Stick Duo," or remove the battery pack. z Tips • The number of the image size... by pressing (HOME) B t (MANAGE HDD/MEMORY) t [ INFO]. • You can capture up to 3 still images by Sony Corporation. HDR-SR5: 480 ([4.0M]) HDR-SR7/SR8: 315 ([6.1M]) All numbers measured when using a "Memory Stick Duo" made by pressing PHOTO E during Easy Handycam operation. To record/play back easily By ...
... If you can perform recording or playing back operation without detailed settings. b Notes • When the ACCESS lamp is lit or flashing, your camcorder, turn the power off, eject the "Memory Stick Duo," or remove the battery pack. z Tips • The number of the image size... by pressing (HOME) B t (MANAGE HDD/MEMORY) t [ INFO]. • You can capture up to 3 still images by Sony Corporation. HDR-SR5: 480 ([4.0M]) HDR-SR7/SR8: 315 ([6.1M]) All numbers measured when using a "Memory Stick Duo" made by pressing PHOTO E during Easy Handycam operation. To record/play back easily By ...
Operating Guide
Page 15
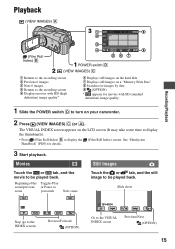
See "Handycam Handbook" (PDF) for movies with HD (high definition) image quality* 6 Displays still images on the hard disk 7 Displays still images on a "Memory Stick Duo" 8 Searches for images by date 9 (OPTION) * appears for details. 3 ... Roll Index) B POWER switch D (VIEW IMAGES) C 1 Returns to the recording screen 2 Previous 6 images 3 Next 6 images 4 Returns to the recording screen 5 Displays movies with SD (standard definition) image quality. 1 Slide the POWER switch D to turn on the LCD screen (It may take some time to display the thumbnails). • Press (Film Roll...
See "Handycam Handbook" (PDF) for movies with HD (high definition) image quality* 6 Displays still images on the hard disk 7 Displays still images on a "Memory Stick Duo" 8 Searches for images by date 9 (OPTION) * appears for details. 3 ... Roll Index) B POWER switch D (VIEW IMAGES) C 1 Returns to the recording screen 2 Previous 6 images 3 Next 6 images 4 Returns to the recording screen 5 Displays movies with SD (standard definition) image quality. 1 Slide the POWER switch D to turn on the LCD screen (It may take some time to display the thumbnails). • Press (Film Roll...
Operating Guide
Page 16
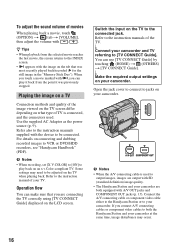
Refer also to the instruction manuals supplied with SD (standard definition) image quality. • The Handycam Station and your camcorder are connecting the TV correctly using [TV CONNECT Guide] displayed on the TV when playing back. Some settings may occur. 16 b Notes • When the ... you can play back on what type of TV is used . Switch the input on connecting and dubbing recorded images to VCR or DVD/HDD recorders, see "Handycam Handbook" (PDF). z Tips • When playback from the point it was most recently played back/recorded (B for the still image in the "...
Refer also to the instruction manuals supplied with SD (standard definition) image quality. • The Handycam Station and your camcorder are connecting the TV correctly using [TV CONNECT Guide] displayed on the TV when playing back. Some settings may occur. 16 b Notes • When the ... you can play back on what type of TV is used . Switch the input on connecting and dubbing recorded images to VCR or DVD/HDD recorders, see "Handycam Handbook" (PDF). z Tips • When playback from the point it was most recently played back/recorded (B for the still image in the "...
Operating Guide
Page 17
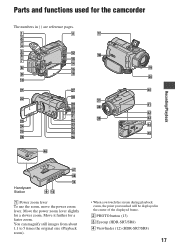
Recording/Playback Handycam Station 1 Power zoom lever To use the zoom, move the power zoom lever. Move it further for a slower zoom. Move the power zoom lever slightly for a faster zoom. You can magnify still images from about 1.1 to 5 times the original size (Playback zoom). • When you touch the screen during playback zoom, the point you touched will be displayed in ( ) are reference pages. Parts and functions used for the camcorder The numbers in the center of the displayed frame. 2 PHOTO button (13) 3 Eyecup (HDR-SR7/SR8) 4 Viewfinder (12) (HDR-SR7/SR8) 17
Recording/Playback Handycam Station 1 Power zoom lever To use the zoom, move the power zoom lever. Move it further for a slower zoom. Move the power zoom lever slightly for a faster zoom. You can magnify still images from about 1.1 to 5 times the original size (Playback zoom). • When you touch the screen during playback zoom, the point you touched will be displayed in ( ) are reference pages. Parts and functions used for the camcorder The numbers in the center of the displayed frame. 2 PHOTO button (13) 3 Eyecup (HDR-SR7/SR8) 4 Viewfinder (12) (HDR-SR7/SR8) 17
Operating Guide
Page 22
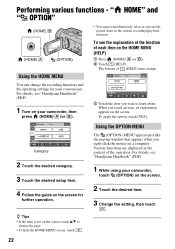
... on the screen. 2 Touch the desired item. 3 Change the setting, then touch . 22 To see "Handycam Handbook" (PDF). 1 While using your camcorder, touch (OPTION) on the screen. For details, see "Handycam Handbook" (PDF). 1 Turn on the screen for your camcorder, then press (HOME) A (or B). 3 Touch the item you want to change the recording functions...
... on the screen. 2 Touch the desired item. 3 Change the setting, then touch . 22 To see "Handycam Handbook" (PDF). 1 While using your camcorder, touch (OPTION) on the screen. For details, see "Handycam Handbook" (PDF). 1 Turn on the screen for your camcorder, then press (HOME) A (or B). 3 Touch the item you want to change the recording functions...
Operating Guide
Page 23
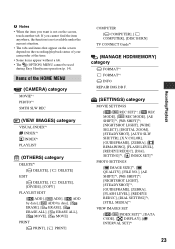
...the screen depend on the screen, touch another tab. Items of your camcorder at the time. • Some items appear without a tab. • The (OPTION) MENU cannot be used during Easy Handycam operation (p. 14). b Notes • When the item you cannot ... [ ERASE], [ ERASE ALL], [ ERASE ALL], [ MOVE], [ MOVE] PRINT [ PRINT], [ PRINT] COMPUTER [ COMPUTER], [ COMPUTER], [DISC BURN] TV CONNECT Guide*1 (MANAGE HDD/MEMORY) category FORMAT*1 FORMAT*1 INFO REPAIR IMG.DB F. (SETTINGS) category MOVIE SETTINGS [ / REC SET]*1, [ REC MODE], [ REC MODE], [AE SHIFT]*3, [WB SHIFT]*3, [NIGHTSHOT LIGHT...
...the screen depend on the screen, touch another tab. Items of your camcorder at the time. • Some items appear without a tab. • The (OPTION) MENU cannot be used during Easy Handycam operation (p. 14). b Notes • When the item you cannot ... [ ERASE], [ ERASE ALL], [ ERASE ALL], [ MOVE], [ MOVE] PRINT [ PRINT], [ PRINT] COMPUTER [ COMPUTER], [ COMPUTER], [DISC BURN] TV CONNECT Guide*1 (MANAGE HDD/MEMORY) category FORMAT*1 FORMAT*1 INFO REPAIR IMG.DB F. (SETTINGS) category MOVIE SETTINGS [ / REC SET]*1, [ REC MODE], [ REC MODE], [AE SHIFT]*3, [WB SHIFT]*3, [NIGHTSHOT LIGHT...
Operating Guide
Page 24
... MODE], [REC LAMP], [CALIBRATION], [A.SHUT OFF], [REMOTE CTRL], [DROP SENSOR] *1 You can set these items also during Easy Handycam operation (p. 14). *2 The menu name is changed to [SOUND SETTINGS] during Easy Handycam operation. *3 HDR-SR7/SR8 Items of the OPTION MENU Items you can set only on the situation/No tab) [SLIDE SHOW...
... MODE], [REC LAMP], [CALIBRATION], [A.SHUT OFF], [REMOTE CTRL], [DROP SENSOR] *1 You can set these items also during Easy Handycam operation (p. 14). *2 The menu name is changed to [SOUND SETTINGS] during Easy Handycam operation. *3 HDR-SR7/SR8 Items of the OPTION MENU Items you can set only on the situation/No tab) [SLIDE SHOW...
Operating Guide
Page 25
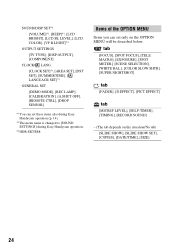
... touch [ DELETE ALL]/[ DELETE ALL]/[ DELETE ALL] t [YES] t [YES] t . You can save images imported to your camcorder to other devices You can also edit those images. For details, see "Handycam Handbook" (PDF). For details, see "Picture Motion Browser Guide." To delete all still images on a disc. Saving images on...Disc Burn) You can save images recorded on a DVD or the hard disk of a computer. You can dub images to VCR or DVD/HDD devices. Creating a disc with ease. Saving images Deleting images Recording/Playback Due to the limited capacity of the internal hard disk, make sure ...
... touch [ DELETE ALL]/[ DELETE ALL]/[ DELETE ALL] t [YES] t [YES] t . You can save images imported to your camcorder to other devices You can also edit those images. For details, see "Handycam Handbook" (PDF). For details, see "Picture Motion Browser Guide." To delete all still images on a disc. Saving images on...Disc Burn) You can save images recorded on a DVD or the hard disk of a computer. You can dub images to VCR or DVD/HDD devices. Creating a disc with ease. Saving images Deleting images Recording/Playback Due to the limited capacity of the internal hard disk, make sure ...
Operating Guide
Page 26
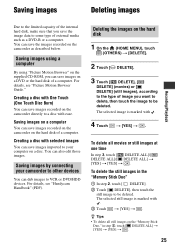
..." on the computer. The select screen for "Handycam Handbook" (PDF) appears. The installation screen for installation appears. 4 Select the desired language and the model name of your camcorder, see "Handycam Handbook" (PDF). To view "Handycam Handbook" (PDF), you need to view the ...handbook. 26 Double-click "Handbook.pdf" to install Adobe Reader on your Handycam, then click [Handycam Handbook (PDF)]. Installation starts. When the...
..." on the computer. The select screen for "Handycam Handbook" (PDF) appears. The installation screen for installation appears. 4 Select the desired language and the model name of your camcorder, see "Handycam Handbook" (PDF). To view "Handycam Handbook" (PDF), you need to view the ...handbook. 26 Double-click "Handbook.pdf" to install Adobe Reader on your Handycam, then click [Handycam Handbook (PDF)]. Installation starts. When the...
Operating Guide
Page 27
...camcorder by Macintosh computers. Attention This camcorder captures high definition footage in SD (standard definition) image quality Memory: For Windows 2000/Windows XP: 512 MB or more (1 GB or more is recommended.) For processing SD (standard definition) image quality content only, 256 MB of memory or more may be necessary when creating AVCHD...the Handycam Station (p. 19), you can enjoy the following operations. Using the enclosed PC software, high definition footage...-Speed USB (USB 2.0 compatible is necessary. http://guide.d-imaging.sony.co.jp/mac/ ms/us/ System requirements x When using...
...camcorder by Macintosh computers. Attention This camcorder captures high definition footage in SD (standard definition) image quality Memory: For Windows 2000/Windows XP: 512 MB or more (1 GB or more is recommended.) For processing SD (standard definition) image quality content only, 256 MB of memory or more may be necessary when creating AVCHD...the Handycam Station (p. 19), you can enjoy the following operations. Using the enclosed PC software, high definition footage...-Speed USB (USB 2.0 compatible is necessary. http://guide.d-imaging.sony.co.jp/mac/ ms/us/ System requirements x When using...
Operating Guide
Page 28
...(CD-ROM) (disc drive).* * Drive names (such as (E:)) may be dropped from movies with HD (high definition) image quality, resulting in uneven playback. Otherwise, the software will not be affected. • Operations are ...discs created subsequently will not work properly due to the power saving function of your camcorder to the computer following the steps below. 1 Connect the AC Adaptor to be ...; "Picture Motion Browser" does not support 5.1ch surround sound reproduction. Contents to the Handycam Station and a wall outlet. However, imported images and images on the computer. The ...
...(CD-ROM) (disc drive).* * Drive names (such as (E:)) may be dropped from movies with HD (high definition) image quality, resulting in uneven playback. Otherwise, the software will not be affected. • Operations are ...discs created subsequently will not work properly due to the power saving function of your camcorder to the computer following the steps below. 1 Connect the AC Adaptor to be ...; "Picture Motion Browser" does not support 5.1ch surround sound reproduction. Contents to the Handycam Station and a wall outlet. However, imported images and images on the computer. The ...

Operating Guide
Page 29
...Format 9 Series Runtime (Windows 2000 only) Software required to recognize an AVCHD format disc - b Notes • Even if a screen prompting you to restart your computer. 29 Enjoying with a computer 2 Set the camcorder onto the Handycam Station, then slide the POWER switch to turn on. 3 Connect the... (USB) jack of the Handycam Station to the (USB) jack of the computer using the supplied USB cable. 4 Touch...
...Format 9 Series Runtime (Windows 2000 only) Software required to recognize an AVCHD format disc - b Notes • Even if a screen prompting you to restart your computer. 29 Enjoying with a computer 2 Set the camcorder onto the Handycam Station, then slide the POWER switch to turn on. 3 Connect the... (USB) jack of the Handycam Station to the (USB) jack of the computer using the supplied USB cable. 4 Touch...


