Operating Guide
Page 6
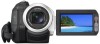
...) - "First Step Guide" for help. This equipment generates, uses, and can radiate radio frequency energy and, if not installed and used with your camcorder You can use mini DV cassettes marked with the instructions, may apply, See www.dtsc.ca.gov/hazardouswaste/perchlorate Perchlorate Material: Lithium battery contains perchlorate. Types of cassette...
...) - "First Step Guide" for help. This equipment generates, uses, and can radiate radio frequency energy and, if not installed and used with your camcorder You can use mini DV cassettes marked with the instructions, may apply, See www.dtsc.ca.gov/hazardouswaste/perchlorate Perchlorate Material: Lithium battery contains perchlorate. Types of cassette...
Operating Guide
Page 8
...the viewfinder used in the HDV format on DV format video cameras or on mini DV players (The screen appears blue). Also, the lens for video cameras and offers a quality typical of recording media and other accessories are based on the model HDR-HC7. The model name is indicated on ...the bottom of tapes by Carl Zeiss, in Germany, and Sony Corporation, and produces superior images. Check the contents of your camcorder is equipped with a Carl Zeiss lens, which was developed ...
...the viewfinder used in the HDV format on DV format video cameras or on mini DV players (The screen appears blue). Also, the lens for video cameras and offers a quality typical of recording media and other accessories are based on the model HDR-HC7. The model name is indicated on ...the bottom of tapes by Carl Zeiss, in Germany, and Sony Corporation, and produces superior images. Check the contents of your camcorder is equipped with a Carl Zeiss lens, which was developed ...

Operating Guide
Page 9
...Note on the icons used in this manual Features available for the HDV format only Features available for the DV format only IMPORTANT SAFEGUARDS .........3 Read this first 5 Enjoying pictures with high definition quality Trying out the new HDV format! ... 11 Viewing video recorded in the HDV format 12 Getting ... CTRL dial (HDR-HC7 27 Using the flash 27 Recording in dark places (NightShot 28 Adjusting the exposure for backlit subjects 28 Recording in mirror mode 28 Using the menu items .......... 40 Menu items 41 CAMERA SET menu 43 Settings to adjust your camcorder to the recording...
...Note on the icons used in this manual Features available for the HDV format only Features available for the DV format only IMPORTANT SAFEGUARDS .........3 Read this first 5 Enjoying pictures with high definition quality Trying out the new HDV format! ... 11 Viewing video recorded in the HDV format 12 Getting ... CTRL dial (HDR-HC7 27 Using the flash 27 Recording in dark places (NightShot 28 Adjusting the exposure for backlit subjects 28 Recording in mirror mode 28 Using the menu items .......... 40 Menu items 41 CAMERA SET menu 43 Settings to adjust your camcorder to the recording...
Operating Guide
Page 11
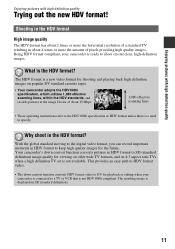
...is the HDV format? Why shoot in SD (standard definition). 11 Your camcorder's down convert function converts HDV format video to DV for shooting and playing back high definition images on 4:3 aspect ratio TVs when a high definition TV set is a need to specify. With the ...The resulting image is connected to shoot crystal clear, high-definition images. Enjoying pictures with high definition quality Enjoying pictures with high definition quality Trying out the new HDV format! Being HDV format compliant, your camcorder is displayed in the HDV format? This provides an...
...is the HDV format? Why shoot in SD (standard definition). 11 Your camcorder's down convert function converts HDV format video to DV for shooting and playing back high definition images on 4:3 aspect ratio TVs when a high definition TV set is a need to specify. With the ...The resulting image is connected to shoot crystal clear, high-definition images. Enjoying pictures with high definition quality Enjoying pictures with high definition quality Trying out the new HDV format! Being HDV format compliant, your camcorder is displayed in the HDV format? This provides an...

Operating Guide
Page 16
... changing the battery pack, slide the POWER switch to the DC IN jack of your camcorder, even when the power cord is disconnected from the battery as long as the AC Adaptor is closed HDV DV HDV DV 105 115 120 130 140 150 160 170 230 245 255 280 525 565 590... Battery Info only). • The power will not be supplied from the wall outlet. HDR-HC5 Battery pack Recorded Format NP-FH50 NP-FH60 (supplied) NP-FH70 NP-FH100 LCD panel LCD panel opened* closed HDV DV HDV DV 110 120 125 135 145 160 165 180 235 255 270 290 545 590 615...
... changing the battery pack, slide the POWER switch to the DC IN jack of your camcorder, even when the power cord is disconnected from the battery as long as the AC Adaptor is closed HDV DV HDV DV 105 115 120 130 140 150 160 170 230 245 255 280 525 565 590... Battery Info only). • The power will not be supplied from the wall outlet. HDR-HC5 Battery pack Recorded Format NP-FH50 NP-FH60 (supplied) NP-FH70 NP-FH100 LCD panel LCD panel opened* closed HDV DV HDV DV 110 120 125 135 145 160 165 180 235 255 270 290 545 590 615...

Operating Guide
Page 35
...Use the supplied AC Adaptor as SD (standard definition) images regardless of the connection. • When recording, set automatically. 1 Touch [GUIDE]. 2 Touch [CNNECT GUIDE]. 3 Connect your camcorder and TV according to be connected. An example of connecting to a high definition TV 1 Touch [TV] t [HD TV...]. 2 Select the TV input jacks with an i.LINK cable. • Pictures recorded in the DV format are played back as the power source ...
...Use the supplied AC Adaptor as SD (standard definition) images regardless of the connection. • When recording, set automatically. 1 Touch [GUIDE]. 2 Touch [CNNECT GUIDE]. 3 Connect your camcorder and TV according to be connected. An example of connecting to a high definition TV 1 Touch [TV] t [HD TV...]. 2 Select the TV input jacks with an i.LINK cable. • Pictures recorded in the DV format are played back as the power source ...
Operating Guide
Page 36
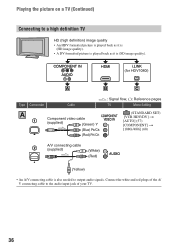
...Camcorder Cable A 1 Component video cable (supplied) (Green) Y (Blue) PB/CB (Red) PR/CR : Signal flow, ( ): Reference pages TV Menu Setting (STANDARD SET) [VCR HDV/DV] t [AUTO] (57) [COMPONENT] t [1080i/480i] (60) 2 A/V connecting cable (supplied) (White) (Red) (Yellow) • An A/V connecting cable is also needed to a high definition TV HD (high definition...) image quality • An HDV formatted picture is played back as it is (HD image quality). • A DV formatted picture is played back as it ...
...Camcorder Cable A 1 Component video cable (supplied) (Green) Y (Blue) PB/CB (Red) PR/CR : Signal flow, ( ): Reference pages TV Menu Setting (STANDARD SET) [VCR HDV/DV] t [AUTO] (57) [COMPONENT] t [1080i/480i] (60) 2 A/V connecting cable (supplied) (White) (Red) (Yellow) • An A/V connecting cable is also needed to a high definition TV HD (high definition...) image quality • An HDV formatted picture is played back as it is (HD image quality). • A DV formatted picture is played back as it ...
Operating Guide
Page 37
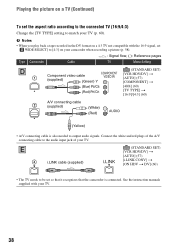
... (e.g., no sound or image). See the instruction manuals supplied with the HDMI logo (on the front cover). • Pictures in the DV format are not output from the HDMI OUT jack, if copyright protection signals are recorded in . • The TV needs to... cable as it recognizes that it is connected. Connecting to a 16:9 (wide) or 4:3 TV SD (standard definition) image quality • An HDV formatted picture is not compatible with HDV1080i specification, connect your camcorder and TV with HDV1080i specification. For details, confirm the specifications of your TV. • If your...
... (e.g., no sound or image). See the instruction manuals supplied with the HDMI logo (on the front cover). • Pictures in the DV format are not output from the HDMI OUT jack, if copyright protection signals are recorded in . • The TV needs to... cable as it recognizes that it is connected. Connecting to a 16:9 (wide) or 4:3 TV SD (standard definition) image quality • An HDV formatted picture is not compatible with HDV1080i specification, connect your camcorder and TV with HDV1080i specification. For details, confirm the specifications of your TV. • If your...
Operating Guide
Page 38
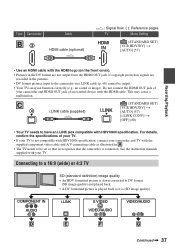
...on your TV. 38 E 4 i.LINK cable (supplied) (STANDARD SET) [VCR HDV/DV] t [AUTO] (57) [i.LINK CONV] t [ON HDV t DV] (60) • The TV needs to be set so that it recognizes that the camcorder is also needed to output audio signals. b Notes • When you play back ...a tape recorded in the DV format on a 4:3 TV not compatible with your camcorder when recording a picture (p. 58). : Signal flow, ( ): Reference pages Type Camcorder Cable TV Menu Setting D 1 Component video cable (supplied) (Green) Y (Blue) PB/CB ...
...on your TV. 38 E 4 i.LINK cable (supplied) (STANDARD SET) [VCR HDV/DV] t [AUTO] (57) [i.LINK CONV] t [ON HDV t DV] (60) • The TV needs to be set so that it recognizes that the camcorder is also needed to output audio signals. b Notes • When you play back ...a tape recorded in the DV format on a 4:3 TV not compatible with your camcorder when recording a picture (p. 58). : Signal flow, ( ): Reference pages Type Camcorder Cable TV Menu Setting D 1 Component video cable (supplied) (Green) Y (Blue) PB/CB ...
Operating Guide
Page 39
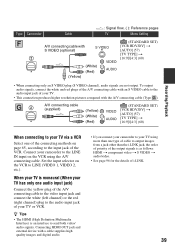
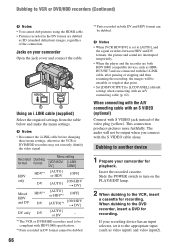
Connect your camcorder to the LINE IN input on the VCR to LINE (VIDEO 1, VIDEO 2, etc.). z Tips • The HDMI (High Definition Multimedia Interface) is monaural (When your TV has only one audio input jack) Connect the yellow plug of the A/V ...connection produces higher resolution pictures compared with S VIDEO (optional) 2 (Yellow) (White) (Red) : Signal flow, ( ): Reference pages TV Menu Setting (STANDARD SET) [VCR HDV/DV] t [AUTO] (57) [TV TYPE] t [16:9]/[4:3] (60) • When connecting only an S VIDEO plug (S VIDEO channel), audio signals are not output. Connecting HDMI OUT...
Connect your camcorder to the LINE IN input on the VCR to LINE (VIDEO 1, VIDEO 2, etc.). z Tips • The HDMI (High Definition Multimedia Interface) is monaural (When your TV has only one audio input jack) Connect the yellow plug of the A/V ...connection produces higher resolution pictures compared with S VIDEO (optional) 2 (Yellow) (White) (Red) : Signal flow, ( ): Reference pages TV Menu Setting (STANDARD SET) [VCR HDV/DV] t [AUTO] (57) [TV TYPE] t [16:9]/[4:3] (60) • When connecting only an S VIDEO plug (S VIDEO channel), audio signals are not output. Connecting HDMI OUT...
Operating Guide
Page 56
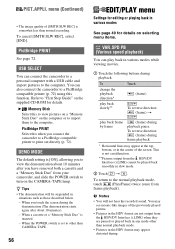
...72) using this to view pictures on a "Memory Stick Duo" on selecting menu items. VAR.SPD PB (Various speed playback) You can connect the camcorder to a personal computer with a USB cable and import pictures to print out directly (p. 72). DEMO MODE The default setting is not a malfunction. **... allowing you connect the camcorder to a PictBridge compatible printer to the computer. Refer to "First Step Guide" on the supplied CD-ROM for details on the computer or to import them to the normal playback mode, touch (Play/Pause) twice (once from the HDV/DV Interface (i.LINK) when ...
...72) using this to view pictures on a "Memory Stick Duo" on selecting menu items. VAR.SPD PB (Various speed playback) You can connect the camcorder to a personal computer with a USB cable and import pictures to print out directly (p. 72). DEMO MODE The default setting is not a malfunction. **... allowing you connect the camcorder to a PictBridge compatible printer to the computer. Refer to "First Step Guide" on the supplied CD-ROM for details on the computer or to import them to the normal playback mode, touch (Play/Pause) twice (once from the HDV/DV Interface (i.LINK) when ...
Operating Guide
Page 57
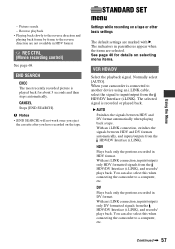
...AUTO]. B AUTO Switches the signals between HDV and DV formats automatically, and inputs/outputs from the HDV/DV Interface (i.LINK), and records/ plays back. You can also select this when connecting the camcorder to input/output from the HDV/DV Interface (i.LINK), and records/ plays back. Continued ,... tape or other basic settings The default settings are marked with B. You can also select this when connecting the camcorder to the reverse direction are selected. DV Plays back only the portions recorded in HDV format. REC CTRL (Movie recording control) See page 68. Using the...
...AUTO]. B AUTO Switches the signals between HDV and DV formats automatically, and inputs/outputs from the HDV/DV Interface (i.LINK), and records/ plays back. You can also select this when connecting the camcorder to input/output from the HDV/DV Interface (i.LINK), and records/ plays back. Continued ,... tape or other basic settings The default settings are marked with B. You can also select this when connecting the camcorder to the reverse direction are selected. DV Plays back only the portions recorded in HDV format. REC CTRL (Movie recording control) See page 68. Using the...
Operating Guide
Page 58
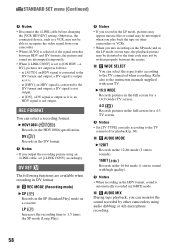
...the LP mode, pictures may appear mosaic-like or sound may be interrupted when you play back the tape on other camcorders using an i.LINK cable, set to the DV format and output; b Notes • Set [TV TYPE] correctly according to the TV connected when recording. B HDV1080i... screen. LP (LP) Increases the recording time to the instruction manuals supplied with high quality). x AUDIO MODE B 12BIT Records in the 12-bit mode (2 stereo sounds). 16BIT ( ) Records in the LP mode on a cassette. DV ( ) Records in the HDV1080i specification. Otherwise, the connected device, such as...
...the LP mode, pictures may appear mosaic-like or sound may be interrupted when you play back the tape on other camcorders using an i.LINK cable, set to the DV format and output; b Notes • Set [TV TYPE] correctly according to the TV connected when recording. B HDV1080i... screen. LP (LP) Increases the recording time to the instruction manuals supplied with high quality). x AUDIO MODE B 12BIT Records in the 12-bit mode (2 stereo sounds). 16BIT ( ) Records in the LP mode on a cassette. DV ( ) Records in the HDV1080i specification. Otherwise, the connected device, such as...
Operating Guide
Page 60
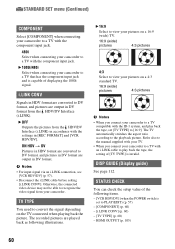
...are converted to play back the tape, set to DV format, and pictures are output in DV format from your camcorder to convert the signal depending on a 4:3 standard TV. 16:9 (wide) pictures 4:3 pictures b Notes • When you connect your camcorder to a TV compatible with the settings in HDV ... manual supplied with your TV. • When you connect your camcorder to a TV with an i.LINK cable to DV format, and pictures in DV format are output in DV format. ON HDV t DV Pictures in [REC FORMAT] and [VCR HDV/DV]. The recorded pictures are played back as following items. - [...
...are converted to play back the tape, set to DV format, and pictures are output in DV format from your camcorder to convert the signal depending on a 4:3 standard TV. 16:9 (wide) pictures 4:3 pictures b Notes • When you connect your camcorder to a TV compatible with the settings in HDV ... manual supplied with your TV. • When you connect your camcorder to a TV with an i.LINK cable to DV format, and pictures in DV format are output in DV format. ON HDV t DV Pictures in [REC FORMAT] and [VCR HDV/DV]. The recorded pictures are played back as following items. - [...
Operating Guide
Page 66
The audio will be compliant with the S VIDEO cable alone. Slide the POWER switch to turn on your camcorder Open the jack cover and connect the cable. HDV/DV A/V OUT 1 2 Using an i.LINK cable (supplied) Select the required settings from the table below and make the ...dubbed. If your camcorder for playback. When connecting with the A/V connecting cable with an S VIDEO (optional) Connect with an A/V connecting cable (p. 62). Insert the recorded cassette. b Notes • When [VCR HDV/DV] is set it to the appropriate input (such as SD (standard definition) images, regardless of...
The audio will be compliant with the S VIDEO cable alone. Slide the POWER switch to turn on your camcorder Open the jack cover and connect the cable. HDV/DV A/V OUT 1 2 Using an i.LINK cable (supplied) Select the required settings from the table below and make the ...dubbed. If your camcorder for playback. When connecting with the A/V connecting cable with an S VIDEO (optional) Connect with an A/V connecting cable (p. 62). Insert the recorded cassette. b Notes • When [VCR HDV/DV] is set it to the appropriate input (such as SD (standard definition) images, regardless of...
Operating Guide
Page 67
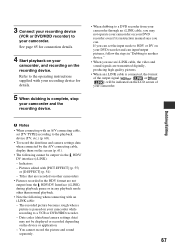
...the steps in "Dubbing to a DVD recorder from the HDV/DV Interface (i.LINK) during playback pause or in the HDV format are transmitted digitally, producing high quality pictures. • When an i.LINK cable is paused on your camcorder while recording to a VCR or DVD/HDD recorder. - Titles ...playback mode other than normal playback. • Note the following cannot be output via the HDV/ DV interface (i.LINK): - See page 65 for details. 5 When dubbing is complete, stop your camcorder and the recording device. • When dubbing to another device." • When you can. ...
...the steps in "Dubbing to a DVD recorder from the HDV/DV Interface (i.LINK) during playback pause or in the HDV format are transmitted digitally, producing high quality pictures. • When an i.LINK cable is paused on your camcorder while recording to a VCR or DVD/HDD recorder. - Titles ...playback mode other than normal playback. • Note the following cannot be output via the HDV/ DV interface (i.LINK): - See page 65 for details. 5 When dubbing is complete, stop your camcorder and the recording device. • When dubbing to another device." • When you can. ...
Operating Guide
Page 68
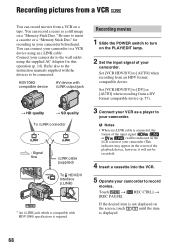
...8226; When an i.LINK cable is displayed. 68 You can connect your camcorder to a VCR device using the supplied AC Adaptor for recording in your camcorder beforehand. Set [VCR HDV/DV] to [DV] or [AUTO] when recording from a DV format compatible device (p. 57). 3 Connect your VCR as a still image ...signal ( or ) will not be recorded). 4 Insert a cassette into the VCR. 5 Operate your camcorder to record movies. If the desired item is required. Set [VCR HDV/DV] to [AUTO] when recording from an HDV format compatible device. Refer also to the instruction manuals supplied...
...8226; When an i.LINK cable is displayed. 68 You can connect your camcorder to a VCR device using the supplied AC Adaptor for recording in your camcorder beforehand. Set [VCR HDV/DV] to [DV] or [AUTO] when recording from a DV format compatible device (p. 57). 3 Connect your VCR as a still image ...signal ( or ) will not be recorded). 4 Insert a cassette into the VCR. 5 Operate your camcorder to record movies. If the desired item is required. Set [VCR HDV/DV] to [AUTO] when recording from an HDV format compatible device. Refer also to the instruction manuals supplied...
Operating Guide
Page 69
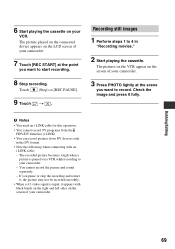
...Stop) or [REC PAUSE]. 9 Touch t . Recording still images 1 Perform steps 1 to 4 in the DV format. • Note the following when connecting with black bands on the right and left sides on the screen of your camcorder. Dubbing/Editing 69 The pictures on the VCR appear on the LCD screen of your... camcorder. 3 Press PHOTO lightly at the point you want to start recording. 8 Stop recording. b Notes • You need an i.LINK cable for this operation. • You cannot record TV programs from the HDV/DV Interface (i.LINK). • You can record ...
...Stop) or [REC PAUSE]. 9 Touch t . Recording still images 1 Perform steps 1 to 4 in the DV format. • Note the following when connecting with black bands on the right and left sides on the screen of your camcorder. Dubbing/Editing 69 The pictures on the VCR appear on the LCD screen of your... camcorder. 3 Press PHOTO lightly at the point you want to start recording. 8 Stop recording. b Notes • You need an i.LINK cable for this operation. • You cannot record TV programs from the HDV/DV Interface (i.LINK). • You can record ...
Operating Guide
Page 70
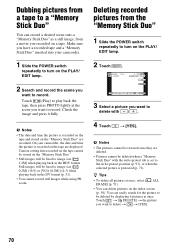
...picture you want to record. Make sure you have a recorded tape and a "Memory Stick Duo" inserted into your camcorder, the date and time the picture is recorded on the tape are recorded. z Tips • To delete all ...min 6.1M 101-0001 1 / 10 101 MEMORY PLAY GUIDE P-MENU 3 Select a picture you want to record. On your camcorder. 1 Slide the POWER switch repeatedly to turn on the PLAY/ EDIT lamp. 2 Search and record the scene you recorded on... want to image size [ 1.2M] when playing back in the DV format (p. 51). • You cannot record still images while using PB zoom.
...picture you want to record. Make sure you have a recorded tape and a "Memory Stick Duo" inserted into your camcorder, the date and time the picture is recorded on the tape are recorded. z Tips • To delete all ...min 6.1M 101-0001 1 / 10 101 MEMORY PLAY GUIDE P-MENU 3 Select a picture you want to record. On your camcorder. 1 Slide the POWER switch repeatedly to turn on the PLAY/ EDIT lamp. 2 Search and record the scene you recorded on... want to image size [ 1.2M] when playing back in the DV format (p. 51). • You cannot record still images while using PB zoom.
Operating Guide
Page 75
...2.8 GHz CPU or faster (Intel Pentium 4 3.2 GHz or faster, Intel Pentium D, or Intel Core Duo is recommended.) For processing SD (standard definition) image quality content only, an Intel Pentium III 1 GHz or faster is necessary. It is necessary to have DirectX installed.) Sound system: Direct ...will not be provided as standard), DV Interface (IEEE1394, i.LINK) (to the computer. • When using a "Memory Stick PRO Duo" and your computer is not assured if the above OS has been upgraded. z Tips • If your camcorder with HD (high definition) image quality, resulting in a multiboot...
...2.8 GHz CPU or faster (Intel Pentium 4 3.2 GHz or faster, Intel Pentium D, or Intel Core Duo is recommended.) For processing SD (standard definition) image quality content only, an Intel Pentium III 1 GHz or faster is necessary. It is necessary to have DirectX installed.) Sound system: Direct ...will not be provided as standard), DV Interface (IEEE1394, i.LINK) (to the computer. • When using a "Memory Stick PRO Duo" and your computer is not assured if the above OS has been upgraded. z Tips • If your camcorder with HD (high definition) image quality, resulting in a multiboot...


