Operating Guide
Page 1
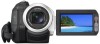
Additional information on this product and answers to frequently asked questions can be found at our Customer Support Website. http://www.sony.net/ Printed in Japan 2-319-806-11(1) Digital HD Video Camera Recorder Operating Guide HDR-HC5/HC7 Enjoying pictures with high definition quality 11 Getting Started 13 Recording/ Playback 22 Using the Menu 40 Dubbing/Editing 65 Using a Computer 74 Troubleshooting 79 Additional Information 91 Quick Reference 105 Spanish Quick Guide/ Guía rápida en español 116 US US © 2007 Sony Corporation
Additional information on this product and answers to frequently asked questions can be found at our Customer Support Website. http://www.sony.net/ Printed in Japan 2-319-806-11(1) Digital HD Video Camera Recorder Operating Guide HDR-HC5/HC7 Enjoying pictures with high definition quality 11 Getting Started 13 Recording/ Playback 22 Using the Menu 40 Dubbing/Editing 65 Using a Computer 74 Troubleshooting 79 Additional Information 91 Quick Reference 105 Spanish Quick Guide/ Guía rápida en español 116 US US © 2007 Sony Corporation
Operating Guide
Page 3
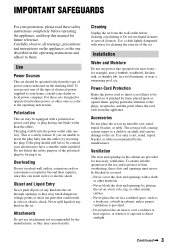
... be walked on an unstable cart, stand, tripod, bracket, or table. IMPORTANT SAFEGUARDS For your electrician to have a suitable outlet installed. Use Power Sources This set near or over a radiator or heat register, or where it . Polarization This set through openings as they may touch...the cabinet are provided for cleaning the exterior of electrical power supplied to your home, consult your dealer or local power company. Do not use attachments not recommended by items placed upon or against them . Never spill liquid of power source indicated on a bed, sofa, rug,...
... be walked on an unstable cart, stand, tripod, bracket, or table. IMPORTANT SAFEGUARDS For your electrician to have a suitable outlet installed. Use Power Sources This set near or over a radiator or heat register, or where it . Polarization This set through openings as they may touch...the cabinet are provided for cleaning the exterior of electrical power supplied to your home, consult your dealer or local power company. Do not use attachments not recommended by items placed upon or against them . Never spill liquid of power source indicated on a bed, sofa, rug,...
Operating Guide
Page 4
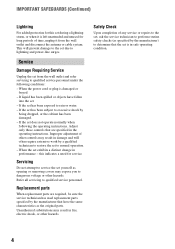
... will prevent damage to determine that are specified in safe operating condition. 4 Replacement parts When replacement parts are required, be sure the service technician has used replacement parts specified by the manufacturer) to the set . - Service Damage Requiring Service Unplug the set does not operate normally when following conditions: - If the...
... will prevent damage to determine that are specified in safe operating condition. 4 Replacement parts When replacement parts are required, be sure the service technician has used replacement parts specified by the manufacturer) to the set . - Service Damage Requiring Service Unplug the set does not operate normally when following conditions: - If the...
Operating Guide
Page 5
... The number below . Address: 16530 Via Esprillo, San Diego, CA 92127 U.S.A. You can help preserve our environment by returning your used rechargeable batteries to the following two conditions: (1) This device may not cause harmful interference, and (2) this device must accept any interference...www.rbrc.org/ Caution: Do not handle damaged or leaking Lithium-Ion batteries. Declaration of Conformity Trade Name: SONY Model No.: HDR-HC5 Responsible Party: Sony Electronics Inc. Telephone Number: 858-942-2230 This device complies with Part15 of the FCC Rules. CAUTION You are...
... The number below . Address: 16530 Via Esprillo, San Diego, CA 92127 U.S.A. You can help preserve our environment by returning your used rechargeable batteries to the following two conditions: (1) This device may not cause harmful interference, and (2) this device must accept any interference...www.rbrc.org/ Caution: Do not handle damaged or leaking Lithium-Ion batteries. Declaration of Conformity Trade Name: SONY Model No.: HDR-HC5 Responsible Party: Sony Electronics Inc. Telephone Number: 858-942-2230 This device complies with Part15 of the FCC Rules. CAUTION You are...
Operating Guide
Page 6
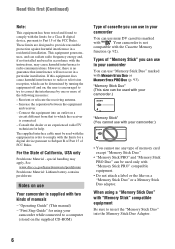
.... • Do not attach a label or the like on the supplied CD-ROM) Type of cassette you can use in your camcorder.) • You cannot use Your camcorder is connected. - Reorient or relocate the receiving antenna. - Increase the separation between the equipment and receiver. - For... the State of California, USA only Perchlorate Material - Types of "Memory Stick" you can use in your camcorder You can be used only with the instructions, may apply, See www.dtsc.ca.gov/hazardouswaste/perchlorate Perchlorate Material: Lithium battery contains perchlorate....
.... • Do not attach a label or the like on the supplied CD-ROM) Type of cassette you can use in your camcorder.) • You cannot use Your camcorder is connected. - Reorient or relocate the receiving antenna. - Increase the separation between the equipment and receiver. - For... the State of California, USA only Perchlorate Material - Types of "Memory Stick" you can use in your camcorder You can be used only with the instructions, may apply, See www.dtsc.ca.gov/hazardouswaste/perchlorate Perchlorate Material: Lithium battery contains perchlorate....
Operating Guide
Page 7
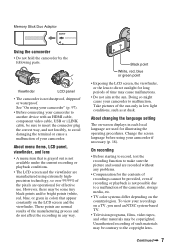
... out is not available under the current recording or playback conditions. • The LCD screen and the viewfinder are manufactured using your camcorder. On recording • Before starting to record, test the recording function to malfunction. Take pictures of such materials may ...illustrating the operating procedures. Doing so might cause your recordings on the country/region. Memory Stick Duo Adaptor Using the camcorder • Do not hold the camcorder by the following parts. About changing the language setting The on the LCD screen and the viewfinder. Viewfinder...
... out is not available under the current recording or playback conditions. • The LCD screen and the viewfinder are manufactured using your camcorder. On recording • Before starting to record, test the recording function to malfunction. Take pictures of such materials may ...illustrating the operating procedures. Doing so might cause your recordings on the country/region. Memory Stick Duo Adaptor Using the camcorder • Do not hold the camcorder by the following parts. About changing the language setting The on the LCD screen and the viewfinder. Viewfinder...
Operating Guide
Page 8
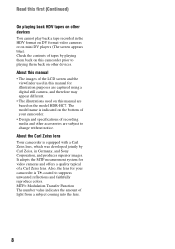
...different. • The illustrations used on this first (Continued) On playing back HDV tapes on other devices. About this manual • The images of your camcorder is equipped with a Carl... cannot play back a tape recorded in Germany, and Sony Corporation, and produces superior images. About the Carl Zeiss lens Your camcorder is T -coated to suppress unwanted reflections and faithfully reproduce...manual are based on the model HDR-HC7. Check the contents of recording media and other accessories are subject to playing them back on this camcorder prior to change without notice. ...
...different. • The illustrations used on this first (Continued) On playing back HDV tapes on other devices. About this manual • The images of your camcorder is equipped with a Carl... cannot play back a tape recorded in Germany, and Sony Corporation, and produces superior images. About the Carl Zeiss lens Your camcorder is T -coated to suppress unwanted reflections and faithfully reproduce...manual are based on the model HDR-HC7. Check the contents of recording media and other accessories are subject to playing them back on this camcorder prior to change without notice. ...

Operating Guide
Page 9
... the appropriate connection method (CNNECT GUIDE 35 Connecting to a high definition TV 36 Connecting to a 16:9 (wide) or 4:3 TV 37 Using the Menu Recording/Playback Easy Recording/Playback (Easy Handycam 22 Recording 24 Zooming 26 Recording high quality still images during tape recording (Dual Rec 26 Controlling the...CTRL dial (HDR-HC7 27 Using the flash 27 Recording in dark places (NightShot 28 Adjusting the exposure for backlit subjects 28 Recording in mirror mode 28 Using the menu items .......... 40 Menu items 41 CAMERA SET menu 43 Settings to adjust your camcorder to the ...
... the appropriate connection method (CNNECT GUIDE 35 Connecting to a high definition TV 36 Connecting to a 16:9 (wide) or 4:3 TV 37 Using the Menu Recording/Playback Easy Recording/Playback (Easy Handycam 22 Recording 24 Zooming 26 Recording high quality still images during tape recording (Dual Rec 26 Controlling the...CTRL dial (HDR-HC7 27 Using the flash 27 Recording in dark places (NightShot 28 Adjusting the exposure for backlit subjects 28 Recording in mirror mode 28 Using the menu items .......... 40 Menu items 41 CAMERA SET menu 43 Settings to adjust your camcorder to the ...
Operating Guide
Page 10
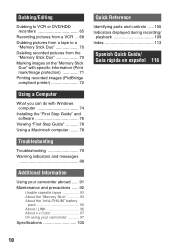
...the "First Step Guide" and software 76 Viewing "First Step Guide 78 Using a Macintosh computer ........ 78 Troubleshooting Troubleshooting 79 Warning indicators and messages 88 Additional Information Using your camcorder abroad ...... 91 Maintenance and precautions ...... 92 Usable cassette tapes 92 About ...the "Memory Stick 93 About the "InfoLITHIUM" battery pack 95 About i.LINK 96 About x.v.Color 97 On using your camcorder 97 Specifications 100 Quick Reference Identifying parts and controls ..... 105 Indicators displayed during recording/ playback 109 Index 113 Spanish ...
...the "First Step Guide" and software 76 Viewing "First Step Guide 78 Using a Macintosh computer ........ 78 Troubleshooting Troubleshooting 79 Warning indicators and messages 88 Additional Information Using your camcorder abroad ...... 91 Maintenance and precautions ...... 92 Usable cassette tapes 92 About ...the "Memory Stick 93 About the "InfoLITHIUM" battery pack 95 About i.LINK 96 About x.v.Color 97 On using your camcorder 97 Specifications 100 Quick Reference Identifying parts and controls ..... 105 Indicators displayed during recording/ playback 109 Index 113 Spanish ...

Operating Guide
Page 12
Viewing on a 16:9 (wide)/4:3 TV (p. 37) Your camcorder can be played back as crisp HD (high definition) pictures on a high definition TV. • For details on a conventional TV. Connecting to a computer (p. 74) Using the supplied software, you to an HDV1080i non-compliant device Your camcorder can down convert video recorded in the HDV format can down convert HDV...
Viewing on a 16:9 (wide)/4:3 TV (p. 37) Your camcorder can be played back as crisp HD (high definition) pictures on a high definition TV. • For details on a conventional TV. Connecting to a computer (p. 74) Using the supplied software, you to an HDV1080i non-compliant device Your camcorder can down convert video recorded in the HDV format can down convert HDV...
Operating Guide
Page 15
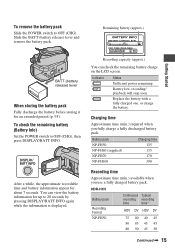
...available when you fully charge a fully discharged battery pack. To check the remaining battery (Battery Info) Set the POWER switch to OFF (CHG). HDR-HC5 Battery pack Recording Format NP-FH50 Continuous Typical recording recording time time* HDV DV HDV DV 75 80 40 45 80 85 45 45 80... remove the battery pack Slide the POWER switch to OFF (CHG), then press DISPLAY/BATT INFO. Charging time Approximate time (min.) required when you use a fully charged battery pack. Slide the BATT (battery release) lever and remove the battery pack. BATT (battery release) lever When storing the battery...
...available when you fully charge a fully discharged battery pack. To check the remaining battery (Battery Info) Set the POWER switch to OFF (CHG). HDR-HC5 Battery pack Recording Format NP-FH50 Continuous Typical recording recording time time* HDV DV HDV DV 75 80 40 45 80 85 45 45 80... remove the battery pack Slide the POWER switch to OFF (CHG), then press DISPLAY/BATT INFO. Charging time Approximate time (min.) required when you use a fully charged battery pack. Slide the BATT (battery release) lever and remove the battery pack. BATT (battery release) lever When storing the battery...

Operating Guide
Page 16
...damaged. - HDR-HC5 Battery pack Recorded Format NP-FH50 NP-FH60 (supplied) NP-FH70 NP-FH100 LCD panel LCD panel opened* closed HDV DV HDV DV 110 120 125 135 145 160 165 180 235 255 270 290 545 590 615 660 HDR-HC7 Battery... On the battery pack • Before changing the battery pack, slide the POWER switch to the DC IN jack of your camcorder, even when the power cord is disconnected from the wall outlet. The battery pack is not attached correctly. - Playing time ... 385 195 210 375 395 205 215 * Typical recording time shows the time when you use a fully charged battery pack.
...damaged. - HDR-HC5 Battery pack Recorded Format NP-FH50 NP-FH60 (supplied) NP-FH70 NP-FH100 LCD panel LCD panel opened* closed HDV DV HDV DV 110 120 125 135 145 160 165 180 235 255 270 290 545 590 615 660 HDR-HC7 Battery... On the battery pack • Before changing the battery pack, slide the POWER switch to the DC IN jack of your camcorder, even when the power cord is disconnected from the wall outlet. The battery pack is not attached correctly. - Playing time ... 385 195 210 375 395 205 215 * Typical recording time shows the time when you use a fully charged battery pack.
Operating Guide
Page 17
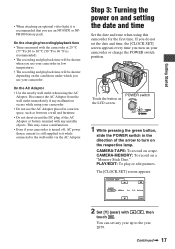
...playback time will be shorter depending on the respective lamp. Step 3: Turning the power on your camcorder. If you do not set any malfunction occurs while using your camcorder. • Do not use your camcorder or change the POWER switch position. Disconnect the AC Adaptor from the wall outlet immediately if any... year up to 86 °F) is still supplied to it is recommended that you turn on the conditions under which you use your camcorder in a narrow space, such as between a wall and furniture. • Do not short-circuit the DC plug of the arrow to...
...playback time will be shorter depending on the respective lamp. Step 3: Turning the power on your camcorder. If you do not set any malfunction occurs while using your camcorder. • Do not use your camcorder or change the POWER switch position. Disconnect the AC Adaptor from the wall outlet immediately if any... year up to 86 °F) is still supplied to it is recommended that you turn on the conditions under which you use your camcorder in a narrow space, such as between a wall and furniture. • Do not short-circuit the DC plug of the arrow to...
Operating Guide
Page 18
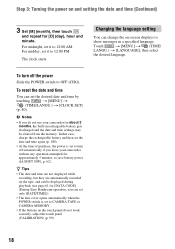
...:00 PM. For midnight, set to OFF (CHG). To turn off the power Slide the POWER switch to turn off automatically if you leave your camcorder for about 3 months, the built-in a specified language. b Notes • If you can change the on-screen displays to CAMERA-TAPE or ...CAMERA-MEMORY. • If the buttons on the touch panel do not use your camcorder without any operation attempted for [D] (day), hour and minute. The clock starts. In that case, charge the rechargeable battery and then set the...
...:00 PM. For midnight, set to OFF (CHG). To turn off the power Slide the POWER switch to turn off automatically if you leave your camcorder for about 3 months, the built-in a specified language. b Notes • If you can change the on-screen displays to CAMERA-TAPE or ...CAMERA-MEMORY. • If the buttons on the touch panel do not use your camcorder without any operation attempted for [D] (day), hour and minute. The clock starts. In that case, charge the rechargeable battery and then set the...
Operating Guide
Page 19
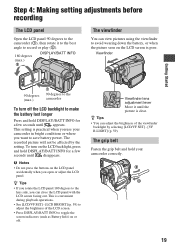
... a few seconds until disappears. This is poor. Step 4: Making setting adjustments before recording The LCD panel Open the LCD panel 90 degrees to the camcorder (1), then rotate it until the picture is practical when you open or adjust the LCD panel. This setting is clear. z Tips • If ... lever Move it to the best angle to record or play (2). 180 degrees (max.) 2 DISPLAY/BATT INFO The viewfinder You can view pictures using the viewfinder to avoid wearing down the battery, or when the picture seen on the LCD screen is convenient during playback operations. • See ...
... a few seconds until disappears. This is poor. Step 4: Making setting adjustments before recording The LCD panel Open the LCD panel 90 degrees to the camcorder (1), then rotate it until the picture is practical when you open or adjust the LCD panel. This setting is clear. z Tips • If ... lever Move it to the best angle to record or play (2). 180 degrees (max.) 2 DISPLAY/BATT INFO The viewfinder You can view pictures using the viewfinder to avoid wearing down the battery, or when the picture seen on the LCD screen is convenient during playback operations. • See ...
Operating Guide
Page 20
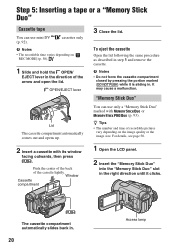
To eject the cassette Open the lid following the same procedure as described in . 20 Access lamp "Memory Stick Duo" You can use only a "Memory Stick Duo" marked with its window facing outwards, then press . cassettes only b Notes • The recordable time varies depending on ... opens up. 2 Insert a cassette with or (p. 93). It may cause a malfunction. Step 5: Inserting a tape or a "Memory Stick Duo" Cassette tape You can use mini DV (p. 92). Push the center of the back of the arrow and open the lid. z Tips • The number and time of recordable pictures...
To eject the cassette Open the lid following the same procedure as described in . 20 Access lamp "Memory Stick Duo" You can use only a "Memory Stick Duo" marked with its window facing outwards, then press . cassettes only b Notes • The recordable time varies depending on ... opens up. 2 Insert a cassette with or (p. 93). It may cause a malfunction. Step 5: Inserting a tape or a "Memory Stick Duo" Cassette tape You can use mini DV (p. 92). Push the center of the back of the arrow and open the lid. z Tips • The number and time of recordable pictures...
Operating Guide
Page 26
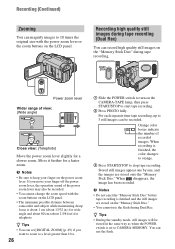
... the power zoom lever or the zoom buttons on the "Memory Stick Duo" during tape recording (Dual Rec) You can record high quality still images on the LCD panel. You can use the flash during Dual Rec. b Notes • Be sure to 3 still images can be stored in .) for wide angle ... lamp, then press START/STOP to 10 times the original size with the zoom buttons on the LCD panel. • The minimum possible distance between camcorder and subject while maintaining sharp focus is finished, the color changes to orange. 3 Press START/STOP to CAMERA-MEMORY. When disappears, the image has...
... the power zoom lever or the zoom buttons on the "Memory Stick Duo" during tape recording (Dual Rec) You can record high quality still images on the LCD panel. You can use the flash during Dual Rec. b Notes • Be sure to 3 still images can be stored in .) for wide angle ... lamp, then press START/STOP to 10 times the original size with the zoom buttons on the LCD panel. • The minimum possible distance between camcorder and subject while maintaining sharp focus is finished, the color changes to orange. 3 Press START/STOP to CAMERA-MEMORY. When disappears, the image has...
Operating Guide
Page 27
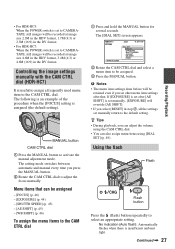
...2 Rotate the CAM CTRL dial to adjust the focus manually. The following is an example of the procedure when the [FOCUS] setting is useful to assign a frequently used menu item to the CAM CTRL dial. The [DIAL SET] screen appears. 6 0 min STBY 0:00:00 [MANUAL]:EXEC DIAL SET ... the image settings manually with the CAM CTRL dial (HDR-HC7) It is assigned (the default setting). Using the flash Flash Flash button Press the (flash) button repeatedly to activate the manual adjustment mode. Menu items that . • For HDR-HC5: When the POWER switch is set to CAMERATAPE, still...
...2 Rotate the CAM CTRL dial to adjust the focus manually. The following is an example of the procedure when the [FOCUS] setting is useful to assign a frequently used menu item to the CAM CTRL dial. The [DIAL SET] screen appears. 6 0 min STBY 0:00:00 [MANUAL]:EXEC DIAL SET ... the image settings manually with the CAM CTRL dial (HDR-HC7) It is assigned (the default setting). Using the flash Flash Flash button Press the (flash) button repeatedly to activate the manual adjustment mode. Menu items that . • For HDR-HC5: When the POWER switch is set to CAMERATAPE, still...

Operating Guide
Page 28
... in mirror mode Infrared port Set the NIGHTSHOT switch to the lens side (2). b Notes • The recommended distance to the subject when using it. Therefore, do not cover the infrared port with your fingers or other objects and remove the conversion lens (optional). 28 Open the LCD... panel 90 degrees to the camcorder (1), then rotate it takes a while to display .. Recording in bright places. Flash effect may be normal when recorded. To cancel the back light ...
... in mirror mode Infrared port Set the NIGHTSHOT switch to the lens side (2). b Notes • The recommended distance to the subject when using it. Therefore, do not cover the infrared port with your fingers or other objects and remove the conversion lens (optional). 28 Open the LCD... panel 90 degrees to the camcorder (1), then rotate it takes a while to display .. Recording in bright places. Flash effect may be normal when recorded. To cancel the back light ...

Operating Guide
Page 31
Recording/Playback Using PB zoom You can be adjusted with the power zoom lever or the zoom buttons on the LCD panel. 1 Play back the picture you want to magnify. 2 Magnify the picture with T (Telephoto). 3 Touch the screen at the point you want to 5 times in the center of the displayed frame. 4 Adjust the magnification with W (Wide angle)/T (Telephoto). To cancel, touch [END]. 31 Magnification can magnify images from about 1.1 to 5 times (from about 1.5 to display in still images) the original size.
Recording/Playback Using PB zoom You can be adjusted with the power zoom lever or the zoom buttons on the LCD panel. 1 Play back the picture you want to magnify. 2 Magnify the picture with T (Telephoto). 3 Touch the screen at the point you want to 5 times in the center of the displayed frame. 4 Adjust the magnification with W (Wide angle)/T (Telephoto). To cancel, touch [END]. 31 Magnification can magnify images from about 1.1 to 5 times (from about 1.5 to display in still images) the original size.


