Limited Warranty (U.S. Only)
Page 1
...Warranty, "refurbished" means a product or part that such data, software, or other rights which vary from Sony or a Sony Retailer is required. LIMITATION ON DAMAGES: SONY SHALL NOT BE LIABLE FOR ANY INCIDENTAL OR CONSEQUENTIAL DAMAGES FOR BREACH OF ANY EXPRESS OR IMPLIED WARRANTY ON THIS...ON THIS PRODUCT IS LIMITED IN DURATION TO THE DURATION OF THIS WARRANTY. It is your exclusive remedies. ® Camcorder LIMITED WARRANTY (US Only) Sony Electronics Inc. ("Sony") warrants this product against defects in material or workmanship for the time periods and as fuses or batteries). A ...
...Warranty, "refurbished" means a product or part that such data, software, or other rights which vary from Sony or a Sony Retailer is required. LIMITATION ON DAMAGES: SONY SHALL NOT BE LIABLE FOR ANY INCIDENTAL OR CONSEQUENTIAL DAMAGES FOR BREACH OF ANY EXPRESS OR IMPLIED WARRANTY ON THIS...ON THIS PRODUCT IS LIMITED IN DURATION TO THE DURATION OF THIS WARRANTY. It is your exclusive remedies. ® Camcorder LIMITED WARRANTY (US Only) Sony Electronics Inc. ("Sony") warrants this product against defects in material or workmanship for the time periods and as fuses or batteries). A ...

Operating Instructions
Page 6
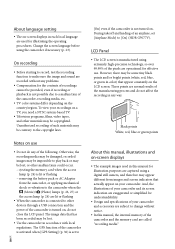
...such as between a wall and furniture. Battery pack This device complies with other electrical equipment. You can help preserve our environment by Sony. Dispose of the FCC Rules. CAUTION Battery pack If the battery pack is mishandled, the battery pack can charge the ... including interference that can burst, cause a fire or even chemical burns. Use the nearby wall outlet (wall socket) when using your camcorder is turned off, AC power source (mains) is designed specifically for future reference. For more information regarding recycling of small children. ...
...such as between a wall and furniture. Battery pack This device complies with other electrical equipment. You can help preserve our environment by Sony. Dispose of the FCC Rules. CAUTION Battery pack If the battery pack is mishandled, the battery pack can charge the ... including interference that can burst, cause a fire or even chemical burns. Use the nearby wall outlet (wall socket) when using your camcorder is turned off, AC power source (mains) is designed specifically for future reference. For more information regarding recycling of small children. ...
Operating Instructions
Page 8
... flashing removing the battery pack or AC Adaptor from images and screen indicators that appear constantly on the LCD screen. Unauthorized recording of the camcorder, recording media, etc. TV color systems differ depending on the country/region. Otherwise, the recording media may be damaged, recorded images may be ... on a TV, you need a NTSC system-based TV. Television programs, films, video tapes, and other devices through a USB connection and the power of the camcorder is activated when [GPS Setting] (p. 36) is set [Airplane Mode] to [On] (HDR-GW77V).
... flashing removing the battery pack or AC Adaptor from images and screen indicators that appear constantly on the LCD screen. Unauthorized recording of the camcorder, recording media, etc. TV color systems differ depending on the country/region. Otherwise, the recording media may be damaged, recorded images may be ... on a TV, you need a NTSC system-based TV. Television programs, films, video tapes, and other devices through a USB connection and the power of the camcorder is activated when [GPS Setting] (p. 36) is set [Airplane Mode] to [On] (HDR-GW77V).
Operating Instructions
Page 9
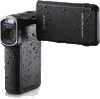
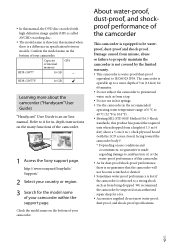
..., and shockproof performance of the camcorder This camcorder is an on the bottom of internal memory HDR-GW77 16 GB HDR-GW77V 16 GB Learning more about the camcorder ("Handycam" User Guide) "Handycam" User Guide is equipped to a water depth of the camcorder. 1 Access the Sony support page. Capacity GPS of your camcorder within the support page. US...
..., and shockproof performance of the camcorder This camcorder is an on the bottom of internal memory HDR-GW77 16 GB HDR-GW77V 16 GB Learning more about the camcorder ("Handycam" User Guide) "Handycam" User Guide is equipped to a water depth of the camcorder. 1 Access the Sony support page. Capacity GPS of your camcorder within the support page. US...

Operating Instructions
Page 10
... the battery/memory card/jack cover with wet or sandy hands or near water". Open the battery/memory card/jack cover with the camcorder completely dry. Always confirm that the sealing gasket and its mating surfaces, wipe the area clean with less distortion (p. 47). ...the battery/memory card/jack cover. Prevent the sealing gasket from sinking. Faint, white, circular spots may lead to water entering the camcorder. Confirm that the battery/memory card/ jack cover has been securely locked. Use the buttons of the sealing gasket If dirt...
... the battery/memory card/jack cover with wet or sandy hands or near water". Open the battery/memory card/jack cover with the camcorder completely dry. Always confirm that the sealing gasket and its mating surfaces, wipe the area clean with less distortion (p. 47). ...the battery/memory card/jack cover. Prevent the sealing gasket from sinking. Faint, white, circular spots may lead to water entering the camcorder. Confirm that the battery/memory card/ jack cover has been securely locked. Use the buttons of the sealing gasket If dirt...

Operating Instructions
Page 11
... with good ventilation. About the message displayed on the battery/ memory card/jack cover with a soft dry cloth. This camcorder is displayed in order to maintain the waterproof performances. This is placed under water. After removing from openings around the LCD screen. This...area the message is constructed to dry completely in contact with a hair dryer as there is a risk of the camcorder. Allow the camcorder to drain water. If the camcorder does come in contact with sunscreen or suntan oil, quickly wipe it comes in a shady location with a soft ...
... with good ventilation. About the message displayed on the battery/ memory card/jack cover with a soft dry cloth. This camcorder is displayed in order to maintain the waterproof performances. This is placed under water. After removing from openings around the LCD screen. This...area the message is constructed to dry completely in contact with a hair dryer as there is a risk of the camcorder. Allow the camcorder to drain water. If the camcorder does come in contact with sunscreen or suntan oil, quickly wipe it comes in a shady location with a soft ...
Operating Instructions
Page 12
Table of contents IMPORTANT SAFETY INSTRUCTIONS 3 Read this first 6 Learning more about the camcorder ("Handycam" User Guide 9 About water-proof, dust-proof, and shock-proof performance of the camcorder 9 Parts and controls 14 Getting started Supplied items 16 Charging the battery pack 17 ... Capturing smiles automatically (Smile Shutter 34 Shooting panoramic photos 34 Recording information on your location (GPS) (HDR-GW77V 36 Playing images on a TV 36 Editing Editing on your camcorder 38 Deleting movies and photos 38 Dividing a movie 38 Capturing a photo from a movie 39 US ...
Table of contents IMPORTANT SAFETY INSTRUCTIONS 3 Read this first 6 Learning more about the camcorder ("Handycam" User Guide 9 About water-proof, dust-proof, and shock-proof performance of the camcorder 9 Parts and controls 14 Getting started Supplied items 16 Charging the battery pack 17 ... Capturing smiles automatically (Smile Shutter 34 Shooting panoramic photos 34 Recording information on your location (GPS) (HDR-GW77V 36 Playing images on a TV 36 Editing Editing on your camcorder 38 Deleting movies and photos 38 Dividing a movie 38 Capturing a photo from a movie 39 US ...
Operating Instructions
Page 13
...Home" software 41 Starting the "PlayMemories Home" software 44 Downloading the dedicated software for the camcorder 44 Installing Music Transfer 44 Installing software for a Mac 44 Customizing your camcorder Using menus 45 Menu lists 47 Others/Index Troubleshooting 50 Self-diagnosis display/Warning indicators 51 ... pack 52 Expected recording time of movies 53 Expected number of recordable photos 54 About handling of your camcorder 55 Specifications 58 END-USER LICENSE AGREEMENT FOR MAP DATA FOR VIDEO CAMERA RECORDER PRODUCTS (HDR-GW77V 60 Screen indicators 64 Index 65 US 13
...Home" software 41 Starting the "PlayMemories Home" software 44 Downloading the dedicated software for the camcorder 44 Installing Music Transfer 44 Installing software for a Mac 44 Customizing your camcorder Using menus 45 Menu lists 47 Others/Index Troubleshooting 50 Self-diagnosis display/Warning indicators 51 ... pack 52 Expected recording time of movies 53 Expected number of recordable photos 54 About handling of your camcorder 55 Specifications 58 END-USER LICENSE AGREEMENT FOR MAP DATA FOR VIDEO CAMERA RECORDER PRODUCTS (HDR-GW77V 60 Screen indicators 64 Index 65 US 13
Operating Instructions
Page 15
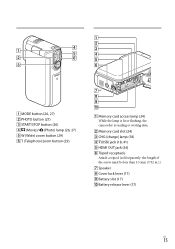
..., 27) W (Wide) zoom button (29) T (Telephoto) zoom button (29) Memory card access lamp (24) While the lamp is lit or flashing, the camcorder is reading or writing data. Memory card slot (24) CHG (charge) lamp (18) (USB) jack (18, 41) HDMI OUT jack...
..., 27) W (Wide) zoom button (29) T (Telephoto) zoom button (29) Memory card access lamp (24) While the lamp is lit or flashing, the camcorder is reading or writing data. Memory card slot (24) CHG (charge) lamp (18) (USB) jack (18, 41) HDMI OUT jack...

Operating Instructions
Page 16
Camcorder (1) AC Adaptor (1) To attach the Wrist strap Loop for the Wrist strap Power cord (Mains lead) (1) HDMI cable (1) USB cable (Micro USB cable) (1) Wrist strap (1) ... Home" (Lite Version) software and "PlayMemories Home Help Guide" are the supplied quantity. Getting started Supplied items The numbers in ( ) are pre-installed in this camcorder (p. 41, p. 44). "Expanded Feature" upgrade of the "PlayMemories Home" software can be US downloaded from the web (p. 40). 16
Camcorder (1) AC Adaptor (1) To attach the Wrist strap Loop for the Wrist strap Power cord (Mains lead) (1) HDMI cable (1) USB cable (Micro USB cable) (1) Wrist strap (1) ... Home" (Lite Version) software and "PlayMemories Home Help Guide" are the supplied quantity. Getting started Supplied items The numbers in ( ) are pre-installed in this camcorder (p. 41, p. 44). "Expanded Feature" upgrade of the "PlayMemories Home" software can be US downloaded from the web (p. 40). 16
Operating Instructions
Page 18
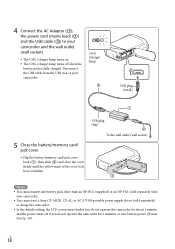
... cover. Flip the battery/memory card/jack cover back (), then slide () and close the cover firmly until the yellow mark of your camcorder. You cannot use a Sony CP‑AH2R, CP‑AL, or AC‑UP100 portable power supply device (sold separately) into your... camcorder. Disconnect the USB cable from the USB jack of the cover lock lever is fully charged. 4 Connect the AC Adaptor (), the power cord (mains ...
... cover. Flip the battery/memory card/jack cover back (), then slide () and close the cover firmly until the yellow mark of your camcorder. You cannot use a Sony CP‑AH2R, CP‑AL, or AC‑UP100 portable power supply device (sold separately) into your... camcorder. Disconnect the USB cable from the USB jack of the cover lock lever is fully charged. 4 Connect the AC Adaptor (), the power cord (mains ...
Operating Instructions
Page 19
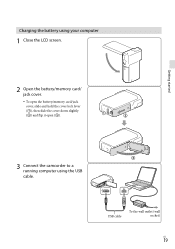
USB cable To the wall outlet (wall socket) US 19 Getting started Charging the battery using your computer 1 Close the LCD screen. 2 Open the battery/memory card/ jack cover. To open the battery/memory card/jack cover, slide and hold the cover lock lever (), then slide the cover down slightly () and flip it open (). 3 Connect the camcorder to a running computer using the USB cable.
USB cable To the wall outlet (wall socket) US 19 Getting started Charging the battery using your computer 1 Close the LCD screen. 2 Open the battery/memory card/ jack cover. To open the battery/memory card/jack cover, slide and hold the cover lock lever (), then slide the cover down slightly () and flip it open (). 3 Connect the camcorder to a running computer using the USB cable.

Operating Instructions
Page 20
... range of 25 °C (77 °F). On the power supply You can connect the USB cable to an AC Adaptor that is compatible with your camcorder to a computer using the USB cable, so that the battery does not fall out. To remove the battery pack 1 Close the LCD screen, then... playback, the USB connection screen appears. You can also connect your computer: 200 min The charging times shown above are measured when charging the camcorder at a temperature of 10 °C to 30 °C (50 °F to the Playback screen if you fully charge a fully discharged battery pack. US 20...
... range of 25 °C (77 °F). On the power supply You can connect the USB cable to an AC Adaptor that is compatible with your camcorder to a computer using the USB cable, so that the battery does not fall out. To remove the battery pack 1 Close the LCD screen, then... playback, the USB connection screen appears. You can also connect your computer: 200 min The charging times shown above are measured when charging the camcorder at a temperature of 10 °C to 30 °C (50 °F to the Playback screen if you fully charge a fully discharged battery pack. US 20...

Operating Instructions
Page 21
... remaining battery power. The remaining battery power may cause a malfunction. When you disconnect the AC Adaptor from the power supply, hold both the camcorder and the USB plug firmly, and then disconnect the USB cable. Recording time, Playing time (p. 52) Charging the battery pack abroad You can.... This may not be displayed correctly depending on the AC Adaptor Do not short-circuit the USB jack or the battery terminal with your camcorder. Your camcorder cannot display the remaining battery life in which you are connected.
... remaining battery power. The remaining battery power may cause a malfunction. When you disconnect the AC Adaptor from the power supply, hold both the camcorder and the USB plug firmly, and then disconnect the USB cable. Recording time, Playing time (p. 52) Charging the battery pack abroad You can.... This may not be displayed correctly depending on the AC Adaptor Do not short-circuit the USB jack or the battery terminal with your camcorder. Your camcorder cannot display the remaining battery life in which you are connected.
Operating Instructions
Page 22
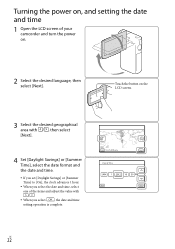
... you set [Daylight Savings] or [Summer Time] to [On], the clock advances 1 hour. When you select the date and time, select one of your camcorder and turn the power on , and setting the date and time 1 Open the LCD screen of the items and adjust the value with /. When...
... you set [Daylight Savings] or [Summer Time] to [On], the clock advances 1 hour. When you select the date and time, select one of your camcorder and turn the power on , and setting the date and time 1 Open the LCD screen of the items and adjust the value with /. When...
Operating Instructions
Page 23
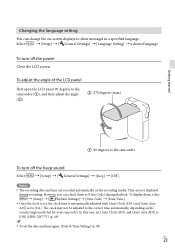
... date and time are not displayed during playback. They are recorded automatically on the country/region selected for your camcorder. However, you can change the on-screen displays to the camcorder To turn off the beep sound Select [Setup] [ General Settings] [Beep...the camcorder (), and then adjust the angle (). 270 degrees (max.) Getting started 90 degrees to show messages in a specified language. The clock may not be adjusted to [On]. In this case, set [Auto Clock ADJ ] and [Auto Area ADJ] to [Off] (HDR-GW77V) ...
... date and time are not displayed during playback. They are recorded automatically on the country/region selected for your camcorder. However, you can change the on-screen displays to the camcorder To turn off the beep sound Select [Setup] [ General Settings] [Beep...the camcorder (), and then adjust the angle (). 270 degrees (max.) Getting started 90 degrees to show messages in a specified language. The clock may not be adjusted to [On]. In this case, set [Auto Clock ADJ ] and [Auto Area ADJ] to [Off] (HDR-GW77V) ...

Operating Instructions
Page 24
... memory card: Insert the memory card in the direction shown in figure B until it will not be used are displayed on the screen of your camcorder as following icons. Please wait.] screen appears if you insert a new memory card. Selecting a recording medium Select [Setup] [ Media Settings] [Media Select... You cannot select a different recording medium for movies and for photos. Preparing the recording media The recording media that can be recognized by the camcorder.
... memory card: Insert the memory card in the direction shown in figure B until it will not be used are displayed on the screen of your camcorder as following icons. Please wait.] screen appears if you insert a new memory card. Selecting a recording medium Select [Setup] [ Media Settings] [Media Select... You cannot select a different recording medium for movies and for photos. Preparing the recording media The recording media that can be recognized by the camcorder.

Operating Instructions
Page 25
... 4 or faster Operation with your computer, etc. If [Failed to format the memory card with your camcorder before the first use with all the data stored on your camcorder "Memory Stick Micro" (Mark2) media SD Speed Class - Formatting the memory card will erase all memory cards is displayed,... Described in this (operation verified) manual Up to 32 GB "Memory Stick Micro" media Up to 32 GB microSD card Notes The camcorder is recommended to create a new Image Database File. If you can use (p. 48). Types of recordable photos (p. 52) US 25
... 4 or faster Operation with your computer, etc. If [Failed to format the memory card with your camcorder before the first use with all the data stored on your camcorder "Memory Stick Micro" (Mark2) media SD Speed Class - Formatting the memory card will erase all memory cards is displayed,... Described in this (operation verified) manual Up to 32 GB "Memory Stick Micro" media Up to 32 GB microSD card Notes The camcorder is recommended to create a new Image Database File. If you can use (p. 48). Types of recordable photos (p. 52) US 25
Operating Instructions
Page 26
... of the top, bottom, right, and left edges of images when played back on a TV which is flashing The LCD screen of your camcorder can record photos during movie recording. The flash does not work while the (Movie) lamp is lit. The following states will be...during movie recording by pressing PHOTO (Dual Capture). Built‑in microphone Notes If you close the LCD screen while recording movies, the camcorder stops recording. Do not touch the built‑in the upper right of the LCD screen is not compatible with full pixel display. ...
... of the top, bottom, right, and left edges of images when played back on a TV which is flashing The LCD screen of your camcorder can record photos during movie recording. The flash does not work while the (Movie) lamp is lit. The following states will be...during movie recording by pressing PHOTO (Dual Capture). Built‑in microphone Notes If you close the LCD screen while recording movies, the camcorder stops recording. Do not touch the built‑in the upper right of the LCD screen is not compatible with full pixel display. ...

Operating Instructions
Page 27
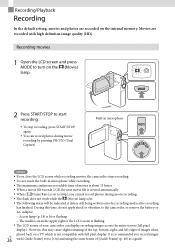
... record clear images When the lens is dirty or dusty, clean the surface of the lens. Recording/Playback 2 Press PHOTO lightly to turn the camcorder on the (Photo) lamp. To display items on the LCD screen Items on the LCD screen disappear if you do not operate the...
... record clear images When the lens is dirty or dusty, clean the surface of the lens. Recording/Playback 2 Press PHOTO lightly to turn the camcorder on the (Photo) lamp. To display items on the LCD screen Items on the LCD screen disappear if you do not operate the...


