Help Guide
Page 2
Power source preparations Attaching the battery pack [12] Charging the battery pack using the AC Adaptor [13] Charging the battery pack using your computer [14] Turning the power on [15] Using this product supplying power from a wall outlet (wall socket) [16] Initial setup Initial setting [...
Power source preparations Attaching the battery pack [12] Charging the battery pack using the AC Adaptor [13] Charging the battery pack using your computer [14] Turning the power on [15] Using this product supplying power from a wall outlet (wall socket) [16] Initial setup Initial setting [...

Help Guide
Page 9
... Connect Setting [164] USB Power Supply [165] USB LUN Setting [166] Beep [167] Monitor Brightness [168] Power ON w/monitor [169] Language Setting [170] Calibration [171] Battery Info [172] Power Save [173] Initialize [174] Demo Mode [175] Version [176] Date & Time Setting [177] Area Setting [178] Charging time/recording time of movies...
... Connect Setting [164] USB Power Supply [165] USB LUN Setting [166] Beep [167] Monitor Brightness [168] Power ON w/monitor [169] Language Setting [170] Calibration [171] Battery Info [172] Power Save [173] Initialize [174] Demo Mode [175] Version [176] Date & Time Setting [177] Area Setting [178] Charging time/recording time of movies...
Help Guide
Page 10
Expected recording and playback times for individual batteries Expected recording time with each battery pack [180] Expected playback time with each battery pack [181] Expected movie recording time and number of recordable photos for the internal memory Notes on recording movies [182] Expected recording time of movies (... size of photos Recording pixels and aspect ratio [189] Additional information Precautions About the AVCHD format [190] About the memory card [191] About the InfoLITHIUM battery pack [192] Handling of this product On use and care [193]
Expected recording and playback times for individual batteries Expected recording time with each battery pack [180] Expected playback time with each battery pack [181] Expected movie recording time and number of recordable photos for the internal memory Notes on recording movies [182] Expected recording time of movies (... size of photos Recording pixels and aspect ratio [189] Additional information Precautions About the AVCHD format [190] About the memory card [191] About the InfoLITHIUM battery pack [192] Handling of this product On use and care [193]
Help Guide
Page 12
... been changed automatically. [210] This product gets warm. [211] A rattling noise is heard when this product is shaken. [212] Intelligent Auto is canceled. [213] Batteries/power sources The power abruptly turns off. [214] The POWER/CHG (charge) lamp does not light while the... battery pack is being charged. [215] The POWER/CHG (charge) lamp flashes while the battery pack is being charged. [216] The remaining battery power is not displayed correctly. [217] The battery pack is quickly discharged. [218] Monitor Menu items are grayed out. ...
... been changed automatically. [210] This product gets warm. [211] A rattling noise is heard when this product is shaken. [212] Intelligent Auto is canceled. [213] Batteries/power sources The power abruptly turns off. [214] The POWER/CHG (charge) lamp does not light while the... battery pack is being charged. [215] The POWER/CHG (charge) lamp flashes while the battery pack is being charged. [216] The remaining battery power is not displayed correctly. [217] The battery pack is quickly discharged. [218] Monitor Menu items are grayed out. ...
Help Guide
Page 20
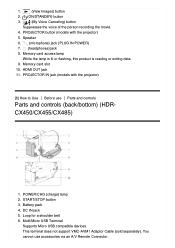
HDMI OUT jack 11. Multi/Micro USB Terminal Supports Micro USB compatible devices. Memory card slot 10. START/STOP button 3. Loop for a shoulder belt 6. Battery pack 4. You cannot use Parts and controls Parts and controls (back/bottom) (HDRCX450/CX455/CX485) 1. PROJECTOR button (models with the projector) [8] How to Use Before ...
HDMI OUT jack 11. Multi/Micro USB Terminal Supports Micro USB compatible devices. Memory card slot 10. START/STOP button 3. Loop for a shoulder belt 6. Battery pack 4. You cannot use Parts and controls Parts and controls (back/bottom) (HDRCX450/CX455/CX485) 1. PROJECTOR button (models with the projector) [8] How to Use Before ...

Help Guide
Page 21
Built-in the proper direction. 10. DC IN jack 5. Depending on the specifications of the screw must be less than 5.5 mm (7/32 in.)). Tripod receptacle Attach a tripod (sold separately: the length of the tripod, this product may not attach in USB Cable 9. START/STOP button 3. Battery pack 4. Grip belt 8. POWER/CHG (charge) lamp 2. 7. Loop for a shoulder belt Battery release lever To fasten the grip belt [9] How to Use Before use Parts and controls Parts and controls (back/bottom) (HDRCX625/CX675/PJ675/CX680/PJ680) 1.
Built-in the proper direction. 10. DC IN jack 5. Depending on the specifications of the screw must be less than 5.5 mm (7/32 in.)). Tripod receptacle Attach a tripod (sold separately: the length of the tripod, this product may not attach in USB Cable 9. START/STOP button 3. Battery pack 4. Grip belt 8. POWER/CHG (charge) lamp 2. 7. Loop for a shoulder belt Battery release lever To fasten the grip belt [9] How to Use Before use Parts and controls Parts and controls (back/bottom) (HDRCX625/CX675/PJ675/CX680/PJ680) 1.

Help Guide
Page 22
... indicators The following indicators appear when you change the settings. Depending on the specifications of the screw must be less than 5.5 mm (7/32 in.)). 6. BATT (battery) release lever To fasten the grip belt [10] How to [On] This terminal does not support VMC-AVM1 Adaptor Cable (sold separately: the length of...
... indicators The following indicators appear when you change the settings. Depending on the specifications of the screw must be less than 5.5 mm (7/32 in.)). 6. BATT (battery) release lever To fasten the grip belt [10] How to [On] This terminal does not support VMC-AVM1 Adaptor Cable (sold separately: the length of...
Help Guide
Page 23
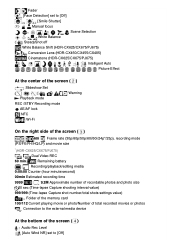
...Detection] set to [Off] [Smile Shutter] Manual focus Scene Selection White Balance SteadyShot off White Balance Shift (HDR-CX625/CX675/PJ675) Conversion Lens (HDR-CX450/CX455/CX485) Cinematone (HDR-CX625/CX675/PJ675) Intelligent Auto Picture Effect At the center of the screen ( ) Slideshow Set Playback mode REC /... (30p/60p/50p/60i/50i/24p*/25p), recording mode (PS/FX/FH/HQ/LP) and movie size *(HDR-CX625/CX675/PJ675) Dual Video REC 60 min Remaining battery Recording/playback/editing media 0:00:00 Counter (hour:minute:second) 00min Estimated recording time 9999 9.2M Approximate number...
...Detection] set to [Off] [Smile Shutter] Manual focus Scene Selection White Balance SteadyShot off White Balance Shift (HDR-CX625/CX675/PJ675) Conversion Lens (HDR-CX450/CX455/CX485) Cinematone (HDR-CX625/CX675/PJ675) Intelligent Auto Picture Effect At the center of the screen ( ) Slideshow Set Playback mode REC /... (30p/60p/50p/60i/50i/24p*/25p), recording mode (PS/FX/FH/HQ/LP) and movie size *(HDR-CX625/CX675/PJ675) Dual Video REC 60 min Remaining battery Recording/playback/editing media 0:00:00 Counter (hour:minute:second) 00min Estimated recording time 9999 9.2M Approximate number...

Help Guide
Page 25
... connection support cable is too short for use with this product only. Align the indentation on the battery pack, then slide the battery pack upwards. Rechargeable battery pack NP-FV50 (HDR-CX450/CX455/CX485/CX625/CX675/PJ675) (1) NP-FV50A (HDR-CX680/PJ680) (1) When using this product while connected to a wall outlet (wall socket), such as while...
... connection support cable is too short for use with this product only. Align the indentation on the battery pack, then slide the battery pack upwards. Rechargeable battery pack NP-FV50 (HDR-CX450/CX455/CX485/CX625/CX675/PJ675) (1) NP-FV50A (HDR-CX680/PJ680) (1) When using this product while connected to a wall outlet (wall socket), such as while...

Help Guide
Page 26
... out the USB Cable from this product. The POWER/CHG (charge) lamp turns off automatically if you leave this product without any InfoLITHIUM battery pack other than the V series to this product to a wall outlet (wall socket) using the supplied AC Adaptor. Note You cannot use... the NP-FV30 InfoLITHIUM battery pack with this product. 3. Close the LCD monitor. 2. Connect this product. Attach the battery pack in advance. 1. The POWER/CHG (charge) lamp lights orange. Disconnect the USB connection support ...
... out the USB Cable from this product. The POWER/CHG (charge) lamp turns off automatically if you leave this product without any InfoLITHIUM battery pack other than the V series to this product to a wall outlet (wall socket) using the supplied AC Adaptor. Note You cannot use... the NP-FV30 InfoLITHIUM battery pack with this product. 3. Close the LCD monitor. 2. Connect this product. Attach the battery pack in advance. 1. The POWER/CHG (charge) lamp lights orange. Disconnect the USB connection support ...

Help Guide
Page 27
... metallic objects. Do not short-circuit the USB jack of the following notes on using the AC Adaptor. Be aware of the AC Adaptor or battery terminal with the USB Cable. Note The shape of 10 °C to 30 °C (50 °F to 86 °F). [14] How to Use Getting ...started Power source preparations Charging the battery pack using your computer Charge the battery pack by connecting this product and your computer with any malfunction occurs while using the AC Adaptor. Attach the...
... metallic objects. Do not short-circuit the USB jack of the following notes on using the AC Adaptor. Be aware of the AC Adaptor or battery terminal with the USB Cable. Note The shape of 10 °C to 30 °C (50 °F to 86 °F). [14] How to Use Getting ...started Power source preparations Charging the battery pack using your computer Charge the battery pack by connecting this product and your computer with any malfunction occurs while using the AC Adaptor. Attach the...

Help Guide
Page 28
... USB Cable from the computer, and then store it in the pocket on the grip belt. The POWER/CHG (charge) lamp turns off when the battery pack is not long enough for the connection, use the USB connection support cable. : USB Cable : To a wall outlet (wall socket) To put the USB...
... USB Cable from the computer, and then store it in the pocket on the grip belt. The POWER/CHG (charge) lamp turns off when the battery pack is not long enough for the connection, use the USB connection support cable. : USB Cable : To a wall outlet (wall socket) To put the USB...

Help Guide
Page 29
... the AC Adaptor. 1. Open the LCD monitor of 10 °C to 30 °C (50 °F to 86 °F). [15] How to this product. 1. Attach the battery pack, and then pull out the USB Cable. You can also turn off the power Close the LCD monitor. You can also turn on this... product and turn off this product by pressing (ON/STANDBY) button. It is recommended that you charge the battery in a temperature range of this product by pressing (ON/STANDBY) button. [16] How to Use Getting started Power source preparations Using this product supplying power...
... the AC Adaptor. 1. Open the LCD monitor of 10 °C to 30 °C (50 °F to 86 °F). [15] How to this product. 1. Attach the battery pack, and then pull out the USB Cable. You can also turn off the power Close the LCD monitor. You can also turn on this... product and turn off this product by pressing (ON/STANDBY) button. It is recommended that you charge the battery in a temperature range of this product by pressing (ON/STANDBY) button. [16] How to Use Getting started Power source preparations Using this product supplying power...

Help Guide
Page 30
... USB connection support cable and the AC Adaptor. Even when connecting the AC Adaptor to this product, this product may subsidiarily use power from the battery pack depending on the environment in which you use this product, as long as the power is connected to this product and turn the power... on . The battery pack must be supplied. Otherwise power will not be attached to this product. [17] How to a wall outlet (wall socket) using this product for the...
... USB connection support cable and the AC Adaptor. Even when connecting the AC Adaptor to this product, this product may subsidiarily use power from the battery pack depending on the environment in which you use this product, as long as the power is connected to this product and turn the power... on . The battery pack must be supplied. Otherwise power will not be attached to this product. [17] How to a wall outlet (wall socket) using this product for the...
Help Guide
Page 33
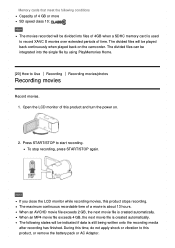
Note If you close the LCD monitor while recording movies, this product, or remove the battery pack or AC Adaptor. The maximum continuous recordable time of a movie is created automatically. During this time, do not apply shock or vibration to record ...
Note If you close the LCD monitor while recording movies, this product, or remove the battery pack or AC Adaptor. The maximum continuous recordable time of a movie is created automatically. During this time, do not apply shock or vibration to record ...

Help Guide
Page 35
... not apply shock or vibration to magnify or reduce the size of the image. Move the power zoom lever to this product, or remove the battery pack or AC Adaptor.
... not apply shock or vibration to magnify or reduce the size of the image. Move the power zoom lever to this product, or remove the battery pack or AC Adaptor.

Help Guide
Page 40
Note To save battery power, it ( ). Open the LCD monitor and press (View Images) to the center ( ) and then select it is adjusted properly, the AE/AF lock indicator ...
Note To save battery power, it ( ). Open the LCD monitor and press (View Images) to the center ( ) and then select it is adjusted properly, the AE/AF lock indicator ...
Help Guide
Page 49
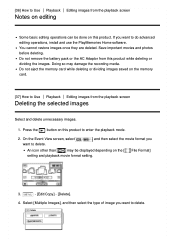
Doing so may be done on the memory card. [37] How to delete. File Format] 3. - [Edit/Copy] - [Delete]. 4. Do not remove the battery pack or the AC Adaptor from this product to delete. , and then select the movie format you An icon other than may damage the recording ...
Doing so may be done on the memory card. [37] How to delete. File Format] 3. - [Edit/Copy] - [Delete]. 4. Do not remove the battery pack or the AC Adaptor from this product to delete. , and then select the movie format you An icon other than may damage the recording ...

Help Guide
Page 53
Make sure not to project images towards the eyes. Using the projector shortens battery life (using the projector (models with the LCD monitor closed Several other functions When the projected images contain a lot of black, faint color unevenness may ...
Make sure not to project images towards the eyes. Using the projector shortens battery life (using the projector (models with the LCD monitor closed Several other functions When the projected images contain a lot of black, faint color unevenness may ...

Help Guide
Page 63
...format it on use of disc after creating the disc. BD-R (unrewritable) and BD-RE (rewritable) media are FAT32/exFAT/NTFS. After attaching the battery pack to Use Saving images Using the PlayMemories Home software Creating a Blu-ray disc You can save MP4 or XAVC S images onto a Blu-ray ...on an external media device Notes on your computer, etc. To use external media devices with the AVCHD Ver. 2.0 format. http://support.d-imaging.sony.co.jp/BDUW/ Your computer must be able to use an external media device formatted with an AVCHD movie previously imported to the instruction manual...
...format it on use of disc after creating the disc. BD-R (unrewritable) and BD-RE (rewritable) media are FAT32/exFAT/NTFS. After attaching the battery pack to Use Saving images Using the PlayMemories Home software Creating a Blu-ray disc You can save MP4 or XAVC S images onto a Blu-ray ...on an external media device Notes on your computer, etc. To use external media devices with the AVCHD Ver. 2.0 format. http://support.d-imaging.sony.co.jp/BDUW/ Your computer must be able to use an external media device formatted with an AVCHD movie previously imported to the instruction manual...


