Operating Instructions
Page 1
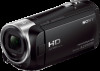
4-564-744-14(1) Digital HD Video Camera Recorder Operating Guide "Help Guide" (Web manual) Refer to "Help Guide" for in-depth instructions on the many functions of the camera. Getting started Recording/Playback Saving images Customizing your camcorder Others http://rd1.sony.net/help/cam/1440/h_zz/ HDR-CX405/CX440/CX470/PJ410/PJ440
4-564-744-14(1) Digital HD Video Camera Recorder Operating Guide "Help Guide" (Web manual) Refer to "Help Guide" for in-depth instructions on the many functions of the camera. Getting started Recording/Playback Saving images Customizing your camcorder Others http://rd1.sony.net/help/cam/1440/h_zz/ HDR-CX405/CX440/CX470/PJ410/PJ440
Operating Instructions
Page 3
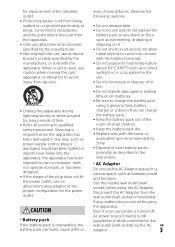
...damaged or leaking lithium ion batteries. • Be sure to the wall outlet (wall socket) via the AC GB Adaptor. 3 Even if your camcorder is turned off, AC power source (mains) is damaged, liquid has been spilled or objects have fallen into contact with the apparatus. Use the ...replacement of the obsolete outlet. • Protect the power cord from being walked on it while connected to charge the battery pack using a genuine Sony battery charger or a device that can burst, cause a fire or even chemical burns. Servicing is required when the apparatus has been damaged in any...
...damaged or leaking lithium ion batteries. • Be sure to the wall outlet (wall socket) via the AC GB Adaptor. 3 Even if your camcorder is turned off, AC power source (mains) is damaged, liquid has been spilled or objects have fallen into contact with the apparatus. Use the ...replacement of the obsolete outlet. • Protect the power cord from being walked on it while connected to charge the battery pack using a genuine Sony battery charger or a device that can burst, cause a fire or even chemical burns. Servicing is required when the apparatus has been damaged in any...

Operating Instructions
Page 7
... 20 Using the Wi-Fi function (HDRCX440/PJ410/PJ440 21 Customizing your camcorder 26 Using the menus 26 Others 27 Precautions 27 Specifications 29 Parts and controls 33 GB 7 Access the Sony support page. http://rd1.sony.net/help/cam/ 1440/h_zz/ You will find further information such as... the following marks on the bottom of the camcorder. To check whether your camera is a 1080 60i-compatible device or...
... 20 Using the Wi-Fi function (HDRCX440/PJ410/PJ440 21 Customizing your camcorder 26 Using the menus 26 Others 27 Precautions 27 Specifications 29 Parts and controls 33 GB 7 Access the Sony support page. http://rd1.sony.net/help/cam/ 1440/h_zz/ You will find further information such as... the following marks on the bottom of the camcorder. To check whether your camera is a 1080 60i-compatible device or...
Operating Instructions
Page 8
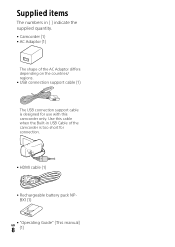
Use this camcorder only. Getting started Supplied items The numbers in USB Cable of the camcorder is designed for use with this cable when the Built-in ( ) indicate the supplied quantity. • Camcorder (1) • AC Adaptor (1) The shape of the AC Adaptor differs depending on the countries/ regions. • USB connection support cable (1) The USB connection support cable is too short for connection. • HDMI cable (1) • Rechargeable battery pack NPBX1 (1) • "Operating Guide" (This manual) 8GB (1)
Use this camcorder only. Getting started Supplied items The numbers in USB Cable of the camcorder is designed for use with this cable when the Built-in ( ) indicate the supplied quantity. • Camcorder (1) • AC Adaptor (1) The shape of the AC Adaptor differs depending on the countries/ regions. • USB connection support cable (1) The USB connection support cable is too short for connection. • HDMI cable (1) • Rechargeable battery pack NPBX1 (1) • "Operating Guide" (This manual) 8GB (1)
Operating Instructions
Page 9
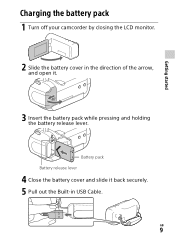
Getting started Charging the battery pack 1 Turn off your camcorder by closing the LCD monitor. 2 Slide the battery cover in the direction of the arrow, and open it back securely. 5 Pull out the Built-in USB Cable. GB 9 Battery pack Battery release lever 4 Close the battery cover and slide it . 3 Insert the battery pack while pressing and holding the battery release lever.
Getting started Charging the battery pack 1 Turn off your camcorder by closing the LCD monitor. 2 Slide the battery cover in the direction of the arrow, and open it back securely. 5 Pull out the Built-in USB Cable. GB 9 Battery pack Battery release lever 4 Close the battery cover and slide it . 3 Insert the battery pack while pressing and holding the battery release lever.
Operating Instructions
Page 10
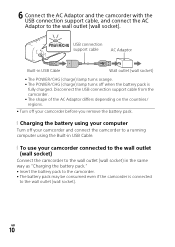
..."Charging the battery pack." • Insert the battery pack to the camcorder. • The battery pack may be consumed even if the camcorder is fully charged. Disconnect the USB connection support cable from the camcorder. • The shape of the AC Adaptor differs depending on the countries...57812; Charging the battery using your computer Turn off your camcorder and connect the camcorder to a running computer using the Built-in USB Cable. To use your camcorder connected to the wall outlet (wall socket) Connect the camcorder to the wall outlet (wall socket). GB 10 6 Connect...
..."Charging the battery pack." • Insert the battery pack to the camcorder. • The battery pack may be consumed even if the camcorder is fully charged. Disconnect the USB connection support cable from the camcorder. • The shape of the AC Adaptor differs depending on the countries...57812; Charging the battery using your computer Turn off your camcorder and connect the camcorder to a running computer using the Built-in USB Cable. To use your camcorder connected to the wall outlet (wall socket) Connect the camcorder to the wall outlet (wall socket). GB 10 6 Connect...

Operating Instructions
Page 11
... • To turn the power on 1 Open the LCD monitor of the selector to select the desired item, and then press the center of your camcorder for several months) • To turn off the power, close the LCD monitor. • To set the date and time again, select [Setup] &#...57732; [ Clock Settings] [Date & Time Setting]. (In case you haven't used your camcorder and turn off the operating sound, select [ General Settings] [Beep] [Off]. [Setup] GB 11
... • To turn the power on 1 Open the LCD monitor of the selector to select the desired item, and then press the center of your camcorder for several months) • To turn off the power, close the LCD monitor. • To set the date and time again, select [Setup] &#...57732; [ Clock Settings] [Date & Time Setting]. (In case you haven't used your camcorder and turn off the operating sound, select [ General Settings] [Beep] [Off]. [Setup] GB 11

Operating Instructions
Page 12
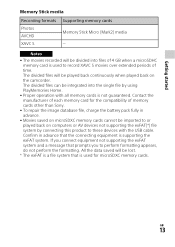
...faster, or U1 or faster.) Please wait.] screen appears if you can use with your camcorder Select the type of memory card to use with the camcorder referring to the following table. microSD memory card Memory Stick Micro™ (M2) media ...Printed surface Terminal • The [Preparing image database file. Wait until it . • To select a memory card as the recording medium, select [Setup] [ Media Settings] [Media Select] [Memory Card]. (HDR...
...faster, or U1 or faster.) Please wait.] screen appears if you can use with your camcorder Select the type of memory card to use with the camcorder referring to the following table. microSD memory card Memory Stick Micro™ (M2) media ...Printed surface Terminal • The [Preparing image database file. Wait until it . • To select a memory card as the recording medium, select [Setup] [ Media Settings] [Media Select] [Memory Card]. (HDR...
Operating Instructions
Page 13
...connecting this product to these devices with all memory cards is used to record XAVC S movies over extended periods of memory cards other than Sony. • To repair the image database file, charge the battery pack fully in advance that prompts you connect equipment not supporting the ... supporting the exFAT system. Contact the manufacturer of each memory card for microSDXC memory cards. If you to or played back on the camcorder. The divided files will be played back continuously when played back on computers or AV devices not supporting the exFAT(*) file system by ...
...connecting this product to these devices with all memory cards is used to record XAVC S movies over extended periods of memory cards other than Sony. • To repair the image database file, charge the battery pack fully in advance that prompts you connect equipment not supporting the ... supporting the exFAT system. Contact the manufacturer of each memory card for microSDXC memory cards. If you to or played back on the camcorder. The divided files will be played back continuously when played back on computers or AV devices not supporting the exFAT(*) file system by ...
Operating Instructions
Page 16
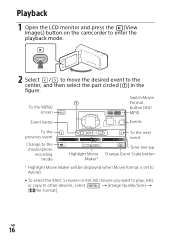
... the center, and then select the part circled () in the figure. Playback 1 Open the LCD monitor and press the (View Images) button on the camcorder to enter the playback mode. 2 Select / to move the desired event to other devices, select [Image Quality/Size] [ File Format]. GB 16...
... the center, and then select the part circled () in the figure. Playback 1 Open the LCD monitor and press the (View Images) button on the camcorder to enter the playback mode. 2 Select / to move the desired event to other devices, select [Image Quality/Size] [ File Format]. GB 16...
Operating Instructions
Page 18
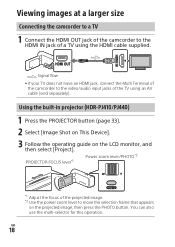
...this operation. Using the built-in projector (HDR-PJ410/PJ440) 1 Press the PROJECTOR button (page 33). 2 Select [Image Shot on This Device]. 3 Follow the operating guide on the projected image, then press the PHOTO button. GB 18 Viewing images at a larger size Connecting the camcorder to a TV 1 Connect the HDMI ...OUT jack of the camcorder to the HDMI IN jack of the projected image. *2 Use the power zoom lever to the video/audio input jacks...
...this operation. Using the built-in projector (HDR-PJ410/PJ440) 1 Press the PROJECTOR button (page 33). 2 Select [Image Shot on This Device]. 3 Follow the operating guide on the projected image, then press the PHOTO button. GB 18 Viewing images at a larger size Connecting the camcorder to a TV 1 Connect the HDMI ...OUT jack of the camcorder to the HDMI IN jack of the projected image. *2 Use the power zoom lever to the video/audio input jacks...
Operating Instructions
Page 19
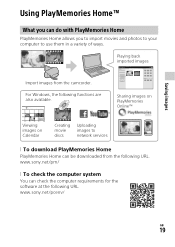
.../pcenv/ GB 19 www.sony.net/pm/ To check the computer system You can be downloaded from the camcorder. Sharing images on PlayMemories Online™ Viewing images on Calendar Creating movie discs Uploading images to use them in a variety of ways. Playing back imported ...
.../pcenv/ GB 19 www.sony.net/pm/ To check the computer system You can be downloaded from the camcorder. Sharing images on PlayMemories Online™ Viewing images on Calendar Creating movie discs Uploading images to use them in a variety of ways. Playing back imported ...
Operating Instructions
Page 20
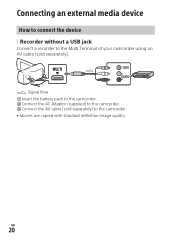
GB 20 Connecting an external media device How to connect the device Recorder without a USB jack Connect a recorder to the Multi Terminal of your camcorder using an AV cable (sold separately) to the camcorder. Connect the AV cable (sold separately). Signal flow Insert the battery pack to the camcorder. Connect the AC Adaptor (supplied) to the camcorder. • Movies are copied with standard definition image quality.
GB 20 Connecting an external media device How to connect the device Recorder without a USB jack Connect a recorder to the Multi Terminal of your camcorder using an AV cable (sold separately) to the camcorder. Connect the AV cable (sold separately). Signal flow Insert the battery pack to the camcorder. Connect the AC Adaptor (supplied) to the camcorder. • Movies are copied with standard definition image quality.
Operating Instructions
Page 21
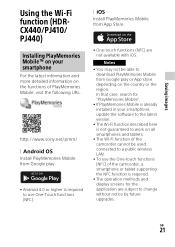
In that case, search for the application are not available with iOS. GB 21 http://www.sony.net/pmm/ Android OS Install PlayMemories Mobile from App Store. • One-touch functions (NFC) are subject to change without notice by future ... LAN. • To use One-Touch functions (NFC). iOS Install PlayMemories Mobile from Google play or App store depending on the functions of the camcorder, a smartphone or tablet supporting the NFC function is required. • The operation methods and display screens for "PlayMemories Mobile". • If PlayMemories Mobile is...
In that case, search for the application are not available with iOS. GB 21 http://www.sony.net/pmm/ Android OS Install PlayMemories Mobile from App Store. • One-touch functions (NFC) are subject to change without notice by future ... LAN. • To use One-Touch functions (NFC). iOS Install PlayMemories Mobile from Google play or App store depending on the functions of the camcorder, a smartphone or tablet supporting the NFC function is required. • The operation methods and display screens for "PlayMemories Mobile". • If PlayMemories Mobile is...
Operating Instructions
Page 22
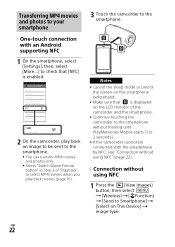
... that [NFC] is displayed on the LCD monitor of "Playback", to select MP4 movies when you play back movies (page 16). 3 Touch the camcorder to Smartphone] [Select on This Device] image type. Transferring MP4 movies and photos to your smartphone One-touch connection ...with an Android supporting NFC 1 On the smartphone, select [Settings], then, select [More...] to check that is enabled. 2 On the camcorder, play back an image to be sent to the smartphone. • You can transfer MP4 movies and photos only. • Select "Switch Movie Format...
... that [NFC] is displayed on the LCD monitor of "Playback", to select MP4 movies when you play back movies (page 16). 3 Touch the camcorder to Smartphone] [Select on This Device] image type. Transferring MP4 movies and photos to your smartphone One-touch connection ...with an Android supporting NFC 1 On the smartphone, select [Settings], then, select [More...] to check that is enabled. 2 On the camcorder, play back an image to be sent to the smartphone. • You can transfer MP4 movies and photos only. • Select "Switch Movie Format...
Operating Instructions
Page 23
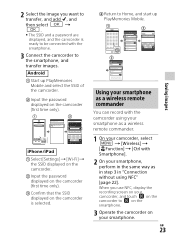
...Settings] [Wi-Fi] the SSID displayed on the camcorder. Input the password displayed on the camcorder (first time only). Confirm that the SSID displayed on the camcorder is ready to be connected with Smartphone]. 2 On your smartphone, perform in...in step 3 in "Connection without using your smartphone as a wireless remote commander. 1 On your camcorder, select [Wireless] [ Function] [Ctrl with the smartphone. 3 Connect the camcorder to the smartphone, and transfer images. When you want to transfer, and add , and then select...
...Settings] [Wi-Fi] the SSID displayed on the camcorder. Input the password displayed on the camcorder (first time only). Confirm that the SSID displayed on the camcorder is ready to be connected with Smartphone]. 2 On your smartphone, perform in...in step 3 in "Connection without using your smartphone as a wireless remote commander. 1 On your camcorder, select [Wireless] [ Function] [Ctrl with the smartphone. 3 Connect the camcorder to the smartphone, and transfer images. When you want to transfer, and add , and then select...
Operating Instructions
Page 24
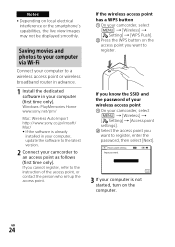
.../pm/ Mac: Wireless Auto Import http://www.sony.co.jp/imsoft/ Mac/ • If the software is ...computer. If you want to register, enter the password, then select [Next]. 3 If your computer is already installed in your camcorder, select [Wireless] [ Setting] [WPS Push]. Press the WPS button on the... router in advance. 1 Install the dedicated software in your computer, update the software to the latest version. 2 Connect your camcorder, select [Wireless] [ Setting] [Access point settings]. Select the access point you...
.../pm/ Mac: Wireless Auto Import http://www.sony.co.jp/imsoft/ Mac/ • If the software is ...computer. If you want to register, enter the password, then select [Next]. 3 If your computer is already installed in your camcorder, select [Wireless] [ Setting] [WPS Push]. Press the WPS button on the... router in advance. 1 Install the dedicated software in your computer, update the software to the latest version. 2 Connect your camcorder, select [Wireless] [ Setting] [Access point settings]. Select the access point you...
Operating Instructions
Page 25
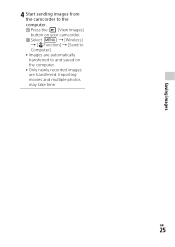
Importing movies and multiple photos may take time. 4 Start sending images from the camcorder to the computer. Press the (View Images) button on your camcorder. Select [Wireless] [ Function] [Send to Computer]. • Images are automatically transferred to and saved on the computer. • Only newly recorded images are transferred. Saving images GB 25
Importing movies and multiple photos may take time. 4 Start sending images from the camcorder to the computer. Press the (View Images) button on your camcorder. Select [Wireless] [ Function] [Send to Computer]. • Images are automatically transferred to and saved on the computer. • Only newly recorded images are transferred. Saving images GB 25
Operating Instructions
Page 26
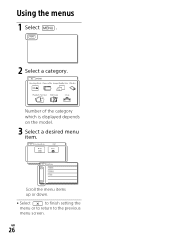
Number of the category which is displayed depends on the model. 3 Select a desired menu item. GB 26 Customizing your camcorder Using the menus 1 Select . 2 Select a category. Scroll the menu items up or down. • Select to finish setting the menu or to return to the previous menu screen.
Number of the category which is displayed depends on the model. 3 Select a desired menu item. GB 26 Customizing your camcorder Using the menus 1 Select . 2 Select a category. Scroll the menu items up or down. • Select to finish setting the menu or to return to the previous menu screen.
Operating Instructions
Page 27
... of recordings cannot be provided, even if recording or playback is not dustproofed, dripproofed or waterproofed. • Do not let your camcorder to play back images that appear constantly on a sandy beach or anywhere dusty. Unauthorized recording of such materials may be irrecoverable. This... recording in color) that were recorded on it is recommended to record or play back images properly. • Do not use the camcorder near strong radio waves or radiation. Recording and playback • Avoid rough handling, disassembling, modifying, physical shock, or impact such as...
... of recordings cannot be provided, even if recording or playback is not dustproofed, dripproofed or waterproofed. • Do not let your camcorder to play back images that appear constantly on a sandy beach or anywhere dusty. Unauthorized recording of such materials may be irrecoverable. This... recording in color) that were recorded on it is recommended to record or play back images properly. • Do not use the camcorder near strong radio waves or radiation. Recording and playback • Avoid rough handling, disassembling, modifying, physical shock, or impact such as...


