Operating Guide (Large File - 11.29 MB)
Page 9
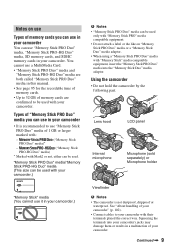
"Memory Stick PRO Duo" media/"Memory Stick PRO-HG Duo" media (This size can be used with your camcorder.) b Notes • "Memory Stick PRO Duo" media can use "Memory Stick PRO Duo" media, "Memory Stick PRO-HG Duo" media, SD memory cards, and SDHC memory cards in your camcorder.) Viewfinder b Notes • The camcorder is recommended to use "Memory Stick PRO Duo" media of 1 GB or larger marked with: - Lens...
"Memory Stick PRO Duo" media/"Memory Stick PRO-HG Duo" media (This size can be used with your camcorder.) b Notes • "Memory Stick PRO Duo" media can use "Memory Stick PRO Duo" media, "Memory Stick PRO-HG Duo" media, SD memory cards, and SDHC memory cards in your camcorder.) Viewfinder b Notes • The camcorder is recommended to use "Memory Stick PRO Duo" media of 1 GB or larger marked with: - Lens...
Operating Guide (Large File - 11.29 MB)
Page 10
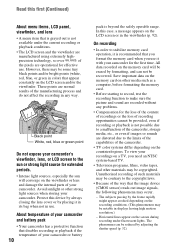
... to a malfunction of the camcorder, storage media, etc., or even if images or sounds are normal results of the manufacturing process and do not affect the recording in displays having high motion resolution.) - Save important data on the memory card on the memory card will converge on the viewfinder... on a TV, you use . All data recorded on other media such as a computer, before formatting the memory card. • Before starting to record, test the recording function to the limits of the capabilities of the camcorder. • TV color systems differ depending on the screen during ...
... to a malfunction of the camcorder, storage media, etc., or even if images or sounds are normal results of the manufacturing process and do not affect the recording in displays having high motion resolution.) - Save important data on the memory card on the memory card will converge on the viewfinder... on a TV, you use . All data recorded on other media such as a computer, before formatting the memory card. • Before starting to record, test the recording function to the limits of the capabilities of the camcorder. • TV color systems differ depending on the screen during ...
Operating Guide (Large File - 11.29 MB)
Page 11
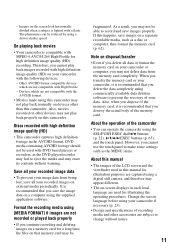
...recorded on external media periodically. DVD media containing AVCHD footage should not be fragmented. Images on a separate recordable media, such as the MENU items. About this manual • The images of the memory card. When you transfer the memory card or your camcorder, it is recommended... to make some settings such as a disc or computer, then format the memory card (p. 62). Other AVCHD format compatible devices which are not compatible with a flash. Format the recording media using a slower shutter speed. - Therefore, you cannot play back images recorded...
...recorded on external media periodically. DVD media containing AVCHD footage should not be fragmented. Images on a separate recordable media, such as the MENU items. About this manual • The images of the memory card. When you transfer the memory card or your camcorder, it is recommended... to make some settings such as a disc or computer, then format the memory card (p. 62). Other AVCHD format compatible devices which are not compatible with a flash. Format the recording media using a slower shutter speed. - Therefore, you cannot play back images recorded...
Operating Guide (Large File - 11.29 MB)
Page 12
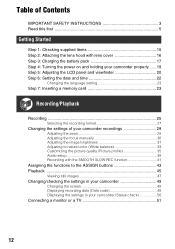
...17 Step 4: Turning the power on and holding your camcorder properly ..... 19 Step 5: Adjusting the LCD panel and viewfinder 20 Step 6: Setting the date and time 22 Changing the language setting 23 Step 7: Inserting a memory card 23 Recording/Playback Recording 25 Selecting the recording format ...27 Changing the settings of your camcorder recordings 29 Adjusting the zoom 29 Adjusting the focus manually 30 Adjusting the image ...
...17 Step 4: Turning the power on and holding your camcorder properly ..... 19 Step 5: Adjusting the LCD panel and viewfinder 20 Step 6: Setting the date and time 22 Changing the language setting 23 Step 7: Inserting a memory card 23 Recording/Playback Recording 25 Selecting the recording format ...27 Changing the settings of your camcorder recordings 29 Adjusting the zoom 29 Adjusting the focus manually 30 Adjusting the image ...

Operating Guide (Large File - 11.29 MB)
Page 13
... 60 Deleting movies and still images 61 Formatting the memory card 62 Preventing data on the memory card from being recovered 63 Repairing the image database file 64 Using the Menu Operating the menu 65 Menu items 67 (CAMERA SET) menu 69 Settings to adjust your camcorder to the recording conditions (GAIN SET/ BACK LIGHT...
... 60 Deleting movies and still images 61 Formatting the memory card 62 Preventing data on the memory card from being recovered 63 Repairing the image database file 64 Using the Menu Operating the menu 65 Menu items 67 (CAMERA SET) menu 69 Settings to adjust your camcorder to the recording conditions (GAIN SET/ BACK LIGHT...
Operating Guide (Large File - 11.29 MB)
Page 14
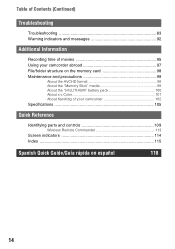
... messages 92 Additional Information Recording time of movies 95 Using your camcorder abroad 97 File/folder structure on the memory card 98 Maintenance and precautions 99 About the AVCHD format 99 About the "Memory Stick" media 99 About the "InfoLITHIUM" battery pack 100 About x.v.Color 101... About handling of your camcorder 102 Specifications 105 Quick Reference Identifying parts ...
... messages 92 Additional Information Recording time of movies 95 Using your camcorder abroad 97 File/folder structure on the memory card 98 Maintenance and precautions 99 About the AVCHD format 99 About the "Memory Stick" media 99 About the "InfoLITHIUM" battery pack 100 About x.v.Color 101... About handling of your camcorder 102 Specifications 105 Quick Reference Identifying parts ...
Operating Guide (Large File - 11.29 MB)
Page 15
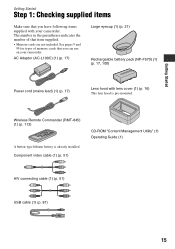
... 21) Rechargeable battery pack (NP-F570) (1) (p. 17, 100) Power cord (mains lead) (1) (p. 17) Lens hood with your camcorder. The number in the parentheses indicates the number of memory cards that you have following items supplied with lens cover (1) (p. 16) This lens hood is already installed. Component video cable (1) (p. 51)...button-type lithium battery is pre-mounted. Getting Started Getting Started Step 1: Checking supplied items Make sure that item supplied. • Memory cards are not included. See pages 9 and 99 for types of that you can use on your camcorder.
... 21) Rechargeable battery pack (NP-F570) (1) (p. 17, 100) Power cord (mains lead) (1) (p. 17) Lens hood with your camcorder. The number in the parentheses indicates the number of memory cards that you have following items supplied with lens cover (1) (p. 16) This lens hood is already installed. Component video cable (1) (p. 51)...button-type lithium battery is pre-mounted. Getting Started Getting Started Step 1: Checking supplied items Make sure that item supplied. • Memory cards are not included. See pages 9 and 99 for types of that you can use on your camcorder.
Operating Guide (Large File - 11.29 MB)
Page 21
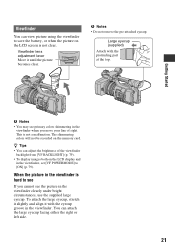
... display and in the viewfinder when you move your line of the viewfinder backlight from [VF BACKLIGHT] (p. 79). • To display images both on the memory card. When the picture in the viewfinder is hard to see If you cannot see primary colors shimmering in the viewfinder, set [VF POWERMODE] to save...
... display and in the viewfinder when you move your line of the viewfinder backlight from [VF BACKLIGHT] (p. 79). • To display images both on the memory card. When the picture in the viewfinder is hard to see If you cannot see primary colors shimmering in the viewfinder, set [VF POWERMODE] to save...

Operating Guide (Large File - 11.29 MB)
Page 23
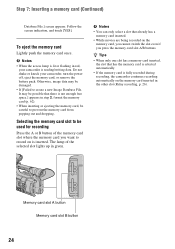
...the SEL/PUSH EXEC dial. Changing the language setting You can be damaged. • When you insert a memory card into the memory card slot until it clicks. Getting Started Step 7: Inserting a memory card 1 Open the cover in standby mode, the [Create a new Image Continued , 23 Select the screen language ...illustration, and insert into the slot in a specified language. For midday, set it to show messages in the wrong direction, the memory card, the memory card slot, or image data may be displayed during playback (DATA CODE button, p. 49). The clock starts. • Set [DST ...
...the SEL/PUSH EXEC dial. Changing the language setting You can be damaged. • When you insert a memory card into the memory card slot until it clicks. Getting Started Step 7: Inserting a memory card 1 Open the cover in standby mode, the [Create a new Image Continued , 23 Select the screen language ...illustration, and insert into the slot in a specified language. For midday, set it to show messages in the wrong direction, the memory card, the memory card slot, or image data may be displayed during playback (DATA CODE button, p. 49). The clock starts. • Set [DST ...
Operating Guide (Large File - 11.29 MB)
Page 24
...; When the access lamp is lit or flashing in red, your camcorder, turn the power off, eject the memory card, or remove the battery pack. Do not shake or knock your camcorder is not enough free space.] appears in step 2, format the memory card (p. 62). • When inserting or ejecting the memory card, be possible that there is reading...
...; When the access lamp is lit or flashing in red, your camcorder, turn the power off, eject the memory card, or remove the battery pack. Do not shake or knock your camcorder is not enough free space.] appears in step 2, format the memory card (p. 62). • When inserting or ejecting the memory card, be possible that there is reading...
Operating Guide (Large File - 11.29 MB)
Page 25
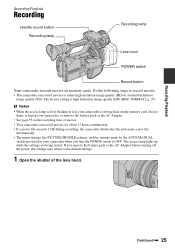
...in either high definition image quality (HD) or standard definition image quality (SD). b Notes • When the access lamp is lit or flashing in red, your camcorder when you remove the battery pack or the AC Adaptor before turning off the power, the settings may return to the default settings. 1 ... recording time of the lens hood. Recording/Playback Recording Handle record button Recording lamp Recording lamp Lens hood POWER switch Record button Your camcorder records movies on the memory card. The factory setting is writing data on memory cards. Do the following steps to OFF.
...in either high definition image quality (HD) or standard definition image quality (SD). b Notes • When the access lamp is lit or flashing in red, your camcorder when you remove the battery pack or the AC Adaptor before turning off the power, the settings may return to the default settings. 1 ... recording time of the lens hood. Recording/Playback Recording Handle record button Recording lamp Recording lamp Lens hood POWER switch Record button Your camcorder records movies on the memory card. The factory setting is writing data on memory cards. Do the following steps to OFF.

Operating Guide (Large File - 11.29 MB)
Page 26
...low angle recording, the handle record button is fixed to enable the handle record button. When recording in both slots A and B, so the camcorder switches memory card A (or B) just before space on the other one runs out, and continues recording on page 114. • The recording lamp can ... the movies you can switch the aspect ratio to ON while pressing the green button. Release the HOLD lever to 16:9. To continue recording on memory cards, one after turning it face down, or lift the viewfinder up during recording. Recording (Continued) 2 Slide the POWER switch to 4:3 ([ WIDE ...
...low angle recording, the handle record button is fixed to enable the handle record button. When recording in both slots A and B, so the camcorder switches memory card A (or B) just before space on the other one runs out, and continues recording on page 114. • The recording lamp can ... the movies you can switch the aspect ratio to ON while pressing the green button. Release the HOLD lever to 16:9. To continue recording on memory cards, one after turning it face down, or lift the viewfinder up during recording. Recording (Continued) 2 Slide the POWER switch to 4:3 ([ WIDE ...
Operating Guide (Large File - 11.29 MB)
Page 27
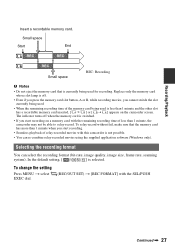
...B, while recording movies, you cannot switch the slot currently being used. • When the remaining recording time of the memory card being used is less than 1 minute, the camcorder may not be able to relay-record. To change the setting Press MENU t select EXEC dial. (REC/OUT SET)... t [REC FORMAT] with this camcorder is switched. • If you start recording on the camcorder screen. Small space Start End Small space REC: Recording b Notes • Do not eject the memory card that the memory card has more than 1 minute when you start recording. •...
...B, while recording movies, you cannot switch the slot currently being used. • When the remaining recording time of the memory card being used is less than 1 minute, the camcorder may not be able to relay-record. To change the setting Press MENU t select EXEC dial. (REC/OUT SET)... t [REC FORMAT] with this camcorder is switched. • If you start recording on the camcorder screen. Small space Start End Small space REC: Recording b Notes • Do not eject the memory card that the memory card has more than 1 minute when you start recording. •...
Operating Guide (Large File - 11.29 MB)
Page 42
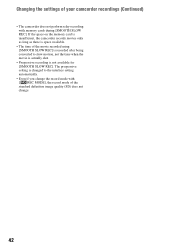
The progressive setting is not available for [SMOOTH SLOW REC]. If the space on the memory card is insufficient, the camcorder records movies only as long as there is space available. • The time of the movie recorded using [SMOOTH SLOW REC] is ...the interlace setting automatically. • Even if you change the record mode with [ REC MODE], the record mode of your camcorder recordings (Continued) • The camcorder does not perform relay recording with memory cards during [SMOOTH SLOW REC]. Changing the settings of the standard definition image quality (SD) does not change. 42
The progressive setting is not available for [SMOOTH SLOW REC]. If the space on the memory card is insufficient, the camcorder records movies only as long as there is space available. • The time of the movie recorded using [SMOOTH SLOW REC] is ...the interlace setting automatically. • Even if you change the record mode with [ REC MODE], the record mode of your camcorder recordings (Continued) • The camcorder does not perform relay recording with memory cards during [SMOOTH SLOW REC]. Changing the settings of the standard definition image quality (SD) does not change. 42

Operating Guide (Large File - 11.29 MB)
Page 46
... not be displayed correctly when you play back the memory card with no time code, or the memory card with time code that has been most recently played back or recorded. If you touch the movie with the movie that your camcorder does not support. • i appears with i,... you can continue playback from the previous time. 46 Playback (Continued) 3 Play back movies. 1 Touch the recording media you want to play back. : Memory card A : Memory card B 2 Touch the playback mode, and select the...
... not be displayed correctly when you play back the memory card with no time code, or the memory card with time code that has been most recently played back or recorded. If you touch the movie with the movie that your camcorder does not support. • i appears with i,... you can continue playback from the previous time. 46 Playback (Continued) 3 Play back movies. 1 Touch the recording media you want to play back. : Memory card A : Memory card B 2 Touch the playback mode, and select the...
Operating Guide (Large File - 11.29 MB)
Page 47
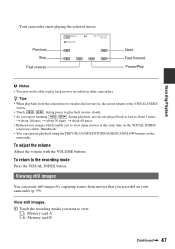
... movie, the screen returns to the VISUAL INDEX screen. • Touch / during pause to play back movies recorded on the camcorder. z Tips • When playback from movies that you want to the recording mode Press the VISUAL INDEX button. Viewing still...STOP/PAUSE/SCAN/SLOW buttons on other camcorders. To adjust the volume Adjust the volume with the VOLUME buttons. To return to view. : Memory card A : Memory card B Continued , 47 View still images. 1 Touch the recording media you recorded on your camcorder (p. 59). Your camcorder starts playing the selected movie.
... movie, the screen returns to the VISUAL INDEX screen. • Touch / during pause to play back movies recorded on the camcorder. z Tips • When playback from movies that you want to the recording mode Press the VISUAL INDEX button. Viewing still...STOP/PAUSE/SCAN/SLOW buttons on other camcorders. To adjust the volume Adjust the volume with the VOLUME buttons. To return to view. : Memory card A : Memory card B Continued , 47 View still images. 1 Touch the recording media you recorded on your camcorder (p. 59). Your camcorder starts playing the selected movie.
Operating Guide (Large File - 11.29 MB)
Page 50
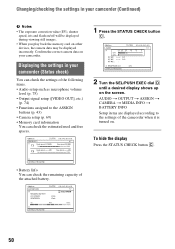
... exposure correction value (EV), shutter speed, iris and flash on/off will be displayed during viewing still images. • When you play back the memory card on your camcorder (Status check) You can check the settings of the attached battery. 50 AUDIO t OUTPUT t ASSIGN t CAMERA t MEDIA INFO t BATTERY INFO Setup items are displayed according to...
... exposure correction value (EV), shutter speed, iris and flash on/off will be displayed during viewing still images. • When you play back the memory card on your camcorder (Status check) You can check the settings of the attached battery. 50 AUDIO t OUTPUT t ASSIGN t CAMERA t MEDIA INFO t BATTERY INFO Setup items are displayed according to...
Operating Guide (Large File - 11.29 MB)
Page 56
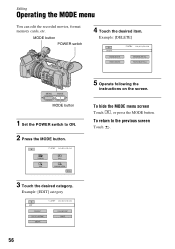
To return to ON. 2 Press the MODE button. 5 Operate following the instructions on the screen. Editing Operating the MODE menu You can edit the recorded movies, format memory cards, etc. MODE button POWER switch 4 Touch the desired item. Example: [EDIT] category 56 Example: [DELETE] MODE button 1 Set the POWER switch to the previous screen Touch . 3 Touch the desired category. To hide the MODE menu screen Touch , or press the MODE button.
To return to ON. 2 Press the MODE button. 5 Operate following the instructions on the screen. Editing Operating the MODE menu You can edit the recorded movies, format memory cards, etc. MODE button POWER switch 4 Touch the desired item. Example: [EDIT] category 56 Example: [DELETE] MODE button 1 Set the POWER switch to the previous screen Touch . 3 Touch the desired category. To hide the MODE menu screen Touch , or press the MODE button.
Operating Guide (Large File - 11.29 MB)
Page 57
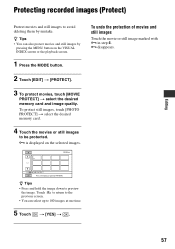
... protection of movies and still images Touch the movie or still image marked with - To protect still images, touch [PHOTO PROTECT] t select the desired memory card. 4 Touch the movies or still images to 100 images at one time. 5 Touch t [YES] t . 57 disappears. is displayed on the... the playback screen. 1 Press the MODE button. 2 Touch [EDIT] t [PROTECT]. 3 To protect movies, touch [MOVIE PROTECT] t select the desired memory card and image quality. Touch to return to the previous screen. • You can also protect movies and still images by mistake. Protecting recorded images (Protect...
... protection of movies and still images Touch the movie or still image marked with - To protect still images, touch [PHOTO PROTECT] t select the desired memory card. 4 Touch the movies or still images to 100 images at one time. 5 Touch t [YES] t . 57 disappears. is displayed on the... the playback screen. 1 Press the MODE button. 2 Touch [EDIT] t [PROTECT]. 3 To protect movies, touch [MOVIE PROTECT] t select the desired memory card and image quality. Touch to return to the previous screen. • You can also protect movies and still images by mistake. Protecting recorded images (Protect...
Operating Guide (Large File - 11.29 MB)
Page 58
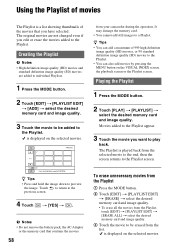
...Touch the movie to be erased from the list. from the Playlist, touch [EDIT] t [PLAYLIST EDIT] t [ERASE ALL] t select the desired memory card and image quality. 3 Touch the movie to the Playlist. z Tips • Press and hold the image down to the Playlist. Using the Playlist ...button. 2 Touch [EDIT] t [PLAYLIST EDIT] t [ERASE] t select the desired memory card and image quality. • To erase all the movies from your camcorder during the operation. is displayed on the selected movies. It may damage the memory card. • You cannot add still images to play back. Movies added to the...
...Touch the movie to be erased from the list. from the Playlist, touch [EDIT] t [PLAYLIST EDIT] t [ERASE ALL] t select the desired memory card and image quality. 3 Touch the movie to the Playlist. z Tips • Press and hold the image down to the Playlist. Using the Playlist ...button. 2 Touch [EDIT] t [PLAYLIST EDIT] t [ERASE] t select the desired memory card and image quality. • To erase all the movies from your camcorder during the operation. is displayed on the selected movies. It may damage the memory card. • You cannot add still images to play back. Movies added to the...


