
Handbook
Page 10
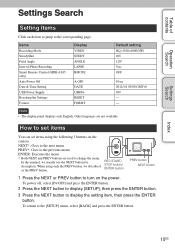
... usually use the NEXT button for description. To power off, select [PwOFF] and press the ENTER button. 2 Press the NEXT button to display [SETUP], then press the ENTER button. 3 Press the NEXT button to change the menu. NEXT*: Goes to the next menu PREV*: Goes to the previous... Executes the menu * Both NEXT and PREV buttons are not available. Items Recording Mode SteadyShot Field Angle Interval Photo Recording Smart Remote Control (HDR-AS15 only) Auto Power Off Date & Time Setting USB Power Supply Resetting the Settings Format Display VIDEO STEDY ANGLE LAPSE RMOTE A.OFF DATE USBPw RESET...
... usually use the NEXT button for description. To power off, select [PwOFF] and press the ENTER button. 2 Press the NEXT button to display [SETUP], then press the ENTER button. 3 Press the NEXT button to change the menu. NEXT*: Goes to the next menu PREV*: Goes to the previous... Executes the menu * Both NEXT and PREV buttons are not available. Items Recording Mode SteadyShot Field Angle Interval Photo Recording Smart Remote Control (HDR-AS15 only) Auto Power Off Date & Time Setting USB Power Supply Resetting the Settings Format Display VIDEO STEDY ANGLE LAPSE RMOTE A.OFF DATE USBPw RESET...
Handbook
Page 13
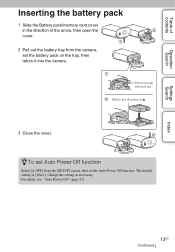
Change the setting as necessary. Match the direction of the arrow, then open the cover. 2 Pull out the battery tray from the [SETUP] screen, then set the battery pack on the tray, then return it into the camera. The default setting is [10sec]. Table of contents Operation Search ...
Change the setting as necessary. Match the direction of the arrow, then open the cover. 2 Pull out the battery tray from the [SETUP] screen, then set the battery pack on the tray, then return it into the camera. The default setting is [10sec]. Table of contents Operation Search ...
Handbook
Page 18
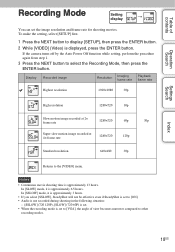
... image resolution and frame rate for shooting movies. Index 18US Table of view becomes narrower compared to other recording modes. To make the setting, select [SETUP] first. 1 Press the NEXT button to [ON]. • Audio is not recorded during shooting in the following situation: - [SSLOW] (720 120P), [SLOW] (720 60P) is... button. In [SLOW] mode, it is approximately 3 hours. • If you select [SSLOW], SteadyShot will not be effective even if SteadyShot is set to display [SETUP], then press the ENTER button. 2 While [VIDEO] (Video) is approximately 13 hours.
... image resolution and frame rate for shooting movies. Index 18US Table of view becomes narrower compared to other recording modes. To make the setting, select [SETUP] first. 1 Press the NEXT button to [ON]. • Audio is not recorded during shooting in the following situation: - [SSLOW] (720 120P), [SLOW] (720 60P) is... button. In [SLOW] mode, it is approximately 3 hours. • If you select [SSLOW], SteadyShot will not be effective even if SteadyShot is set to display [SETUP], then press the ENTER button. 2 While [VIDEO] (Video) is approximately 13 hours.
Handbook
Page 19
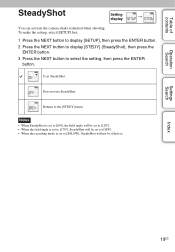
To make the setting, select [SETUP] first. 1 Press the NEXT button to display [SETUP], then press the ENTER button. 2 Press the NEXT button to display [STEDY] (SteadyShot), then press the ENTER button. 3 Press the NEXT button to [SSLOW], SteadyShot ...
To make the setting, select [SETUP] first. 1 Press the NEXT button to display [SETUP], then press the ENTER button. 2 Press the NEXT button to display [STEDY] (SteadyShot), then press the ENTER button. 3 Press the NEXT button to [SSLOW], SteadyShot ...

Handbook
Page 20
... angle of contents Operation Search Field Angle Setting display t You can change the field angle for recording. To make the setting, select [SETUP] first. 1 Press the NEXT button to display [SETUP], then press the ENTER button. 2 Press the NEXT button to display [ANGLE] (Angle), then press the ENTER button. 3 Press the NEXT...
... angle of contents Operation Search Field Angle Setting display t You can change the field angle for recording. To make the setting, select [SETUP] first. 1 Press the NEXT button to display [SETUP], then press the ENTER button. 2 Press the NEXT button to display [ANGLE] (Angle), then press the ENTER button. 3 Press the NEXT...
Handbook
Page 21
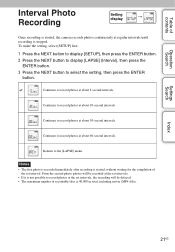
... the set interval. Continues to the [LAPSE] menu. Returns to record photos at about 60-second intervals. To make the setting, select [SETUP] first. 1 Press the NEXT button to display [SETUP], then press the ENTER button. 2 Press the NEXT button to display [LAPSE] (Interval), then press the ENTER button. 3 Press the NEXT...
... the set interval. Continues to the [LAPSE] menu. Returns to record photos at about 60-second intervals. To make the setting, select [SETUP] first. 1 Press the NEXT button to display [SETUP], then press the ENTER button. 2 Press the NEXT button to display [LAPSE] (Interval), then press the ENTER button. 3 Press the NEXT...
Handbook
Page 22
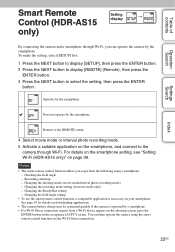
Table of contents Operation Search Settings Search Smart Remote Setting Control (HDR-AS15 display t only) By connecting the camera and a smartphone through Wi-Fi. To make the setting, select [SETUP] first. 1 Press the NEXT button to display [SETUP], then press the ENTER button. 2 Press the NEXT button to...is operated by the smartphone. You can operate the camera by the smartphone. For details on the smartphone setting, see "Setting Wi-Fi (HDR-AS15 only)" on your smartphone. Recording start/stop - Does not operate by a smartphone. • If a Wi-Fi Direct connection request from ...
Table of contents Operation Search Settings Search Smart Remote Setting Control (HDR-AS15 display t only) By connecting the camera and a smartphone through Wi-Fi. To make the setting, select [SETUP] first. 1 Press the NEXT button to display [SETUP], then press the ENTER button. 2 Press the NEXT button to...is operated by the smartphone. You can operate the camera by the smartphone. For details on the smartphone setting, see "Setting Wi-Fi (HDR-AS15 only)" on your smartphone. Recording start/stop - Does not operate by a smartphone. • If a Wi-Fi Direct connection request from ...

Handbook
Page 23
... mode - Supplying power from a connected USB device - Notes • This function is being connected, or an image is displayed. while adjusting [SETUP] settings - while playing back photos - Turns the power off after about 10 seconds. Index 23US To make the setting, select... [SETUP] first. 1 Press the NEXT button to display [SETUP], then press the ENTER button. 2 Press the NEXT button to display [A.OFF] (Auto Power Off), then press the ENTER button. 3...
... mode - Supplying power from a connected USB device - Notes • This function is being connected, or an image is displayed. while adjusting [SETUP] settings - while playing back photos - Turns the power off after about 10 seconds. Index 23US To make the setting, select... [SETUP] first. 1 Press the NEXT button to display [SETUP], then press the ENTER button. 2 Press the NEXT button to display [A.OFF] (Auto Power Off), then press the ENTER button. 3...
Handbook
Page 24
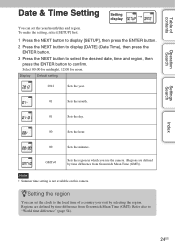
..., 12:00 for noon. Note • Summer time setting is not available on this camera. Index 24US To make the setting, select [SETUP] first. 1 Press the NEXT button to display [SETUP], then press the ENTER button. 2 Press the NEXT button to display [DATE] (Date Time), then press the ENTER button. 3 Press the...
..., 12:00 for noon. Note • Summer time setting is not available on this camera. Index 24US To make the setting, select [SETUP] first. 1 Press the NEXT button to display [SETUP], then press the ENTER button. 2 Press the NEXT button to display [DATE] (Date Time), then press the ENTER button. 3 Press the...
Handbook
Page 25
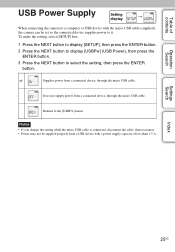
Table of less than 1.5 A. Returns to select the setting, then press the ENTER button. To make the setting, select [SETUP] first. 1 Press the NEXT button to display [SETUP], then press the ENTER button. 2 Press the NEXT button to display [USBPw] (USB Power), then press the ENTER button. 3 Press the NEXT button to the...
Table of less than 1.5 A. Returns to select the setting, then press the ENTER button. To make the setting, select [SETUP] first. 1 Press the NEXT button to display [SETUP], then press the ENTER button. 2 Press the NEXT button to display [USBPw] (USB Power), then press the ENTER button. 3 Press the NEXT button to the...

Handbook
Page 26
If you activate [RESET], movies are not deleted. 1 Press the NEXT button to display [SETUP], then press the ENTER button. 2 Press the NEXT button to display [RESET] (Reset), then press the ENTER button. 3 Press the ENTER button to their defaults. ...
If you activate [RESET], movies are not deleted. 1 Press the NEXT button to display [SETUP], then press the ENTER button. 2 Press the NEXT button to display [RESET] (Reset), then press the ENTER button. 3 Press the ENTER button to their defaults. ...
Handbook
Page 27
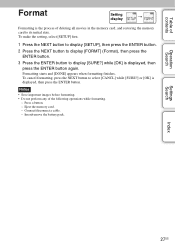
... the memory card, and restoring the memory card to its initial state. Insert/remove the battery pack. To make the setting, select [SETUP] first. 1 Press the NEXT button to display [SETUP], then press the ENTER button. 2 Press the NEXT button to display [FORMT] (Format), then press the ENTER button. 3 Press the ENTER...
... the memory card, and restoring the memory card to its initial state. Insert/remove the battery pack. To make the setting, select [SETUP] first. 1 Press the NEXT button to display [SETUP], then press the ENTER button. 2 Press the NEXT button to display [FORMT] (Format), then press the ENTER button. 3 Press the ENTER...


