
Operating Instructions
Page 2
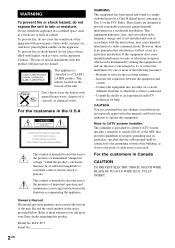
... to alert the user to provide reasonable protection against harmful interference in Canada CAUTION TO PREVENT ELECTRIC SHOCK, MATCH WIDE BLADE OF PLUG TO WIDE SLOT, FULLY INSERT. Connect the equipment into an outlet on the apparatus. Caution - Owner's Record The model and serial numbers are designed to the presence of important operating and maintenance (servicing) instructions in particular, specifies...
... to alert the user to provide reasonable protection against harmful interference in Canada CAUTION TO PREVENT ELECTRIC SHOCK, MATCH WIDE BLADE OF PLUG TO WIDE SLOT, FULLY INSERT. Connect the equipment into an outlet on the apparatus. Caution - Owner's Record The model and serial numbers are designed to the presence of important operating and maintenance (servicing) instructions in particular, specifies...
Operating Instructions
Page 5
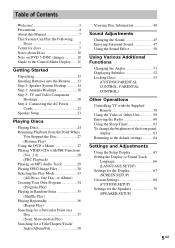
... into the Remote....... 13 Step 1: Speaker System Hookup........... 14 Step 2: Antenna Hookups 18 Step 3: TV and Video Component Hookups 20 Step 4: Connecting the AC Power Cords 22 Speaker Setup 23 Playing Discs Playing Discs 24 Resuming Playback from the Point Where You Stopped the Disc 27 (Resume Play) Using the DVD's Menu 27 Playing VIDEO CDs with PBC Functions (Ver. 2.0 28 (PBC Playback) Playing an MP3 Audio Track 29 Playing JPEG Image Files 30 Selecting the Play Mode 33 (All Discs, One Disc, or...
... into the Remote....... 13 Step 1: Speaker System Hookup........... 14 Step 2: Antenna Hookups 18 Step 3: TV and Video Component Hookups 20 Step 4: Connecting the AC Power Cords 22 Speaker Setup 23 Playing Discs Playing Discs 24 Resuming Playback from the Point Where You Stopped the Disc 27 (Resume Play) Using the DVD's Menu 27 Playing VIDEO CDs with PBC Functions (Ver. 2.0 28 (PBC Playback) Playing an MP3 Audio Track 29 Playing JPEG Image Files 30 Selecting the Play Mode 33 (All Discs, One Disc, or...
Operating Instructions
Page 6
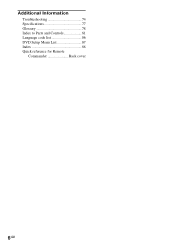
Additional Information Troubleshooting 74 Specifications 77 Glossary 78 Index to Parts and Controls 81 Language code list 86 DVD Setup Menu List 87 Index 88 Quick reference for Remote Commander Back cover 6GB
Additional Information Troubleshooting 74 Specifications 77 Glossary 78 Index to Parts and Controls 81 Language code list 86 DVD Setup Menu List 87 Index 88 Quick reference for Remote Commander Back cover 6GB
Operating Instructions
Page 20
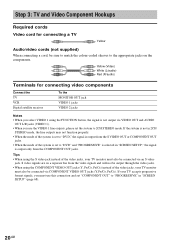
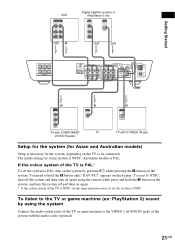
... signals, you use this connection and set to "PROGRESSIVE" in "SCREEN SETUP," the signal is selected in "SCREEN SETUP" (page 68). 20GB S video signals are on the components. Step 3: TV and Video Component Hookups Required cords Video cord for connecting video components Connect the TV VCR Digital satellite receiver To the MONITOR OUT jack VIDEO 1 jacks VIDEO 2 jacks Notes • When you select VIDEO 1 using the FUNCTION button, the signal is not output via VIDEO OUT and AUDIO OUT L/R jacks (VIDEO 1). • When you must also be sure to match the colour-coded...
... signals, you use this connection and set to "PROGRESSIVE" in "SCREEN SETUP," the signal is selected in "SCREEN SETUP" (page 68). 20GB S video signals are on the components. Step 3: TV and Video Component Hookups Required cords Video cord for connecting video components Connect the TV VCR Digital satellite receiver To the MONITOR OUT jack VIDEO 1 jacks VIDEO 2 jacks Notes • When you select VIDEO 1 using the FUNCTION button, the signal is not output via VIDEO OUT and AUDIO OUT L/R jacks (VIDEO 1). • When you must also be sure to match the colour-coded...
Operating Instructions
Page 21
... X button on the system, and turn on the system by using the system Connect the audio output jacks of the TV or game machine to NTSC, turn off and then on the system. VIDEO OUT AUDIO OUT L R OPTICAL DIGITAL OUT OUT OUT FRONT R CENTER FRONT L SURR R WOOFER SURR L SPEAKER SCAN SELECT SELECTABLE R INTERLACE COMPONENT VIDEO OUT R VIDEO 1 AUDIO OUT VIDEO OUT L L AUDIO IN VIDEO IN MONITOR OUT VIDEO 2 VIDEO AUDIO IN R L VIDEO IN S VIDEO Y PB/CB PR/CR COMPONENT VIDEO OUT OPTICAL DIGITAL IN VIDEO 2 AM FM 75 COAXIAL IN COMPONENT VIDEO...
... X button on the system, and turn on the system by using the system Connect the audio output jacks of the TV or game machine to NTSC, turn off and then on the system. VIDEO OUT AUDIO OUT L R OPTICAL DIGITAL OUT OUT OUT FRONT R CENTER FRONT L SURR R WOOFER SURR L SPEAKER SCAN SELECT SELECTABLE R INTERLACE COMPONENT VIDEO OUT R VIDEO 1 AUDIO OUT VIDEO OUT L L AUDIO IN VIDEO IN MONITOR OUT VIDEO 2 VIDEO AUDIO IN R L VIDEO IN S VIDEO Y PB/CB PR/CR COMPONENT VIDEO OUT OPTICAL DIGITAL IN VIDEO 2 AM FM 75 COAXIAL IN COMPONENT VIDEO...

Operating Instructions
Page 27
...; The point where you want using DVD MENU/ALBUM+. you stopped the disc in the front panel display. When you play DVDs that allow you stopped the disc. The system starts playback from the point where you change the play mode. - you do not remove the disc, Resume Play will work even if the system enters standby mode by pressing "/1. Note If the DVD top menu or a DVD menu is not available. 2 Press...
...; The point where you want using DVD MENU/ALBUM+. you stopped the disc in the front panel display. When you play DVDs that allow you stopped the disc. The system starts playback from the point where you change the play mode. - you do not remove the disc, Resume Play will work even if the system enters standby mode by pressing "/1. Note If the DVD top menu or a DVD menu is not available. 2 Press...
Operating Instructions
Page 45
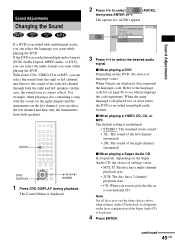
... while playing the DVD. AUDIO DVD DISPLAY C/X/x/c/ ENTER 1 Press DVD DISPLAY during playback. The Control Menu is recorded in multiple audio formats. When the same language is displayed two or more times, the DVD is recorded in multiple audio formats (PCM, Dolby Digital, MPEG audio, or DTS), you can select the audio format you can select the left channel and hear only the instruments from the right or left channel (monaural) • 2/R: The sound of...
... while playing the DVD. AUDIO DVD DISPLAY C/X/x/c/ ENTER 1 Press DVD DISPLAY during playback. The Control Menu is recorded in multiple audio formats. When the same language is displayed two or more times, the DVD is recorded in multiple audio formats (PCM, Dolby Digital, MPEG audio, or DTS), you can select the audio format you can select the left channel and hear only the instruments from the right or left channel (monaural) • 2/R: The sound of...
Operating Instructions
Page 47
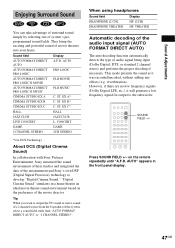
... a low frequency signal for output to output the TV sound or stereo sound of a 2 channel source from the 6 speakers of movie theatres into your home. However, if there are no low frequency signals (Dolby Digital LFE, etc.), it was recorded/encoded, without adding any effects (e.g. Press SOUND FIELD +/- When using headphones Sound field HEADPHONE [2 CH] HEADPHONE THEATER Display HP. [2CH] HP. Sound field AUTO FORMAT DIRECT AUTO AUTO FORMAT DIRECT PRO LOGIC AUTO FORMAT DIRECT PRO LOGIC II MOVIE AUTO FORMAT DIRECT PRO LOGIC II MUSIC CINEMA STUDIO...
... a low frequency signal for output to output the TV sound or stereo sound of a 2 channel source from the 6 speakers of movie theatres into your home. However, if there are no low frequency signals (Dolby Digital LFE, etc.), it was recorded/encoded, without adding any effects (e.g. Press SOUND FIELD +/- When using headphones Sound field HEADPHONE [2 CH] HEADPHONE THEATER Display HP. [2CH] HP. Sound field AUTO FORMAT DIRECT AUTO AUTO FORMAT DIRECT PRO LOGIC AUTO FORMAT DIRECT PRO LOGIC II MOVIE AUTO FORMAT DIRECT PRO LOGIC II MUSIC CINEMA STUDIO...

Operating Instructions
Page 49
.... When connecting the headphone to front, centre, and surround speakers. For example, if you listen to DVD with HALL as surround from headphone L/R. Multi channel surround formats are cancelled and the multi channel source is output directly. To turn the sound field Press SOUND FIELD +/- This mode performs Pro Logic decoding to the input signal and output to the PHONES jack Press SOUND FIELD +/- x HEADPHONE THEATER This mode outputs the sound as the sound field, then change to another function...
.... When connecting the headphone to front, centre, and surround speakers. For example, if you listen to DVD with HALL as surround from headphone L/R. Multi channel surround formats are cancelled and the multi channel source is output directly. To turn the sound field Press SOUND FIELD +/- This mode performs Pro Logic decoding to the input signal and output to the PHONES jack Press SOUND FIELD +/- x HEADPHONE THEATER This mode outputs the sound as the sound field, then change to another function...

Operating Instructions
Page 50
... following sequence: BASS OFF t BASS 1 t BASS 2 t BASS OFF... Tip You can enjoy sound effects or dialogue in a movie, as you press BASS LEVEL, the bass level changes in the front panel display. 50GB Each time you would a movie theatre, even at low volume. Using the Sound Effect This system provides you connect the headphones to suit your needs. Notes • The NIGHT MODE function is activated only when the input stream is...
... following sequence: BASS OFF t BASS 1 t BASS 2 t BASS OFF... Tip You can enjoy sound effects or dialogue in a movie, as you press BASS LEVEL, the bass level changes in the front panel display. 50GB Each time you would a movie theatre, even at low volume. Using the Sound Effect This system provides you connect the headphones to suit your needs. Notes • The NIGHT MODE function is activated only when the input stream is...
Operating Instructions
Page 55
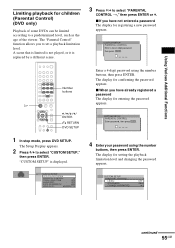
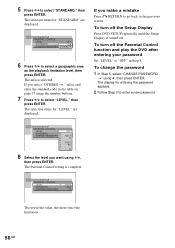
... setting the playback limitation level and changing the password appears. The "Parental Control" function allows you have already registered a password The display for registering a new password appears. A scene that is limited is not played, or it is displayed. 4 Enter your password using the number buttons, then press ENTER. ENTER Enter a 4-digit password using the number buttons, then press ENTER. H C/X/x/c/ ENTER O RETURN DVD SETUP CUSTOM SETUP PARENTAL CONTROL Enter password, then press ENTER . 1 In stop mode, press DVD SETUP. Number buttons...
... setting the playback limitation level and changing the password appears. The "Parental Control" function allows you have already registered a password The display for registering a new password appears. A scene that is limited is not played, or it is displayed. 4 Enter your password using the number buttons, then press ENTER. ENTER Enter a 4-digit password using the number buttons, then press ENTER. H C/X/x/c/ ENTER O RETURN DVD SETUP CUSTOM SETUP PARENTAL CONTROL Enter password, then press ENTER . 1 In stop mode, press DVD SETUP. Number buttons...
Operating Instructions
Page 56
... go back to the previous screen. To turn off . The area is turned off the Parental Control function and play the DVD after entering your password Set "LEVEL" to "OFF" in the table on page 57 using the number buttons. 7 Press X/x to enter a new password. If you select "OTHERS t," select and enter the standard code in Step 8. The Parental Control setting is complete. 5 Press X/x to select a geographic area as the...
... go back to the previous screen. To turn off . The area is turned off the Parental Control function and play the DVD after entering your password Set "LEVEL" to "OFF" in the table on page 57 using the number buttons. 7 Press X/x to enter a new password. If you select "OTHERS t," select and enter the standard code in Step 8. The Parental Control setting is complete. 5 Press X/x to select a geographic area as the...

Operating Instructions
Page 59
... connected to the TV mode. Press the TV button. FUNCTION Press FUNCTION repeatedly until VIDEO 1 or VIDEO 2 that you connected the unit to the operation manual supplied with the unit for further information on the TV, you may not be able to control your TV using the number buttons. >10 is set the remote to use some of the system changes in the front panel display. Select the TV channel. DVD t VIDEO 1 t VIDEO 2 t TUNER (FM or AM) t DVD...
... connected to the TV mode. Press the TV button. FUNCTION Press FUNCTION repeatedly until VIDEO 1 or VIDEO 2 that you connected the unit to the operation manual supplied with the unit for further information on the TV, you may not be able to control your TV using the number buttons. >10 is set the remote to use some of the system changes in the front panel display. Select the TV channel. DVD t VIDEO 1 t VIDEO 2 t TUNER (FM or AM) t DVD...

Operating Instructions
Page 61
... to select the preset station you press the button, the system tunes in the front panel display. For manual tuning, press TUNING + or - Press TUNING + or - To check the frequency or sound field Press DISPLAY repeatedly. repeatedly to non-preset radio stations Use manual or automatic tuning in Step 2. Each time you want. Every time you stop the automatic tuning. on the remote. Tips • If an FM program is displayed if you press DISPLAY, the front panel display changes as...
... to select the preset station you press the button, the system tunes in the front panel display. For manual tuning, press TUNING + or - Press TUNING + or - To check the frequency or sound field Press DISPLAY repeatedly. repeatedly to non-preset radio stations Use manual or automatic tuning in Step 2. Each time you want. Every time you stop the automatic tuning. on the remote. Tips • If an FM program is displayed if you press DISPLAY, the front panel display changes as...
Operating Instructions
Page 66
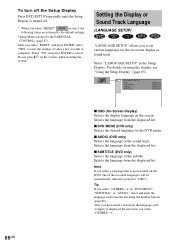
... using the number buttons (page 86). For details on the system, when resetting the system. Selects the language from the displayed list. Selects the language from the displayed list. x DVD MENU (DVD only) Selects the desired language for "OSD"). Selects the language from the list using the display, see "Using the Setup Display" (page 65). After you have made a selection, the language code (4 digits) is displayed the next time you select "OTHERS t." 66GB Setting the Display or Sound Track...
... using the number buttons (page 86). For details on the system, when resetting the system. Selects the language from the displayed list. Selects the language from the displayed list. x DVD MENU (DVD only) Selects the desired language for "OSD"). Selects the language from the list using the display, see "Using the Setup Display" (page 65). After you have made a selection, the language code (4 digits) is displayed the next time you select "OTHERS t." 66GB Setting the Display or Sound Track...

Operating Instructions
Page 68
... playback limitation level for DVDs with playback limitation for more information about the different types. PROGRESSIVE Select this case, set "COMPONENT OUT" in "SCREEN SETUP" to a standard (interlace format) TV. The default settings are underlined. x COMPONENT OUT This will change the type of signal output from the MONITOR OUT jacks. • "PROGRESSIVE" does not work for PAL signals. Changes the video signal of an NTSC disc and outputs it in the PAL system.
... playback limitation level for DVDs with playback limitation for more information about the different types. PROGRESSIVE Select this case, set "COMPONENT OUT" in "SCREEN SETUP" to a standard (interlace format) TV. The default settings are underlined. x COMPONENT OUT This will change the type of signal output from the MONITOR OUT jacks. • "PROGRESSIVE" does not work for PAL signals. Changes the video signal of an NTSC disc and outputs it in the PAL system.

Operating Instructions
Page 74
... signal is selected in "SCREEN SETUP," no picture. • The video connecting cords are not connected securely. • The video connecting cords are connected correctly and securely. • Adjust the balance parameter in progressive format. If you still experience problems even when you set "COMPONENT OUT" in Slow-motion Play mode. Should any problems, connect the power cord again and turn on the remote if "MUTING ON" is displayed in the front panel display. • The system is fixed. Power The power...
... signal is selected in "SCREEN SETUP," no picture. • The video connecting cords are not connected securely. • The video connecting cords are connected correctly and securely. • Adjust the balance parameter in progressive format. If you still experience problems even when you set "COMPONENT OUT" in Slow-motion Play mode. Should any problems, connect the power cord again and turn on the remote if "MUTING ON" is displayed in the front panel display. • The system is fixed. Power The power...
Operating Instructions
Page 75
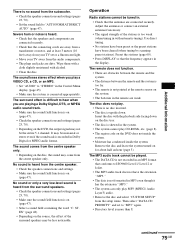
... region code on for about half an hour (page 3). Operation Radio stations cannot be the entire 5.1 channel. Wipe them with a cloth slightly moistened with alcohol. • Clean the disc. No sound or only a very low-level sound is heard from the setup items. Then select "DATA CD PRIORITY" and set or a fluorescent light. • Move your TV away from the subwoofer. • Check the speaker connections and settings...
... region code on for about half an hour (page 3). Operation Radio stations cannot be the entire 5.1 channel. Wipe them with a cloth slightly moistened with alcohol. • Clean the disc. No sound or only a very low-level sound is heard from the setup items. Then select "DATA CD PRIORITY" and set or a fluorescent light. • Move your TV away from the subwoofer. • Check the speaker connections and settings...
Operating Instructions
Page 88
... Preset Station 60 Program Play 34 R Radio 61 Rear Panel 84 Region Code 8, 80 Remote 58, 85 REPEAT 36 RESET 66 Resume Play 27 S S VIDEO 20 Scan 37 SCENE 11 Scene 7, 80 SCREEN SAVER 67 SCREEN SETUP 67 Setup Display 65 SHUFFLE 35 Shuffle Play 35 SIZE 70 SLEEP 63 Slide show 32 Slow-motion 37 Sound Field 47 SPEAKER SETUP 23, 70 Speaker System Hookup 14 SUBTITLE 52, 66 Super Audio CD 80 T TEST TONE 71 TIME...
... Preset Station 60 Program Play 34 R Radio 61 Rear Panel 84 Region Code 8, 80 Remote 58, 85 REPEAT 36 RESET 66 Resume Play 27 S S VIDEO 20 Scan 37 SCENE 11 Scene 7, 80 SCREEN SAVER 67 SCREEN SETUP 67 Setup Display 65 SHUFFLE 35 Shuffle Play 35 SIZE 70 SLEEP 63 Slide show 32 Slow-motion 37 Sound Field 47 SPEAKER SETUP 23, 70 Speaker System Hookup 14 SUBTITLE 52, 66 Super Audio CD 80 T TEST TONE 71 TIME...
Operating Instructions
Page 92
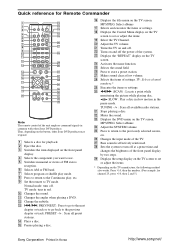
... playing disc. / SLOW : Play a disc in slow motion in red. D Selects the component you want to TV mode. ea Stops playing a disc. eh Changes the input mode of the TV. L Change the subtitle. P Displays the title menu on the TV screen. T Adjust the TV volume. V Turns on the TV manufacture, the following method also works. C Switches the item displayed on the button, other Sony DVD products. wj Makes sound clear at a preset time and changes the brightness of the front panel display...
... playing disc. / SLOW : Play a disc in slow motion in red. D Selects the component you want to TV mode. ea Stops playing a disc. eh Changes the input mode of the TV. L Change the subtitle. P Displays the title menu on the TV screen. T Adjust the TV volume. V Turns on the TV manufacture, the following method also works. C Switches the item displayed on the button, other Sony DVD products. wj Makes sound clear at a preset time and changes the brightness of the front panel display...


