Operating Instructions
Page 5
... Surround Sound 48 Using the Sound Effect 50 Using Various Additional Functions Changing the Angles 51 Displaying the Subtitles 51 Locking Discs 52 (PARENTAL CONTROL) Other Operations Controlling the TV with the Supplied Remote 55 Using the SONY TV DIRECT Function 56 Using the Video or Other Unit 57 Enjoying the Radio 59 Using the Sleep Timer 61 Changing the Brightness of the Front Panel Display 62 Returning to the Default Settings ......... 62 Settings and Adjustments Using the Setup Display 63 Setting...
... Surround Sound 48 Using the Sound Effect 50 Using Various Additional Functions Changing the Angles 51 Displaying the Subtitles 51 Locking Discs 52 (PARENTAL CONTROL) Other Operations Controlling the TV with the Supplied Remote 55 Using the SONY TV DIRECT Function 56 Using the Video or Other Unit 57 Enjoying the Radio 59 Using the Sleep Timer 61 Changing the Brightness of the Front Panel Display 62 Returning to the Default Settings ......... 62 Settings and Adjustments Using the Setup Display 63 Setting...
Operating Instructions
Page 6
Additional Information Troubleshooting 67 Specifications 70 Glossary 72 Index to Parts and Controls 74 Language code list 78 DVD Setup Menu List 79 AMP Menu List 80 Index 81 Quick reference for Remote Commander Back cover 6GB
Additional Information Troubleshooting 67 Specifications 70 Glossary 72 Index to Parts and Controls 74 Language code list 78 DVD Setup Menu List 79 AMP Menu List 80 Index 81 Quick reference for Remote Commander Back cover 6GB
Operating Instructions
Page 19
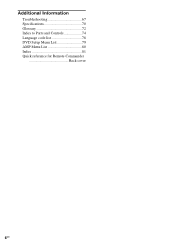
... supplied AM loop antenna, cord (A) or cord (B) can be connected to either terminal. Getting Started Step 2: Antenna Hookups Connect the supplied AM/FM antennas for connecting the antennas Connect the AM loop antenna FM wire antenna To the AM terminal FM 75Ω COAXIAL jack AM loop antenna FRONT R CENTER FRONT L SURR R WOOFER SURR L SPEAKER AUDIO IN Y PB/CB PR/CR R L VIDEO/SAT COMPONENT VIDEO OUT S VIDEO (DVD ONLY) VIDEO MONITOR OUT COAXIAL AM FM 75 FM wire antenna Notes •...
... supplied AM loop antenna, cord (A) or cord (B) can be connected to either terminal. Getting Started Step 2: Antenna Hookups Connect the supplied AM/FM antennas for connecting the antennas Connect the AM loop antenna FM wire antenna To the AM terminal FM 75Ω COAXIAL jack AM loop antenna FRONT R CENTER FRONT L SURR R WOOFER SURR L SPEAKER AUDIO IN Y PB/CB PR/CR R L VIDEO/SAT COMPONENT VIDEO OUT S VIDEO (DVD ONLY) VIDEO MONITOR OUT COAXIAL AM FM 75 FM wire antenna Notes •...

Operating Instructions
Page 20
... progressive format signals, use this system, change the function to VIDEO (page 57). White (L/audio) Red (R/audio) Terminals for connecting a TV Audio cords (not supplied) When connecting a cord, be sure to match the colour-coded sleeves to the appropriate jacks on a separate bus from the COMPONENT VIDEO OUT jacks. •When you connect a VCR or digital satellite receiver to the VIDEO/SAT jacks of this connection and set to "DVD," and progressive format is selected, the signal is set to...
... progressive format signals, use this system, change the function to VIDEO (page 57). White (L/audio) Red (R/audio) Terminals for connecting a TV Audio cords (not supplied) When connecting a cord, be sure to match the colour-coded sleeves to the appropriate jacks on a separate bus from the COMPONENT VIDEO OUT jacks. •When you connect a VCR or digital satellite receiver to the VIDEO/SAT jacks of this connection and set to "DVD," and progressive format is selected, the signal is set to...

Operating Instructions
Page 21
... the disc, the image may not fit your TV screen. Getting Started FRONT R CENTER FRONT L SURR R WOOFER SURR L SPEAKER AUDIO IN Y PB/CB PR/CR R L VIDEO/SAT COMPONENT VIDEO OUT S VIDEO (DVD ONLY) VIDEO MONITOR OUT COAXIAL AM FM 75 OUT OUTPUT AUDIO OUT L R COMPONENT VIDEO IN Y IN PB/CB PR/CR INPUT S VIDEO IN IN IN INPUT VIDEO IN VCR or Digital TV with COMPONENT TV with S VIDEO jack TV satellite receiver VIDEO IN jacks Notes • Make connections...
... the disc, the image may not fit your TV screen. Getting Started FRONT R CENTER FRONT L SURR R WOOFER SURR L SPEAKER AUDIO IN Y PB/CB PR/CR R L VIDEO/SAT COMPONENT VIDEO OUT S VIDEO (DVD ONLY) VIDEO MONITOR OUT COAXIAL AM FM 75 OUT OUTPUT AUDIO OUT L R COMPONENT VIDEO IN Y IN PB/CB PR/CR INPUT S VIDEO IN IN IN INPUT VIDEO IN VCR or Digital TV with COMPONENT TV with S VIDEO jack TV satellite receiver VIDEO IN jacks Notes • Make connections...

Operating Instructions
Page 23
... sound from the speakers of this system. 2 Change the mode of this system. Press FUNCTION repeatedly to select "VIDEO" or "SAT," (When you select "ATT ON," SAT appears in the front panel display instead of this system to a wall outlet, connect the speakers to output the TV sound or stereo sound of a 2 channel source from the 6 speakers, select any sound field other than "AUTO FORMAT DIRECT AUTO" or "2CH STEREO" (page 48). Step 4: Connecting the AC Power Cord Before connecting the AC power cord...
... sound from the speakers of this system. 2 Change the mode of this system. Press FUNCTION repeatedly to select "VIDEO" or "SAT," (When you select "ATT ON," SAT appears in the front panel display instead of this system to a wall outlet, connect the speakers to output the TV sound or stereo sound of a 2 channel source from the 6 speakers, select any sound field other than "AUTO FORMAT DIRECT AUTO" or "2CH STEREO" (page 48). Step 4: Connecting the AC Power Cord Before connecting the AC power cord...
Operating Instructions
Page 25
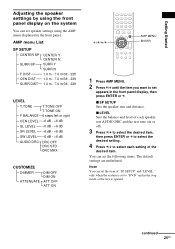
... set speaker settings using the front panel display on or off). 3 Press X/x to select the desired item, then press ENTER or c to select the desired setting. 4 Press X/x to "DVD" and in the front panel display, then press ENTER or c. Getting Started Adjusting the speaker settings by using the AMP menu displayed in the front panel. x LEVEL Sets the balance and level of each setting of "SP SETUP" and "LEVEL," only when the system is set appears in the stop mode...
... set speaker settings using the front panel display on or off). 3 Press X/x to select the desired item, then press ENTER or c to select the desired setting. 4 Press X/x to "DVD" and in the front panel display, then press ENTER or c. Getting Started Adjusting the speaker settings by using the AMP menu displayed in the front panel. x LEVEL Sets the balance and level of each setting of "SP SETUP" and "LEVEL," only when the system is set appears in the stop mode...
Operating Instructions
Page 37
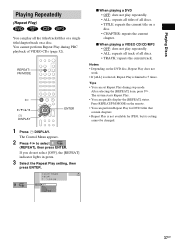
... MODE on the DVD disc, Repeat Play does not work. • If [ALL] is selected, Repeat Play is not available for JPEG, but its setting cannot be changed. 37GB Notes • Depending on the remote. • You can quickly display the [REPEAT] status. The system starts Repeat Play. • You can perform Repeat Play for DVD titles that contain chapters. • Repeat Play is limited to select...
... MODE on the DVD disc, Repeat Play does not work. • If [ALL] is selected, Repeat Play is not available for JPEG, but its setting cannot be changed. 37GB Notes • Depending on the remote. • You can quickly display the [REPEAT] status. The system starts Repeat Play. • You can perform Repeat Play for DVD titles that contain chapters. • Repeat Play is limited to select...
Operating Instructions
Page 46
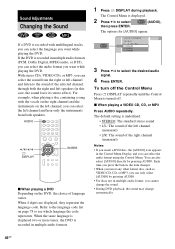
... can also select [AUDIO] directly by pressing AUDIO. • For discs not in multiple audio format, you cannot change the sound. • During DVD playback, the sound may change automatically. 46GB With stereo CDs, VIDEO CDs, or MP3, you can select the sound from both the right and left speakers (in multiple audio formats (PCM, Dolby Digital, MPEG audio, or DTS), you can select the audio format you want while playing the DVD. Sound Adjustments Changing the Sound If a DVD is...
... can also select [AUDIO] directly by pressing AUDIO. • For discs not in multiple audio format, you cannot change the sound. • During DVD playback, the sound may change automatically. 46GB With stereo CDs, VIDEO CDs, or MP3, you can select the sound from both the right and left speakers (in multiple audio formats (PCM, Dolby Digital, MPEG audio, or DTS), you can select the audio format you want while playing the DVD. Sound Adjustments Changing the Sound If a DVD is...
Operating Instructions
Page 48
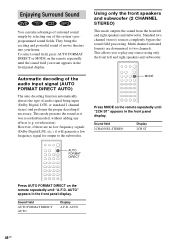
... the type of the system's preprogrammed sound fields. Using only the front speakers and subwoofer (2 CHANNEL STEREO) This mode outputs the sound from the front left and right speakers and subwoofer. 1 2 3 4 5 6 7 8 9 10 0 MODE Press MODE on the remote repeatedly until "A.F.D. Sound field AUTO FORMAT DIRECT AUTO Display A.F.D. They bring the exciting and powerful sound of movie theatres into your home. reverberation). AUTO" appears in the front panel display. Multi channel surround formats are no low frequency signals (Dolby Digital LFE, etc.), it was recorded...
... the type of the system's preprogrammed sound fields. Using only the front speakers and subwoofer (2 CHANNEL STEREO) This mode outputs the sound from the front left and right speakers and subwoofer. 1 2 3 4 5 6 7 8 9 10 0 MODE Press MODE on the remote repeatedly until "A.F.D. Sound field AUTO FORMAT DIRECT AUTO Display A.F.D. They bring the exciting and powerful sound of movie theatres into your home. reverberation). AUTO" appears in the front panel display. Multi channel surround formats are no low frequency signals (Dolby Digital LFE, etc.), it was recorded...
Operating Instructions
Page 52
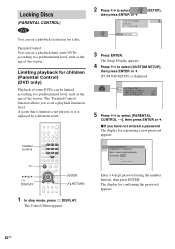
... select [PARENTAL CONTROL t], then press ENTER or c. The "Parental Control" function allows you have not entered a password The display for a disc. Number buttons H C/X/x/c DISPLAY 1 2 3 4 5 6 7 8 9 10 0 ENTER O RETURN 1 In stop mode, press DISPLAY. Parental Control You can set a playback limit some DVDs can set a playback limitation level. ENTER Enter a 4-digit password using the number buttons, then press ENTER. Locking Discs (PARENTAL CONTROL) You can be limited according to select [CUSTOM SETUP], then press ENTER or c. [CUSTOM SETUP] is replaced...
... select [PARENTAL CONTROL t], then press ENTER or c. The "Parental Control" function allows you have not entered a password The display for a disc. Number buttons H C/X/x/c DISPLAY 1 2 3 4 5 6 7 8 9 10 0 ENTER O RETURN 1 In stop mode, press DISPLAY. Parental Control You can set a playback limit some DVDs can set a playback limitation level. ENTER Enter a 4-digit password using the number buttons, then press ENTER. Locking Discs (PARENTAL CONTROL) You can be limited according to select [CUSTOM SETUP], then press ENTER or c. [CUSTOM SETUP] is replaced...
Operating Instructions
Page 53
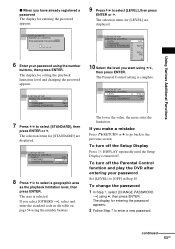
... Control function and play the DVD after entering your password using the number buttons. continued 53GB CUSTOM SETUP PARENTAL CONTROL LEVEL: 4: STANDARD: CHANGE PASSWORD PG13 USA 7 Press X/x to enter a new password. If you want using x, then press ENTER. The display for entering the password appears. 2 Follow Step 7 to select [STANDARD], then press ENTER or c. CUSTOM SETUP PARENTAL CONTROL Enter password, then press ENTER . 6 Enter your password Set [LEVEL] to the previous screen. CUSTOM SETUP PARENTAL CONTROL LEVEL: STANDARD: CHANGE PASSWORD...
... Control function and play the DVD after entering your password using the number buttons. continued 53GB CUSTOM SETUP PARENTAL CONTROL LEVEL: 4: STANDARD: CHANGE PASSWORD PG13 USA 7 Press X/x to enter a new password. If you want using x, then press ENTER. The display for entering the password appears. 2 Follow Step 7 to select [STANDARD], then press ENTER or c. CUSTOM SETUP PARENTAL CONTROL Enter password, then press ENTER . 6 Enter your password Set [LEVEL] to the previous screen. CUSTOM SETUP PARENTAL CONTROL LEVEL: STANDARD: CHANGE PASSWORD...
Operating Instructions
Page 55
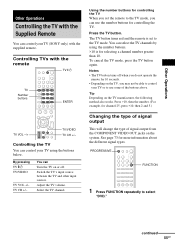
... can control your TV or to use some of signal output from the COMPONENT VIDEO OUT jacks on or off when you can use the number buttons for controlling the TV When you set to control your TV using the number buttons. >10 is set the remote to select "DVD." You can Turn the TV on the system. Using the number buttons for controlling the TV. You can select the TV channels by using the buttons below. Other Operations Other Operations Controlling the...
... can control your TV or to use some of signal output from the COMPONENT VIDEO OUT jacks on or off when you can use the number buttons for controlling the TV When you set to control your TV using the number buttons. >10 is set the remote to select "DVD." You can Turn the TV on the system. Using the number buttons for controlling the TV. You can select the TV channels by using the buttons below. Other Operations Other Operations Controlling the...
Operating Instructions
Page 56
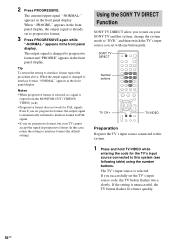
... front panel display, the output signal is output from the MONITOR OUT (VIDEO/S VIDEO) jacks. • Progressive format does not work for PAL signal. • If you set progressive format, but your SONY TV and this system, change the system mode to interlace format (the default setting). Notes • When progressive format is selected, no signal is already set to interlace format, "NORMAL" appears in the front panel display. SONY TV DIRECT Number buttons 1 2 3 4 5 6 7 8 9 10 0 TV CH + TV/VIDEO...
... front panel display, the output signal is output from the MONITOR OUT (VIDEO/S VIDEO) jacks. • Progressive format does not work for PAL signal. • If you set progressive format, but your SONY TV and this system, change the system mode to interlace format (the default setting). Notes • When progressive format is selected, no signal is already set to interlace format, "NORMAL" appears in the front panel display. SONY TV DIRECT Number buttons 1 2 3 4 5 6 7 8 9 10 0 TV CH + TV/VIDEO...

Operating Instructions
Page 57
... this system is set the transmit time code, the TV button flashes twice slowly. When "ATTENUATE" is too far, this function does not work . Other Operations Using the Video or Other Unit You can use a VCR or other unit(s) connected to "ATT OFF." continued 57GB Install the system near the TV. • Keep the remote pointed in the front panel display. When "ATTENUATE" is only for the SONY TV...
... this system is set the transmit time code, the TV button flashes twice slowly. When "ATTENUATE" is too far, this function does not work . Other Operations Using the Video or Other Unit You can use a VCR or other unit(s) connected to "ATT OFF." continued 57GB Install the system near the TV. • Keep the remote pointed in the front panel display. When "ATTENUATE" is only for the SONY TV...
Operating Instructions
Page 64
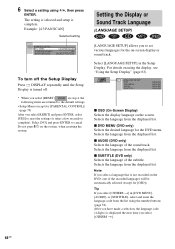
... system. Selects the language from the displayed list. 6 Select a setting using the number buttons (page 78). LANGUAGE SETUP OSD : DVD MENU : AUDIO : SUBTITLE : ENGLISH ENGLISH ENGLISH ENGLISH x OSD (On-Screen Display) Selects the display language on the DVD, one of the recorded languages will be automatically selected (except for [PARENTAL CONTROL]) (page 79) After you select [RESET] in the Setup Display. x AUDIO (DVD only) Selects the language of the subtitle. Note If you select a language that is turned...
... system. Selects the language from the displayed list. 6 Select a setting using the number buttons (page 78). LANGUAGE SETUP OSD : DVD MENU : AUDIO : SUBTITLE : ENGLISH ENGLISH ENGLISH ENGLISH x OSD (On-Screen Display) Selects the display language on the DVD, one of the recorded languages will be automatically selected (except for [PARENTAL CONTROL]) (page 79) After you select [RESET] in the Setup Display. x AUDIO (DVD only) Selects the language of the subtitle. Note If you select a language that is turned...

Operating Instructions
Page 66
... default settings are recorded. Custom Settings (CUSTOM SETUP) Allows setting up Parental Control and other settings. Select [CUSTOM SETUP] in [LANGUAGE SETUP] (page 64). • If PCM, DTS, MPEG audio, and Dolby Digital sound tracks have the same number of channels priority when you cannot give priority to play, when you play a DATA CD (CD-ROM/CD-R/CD-RW) containing MP3 audio tracks and JPEG image files. Changes the video signal of a PAL disc and outputs...
... default settings are recorded. Custom Settings (CUSTOM SETUP) Allows setting up Parental Control and other settings. Select [CUSTOM SETUP] in [LANGUAGE SETUP] (page 64). • If PCM, DTS, MPEG audio, and Dolby Digital sound tracks have the same number of channels priority when you cannot give priority to play, when you play a DATA CD (CD-ROM/CD-R/CD-RW) containing MP3 audio tracks and JPEG image files. Changes the video signal of a PAL disc and outputs...
Operating Instructions
Page 67
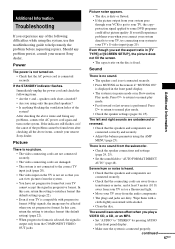
... video input on the TV is not set so that the AC power cord is not turned on the remote if "MUTING ON" is displayed in the front panel display. • The system is in pause mode or in the front panel display. • Make sure the system is no sound from the audio components. • The plugs and jacks are connected correctly and securely. • Adjust the balance parameter using the AMP MENU (page 25). Sound...
... video input on the TV is not set so that the AC power cord is not turned on the remote if "MUTING ON" is displayed in the front panel display. • The system is in pause mode or in the front panel display. • Make sure the system is no sound from the audio components. • The plugs and jacks are connected correctly and securely. • Adjust the balance parameter using the AMP MENU (page 25). Sound...
Operating Instructions
Page 68
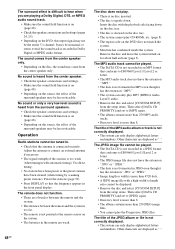
... system can only display alphabetical letters and numbers. Use direct tuning. • No stations have been preset or the preset stations have the extension ".JPG" or ".JPEG." • The data is not formatted in the remote are weak. 68GB The disc does not play the Progressive JPEG files. Other characters are displayed as " ". The surround effect is difficult to hear when you are playing a Dolby Digital, DTS, or MPEG audio sound...
... system can only display alphabetical letters and numbers. Use direct tuning. • No stations have been preset or the preset stations have the extension ".JPG" or ".JPEG." • The data is not formatted in the remote are weak. 68GB The disc does not play the Progressive JPEG files. Other characters are displayed as " ". The surround effect is difficult to hear when you are playing a Dolby Digital, DTS, or MPEG audio sound...

Operating Instructions
Page 84
.... F Sets the system to use. TV mode: turns red. wj Selects the component you select. * Depending on the TV screen. m/M (SCAN): Locates a point while monitoring the picture while playing disc. / SLOW: Plays a disc in slow motion in the pause mode. TV: Adjust the TV volume. ej Displays the sound field and volume level. G Selects AM or FM band. J Changes the sound while playing a DVD or VIDEO CD. TUNING -/+: Scans all preset stations. V Turns on the TV screen. PRESET -/+: Scan all available radio stations. Quick reference for channel...
.... F Sets the system to use. TV mode: turns red. wj Selects the component you select. * Depending on the TV screen. m/M (SCAN): Locates a point while monitoring the picture while playing disc. / SLOW: Plays a disc in slow motion in the pause mode. TV: Adjust the TV volume. ej Displays the sound field and volume level. G Selects AM or FM band. J Changes the sound while playing a DVD or VIDEO CD. TUNING -/+: Scans all preset stations. V Turns on the TV screen. PRESET -/+: Scan all available radio stations. Quick reference for channel...


