
Operating Instructions
Page 1
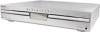
4-255-321-14(2) DVD Home Theatre System Operating Instructions DAV-BC150/BC250 ©2004 Sony Corporation
4-255-321-14(2) DVD Home Theatre System Operating Instructions DAV-BC150/BC250 ©2004 Sony Corporation

Operating Instructions
Page 3
..., the unit can overheat and malfunction. • Do not place the system on a soft surface such as a rug that might block the ventilation holes on the lenses inside the DVD Home Theatre System and cause damage to a section with very low level inputs or no audio...in a place subject to a warm location, wait for future reference. Should this product meets the ENERGY STAR® guidelines for purchasing Sony DVD Home Theatre System. Welcome! If you for energy efficiency. Installing • Allow adequate air circulation to prevent internal heat buildup. • Do not ...
..., the unit can overheat and malfunction. • Do not place the system on a soft surface such as a rug that might block the ventilation holes on the lenses inside the DVD Home Theatre System and cause damage to a section with very low level inputs or no audio...in a place subject to a warm location, wait for future reference. Should this product meets the ENERGY STAR® guidelines for purchasing Sony DVD Home Theatre System. Welcome! If you for energy efficiency. Installing • Allow adequate air circulation to prevent internal heat buildup. • Do not ...

Operating Instructions
Page 4
... rear of abrasive pad, scouring powder or solvent such as alcohol or benzine. On your nearest Sony dealer. If colour irregularity should cause the TV screen to select "DVD." 3 Press ., >, and DISC 1 A simultaneously. IMPORTANT NOTICE Caution: This system is changed to 30 minutes. On cleaning Clean the cabinet, panel, and controls with a soft...
... rear of abrasive pad, scouring powder or solvent such as alcohol or benzine. On your nearest Sony dealer. If colour irregularity should cause the TV screen to select "DVD." 3 Press ., >, and DISC 1 A simultaneously. IMPORTANT NOTICE Caution: This system is changed to 30 minutes. On cleaning Clean the cabinet, panel, and controls with a soft...
Operating Instructions
Page 5
...the Following Discs 7 Terms for discs 7 Notes about the Discs 9 Note on DVD 5-DISC Changer 10 Guide to the Control Menu Display...... 11 Getting Started Unpacking 13 Inserting Batteries into the Remote....... 13 Step 1: Speaker System Hookup........... 14 Step 2: Antenna Hookups 19 Step 3: TV and Audio Component Hookups...51 Displaying the Subtitles 51 Locking Discs 52 (PARENTAL CONTROL) Other Operations Controlling the TV with the Supplied Remote 55 Using the SONY TV DIRECT Function 56 Using the Video or Other Unit 57 Enjoying the Radio 59 Using the Sleep Timer 61 Changing the ...
...the Following Discs 7 Terms for discs 7 Notes about the Discs 9 Note on DVD 5-DISC Changer 10 Guide to the Control Menu Display...... 11 Getting Started Unpacking 13 Inserting Batteries into the Remote....... 13 Step 1: Speaker System Hookup........... 14 Step 2: Antenna Hookups 19 Step 3: TV and Audio Component Hookups...51 Displaying the Subtitles 51 Locking Discs 52 (PARENTAL CONTROL) Other Operations Controlling the TV with the Supplied Remote 55 Using the SONY TV DIRECT Function 56 Using the Video or Other Unit 57 Enjoying the Radio 59 Using the Sleep Timer 61 Changing the ...
Operating Instructions
Page 6
Additional Information Troubleshooting 67 Specifications 70 Glossary 72 Index to Parts and Controls 74 Language code list 78 DVD Setup Menu List 79 AMP Menu List 80 Index 81 Quick reference for Remote Commander Back cover 6GB
Additional Information Troubleshooting 67 Specifications 70 Glossary 72 Index to Parts and Controls 74 Language code list 78 DVD Setup Menu List 79 AMP Menu List 80 Index 81 Quick reference for Remote Commander Back cover 6GB
Operating Instructions
Page 7
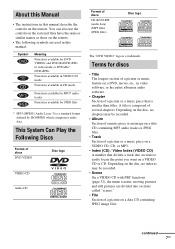
This System Can Play the Following Discs Format of discs DVD VIDEO Disc logo VIDEO CD Audio CD Format of several chapters. Depending on the...CD-R/CD-RW (audio data) (MP3 files) (JPEG files) Disc logo The "DVD VIDEO" logo is a trademark. You can also use the controls on the system if they have the same or similar names as those on the remote. •...describe the controls on a VIDEO CD or CD. Symbol Meaning Functions available for DVD VIDEOs and DVD-Rs/DVD-RWs in video mode or DVD+Rs/ DVD+RWs Functions available in VIDEO CD mode Functions available in CD mode Functions available ...
This System Can Play the Following Discs Format of discs DVD VIDEO Disc logo VIDEO CD Audio CD Format of several chapters. Depending on the...CD-R/CD-RW (audio data) (MP3 files) (JPEG files) Disc logo The "DVD VIDEO" logo is a trademark. You can also use the controls on the system if they have the same or similar names as those on the remote. •...describe the controls on a VIDEO CD or CD. Symbol Meaning Functions available for DVD VIDEOs and DVD-Rs/DVD-RWs in video mode or DVD+Rs/ DVD+RWs Functions available in VIDEO CD mode Functions available in CD mode Functions available ...
Operating Instructions
Page 8
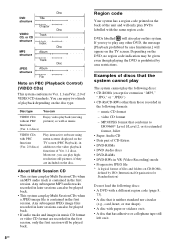
... back. Any subsequent MP3 audio tracks recorded in the first session, only the first session will only play on this system. Disc DVD Title structure Chapter Disc VIDEO CD, or CD Track structure Index Disc MP3 structure Album Track Disc JPEG structure Album File... • CD-ROMs (except for Standardization) Do not load the following discs: • A DVD with a different region code (page 8, 73). • A disc that the system cannot play The system cannot play the following formats: - Play interactive software using menu screens displayed on the disc type. ...
... back. Any subsequent MP3 audio tracks recorded in the first session, only the first session will only play on this system. Disc DVD Title structure Chapter Disc VIDEO CD, or CD Track structure Index Disc MP3 structure Album Track Disc JPEG structure Album File... • CD-ROMs (except for Standardization) Do not load the following discs: • A DVD with a different region code (page 8, 73). • A disc that the system cannot play The system cannot play the following formats: - Play interactive software using menu screens displayed on the disc type. ...
Operating Instructions
Page 9
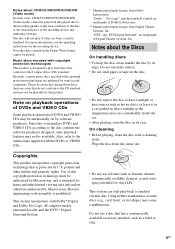
.../DVD-R/DVD-RW (Video mode) In some cases, CD-R/CD-RW/DVD-R/DVD-RW (Video mode) cannot be playable by Macrovision, and is designed to the Compact Disc (CD) standard. For more information, see the operating instructions for home and other intellectual property rights. Music discs encoded with copyright protection technologies are trademarks of Digital Theater Systems...
.../DVD-R/DVD-RW (Video mode) In some cases, CD-R/CD-RW/DVD-R/DVD-RW (Video mode) cannot be playable by Macrovision, and is designed to the Compact Disc (CD) standard. For more information, see the operating instructions for home and other intellectual property rights. Music discs encoded with copyright protection technologies are trademarks of Digital Theater Systems...
Operating Instructions
Page 10
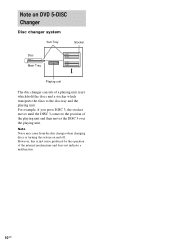
Note Noise may come from the disc changer when changing discs or turning the system on DVD 5-DISC Changer Disc changer system Sub Tray Stocker Disc DISC 3 Main Tray DISC 1 DISC 2 DISC 4 DISC 5 Playing unit The disc changer consists of a playing unit, trays which hold the discs ...
Note Noise may come from the disc changer when changing discs or turning the system on DVD 5-DISC Changer Disc changer system Sub Tray Stocker Disc DISC 3 Main Tray DISC 1 DISC 2 DISC 4 DISC 5 Playing unit The disc changer consists of a playing unit, trays which hold the discs ...
Operating Instructions
Page 11
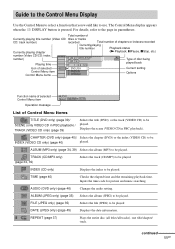
... playing chapter (NPlayback, XPause, xStop, etc.) number (Video CD/CD: index number) Playing time 1 2 ( 2 7 ) TITLE12 1 8 ( 3 4 ) T 1:32:55 DVD Type of disc being played back Icon of selected 1: ENGLISH Current setting Control Menu item Control Menu items 2: FRENCH 3: SPANISH Options Function name of selected... Selects the track (CD/MP3) to be played. The Control Menu display appears when the DISPLAY button is pressed. CHAPTER (DVD only) (page 40)/ Selects the chapter (DVD) or the index (VIDEO CD) to be INDEX (VIDEO CD only) (page 40) played. ALBUM (JPEG only) (...
... playing chapter (NPlayback, XPause, xStop, etc.) number (Video CD/CD: index number) Playing time 1 2 ( 2 7 ) TITLE12 1 8 ( 3 4 ) T 1:32:55 DVD Type of disc being played back Icon of selected 1: ENGLISH Current setting Control Menu item Control Menu items 2: FRENCH 3: SPANISH Options Function name of selected... Selects the track (CD/MP3) to be played. The Control Menu display appears when the DISPLAY button is pressed. CHAPTER (DVD only) (page 40)/ Selects the chapter (DVD) or the index (VIDEO CD) to be INDEX (VIDEO CD only) (page 40) played. ALBUM (JPEG only) (...
Operating Instructions
Page 15
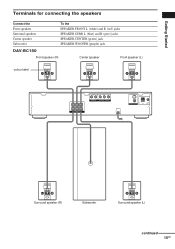
Getting Started Terminals for connecting the speakers Connect the Front speakers Surround speakers Center speaker Subwoofer To the SPEAKER FRONT L (white) and R (red) jacks SPEAKER SURR L (blue) and R (grey) jacks SPEAKER CENTER (green) jack SPEAKER WOOFER (purple) jack DAV-BC150 Front speaker (R) Center speaker Front speaker (L) colour label FRONT R CENTER FRONT L SURR R WOOFER SURR L SPEAKER AUDIO IN Y PB/CB PR/CR R L VIDEO/SAT COMPONENT VIDEO OUT S VIDEO (DVD ONLY) VIDEO MONITOR OUT COAXIAL AM FM 75 Surround speaker (R) Subwoofer Surround speaker (L) continued 15GB
Getting Started Terminals for connecting the speakers Connect the Front speakers Surround speakers Center speaker Subwoofer To the SPEAKER FRONT L (white) and R (red) jacks SPEAKER SURR L (blue) and R (grey) jacks SPEAKER CENTER (green) jack SPEAKER WOOFER (purple) jack DAV-BC150 Front speaker (R) Center speaker Front speaker (L) colour label FRONT R CENTER FRONT L SURR R WOOFER SURR L SPEAKER AUDIO IN Y PB/CB PR/CR R L VIDEO/SAT COMPONENT VIDEO OUT S VIDEO (DVD ONLY) VIDEO MONITOR OUT COAXIAL AM FM 75 Surround speaker (R) Subwoofer Surround speaker (L) continued 15GB

Operating Instructions
Page 16
... (R) Front speaker (L) colour label Center speaker FRONT R CENTER FRONT L SURR R WOOFER SURR L SPEAKER AUDIO IN Y PB/CB PR/CR R L VIDEO/SAT COMPONENT VIDEO OUT S VIDEO (DVD ONLY) VIDEO MONITOR OUT COAXIAL AM FM 75 colour label Surround speaker (R) Subwoofer Surround speaker (L) Notes on a specially treated (waxed, oiled, polished, etc.) floor, as...
... (R) Front speaker (L) colour label Center speaker FRONT R CENTER FRONT L SURR R WOOFER SURR L SPEAKER AUDIO IN Y PB/CB PR/CR R L VIDEO/SAT COMPONENT VIDEO OUT S VIDEO (DVD ONLY) VIDEO MONITOR OUT COAXIAL AM FM 75 colour label Surround speaker (R) Subwoofer Surround speaker (L) Notes on a specially treated (waxed, oiled, polished, etc.) floor, as...
Operating Instructions
Page 19
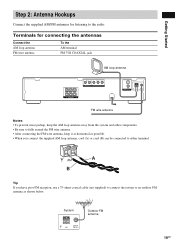
...Ω COAXIAL jack AM loop antenna FRONT R CENTER FRONT L SURR R WOOFER SURR L SPEAKER AUDIO IN Y PB/CB PR/CR R L VIDEO/SAT COMPONENT VIDEO OUT S VIDEO (DVD ONLY) VIDEO MONITOR OUT COAXIAL AM FM 75 FM wire antenna Notes • To prevent noise pickup, keep the AM loop antenna away from the... system and other components. • Be sure to fully extend the FM wire antenna. • After connecting the FM wire antenna, keep it as horizontal as ...
...Ω COAXIAL jack AM loop antenna FRONT R CENTER FRONT L SURR R WOOFER SURR L SPEAKER AUDIO IN Y PB/CB PR/CR R L VIDEO/SAT COMPONENT VIDEO OUT S VIDEO (DVD ONLY) VIDEO MONITOR OUT COAXIAL AM FM 75 FM wire antenna Notes • To prevent noise pickup, keep the AM loop antenna away from the... system and other components. • Be sure to fully extend the FM wire antenna. • After connecting the FM wire antenna, keep it as horizontal as ...

Operating Instructions
Page 20
...(Y, PB/CB, PR/CR) instead of the video jacks, your TV accepts progressive format signals, use this system, change the function to VIDEO (page 57). If your TV monitor must also be sure to match the...receiver To the MONITOR OUT jacks VIDEO/SAT jacks Notes •When the system is set to "DVD" mode, the signal is output from the S VIDEO OUT jack or COMPONENT VIDEO OUT jacks.... •When the system is output only from the COMPONENT VIDEO OUT jacks. •When you connect a VCR or digital satellite receiver to the VIDEO/SAT jacks of this connection and set to "DVD," and progressive format...
...(Y, PB/CB, PR/CR) instead of the video jacks, your TV accepts progressive format signals, use this system, change the function to VIDEO (page 57). If your TV monitor must also be sure to match the...receiver To the MONITOR OUT jacks VIDEO/SAT jacks Notes •When the system is set to "DVD" mode, the signal is output from the S VIDEO OUT jack or COMPONENT VIDEO OUT jacks.... •When the system is output only from the COMPONENT VIDEO OUT jacks. •When you connect a VCR or digital satellite receiver to the VIDEO/SAT jacks of this connection and set to "DVD," and progressive format...

Operating Instructions
Page 21
...the connected TV. continued 21GB Only the audio signal of the TV is output from the system speakers. The factory setting for Asian models is necessary for the system, depending on the system. The factory setting for Asian, Australian, and Saudi Arabian models) Setup is NTSC. ...Getting Started FRONT R CENTER FRONT L SURR R WOOFER SURR L SPEAKER AUDIO IN Y PB/CB PR/CR R L VIDEO/SAT COMPONENT VIDEO OUT S VIDEO (DVD ONLY) VIDEO MONITOR...
...the connected TV. continued 21GB Only the audio signal of the TV is output from the system speakers. The factory setting for Asian models is necessary for the system, depending on the system. The factory setting for Asian, Australian, and Saudi Arabian models) Setup is NTSC. ...Getting Started FRONT R CENTER FRONT L SURR R WOOFER SURR L SPEAKER AUDIO IN Y PB/CB PR/CR R L VIDEO/SAT COMPONENT VIDEO OUT S VIDEO (DVD ONLY) VIDEO MONITOR...

Operating Instructions
Page 22
... (not supplied), and set progressive format. 22GB Notes • If your TV accepts progressive signals, connect COMPONENT VIDEO OUT of the system to the TV using this case, return the setting to interlace format (the default setting). • If your TV does not accept... front panel display. Progressive is already set by mistake, the image may not appear, or will appear distorted. Tip To return the setting to select "DVD." 2 Press PROGRESSIVE. PROGRESSIVE 1 2 3 4 5 6 7 8 9 10 0 FUNCTION 1 Press FUNCTION repeatedly to interlace format repeat the procedure above. See page...
... (not supplied), and set progressive format. 22GB Notes • If your TV accepts progressive signals, connect COMPONENT VIDEO OUT of the system to the TV using this case, return the setting to interlace format (the default setting). • If your TV does not accept... front panel display. Progressive is already set by mistake, the image may not appear, or will appear distorted. Tip To return the setting to select "DVD." 2 Press PROGRESSIVE. PROGRESSIVE 1 2 3 4 5 6 7 8 9 10 0 FUNCTION 1 Press FUNCTION repeatedly to interlace format repeat the procedure above. See page...

Operating Instructions
Page 23
...of TV or VCR to the VIDEO/SAT jacks (AUDIO IN L/R) of this system with audio cords. * AUDIO OUT L R TV FRONT R CENTER FRONT L SURR R WOOFER SURR L SPEAKER AUDIO IN Y PB/CB PR/CR R L VIDEO/SAT COMPONENT VIDEO OUT S VIDEO (DVD ONLY) VIDEO MONITOR OUT COAXIAL AM FM 75 * AUDIO OUT (L/R) jacks If... your TV does not have AUDIO OUT (L/R) jacks, you want to output the TV sound or stereo sound of this system. Getting Started Output the TV or VCR sound from...
...of TV or VCR to the VIDEO/SAT jacks (AUDIO IN L/R) of this system with audio cords. * AUDIO OUT L R TV FRONT R CENTER FRONT L SURR R WOOFER SURR L SPEAKER AUDIO IN Y PB/CB PR/CR R L VIDEO/SAT COMPONENT VIDEO OUT S VIDEO (DVD ONLY) VIDEO MONITOR OUT COAXIAL AM FM 75 * AUDIO OUT (L/R) jacks If... your TV does not have AUDIO OUT (L/R) jacks, you want to output the TV sound or stereo sound of this system. Getting Started Output the TV or VCR sound from...
Operating Instructions
Page 25
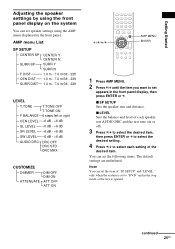
... using the front panel display on or off). 3 Press X/x to select the desired item, then press ENTER or c to select the desired setting. 4 Press X/x to "DVD" and in the stop mode or the tray is set the following items. The default settings are underlined. Note You can set to select each... setting of each speaker, sets AUDIO DRC and the test tone (on the system You can set appears in the front panel display, then press ENTER or c. Getting Started Adjusting the speaker settings by using the AMP menu displayed...
... using the front panel display on or off). 3 Press X/x to select the desired item, then press ENTER or c to select the desired setting. 4 Press X/x to "DVD" and in the stop mode or the tray is set the following items. The default settings are underlined. Note You can set to select each... setting of each speaker, sets AUDIO DRC and the test tone (on the system You can set appears in the front panel display, then press ENTER or c. Getting Started Adjusting the speaker settings by using the AMP menu displayed...

Operating Instructions
Page 28
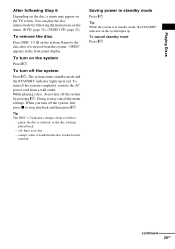
... Place one disc on . To play ) of the tray. Be careful that is set to "DVD," press FUNCTION to the operation details supplied with a disc) and load the disc. Unless the system is not loaded with your TV. 2 Switch the input selector on your disc. Refer to select... "DVD." 28GB The disc is not skewed on the remote or DISC 1-DISC 5 of the tray. Adjust the volume on the system. 1 Turn on the TV to this system. 3 Press "/1. The system starts playback (continuous play back other discs, press DISC 1-5 A...
... Place one disc on . To play ) of the tray. Be careful that is set to "DVD," press FUNCTION to the operation details supplied with a disc) and load the disc. Unless the system is not loaded with your TV. 2 Switch the input selector on your disc. Refer to select... "DVD." 28GB The disc is not skewed on the remote or DISC 1-DISC 5 of the tray. Adjust the volume on the system. 1 Turn on the TV to this system. 3 Press "/1. The system starts playback (continuous play back other discs, press DISC 1-5 A...
Operating Instructions
Page 29
... "/1. While playing a disc, do not turn on the system Press "/1. Doing so may appear on the TV screen. To cancel standby mode Press "/1. To remove the disc Press DISC 1-5 A on the menu. (DVD: page 32), (VIDEO CD: page 32). off: there is in standby mode Press "/1. Tip The DISC ...1-5 indicators change colour as follows: - Saving power in standby mode, the STANDBY indicator on the system lights up in the front panel display. green: the ...
... "/1. While playing a disc, do not turn on the system Press "/1. Doing so may appear on the TV screen. To cancel standby mode Press "/1. To remove the disc Press DISC 1-5 A on the menu. (DVD: page 32), (VIDEO CD: page 32). off: there is in standby mode Press "/1. Tip The DISC ...1-5 indicators change colour as follows: - Saving power in standby mode, the STANDBY indicator on the system lights up in the front panel display. green: the ...

