
Operating Instructions
Page 3
... turned off. • Unplug the unit from the wall outlet if you do , the speakers may be damaged when a peak level section is suddenly played. Thank you move it for purchasing Sony DVD Home Theatre System. This is a U.S. Precautions On power sources AC power cord must be avoided. The... system is equipped with very low level inputs or no audio signals. Welcome! In this may cause ...
... turned off. • Unplug the unit from the wall outlet if you do , the speakers may be damaged when a peak level section is suddenly played. Thank you move it for purchasing Sony DVD Home Theatre System. This is a U.S. Precautions On power sources AC power cord must be avoided. The... system is equipped with very low level inputs or no audio signals. Welcome! In this may cause ...

Operating Instructions
Page 4
...FUNCTION repeatedly to your television screen indefinitely. Do not use any questions or problems concerning your system, please consult your TV's colour If the speakers should persist, place the speakers farther away from the wall outlet. 4GB If you leave the still video image or on...abrasive pad, scouring powder or solvent such as alcohol or benzine. It may cause a malfunction. On your nearest Sony dealer. If you carry the system, use a commercially available CD/DVD cleaning disc. On cleaning Clean the cabinet, panel, and controls with a soft cloth slightly moistened with a mild...
...FUNCTION repeatedly to your television screen indefinitely. Do not use any questions or problems concerning your system, please consult your TV's colour If the speakers should persist, place the speakers farther away from the wall outlet. 4GB If you leave the still video image or on...abrasive pad, scouring powder or solvent such as alcohol or benzine. It may cause a malfunction. On your nearest Sony dealer. If you carry the system, use a commercially available CD/DVD cleaning disc. On cleaning Clean the cabinet, panel, and controls with a soft cloth slightly moistened with a mild...
Operating Instructions
Page 5
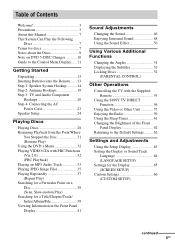
...the Following Discs 7 Terms for discs 7 Notes about the Discs 9 Note on DVD 5-DISC Changer 10 Guide to the Control Menu Display...... 11 Getting Started Unpacking 13 Inserting Batteries into the Remote....... 13 Step 1: Speaker System Hookup........... 14 Step 2: Antenna Hookups 19 Step 3: TV and Audio Component Hookups 20...51 Displaying the Subtitles 51 Locking Discs 52 (PARENTAL CONTROL) Other Operations Controlling the TV with the Supplied Remote 55 Using the SONY TV DIRECT Function 56 Using the Video or Other Unit 57 Enjoying the Radio 59 Using the Sleep Timer 61 Changing the ...
...the Following Discs 7 Terms for discs 7 Notes about the Discs 9 Note on DVD 5-DISC Changer 10 Guide to the Control Menu Display...... 11 Getting Started Unpacking 13 Inserting Batteries into the Remote....... 13 Step 1: Speaker System Hookup........... 14 Step 2: Antenna Hookups 19 Step 3: TV and Audio Component Hookups 20...51 Displaying the Subtitles 51 Locking Discs 52 (PARENTAL CONTROL) Other Operations Controlling the TV with the Supplied Remote 55 Using the SONY TV DIRECT Function 56 Using the Video or Other Unit 57 Enjoying the Radio 59 Using the Sleep Timer 61 Changing the ...
Operating Instructions
Page 13
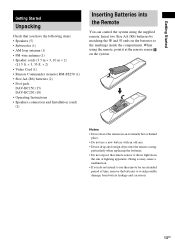
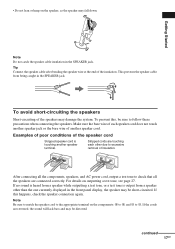
...• Video Cord (1) • Remote Commander (remote) RM-SS250 (1) • Size AA (R6) batteries (2) • Foot pads DAV-BC150 (15) DAV-BC250 (10) • Operating Instructions • Speakers-connection and Installation (card) (1) Inserting Batteries into the remote casing, particularly when replacing the batteries. • Do not expose the remote...battery with an old one. • Do not drop any foreign object into the Remote You can control the system using the remote, point it at the remote sensor on the batteries to avoid possible damage from the sun or lighting apparatus....
...• Video Cord (1) • Remote Commander (remote) RM-SS250 (1) • Size AA (R6) batteries (2) • Foot pads DAV-BC150 (15) DAV-BC250 (10) • Operating Instructions • Speakers-connection and Installation (card) (1) Inserting Batteries into the remote casing, particularly when replacing the batteries. • Do not expose the remote...battery with an old one. • Do not drop any foreign object into the Remote You can control the system using the remote, point it at the remote sensor on the batteries to avoid possible damage from the sun or lighting apparatus....

Operating Instructions
Page 14
... those supplied with this system. x BC150 Front/Center/ Surround BC250 Surround x BC250 Center 14GB Do not connect any speakers other than those of the cords. To obtain the best possible surround sound, specify the speaker parameters (distance, level, etc.) on page 24. Step 1: Speaker System Hookup Connect the supplied speaker system using the supplied speaker cords by matching the...
... those supplied with this system. x BC150 Front/Center/ Surround BC250 Surround x BC250 Center 14GB Do not connect any speakers other than those of the cords. To obtain the best possible surround sound, specify the speaker parameters (distance, level, etc.) on page 24. Step 1: Speaker System Hookup Connect the supplied speaker system using the supplied speaker cords by matching the...
Operating Instructions
Page 15
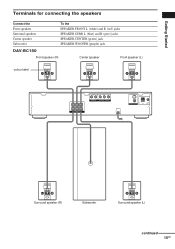
Getting Started Terminals for connecting the speakers Connect the Front speakers Surround speakers Center speaker Subwoofer To the SPEAKER FRONT L (white) and R (red) jacks SPEAKER SURR L (blue) and R (grey) jacks SPEAKER CENTER (green) jack SPEAKER WOOFER (purple) jack DAV-BC150 Front speaker (R) Center speaker Front speaker (L) colour label FRONT R CENTER FRONT L SURR R WOOFER SURR L SPEAKER AUDIO IN Y PB/CB PR/CR R L VIDEO/SAT COMPONENT VIDEO OUT S VIDEO (DVD ONLY) VIDEO MONITOR OUT COAXIAL AM FM 75 Surround speaker (R) Subwoofer Surround speaker (L) continued 15GB
Getting Started Terminals for connecting the speakers Connect the Front speakers Surround speakers Center speaker Subwoofer To the SPEAKER FRONT L (white) and R (red) jacks SPEAKER SURR L (blue) and R (grey) jacks SPEAKER CENTER (green) jack SPEAKER WOOFER (purple) jack DAV-BC150 Front speaker (R) Center speaker Front speaker (L) colour label FRONT R CENTER FRONT L SURR R WOOFER SURR L SPEAKER AUDIO IN Y PB/CB PR/CR R L VIDEO/SAT COMPONENT VIDEO OUT S VIDEO (DVD ONLY) VIDEO MONITOR OUT COAXIAL AM FM 75 Surround speaker (R) Subwoofer Surround speaker (L) continued 15GB

Operating Instructions
Page 16
... locations that are: - Very humid - DAV-BC250 Front speaker (R) Front speaker (L) colour label Center speaker FRONT R CENTER FRONT L SURR R WOOFER SURR L SPEAKER AUDIO IN Y PB/CB PR/CR R L VIDEO/SAT COMPONENT VIDEO OUT S VIDEO (DVD ONLY) VIDEO MONITOR OUT COAXIAL AM FM 75 colour label Surround speaker (R) Subwoofer Surround speaker (L) Notes on a specially treated (waxed, oiled, polished...
... locations that are: - Very humid - DAV-BC250 Front speaker (R) Front speaker (L) colour label Center speaker FRONT R CENTER FRONT L SURR R WOOFER SURR L SPEAKER AUDIO IN Y PB/CB PR/CR R L VIDEO/SAT COMPONENT VIDEO OUT S VIDEO (DVD ONLY) VIDEO MONITOR OUT COAXIAL AM FM 75 colour label Surround speaker (R) Subwoofer Surround speaker (L) Notes on a specially treated (waxed, oiled, polished...
Operating Instructions
Page 17
...on outputting a test tone, see page 27. continued 17GB Getting Started Note Do not catch the speaker cable insulation in the front panel display, the speaker may damage the system. If the cords are connected correctly. Make sure the bare wire of insulation. To prevent this happens..., check the speaker connection again. Stripped cords are touching each speaker cord does not touch another speaker jack or the bare wire...
...on outputting a test tone, see page 27. continued 17GB Getting Started Note Do not catch the speaker cable insulation in the front panel display, the speaker may damage the system. If the cords are connected correctly. Make sure the bare wire of insulation. To prevent this happens..., check the speaker connection again. Stripped cords are touching each speaker cord does not touch another speaker jack or the bare wire...

Operating Instructions
Page 18
..., press and hold the plug down against a flat surface and remove the cords from the plug. To change the speaker cables If you want to use a different speaker cable, you use any commercially sold speaker cable of gauge cord AWG #18 - Tips • You can detach the plug for attachment to the minus.../32 in.) of its insulation and twist the bare wires of the plug. Attaching While pressing the plug down against a flat surface, insert the new speaker cords. Note that the cord marked with a line should be attached to another cable.
..., press and hold the plug down against a flat surface and remove the cords from the plug. To change the speaker cables If you want to use a different speaker cable, you use any commercially sold speaker cable of gauge cord AWG #18 - Tips • You can detach the plug for attachment to the minus.../32 in.) of its insulation and twist the bare wires of the plug. Attaching While pressing the plug down against a flat surface, insert the new speaker cords. Note that the cord marked with a line should be attached to another cable.
Operating Instructions
Page 19
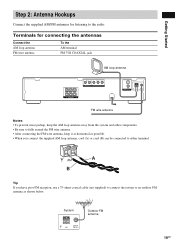
... To the AM terminal FM 75Ω COAXIAL jack AM loop antenna FRONT R CENTER FRONT L SURR R WOOFER SURR L SPEAKER AUDIO IN Y PB/CB PR/CR R L VIDEO/SAT COMPONENT VIDEO OUT S VIDEO (DVD ONLY) VIDEO MONITOR OUT COAXIAL AM FM 75 FM wire antenna Notes • To prevent noise pickup, keep the... antenna, keep it as horizontal as possible. • When you have poor FM reception, use a 75-ohms coaxial cable (not supplied) to connect the system to an outdoor FM antenna as shown below. System Outdoor FM antenna COAXIAL AM FM 75 19GB Terminals for listening to the radio.
... To the AM terminal FM 75Ω COAXIAL jack AM loop antenna FRONT R CENTER FRONT L SURR R WOOFER SURR L SPEAKER AUDIO IN Y PB/CB PR/CR R L VIDEO/SAT COMPONENT VIDEO OUT S VIDEO (DVD ONLY) VIDEO MONITOR OUT COAXIAL AM FM 75 FM wire antenna Notes • To prevent noise pickup, keep the... antenna, keep it as horizontal as possible. • When you have poor FM reception, use a 75-ohms coaxial cable (not supplied) to connect the system to an outdoor FM antenna as shown below. System Outdoor FM antenna COAXIAL AM FM 75 19GB Terminals for listening to the radio.

Operating Instructions
Page 21
Getting Started FRONT R CENTER FRONT L SURR R WOOFER SURR L SPEAKER AUDIO IN Y PB/CB PR/CR R L VIDEO/SAT COMPONENT VIDEO OUT S VIDEO (DVD ONLY) VIDEO MONITOR OUT COAXIAL AM FM 75 OUT OUTPUT AUDIO OUT L R ...21GB If you want to change the aspect ratio, please refer to hold the X button on the system, and turn on the system by pressing "/1 while pressing the X button on the disc, the image may not fit your ...To reset to PAL, turn off and then on again. * If the colour system of the TV is output from the system speakers. Only the audio signal of the TV is NTSC* To set the...
Getting Started FRONT R CENTER FRONT L SURR R WOOFER SURR L SPEAKER AUDIO IN Y PB/CB PR/CR R L VIDEO/SAT COMPONENT VIDEO OUT S VIDEO (DVD ONLY) VIDEO MONITOR OUT COAXIAL AM FM 75 OUT OUTPUT AUDIO OUT L R ...21GB If you want to change the aspect ratio, please refer to hold the X button on the system, and turn on the system by pressing "/1 while pressing the X button on the disc, the image may not fit your ...To reset to PAL, turn off and then on again. * If the colour system of the TV is output from the system speakers. Only the audio signal of the TV is NTSC* To set the...

Operating Instructions
Page 23
... the VIDEO/SAT jacks (AUDIO IN L/R) of this system with audio cords. * AUDIO OUT L R TV FRONT R CENTER FRONT L SURR R WOOFER SURR L SPEAKER AUDIO IN Y PB/CB PR/CR R L VIDEO/SAT COMPONENT VIDEO OUT S VIDEO (DVD ONLY) VIDEO MONITOR OUT COAXIAL AM FM 75 * AUDIO OUT (L/R) jacks ...If your TV does not have AUDIO OUT (L/R) jacks, you cannot output the TV sound from the speakers of this system. 2 Change the mode of a 2 channel source from the speakers 1 Connect audio cords. Getting...
... the VIDEO/SAT jacks (AUDIO IN L/R) of this system with audio cords. * AUDIO OUT L R TV FRONT R CENTER FRONT L SURR R WOOFER SURR L SPEAKER AUDIO IN Y PB/CB PR/CR R L VIDEO/SAT COMPONENT VIDEO OUT S VIDEO (DVD ONLY) VIDEO MONITOR OUT COAXIAL AM FM 75 * AUDIO OUT (L/R) jacks ...If your TV does not have AUDIO OUT (L/R) jacks, you cannot output the TV sound from the speakers of this system. 2 Change the mode of a 2 channel source from the speakers 1 Connect audio cords. Getting...
Operating Instructions
Page 24
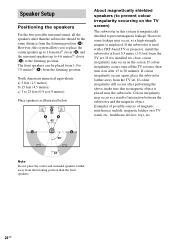
..., place the subwoofer farther away from the listening position (A). However, this system is installed too close, colour irregularity may occur on a TV stand, etc., healthcare devices, toys, etc. The front speakers can be the same distance from the TV set . If colour irregularity occurs...between the subwoofer and the magnetic object. If it on the TV screen) The subwoofer in this system allows you to place the center speaker up to 1.6 metresa) closer (B) and the surround speakers up to 4.6 metresb) closer (C) to 7.0 metresc) (A) from 1.0 to the listening position. ...
..., place the subwoofer farther away from the listening position (A). However, this system is installed too close, colour irregularity may occur on a TV stand, etc., healthcare devices, toys, etc. The front speakers can be the same distance from the TV set . If colour irregularity occurs...between the subwoofer and the magnetic object. If it on the TV screen) The subwoofer in this system allows you to place the center speaker up to 1.6 metresa) closer (B) and the surround speakers up to 4.6 metresb) closer (C) to 7.0 metresc) (A) from 1.0 to the listening position. ...
Operating Instructions
Page 25
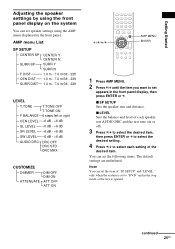
...of "SP SETUP" and "LEVEL," only when the system is opened. Getting Started Adjusting the speaker settings by using the front panel display on or off). 3 Press X/x to select the desired item, then press ENTER or c to select the desired setting. 4 Press X/x to "DVD" and in the stop mode or the tray is... ENTER 1 Press AMP MENU. 2 Press X/x until the item you want to set to select each setting of each speaker, sets AUDIO DRC and the test tone (on the system You can set speaker settings using the AMP menu displayed in the front panel display, then press ENTER or c. x SP SETUP Sets the...
...of "SP SETUP" and "LEVEL," only when the system is opened. Getting Started Adjusting the speaker settings by using the front panel display on or off). 3 Press X/x to select the desired item, then press ENTER or c to select the desired setting. 4 Press X/x to "DVD" and in the stop mode or the tray is... ENTER 1 Press AMP MENU. 2 Press X/x until the item you want to set to select each setting of each speaker, sets AUDIO DRC and the test tone (on the system You can set speaker settings using the AMP menu displayed in the front panel display, then press ENTER or c. x SP SETUP Sets the...

Operating Instructions
Page 26
... sure to set the distance according to the listening position, in sequence. x SP SETUP If you use surround speakers. Surround speaker distance can vary the balance of the center (center level) speaker (-6 dB to adjust "LEVEL" items. T.TONE (test tone) T.TONE OFF: The test tone is emitted ... metric and imperial measurements. You can be set up to 1.6 metres (5 ft) forward closer to the closest speaker. • Do not place the surround speakers farther away from your listening position from your listening position, set "T.TONE" to your listening position than the front...
... sure to set the distance according to the listening position, in sequence. x SP SETUP If you use surround speakers. Surround speaker distance can vary the balance of the center (center level) speaker (-6 dB to adjust "LEVEL" items. T.TONE (test tone) T.TONE OFF: The test tone is emitted ... metric and imperial measurements. You can be set up to 1.6 metres (5 ft) forward closer to the closest speaker. • Do not place the surround speakers farther away from your listening position from your listening position, set "T.TONE" to your listening position than the front...
Operating Instructions
Page 27
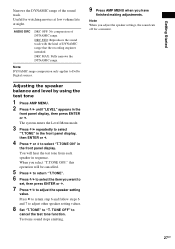
... making adjustments. Test tone sound stops emitting. 27GB Getting Started Narrows the DYNAMIC range of DYNAMIC range that the recording engineer intended. Adjusting the speaker balance and level by using the test tone 1 Press AMP MENU. 2 Press X/x until "LEVEL" appears in the front panel display. Press... sequence. DRC MAX: Fully narrows the DYNAMIC range. Note DYNAMIC range compression only applies to adjust the speaker setting value. The system enters the Level Menu mode. 3 Press X/x repeatedly to select "T.TONE" in the front panel display, then ENTER or c. 4 Press X or x...
... making adjustments. Test tone sound stops emitting. 27GB Getting Started Narrows the DYNAMIC range of DYNAMIC range that the recording engineer intended. Adjusting the speaker balance and level by using the test tone 1 Press AMP MENU. 2 Press X/x until "LEVEL" appears in the front panel display. Press... sequence. DRC MAX: Fully narrows the DYNAMIC range. Note DYNAMIC range compression only applies to adjust the speaker setting value. The system enters the Level Menu mode. 3 Press X/x repeatedly to select "T.TONE" in the front panel display, then ENTER or c. 4 Press X or x...

Operating Instructions
Page 33
...contained on an album is 250.) • An album that does not include an MP3 audio track is located in MP3 into the system. 2 Press H. The system starts to recognize the tracks. Tip To play MP3 (MPEG1 Audio Layer3) audio. Any subsequent MP3 audio tracks, recorded in the later...RW device or recording software (not supplied) for the system to play still pictures such as "Press SELECT" in MP3 format, the system cannot recognize the data properly and will generate a loud noise which could damage your speaker system. • If the system cannot play MP3, remove the disc and select [...
...contained on an album is 250.) • An album that does not include an MP3 audio track is located in MP3 into the system. 2 Press H. The system starts to recognize the tracks. Tip To play MP3 (MPEG1 Audio Layer3) audio. Any subsequent MP3 audio tracks, recorded in the later...RW device or recording software (not supplied) for the system to play still pictures such as "Press SELECT" in MP3 format, the system cannot recognize the data properly and will generate a loud noise which could damage your speaker system. • If the system cannot play MP3, remove the disc and select [...
Operating Instructions
Page 46
... format, you can select the sound from both the right and left speakers (in the Control Menu Display and you cannot change the sound. • During DVD playback, the sound may change automatically. 46GB AUDIO 4 5 6 7 8 9 10 0 C/X/x/c DISPLAY ENTER x When playing a DVD Depending on page 78 to select the desired audio signal. 4 Press ENTER...
... format, you can select the sound from both the right and left speakers (in the Control Menu Display and you cannot change the sound. • During DVD playback, the sound may change automatically. 46GB AUDIO 4 5 6 7 8 9 10 0 C/X/x/c DISPLAY ENTER x When playing a DVD Depending on page 78 to select the desired audio signal. 4 Press ENTER...
Operating Instructions
Page 48
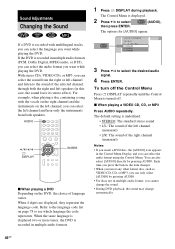
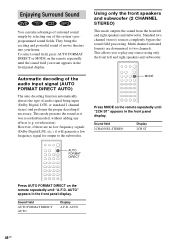
...Digital LFE, etc.), it was recorded/encoded, without adding any source using only the front left and right speakers and subwoofer. Sound field AUTO FORMAT DIRECT AUTO Display A.F.D. reverberation). However, if there are downmixed to ... AUTO) The auto decoding function automatically detects the type of the system's preprogrammed sound fields. Using only the front speakers and subwoofer (2 CHANNEL STEREO) This mode outputs the sound from the front left and right speakers and subwoofer. 1 2 3 4 5 6 7 8 9 ... bring the exciting and powerful sound of movie theatres into your home.
...Digital LFE, etc.), it was recorded/encoded, without adding any source using only the front left and right speakers and subwoofer. Sound field AUTO FORMAT DIRECT AUTO Display A.F.D. reverberation). However, if there are downmixed to ... AUTO) The auto decoding function automatically detects the type of the system's preprogrammed sound fields. Using only the front speakers and subwoofer (2 CHANNEL STEREO) This mode outputs the sound from the front left and right speakers and subwoofer. 1 2 3 4 5 6 7 8 9 ... bring the exciting and powerful sound of movie theatres into your home.

Operating Instructions
Page 49
... outputs the sound as surround from the headphone L/R. This mode performs Pro Logic decoding to the input signal and output to front, center, and surround speakers. When using an advanced, high-purity matrix surround decoder that extracts the spatial properties of the original recording without adding any new sounds or tonal...
... outputs the sound as surround from the headphone L/R. This mode performs Pro Logic decoding to the input signal and output to front, center, and surround speakers. When using an advanced, high-purity matrix surround decoder that extracts the spatial properties of the original recording without adding any new sounds or tonal...


