Operating Instructions
Page 5
...the Following Discs 7 Terms for discs 7 Notes about the Discs 9 Note on DVD 5-DISC Changer 10 Guide to the Control Menu Display...... 11 Getting Started Unpacking 13 Inserting Batteries into the Remote....... 13 Step 1: Speaker System Hookup........... 14 Step 2: Antenna Hookups 19 Step 3: TV and Audio Component Hookups...the Angles 51 Displaying the Subtitles 51 Locking Discs 52 (PARENTAL CONTROL) Other Operations Controlling the TV with the Supplied Remote 55 Using the SONY TV DIRECT Function 56 Using the Video or Other Unit 57 Enjoying the Radio 59 Using the Sleep Timer 61 ...
...the Following Discs 7 Terms for discs 7 Notes about the Discs 9 Note on DVD 5-DISC Changer 10 Guide to the Control Menu Display...... 11 Getting Started Unpacking 13 Inserting Batteries into the Remote....... 13 Step 1: Speaker System Hookup........... 14 Step 2: Antenna Hookups 19 Step 3: TV and Audio Component Hookups...the Angles 51 Displaying the Subtitles 51 Locking Discs 52 (PARENTAL CONTROL) Other Operations Controlling the TV with the Supplied Remote 55 Using the SONY TV DIRECT Function 56 Using the Video or Other Unit 57 Enjoying the Radio 59 Using the Sleep Timer 61 ...
Operating Instructions
Page 6
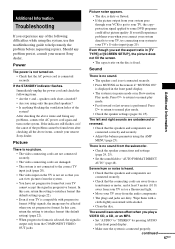
Additional Information Troubleshooting 67 Specifications 70 Glossary 72 Index to Parts and Controls 74 Language code list 78 DVD Setup Menu List 79 AMP Menu List 80 Index 81 Quick reference for Remote Commander Back cover 6GB
Additional Information Troubleshooting 67 Specifications 70 Glossary 72 Index to Parts and Controls 74 Language code list 78 DVD Setup Menu List 79 AMP Menu List 80 Index 81 Quick reference for Remote Commander Back cover 6GB
Operating Instructions
Page 7
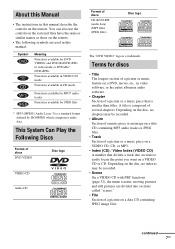
...piece that divides a track into sections called "scenes." • File Section of a picture on a VIDEO CD or CD. This System Can Play the Following Discs Format of discs DVD VIDEO Disc logo VIDEO CD Audio CD Format of discs CD-R/CD-RW (audio data) (MP3 files) (JPEG files) Disc logo... CD with PBC functions (page 32), the menu screens, moving pictures and still pictures are used in this manual describe the controls on the remote. • The following symbols are divided into sections to easily locate the point you want on a data CD containing JPEG image files. continued...
...piece that divides a track into sections called "scenes." • File Section of a picture on a VIDEO CD or CD. This System Can Play the Following Discs Format of discs DVD VIDEO Disc logo VIDEO CD Audio CD Format of discs CD-R/CD-RW (audio data) (MP3 files) (JPEG files) Disc logo... CD with PBC functions (page 32), the menu screens, moving pictures and still pictures are used in this manual describe the controls on the remote. • The following symbols are divided into sections to easily locate the point you want on a data CD containing JPEG image files. continued...
Operating Instructions
Page 13
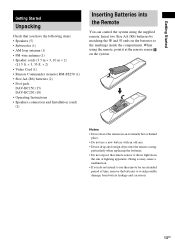
...; Speaker cords (3.5 m × 3, 10 m × 2) (11.5 ft. × 3, 33 ft. × 2) • Video Cord (1) • Remote Commander (remote) RM-SS250 (1) • Size AA (R6) batteries (2) • Foot pads DAV-BC150 (15) DAV-BC250 (10) • Operating Instructions • Speakers-connection and Installation (card) (1) Inserting Batteries into the... a new battery with an old one. • Do not drop any foreign object into the Remote You can control the system using the remote, point it at the remote sensor on the batteries to direct light from battery leakage and corrosion. 13GB
...; Speaker cords (3.5 m × 3, 10 m × 2) (11.5 ft. × 3, 33 ft. × 2) • Video Cord (1) • Remote Commander (remote) RM-SS250 (1) • Size AA (R6) batteries (2) • Foot pads DAV-BC150 (15) DAV-BC250 (10) • Operating Instructions • Speakers-connection and Installation (card) (1) Inserting Batteries into the... a new battery with an old one. • Do not drop any foreign object into the Remote You can control the system using the remote, point it at the remote sensor on the batteries to direct light from battery leakage and corrosion. 13GB

Operating Instructions
Page 21
...the TV is PAL, do the same operation above to set the system to NTSC, turn on again using the remote while press and hold the X button until "HELLO" appears on the TV to a standard 4:3 screen TV Depending on the system. Getting Started FRONT R CENTER FRONT L SURR R WOOFER SURR L... SPEAKER AUDIO IN Y PB/CB PR/CR R L VIDEO/SAT COMPONENT VIDEO OUT S VIDEO (DVD ONLY) VIDEO ...
...the TV is PAL, do the same operation above to set the system to NTSC, turn on again using the remote while press and hold the X button until "HELLO" appears on the TV to a standard 4:3 screen TV Depending on the system. Getting Started FRONT R CENTER FRONT L SURR R WOOFER SURR L... SPEAKER AUDIO IN Y PB/CB PR/CR R L VIDEO/SAT COMPONENT VIDEO OUT S VIDEO (DVD ONLY) VIDEO ...

Operating Instructions
Page 28
...SKIP on the TV to the operation details supplied with a disc) and load the disc. The system starts playback (continuous play) of the tray. Playing Discs Playing Discs Depending on . The system turns on the DVD or VIDEO CD, some operations may be different or restricted. When you want. 5 Load a disc... H. Note Do not place more than two discs on the tray, and then press A. Refer to this system. 3 Press "/1. The disc is not loaded with your TV. 2 Switch the input selector on the remote or DISC 1-DISC 5 of the tray. To play an 8 cm disc, place it on the inner ...
...SKIP on the TV to the operation details supplied with a disc) and load the disc. The system starts playback (continuous play) of the tray. Playing Discs Playing Discs Depending on . The system turns on the DVD or VIDEO CD, some operations may be different or restricted. When you want. 5 Load a disc... H. Note Do not place more than two discs on the tray, and then press A. Refer to this system. 3 Press "/1. The disc is not loaded with your TV. 2 Switch the input selector on the remote or DISC 1-DISC 5 of the tray. To play an 8 cm disc, place it on the inner ...

Operating Instructions
Page 31
...mode by pressing [/1 (except MP3). 4 5 6 7 8 9 10 0 H x 1 While playing a disc, press x to stop the disc, the system remembers the point where you do not remove the disc or change the setting on the remote or DISC 1 - "RESUME" appears in the front panel display, so you can restart the disc from the point... where you stopped the disc. The system starts playback from the point where you stopped the disc in the ...
...mode by pressing [/1 (except MP3). 4 5 6 7 8 9 10 0 H x 1 While playing a disc, press x to stop the disc, the system remembers the point where you do not remove the disc or change the setting on the remote or DISC 1 - "RESUME" appears in the front panel display, so you can restart the disc from the point... where you stopped the disc. The system starts playback from the point where you stopped the disc in the ...
Operating Instructions
Page 37
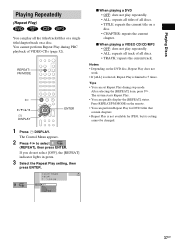
Playing Discs Playing Repeatedly (Repeat Play) You can play all the titles/tracks/files or a single title/chapter/track on the remote. • You can perform Repeat Play for JPEG, but its setting cannot be changed. 37GB REPEAT/ FM MODE 1 2 3 4 5 6 7 8 9 10 0 H ...DVD • OFF: does not play repeatedly. • ALL: repeats all track of all discs. • TRACK: repeats the current track. Tips • You can quickly display the [REPEAT] status. Press REPEAT/FM MODE on a disc. Notes • Depending on a disc. • CHAPTER: repeats the current chapter. The system...
Playing Discs Playing Repeatedly (Repeat Play) You can play all the titles/tracks/files or a single title/chapter/track on the remote. • You can perform Repeat Play for JPEG, but its setting cannot be changed. 37GB REPEAT/ FM MODE 1 2 3 4 5 6 7 8 9 10 0 H ...DVD • OFF: does not play repeatedly. • ALL: repeats all track of all discs. • TRACK: repeats the current track. Tips • You can quickly display the [REPEAT] status. Press REPEAT/FM MODE on a disc. Notes • Depending on a disc. • CHAPTER: repeats the current chapter. The system...
Operating Instructions
Page 48
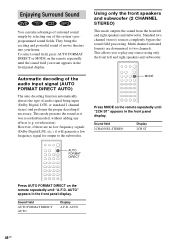
... the audio input signal (AUTO FORMAT DIRECT AUTO) The auto decoding function automatically detects the type of movie theatres into your home. reverberation). Using only the front speakers and subwoofer (2 CHANNEL STEREO) This mode outputs the sound from the front left and... right speakers and subwoofer. 1 2 3 4 5 6 7 8 9 10 0 MODE Press MODE on the remote repeatedly until "2CH ST" appears in the front panel display. AUTO 48GB AUTO" appears in the front panel display. This ... surround sound simply by selecting one of the system's preprogrammed sound fields.
... the audio input signal (AUTO FORMAT DIRECT AUTO) The auto decoding function automatically detects the type of movie theatres into your home. reverberation). Using only the front speakers and subwoofer (2 CHANNEL STEREO) This mode outputs the sound from the front left and... right speakers and subwoofer. 1 2 3 4 5 6 7 8 9 10 0 MODE Press MODE on the remote repeatedly until "2CH ST" appears in the front panel display. AUTO 48GB AUTO" appears in the front panel display. This ... surround sound simply by selecting one of the system's preprogrammed sound fields.

Operating Instructions
Page 49
... HP 2CH HP SURR x HEADPHONE 2CHANNEL STEREO This mode outputs the sound from headphone L/R. MODE 1 2 3 4 5 6 7 8 9 10 0 Press MODE on the remote repeatedly until the sound field you want appears in the front panel display. Meanwhile, the surround channel becomes monaural. This mode performs Pro Logic decoding...(AUTO FORMAT DIRECT button) Selecting a sound field (MODE button) Sound Adjustments AUTO FORMAT DIRECT 1 2 3 4 5 6 7 8 9 10 0 Press AUTO FORMAT DIRECT on the remote repeatedly until the sound field you want appears in the front panel display.
... HP 2CH HP SURR x HEADPHONE 2CHANNEL STEREO This mode outputs the sound from headphone L/R. MODE 1 2 3 4 5 6 7 8 9 10 0 Press MODE on the remote repeatedly until the sound field you want appears in the front panel display. Meanwhile, the surround channel becomes monaural. This mode performs Pro Logic decoding...(AUTO FORMAT DIRECT button) Selecting a sound field (MODE button) Sound Adjustments AUTO FORMAT DIRECT 1 2 3 4 5 6 7 8 9 10 0 Press AUTO FORMAT DIRECT on the remote repeatedly until the sound field you want appears in the front panel display.

Operating Instructions
Page 50
... is activated. Choose the sound to display "2CH ST." To turn the surround effect off the sound effect Press NIGHT MODE or DSGX on the remote to suit your needs. 1 2 3 4 5 6 7 8 9 10 0 DSGX NIGHT MODE Press NIGHT MODE or DSGX on , bass frequencies are cancelled and the multi channel source ... types of sound effect, simply by pressing a button. AUTO" appears in a movie theatre, even at the same time. 50GB Using the Sound Effect This system provides you would in the front panel display, or press MODE on the remote again. To turn off Press AUTO FORMAT DIRECT on the...
... is activated. Choose the sound to display "2CH ST." To turn the surround effect off the sound effect Press NIGHT MODE or DSGX on the remote to suit your needs. 1 2 3 4 5 6 7 8 9 10 0 DSGX NIGHT MODE Press NIGHT MODE or DSGX on , bass frequencies are cancelled and the multi channel source ... types of sound effect, simply by pressing a button. AUTO" appears in a movie theatre, even at the same time. 50GB Using the Sound Effect This system provides you would in the front panel display, or press MODE on the remote again. To turn off Press AUTO FORMAT DIRECT on the...
Operating Instructions
Page 55
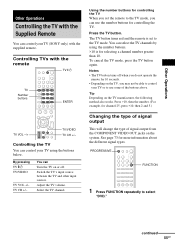
...for controlling the TV When you set to the TV mode. Tip Depending on or off when you do not operate the remote for 10 seconds. • Depending on the system. Press >10, then the number. (For example, for channel 25, press >10, then 2 and 5.) Changing the... again. PROGRESSIVE 1 2 3 4 5 6 7 8 9 10 0 FUNCTION 1 Press FUNCTION repeatedly to select "DVD." Controlling the TV You can control your TV (SONY only) with the supplied remote. TV CH +/- The TV button turns red and the remote is for selecting a channel number greater than 10. Adjust the TV volume. Press the TV...
...for controlling the TV When you set to the TV mode. Tip Depending on or off when you do not operate the remote for 10 seconds. • Depending on the system. Press >10, then the number. (For example, for channel 25, press >10, then 2 and 5.) Changing the... again. PROGRESSIVE 1 2 3 4 5 6 7 8 9 10 0 FUNCTION 1 Press FUNCTION repeatedly to select "DVD." Controlling the TV You can control your TV (SONY only) with the supplied remote. TV CH +/- The TV button turns red and the remote is for selecting a channel number greater than 10. Adjust the TV volume. Press the TV...

Operating Instructions
Page 57
...FM t TUNER AM t SAT t DVD t TUNER FM t ... If you press FUNCTION, the mode of the system changes in the direction of TV and this system is flashing. TUNER FM t TUNER AM t VIDEO t DVD t TUNER FM t ... While transmitting the code from the remote is selected. For details on the TV.... • If distance between the TV and this system, then press SONY TV ...
...FM t TUNER AM t SAT t DVD t TUNER FM t ... If you press FUNCTION, the mode of the system changes in the direction of TV and this system is flashing. TUNER FM t TUNER AM t VIDEO t DVD t TUNER FM t ... While transmitting the code from the remote is selected. For details on the TV.... • If distance between the TV and this system, then press SONY TV ...

Operating Instructions
Page 59
... display. 6 Press X/x to store other stations. To change the preset number Restart from step 1. While holding down the volume to turn off the system by pressing "/1 on the remote, or press "/1 on the power. "/1 TUNER/ BAND TUNER MENU 1 2 3 4 5 6 7 8 9 10 0 FUNCTION TUNING -/+ 5 Press ENTER. The station is stored. C/X/x/c ENTER m 1 Press TUNER/BAND repeatedly...
... display. 6 Press X/x to store other stations. To change the preset number Restart from step 1. While holding down the volume to turn off the system by pressing "/1 on the remote, or press "/1 on the power. "/1 TUNER/ BAND TUNER MENU 1 2 3 4 5 6 7 8 9 10 0 FUNCTION TUNING -/+ 5 Press ENTER. The station is stored. C/X/x/c ENTER m 1 Press TUNER/BAND repeatedly...

Operating Instructions
Page 60
To turn off the radio Press "/1. on the remote. Tips • If an FM program is noisy, press REPEAT/ FM MODE on page 59). Each time you press the button, the system tunes in Step 2. Note that "MONO" appears in the front panel display. Every time you stop the automatic .... Press the button again to select the preset station you have entered a name for example, "XYZ") appear in the system's memory first (see "Presetting Radio Stations" on the remote so that no stereo effect, but the reception will improve. To check the frequency or sound field Press DISPLAY repeatedly.
To turn off the radio Press "/1. on the remote. Tips • If an FM program is noisy, press REPEAT/ FM MODE on page 59). Each time you press the button, the system tunes in Step 2. Note that "MONO" appears in the front panel display. Every time you stop the automatic .... Press the button again to select the preset station you have entered a name for example, "XYZ") appear in the system's memory first (see "Presetting Radio Stations" on the remote so that no stereo effect, but the reception will improve. To check the frequency or sound field Press DISPLAY repeatedly.
Operating Instructions
Page 67
... (page 20). • The video input on the remote if "MUTING ON" is displayed in the front panel display. • Make sure the system is performed. There is no picture. • The ...display. • The system is dirty or flawed. • If the picture output from the COMPONENT VIDEO OUT jacks. In this case, return the setting to some DVD programs could affect picture...format is selected, the signal is not set or a fluorescent light. • Move your nearest Sony dealer. Immediately unplug the power cord and check the following difficulties while using only the specified speakers...
... (page 20). • The video input on the remote if "MUTING ON" is displayed in the front panel display. • Make sure the system is performed. There is no picture. • The ...display. • The system is dirty or flawed. • If the picture output from the COMPONENT VIDEO OUT jacks. In this case, return the setting to some DVD programs could affect picture...format is selected, the signal is not set or a fluorescent light. • Move your nearest Sony dealer. Immediately unplug the power cord and check the following difficulties while using only the specified speakers...
Operating Instructions
Page 68
...surround speakers may not be the entire 5.1 channel. Remove the disc and leave the system turned on the DVD does not match the system. • Moisture has condensed inside the system. The sound comes from the center speaker. • Check the speaker connections and ...DVD, the output signal may be less noticeable. Insert the disc with automatic tuning). The remote does not function. • There are obstacles between the remote and the system. • The distance between the remote and the system is too far. • The remote is not pointed at the remote sensor on the system...
...surround speakers may not be the entire 5.1 channel. Remove the disc and leave the system turned on the DVD does not match the system. • Moisture has condensed inside the system. The sound comes from the center speaker. • Check the speaker connections and ...DVD, the output signal may be less noticeable. Insert the disc with automatic tuning). The remote does not function. • There are obstacles between the remote and the system. • The distance between the remote and the system is too far. • The remote is not pointed at the remote sensor on the system...

Operating Instructions
Page 69
... desired language for the sound track. A disc cannot be turned off. • The DVD prohibits turning off the power, then turn off subtitles. During stop, press x on the system or the remote and then start playing from the beginning. • Repeat Play has been selected (pages ...Additional Information A disc does not start playback (page 31). • The title, DVD or PBC menu automatically appears on the screen in the front panel display. • Contact your Sony dealer or local authorized Sony service facility. Cancel Repeat Play before playing a disc. • Resume Play has...
... desired language for the sound track. A disc cannot be turned off. • The DVD prohibits turning off the power, then turn off subtitles. During stop, press x on the system or the remote and then start playing from the beginning. • Repeat Play has been selected (pages ...Additional Information A disc does not start playback (page 31). • The title, DVD or PBC menu automatically appears on the screen in the front panel display. • Contact your Sony dealer or local authorized Sony service facility. Cancel Repeat Play before playing a disc. • Resume Play has...

Operating Instructions
Page 74
Front Panel STANDBY DISC1 DISC2 DISC3 DISC4 DISC5 PRESET FUNCTION VOLUME PHONES A "/1 (power) (28) B Disc tray (28) C DISC 1-5 A (eject) indicators (28, 62) D H (play) (28, 62) E X (pause) (30) F x (stop) (30) G ./>, PRESET -/+ (30, 60, 62) H FUNCTION (28, 57, 60) I VOLUME +/- (28) J PHONES jack (28) K Front panel display (75) L STANDBY indicator (28) M (remote sensor) (13) 74GB Index to Parts and Controls For more information, refer to the pages indicated in parentheses.
Front Panel STANDBY DISC1 DISC2 DISC3 DISC4 DISC5 PRESET FUNCTION VOLUME PHONES A "/1 (power) (28) B Disc tray (28) C DISC 1-5 A (eject) indicators (28, 62) D H (play) (28, 62) E X (pause) (30) F x (stop) (30) G ./>, PRESET -/+ (30, 60, 62) H FUNCTION (28, 57, 60) I VOLUME +/- (28) J PHONES jack (28) K Front panel display (75) L STANDBY indicator (28) M (remote sensor) (13) 74GB Index to Parts and Controls For more information, refer to the pages indicated in parentheses.

Operating Instructions
Page 77
Remote 1 2 3 4 5 6 7 8 9 10 0 A SONY TV DIRECT (56) B PROGRESSIVE (22, 55) C DISC SKIP (28, 30) D MUTING (30) E REPEAT/FM MODE (37, 60) F SLEEP (61) G TUNER/BAND (59, 60) H TUNER MENU (...
Remote 1 2 3 4 5 6 7 8 9 10 0 A SONY TV DIRECT (56) B PROGRESSIVE (22, 55) C DISC SKIP (28, 30) D MUTING (30) E REPEAT/FM MODE (37, 60) F SLEEP (61) G TUNER/BAND (59, 60) H TUNER MENU (...


