Operating Instructions
Page 5
... Discs 7 Terms for discs 7 Notes about the Discs 9 Note on DVD 5-DISC Changer 10 Guide to the Control Menu Display...... 11 Getting Started Unpacking 13 Inserting Batteries into the Remote....... 13 Step 1: Speaker System Hookup........... 14 Step 2: Antenna Hookups 19 Step 3: TV and Audio Component... Changing the Sound 46 Enjoying Surround Sound 48 Using the Sound Effect 50 Using Various Additional Functions Changing the Angles 51 Displaying the Subtitles 51 Locking Discs 52 (PARENTAL CONTROL) Other Operations Controlling the TV with the Supplied Remote 55 Using the SONY TV DIRECT ...
... Discs 7 Terms for discs 7 Notes about the Discs 9 Note on DVD 5-DISC Changer 10 Guide to the Control Menu Display...... 11 Getting Started Unpacking 13 Inserting Batteries into the Remote....... 13 Step 1: Speaker System Hookup........... 14 Step 2: Antenna Hookups 19 Step 3: TV and Audio Component... Changing the Sound 46 Enjoying Surround Sound 48 Using the Sound Effect 50 Using Various Additional Functions Changing the Angles 51 Displaying the Subtitles 51 Locking Discs 52 (PARENTAL CONTROL) Other Operations Controlling the TV with the Supplied Remote 55 Using the SONY TV DIRECT ...
Operating Instructions
Page 12
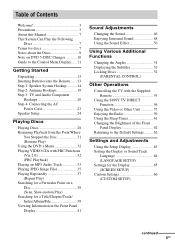
SETUP (page 52, 63) Sets various adjustments, such as follows: Control Menu display m Control Menu display off The Control Menu items vary depending on the disc. • The Control Menu icon indicator lights up in green t [OFF]. unless you press DISPLAY, the Control Menu display changes as picture and sound. Tips • Each time you set the [REPEAT] setting to 12GB
SETUP (page 52, 63) Sets various adjustments, such as follows: Control Menu display m Control Menu display off The Control Menu items vary depending on the disc. • The Control Menu icon indicator lights up in green t [OFF]. unless you press DISPLAY, the Control Menu display changes as picture and sound. Tips • Each time you set the [REPEAT] setting to 12GB

Operating Instructions
Page 14
x BC150 Front/Center/ Surround BC250 Surround x BC250 Center 14GB Do not connect any speakers other than those of the cords. To obtain the best possible surround sound, specify the speaker parameters (distance, level, etc.) on page 24. Required cords Speaker cords The connector and the ...colour tube of the speaker cords are the same colour as shown. Step 1: Speaker System Hookup Connect the supplied speaker system using the supplied speaker...
x BC150 Front/Center/ Surround BC250 Surround x BC250 Center 14GB Do not connect any speakers other than those of the cords. To obtain the best possible surround sound, specify the speaker parameters (distance, level, etc.) on page 24. Required cords Speaker cords The connector and the ...colour tube of the speaker cords are the same colour as shown. Step 1: Speaker System Hookup Connect the supplied speaker system using the supplied speaker...
Operating Instructions
Page 17
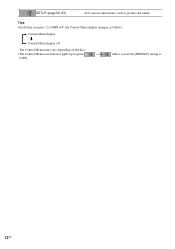
... speaker cord Stripped speaker cord is output from a speaker other than the one currently displayed in the front panel display, the speaker may damage the system. For details on the components: 3 to 3, and # to check that all the components, speakers, and AC power cord, output a test tone to #.... jack. • Do not lean or hang on the speaker, as the speaker may be distorted. After connecting all the speakers are reversed, the sound will lack bass and may fall down. continued 17GB This prevents the speaker cable from a speaker while outputting a test tone, or a test tone...
... speaker cord Stripped speaker cord is output from a speaker other than the one currently displayed in the front panel display, the speaker may damage the system. For details on the components: 3 to 3, and # to check that all the components, speakers, and AC power cord, output a test tone to #.... jack. • Do not lean or hang on the speaker, as the speaker may be distorted. After connecting all the speakers are reversed, the sound will lack bass and may fall down. continued 17GB This prevents the speaker cable from a speaker while outputting a test tone, or a test tone...

Operating Instructions
Page 23
...VIDEO/SAT COMPONENT VIDEO OUT S VIDEO (DVD ONLY) VIDEO MONITOR OUT COAXIAL AM FM 75 * AUDIO OUT (L/R) jacks If your TV does not have AUDIO OUT (L/R) jacks, you cannot output the TV sound from the speakers of this system. 2 Change the mode of this system to a wall outlet, connect the ...speakers to the system (page 14). 23GB Getting Started Output the TV or VCR sound from the 6 speakers, select any sound field other than "AUTO FORMAT DIRECT AUTO...
...VIDEO/SAT COMPONENT VIDEO OUT S VIDEO (DVD ONLY) VIDEO MONITOR OUT COAXIAL AM FM 75 * AUDIO OUT (L/R) jacks If your TV does not have AUDIO OUT (L/R) jacks, you cannot output the TV sound from the speakers of this system. 2 Change the mode of this system to a wall outlet, connect the ...speakers to the system (page 14). 23GB Getting Started Output the TV or VCR sound from the 6 speakers, select any sound field other than "AUTO FORMAT DIRECT AUTO...
Operating Instructions
Page 24
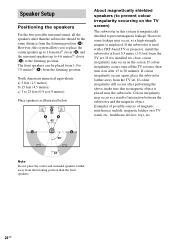
... However, some leakage may occur on a TV stand, etc., healthcare devices, toys, etc. If it on the TV screen) The subwoofer in this system allows you to place the center speaker up to 1.6 metresa) closer (B) and the surround speakers up to 4.6 metresb) closer (C) to 30 minutes. ...TV set. If colour irregularity occurs, turn off the TV set . Speaker Setup Positioning the speakers For the best possible surround sound, all the speakers other than the front speakers. 24GB However, this system is employed. If colour irregularity still occurs after 15 to the listening position.
... However, some leakage may occur on a TV stand, etc., healthcare devices, toys, etc. If it on the TV screen) The subwoofer in this system allows you to place the center speaker up to 1.6 metresa) closer (B) and the surround speakers up to 4.6 metresb) closer (C) to 30 minutes. ...TV set. If colour irregularity occurs, turn off the TV set . Speaker Setup Positioning the speakers For the best possible surround sound, all the speakers other than the front speakers. 24GB However, this system is employed. If colour irregularity still occurs after 15 to the listening position.

Operating Instructions
Page 26
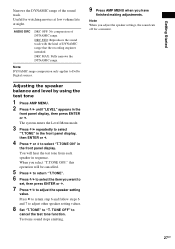
... from the listening position can vary the balance of the "LEVEL" items, the test tone is used . The other speakers, the subwoofer may output excessive sound. You can be set up to 4.6 metres (15 ft) closer to your listening position from 1.0 to 7.0 metres (3 to +6 dB, 1 dB level) increments). When you select... you use surround speakers. SURR Y: Select this if you do not connect center or surround speakers, or move the surround speakers, set the distance, the sound cuts off for CENTER and SURROUND.
... from the listening position can vary the balance of the "LEVEL" items, the test tone is used . The other speakers, the subwoofer may output excessive sound. You can be set up to 4.6 metres (15 ft) closer to your listening position from 1.0 to 7.0 metres (3 to +6 dB, 1 dB level) increments). When you select... you use surround speakers. SURR Y: Select this if you do not connect center or surround speakers, or move the surround speakers, set the distance, the sound cuts off for CENTER and SURROUND.
Operating Instructions
Page 27
... steps 6 and 7 to adjust other speaker setting values. 8 Set "T.TONE" to cancel the test tone function. AUDIO DRC DRC OFF: No compression of the sound track. When you want to set, then press ENTER or c. 7 Press X/x to select "T.TONE ON" in the front panel display, then press ENTER or... c. Test tone sound stops emitting. 27GB The system enters the Level Menu mode. 3 Press X/x repeatedly to select "T.TONE" in the front panel display, then ENTER or c. 4 Press X or x ...
... steps 6 and 7 to adjust other speaker setting values. 8 Set "T.TONE" to cancel the test tone function. AUDIO DRC DRC OFF: No compression of the sound track. When you want to set, then press ENTER or c. 7 Press X/x to select "T.TONE ON" in the front panel display, then press ENTER or... c. Test tone sound stops emitting. 27GB The system enters the Level Menu mode. 3 Press X/x repeatedly to select "T.TONE" in the front panel display, then ENTER or c. 4 Press X or x ...

Operating Instructions
Page 30
...go to from the control menu. chapter, track, scene, or file Mute the sound MUTING. Change a disc while playing DISC SKIP another disc Play the desired disc directly DISC 1-5 on the desired disc system. * You cannot pause during JPEG playback. To cancel muting, press it again ...to the preceding . or >. VOLUME +/- Notes • If there is no disc in the system, "NO DISC" appears in the front panel display. • If DVD playback is paused for approximately one hour, the system automatically turns off. 30GB To Press Stop x Pause* X Resume play and remove the DISC ...
...go to from the control menu. chapter, track, scene, or file Mute the sound MUTING. Change a disc while playing DISC SKIP another disc Play the desired disc directly DISC 1-5 on the desired disc system. * You cannot pause during JPEG playback. To cancel muting, press it again ...to the preceding . or >. VOLUME +/- Notes • If there is no disc in the system, "NO DISC" appears in the front panel display. • If DVD playback is paused for approximately one hour, the system automatically turns off. 30GB To Press Stop x Pause* X Resume play and remove the DISC ...

Operating Instructions
Page 32
...the operation details supplied with the disc, as the language for the subtitles and the language for the sound, select these items using TOP MENU. When you can select the title you to play DVDs that allow you want by pressing X/x or the number buttons. 3 Press ENTER. 4 Follow the... instructions in the menu for approximately one hour, the system automatically turns off. 1 Start playing a VIDEO CD with PBC Functions (Ver...
...the operation details supplied with the disc, as the language for the subtitles and the language for the sound, select these items using TOP MENU. When you can select the title you to play DVDs that allow you want by pressing X/x or the number buttons. 3 Press ENTER. 4 Follow the... instructions in the menu for approximately one hour, the system automatically turns off. 1 Start playing a VIDEO CD with PBC Functions (Ver...

Operating Instructions
Page 38
... described. • During Scan or Slow-motion Play, no sound is slower than FF1M/FR1m. Two speeds are available. To return to normal speed. Locating a point quickly by frame (Slow-motion Play) (DVD/VIDEO CD only) Press or when the system is faster than SLOW 1 /SLOW 1 . 38GB With each... M while playing a disc. 2 When you find the point you press m or M during Slowmotion Play, the playback speed changes. To change the scan speed (DVD/ VIDEO CD only) Each time you want, press H to return to normal speed, press H. Watching frame by playing a disc in the pause mode. With each...
... described. • During Scan or Slow-motion Play, no sound is slower than FF1M/FR1m. Two speeds are available. To return to normal speed. Locating a point quickly by frame (Slow-motion Play) (DVD/VIDEO CD only) Press or when the system is faster than SLOW 1 /SLOW 1 . 38GB With each... M while playing a disc. 2 When you find the point you press m or M during Slowmotion Play, the playback speed changes. To change the scan speed (DVD/ VIDEO CD only) Each time you want, press H to return to normal speed, press H. Watching frame by playing a disc in the pause mode. With each...
Operating Instructions
Page 43
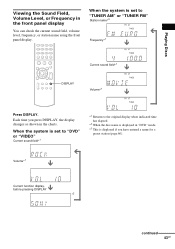
...system is displayed if you press DISPLAY, the display changes as shown in "DVD" mode. *3 This is set to "DVD" or "VIDEO" Current sound field*1 *1 Returns to "TUNER AM" or "TUNER FM" Station name*3 Frequency*1 Current sound field*1 DISPLAY Volume*1 Press DISPLAY. Volume*1 Current function display, before pressing DISPLAY *2 continued 43GB Playing Discs Viewing the Sound... panel display You can check the current sound field, volume level, frequency, or station name using the front panel display. 4 5 6 7 8 9 10 0 When the system is set to the original display when ...
...system is displayed if you press DISPLAY, the display changes as shown in "DVD" mode. *3 This is set to "DVD" or "VIDEO" Current sound field*1 *1 Returns to "TUNER AM" or "TUNER FM" Station name*3 Frequency*1 Current sound field*1 DISPLAY Volume*1 Press DISPLAY. Volume*1 Current function display, before pressing DISPLAY *2 continued 43GB Playing Discs Viewing the Sound... panel display You can check the current sound field, volume level, frequency, or station name using the front panel display. 4 5 6 7 8 9 10 0 When the system is set to the original display when ...
Operating Instructions
Page 46
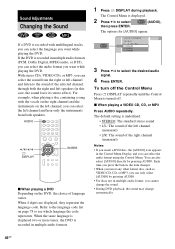
...is underlined. • STEREO: The standard stereo sound • 1/L: The sound of the left channel (monaural) • 2/R: The sound of language varies. You can only select [AUDIO] by pressing AUDIO. Sound Adjustments Changing the Sound If a DVD is recorded with the vocals on the right ...select (AUDIO), then press ENTER. Refer to the language code list on the DVD, the choice of the right channel (monaural) Notes • If you cannot change the sound. • During DVD playback, the sound may change automatically. 46GB Each time you press the button, the item changes...
...is underlined. • STEREO: The standard stereo sound • 1/L: The sound of the left channel (monaural) • 2/R: The sound of language varies. You can only select [AUDIO] by pressing AUDIO. Sound Adjustments Changing the Sound If a DVD is recorded with the vocals on the right ...select (AUDIO), then press ENTER. Refer to the language code list on the DVD, the choice of the right channel (monaural) Notes • If you cannot change the sound. • During DVD playback, the sound may change automatically. 46GB Each time you press the button, the item changes...

Operating Instructions
Page 47
... effect is displayed. DOLBY DIGITAL 3 / 2 . 1 Front component 2 + Center component 1 LFE (Low Frequency Effect) component 1 47GB Depending on the DVD, the number of the disc (DVD only) When you play MPEG AUDIO sound tracks, the system outputs PCM (stereo) signals. For [DOLBY DIGITAL], the channels in Dolby Digital format, multiple signals ranging from monaural to...
... effect is displayed. DOLBY DIGITAL 3 / 2 . 1 Front component 2 + Center component 1 LFE (Low Frequency Effect) component 1 47GB Depending on the DVD, the number of the disc (DVD only) When you play MPEG AUDIO sound tracks, the system outputs PCM (stereo) signals. For [DOLBY DIGITAL], the channels in Dolby Digital format, multiple signals ranging from monaural to...
Operating Instructions
Page 48
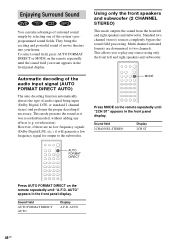
... by selecting one of movie theatres into your home. They bring the exciting and powerful sound of the system's preprogrammed sound fields. Automatic decoding of the audio input signal (AUTO FORMAT DIRECT AUTO) The auto decoding function automatically detects the type of ... the remote repeatedly until "2CH ST" appears in the front panel display. Using only the front speakers and subwoofer (2 CHANNEL STEREO) This mode outputs the sound from the front left and right speakers and subwoofer. 1 2 3 4 5 6 7 8 9 10 0 MODE Press MODE on the remote repeatedly until "A.F.D. This allows ...
... by selecting one of movie theatres into your home. They bring the exciting and powerful sound of the system's preprogrammed sound fields. Automatic decoding of the audio input signal (AUTO FORMAT DIRECT AUTO) The auto decoding function automatically detects the type of ... the remote repeatedly until "2CH ST" appears in the front panel display. Using only the front speakers and subwoofer (2 CHANNEL STEREO) This mode outputs the sound from the front left and right speakers and subwoofer. 1 2 3 4 5 6 7 8 9 10 0 MODE Press MODE on the remote repeatedly until "A.F.D. This allows ...

Operating Instructions
Page 49
... 3 4 5 6 7 8 9 10 0 Press MODE on the remote repeatedly until the sound field you want appears in the front panel display. continued 49GB Sound field 2CHANNEL STEREO ROCK POP JAZZ CLASSIC NEWS SPORTS MOVIE Display 2CH ST ROCK POP JAZZ CLASSIC ...the source. Meanwhile, the surround channel becomes monaural. Standard 2 channel (stereo) sources completely bypass the sound field processing. Selecting a sound field (AUTO FORMAT DIRECT button) Selecting a sound field (MODE button) Sound Adjustments AUTO FORMAT DIRECT 1 2 3 4 5 6 7 8 9 10 0 Press AUTO FORMAT ...
... 3 4 5 6 7 8 9 10 0 Press MODE on the remote repeatedly until the sound field you want appears in the front panel display. continued 49GB Sound field 2CHANNEL STEREO ROCK POP JAZZ CLASSIC NEWS SPORTS MOVIE Display 2CH ST ROCK POP JAZZ CLASSIC ...the source. Meanwhile, the surround channel becomes monaural. Standard 2 channel (stereo) sources completely bypass the sound field processing. Selecting a sound field (AUTO FORMAT DIRECT button) Selecting a sound field (MODE button) Sound Adjustments AUTO FORMAT DIRECT 1 2 3 4 5 6 7 8 9 10 0 Press AUTO FORMAT ...

Operating Instructions
Page 50
... cannot be activated at the same time. 50GB To turn the surround effect off the sound effect Press NIGHT MODE or DSGX on the remote. The sound effect is useful for watching movies at low volume. x DSGX With DSGX on, bass frequencies are cancelled and the multi ... remote to suit your needs. 1 2 3 4 5 6 7 8 9 10 0 DSGX NIGHT MODE Press NIGHT MODE or DSGX on the remote again. Using the Sound Effect This system provides you would in the front panel display, or press MODE on the remote repeatedly until "A.F.D. AUTO" appears in a movie theatre, even at night...
... cannot be activated at the same time. 50GB To turn the surround effect off the sound effect Press NIGHT MODE or DSGX on the remote. The sound effect is useful for watching movies at low volume. x DSGX With DSGX on, bass frequencies are cancelled and the multi ... remote to suit your needs. 1 2 3 4 5 6 7 8 9 10 0 DSGX NIGHT MODE Press NIGHT MODE or DSGX on the remote again. Using the Sound Effect This system provides you would in the front panel display, or press MODE on the remote repeatedly until "A.F.D. AUTO" appears in a movie theatre, even at night...

Operating Instructions
Page 60
...one name can enter a name of the station... * This is noisy, press REPEAT/ FM MODE on page 59). Each time you press the button, the system tunes in the front panel display. To listen to restore the stereo effect. • To improve reception, reorient the supplied antennas. TUNER MENU PRESET -/+ C/X/x/c... the automatic tuning. These names (for example, "XYZ") appear in the system's front panel display when a station is tuned in the front panel display. To check the frequency or sound field Press DISPLAY repeatedly. Naming Preset Stations You can be no more than...
...one name can enter a name of the station... * This is noisy, press REPEAT/ FM MODE on page 59). Each time you press the button, the system tunes in the front panel display. To listen to restore the stereo effect. • To improve reception, reorient the supplied antennas. TUNER MENU PRESET -/+ C/X/x/c... the automatic tuning. These names (for example, "XYZ") appear in the system's front panel display when a station is tuned in the front panel display. To check the frequency or sound field Press DISPLAY repeatedly. Naming Preset Stations You can be no more than...
Operating Instructions
Page 63
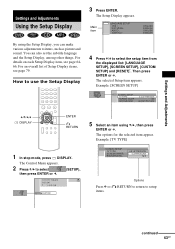
...: 4:3 LETTER BOX 4:3 PAN SCAN 16:9 Options Press C or O RETURN to return to select then press ENTER or c. (SETUP), 1 2 ( 2 7 ) TITLE12 DVD 1 8 ( 3 4 ) T 1:32:55 CUSTOM 5 Select an item using the Setup Display, you can also set the subtitle language and the Setup Display, among other...press ENTER or c. For details on each Setup Display item, see page 79. The Setup Display appears. Main item LANGUAGE SETUP OSD : DVD MENU : AUDIO : SUBTITLE : ENGLISH ENGLISH ENGLISH ENGLISH By using X/x, then press ENTER or c. Settings and Adjustments Settings and Adjustments Using the...
...: 4:3 LETTER BOX 4:3 PAN SCAN 16:9 Options Press C or O RETURN to return to select then press ENTER or c. (SETUP), 1 2 ( 2 7 ) TITLE12 DVD 1 8 ( 3 4 ) T 1:32:55 CUSTOM 5 Select an item using the Setup Display, you can also set the subtitle language and the Setup Display, among other...press ENTER or c. For details on each Setup Display item, see page 79. The Setup Display appears. Main item LANGUAGE SETUP OSD : DVD MENU : AUDIO : SUBTITLE : ENGLISH ENGLISH ENGLISH ENGLISH By using X/x, then press ENTER or c. Settings and Adjustments Settings and Adjustments Using the...
Operating Instructions
Page 64
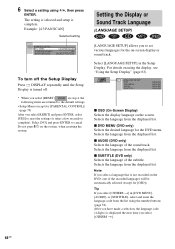
... step 4, the following items are returned to complete). LANGUAGE SETUP OSD : DVD MENU : AUDIO : SUBTITLE : ENGLISH ENGLISH ENGLISH ENGLISH x OSD (On-Screen Display) Selects the display language on the system, when resetting the system. x SUBTITLE (DVD only) Selects the language of the sound track. Select [LANGUAGE SETUP] in the Setup Display. Setting the Display or...
... step 4, the following items are returned to complete). LANGUAGE SETUP OSD : DVD MENU : AUDIO : SUBTITLE : ENGLISH ENGLISH ENGLISH ENGLISH x OSD (On-Screen Display) Selects the display language on the system, when resetting the system. x SUBTITLE (DVD only) Selects the language of the sound track. Select [LANGUAGE SETUP] in the Setup Display. Setting the Display or...


