
Operating Guide
Page 4
... extensive work by the manufacturer that are required, be sure the service technician has used replacement parts specified by a qualified technician to restore the set is in the operating instructions. If the set . - Adjust only those controls that have fallen into the set has been exposed to lightning and power-line surges. Refer all servicing to qualified service personnel under the following the operating instructions. Safety Check Upon...
... extensive work by the manufacturer that are required, be sure the service technician has used replacement parts specified by a qualified technician to restore the set is in the operating instructions. If the set . - Adjust only those controls that have fallen into the set has been exposed to lightning and power-line surges. Refer all servicing to qualified service personnel under the following the operating instructions. Safety Check Upon...
Operating Guide
Page 7
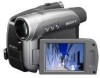
... playback is equipped with a Carl Zeiss lens, which was developed jointly by Carl Zeiss, in each local language are used for effective use. To view your camcorder if necessary (p. 17). • Design and specifications of recording media and accessories are subject to direct sunlight for Modulation Transfer Function. Change the screen language before using your recordings on the countries/regions. Black point White, red, blue or green point • Exposing the LCD screen...
... playback is equipped with a Carl Zeiss lens, which was developed jointly by Carl Zeiss, in each local language are used for effective use. To view your camcorder if necessary (p. 17). • Design and specifications of recording media and accessories are subject to direct sunlight for Modulation Transfer Function. Change the screen language before using your recordings on the countries/regions. Black point White, red, blue or green point • Exposing the LCD screen...
Operating Guide
Page 8
... adjust the focus for an off center subject (SPOT FOCUS) To fix the exposure for the selected subject (Flexible spot meter) To record in mirror mode To use a tripod To use a Shoulder Belt Playback To play back the images with added special effects (Picture effect) Recording/playback To check the remaining battery (Battery Info) To turn off the operation confirmation beep (BEEP) To initialize the settings (RESET) Other part names and functions Indicators displayed...
... adjust the focus for an off center subject (SPOT FOCUS) To fix the exposure for the selected subject (Flexible spot meter) To record in mirror mode To use a tripod To use a Shoulder Belt Playback To play back the images with added special effects (Picture effect) Recording/playback To check the remaining battery (Battery Info) To turn off the operation confirmation beep (BEEP) To initialize the settings (RESET) Other part names and functions Indicators displayed...
Operating Guide
Page 13
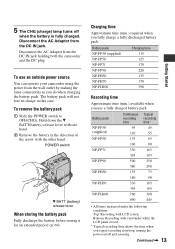
... the camcorder and the DC plug. To remove the battery pack 1 Slide the POWER switch to OFF(CHG). The battery pack will not lose its charge in the direction of the arrow with LCD screen. 5 The CHG (charge) lamp turns off and zooming. POWER switch 1 2 V BATT (battery) release lever When storing the battery pack Fully discharge the battery before storing it for an extended period (p. 66). Battery pack Continuous recording time Typical recording time...
... the camcorder and the DC plug. To remove the battery pack 1 Slide the POWER switch to OFF(CHG). The battery pack will not lose its charge in the direction of the arrow with LCD screen. 5 The CHG (charge) lamp turns off and zooming. POWER switch 1 2 V BATT (battery) release lever When storing the battery pack Fully discharge the battery before storing it for an extended period (p. 66). Battery pack Continuous recording time Typical recording time...

Operating Guide
Page 19
... cleared from the memory. You can set the clock for [DATA CODE] (During Easy Handycam operation, you turn on the tape, and can set it to the year 2079. MANUAL SET PROGRAM AE P EFFECT AUTO SHTR EXEC RET. 2 Select / (SETUP MENU) with / , then touch [EXEC]. The clock starts. • The date and time are not displayed while recording, but they are automatically recorded on your camcorder or change the POWER switch position. •...
... cleared from the memory. You can set the clock for [DATA CODE] (During Easy Handycam operation, you turn on the tape, and can set it to the year 2079. MANUAL SET PROGRAM AE P EFFECT AUTO SHTR EXEC RET. 2 Select / (SETUP MENU) with / , then touch [EXEC]. The clock starts. • The date and time are not displayed while recording, but they are automatically recorded on your camcorder or change the POWER switch position. •...
Operating Guide
Page 26
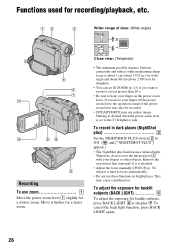
Functions used for recording/playback, etc. 12 3 Wider range of the power zoom lever may also be recorded. • [STEADYSHOT] may cause a malfunction. Close view: (Telephoto) • The minimum possible distance between camcorder and subject while maintaining sharp focus is hard to the T (Telephoto) side. Remove the conversion lens (optional) if it is attached. • Adjust the focus manually ([FOCUS], p. 36) when it further for backlit subjects, press...
Functions used for recording/playback, etc. 12 3 Wider range of the power zoom lever may also be recorded. • [STEADYSHOT] may cause a malfunction. Close view: (Telephoto) • The minimum possible distance between camcorder and subject while maintaining sharp focus is hard to the T (Telephoto) side. Remove the conversion lens (optional) if it is attached. • Adjust the focus manually ([FOCUS], p. 36) when it further for backlit subjects, press...
Operating Guide
Page 27
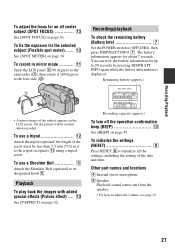
... 5.5 mm (7/32 in mirror mode .......... Remaining battery (approx.) BATTERY INFO BATTERY CHARGE LEVEL 0% 50% 100% REC TIME AVAILABLE LCD SCREEN : 86 min VIEWFINDER : 99 min Recording capacity (approx.) To turn off center subject (SPOT FOCUS 0 See [SPOT FOCUS] on page 47. Recording/Playback To adjust the focus for an off the operation confirmation beep (BEEP 0 See [BEEP] on page 36. Other part names and functions D Internal stereo microphone I Speaker Playback sound comes out from the...
... 5.5 mm (7/32 in mirror mode .......... Remaining battery (approx.) BATTERY INFO BATTERY CHARGE LEVEL 0% 50% 100% REC TIME AVAILABLE LCD SCREEN : 86 min VIEWFINDER : 99 min Recording capacity (approx.) To turn off center subject (SPOT FOCUS 0 See [SPOT FOCUS] on page 47. Recording/Playback To adjust the focus for an off the operation confirmation beep (BEEP 0 See [BEEP] on page 36. Other part names and functions D Internal stereo microphone I Speaker Playback sound comes out from the...
Operating Guide
Page 32
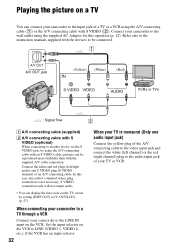
... outlet using the A/V connecting cable with an S VIDEO cable, pictures can display the time code on the VCR to [V-OUT/LCD] (p. 47). Set the input selector on the TV screen by using the supplied AC Adaptor for this case, the yellow (standard video) plug connection is monaural (Only one audio input jack) Connect the yellow plug of the A/V connecting cable to the video input jack and connect the white (left /right audio) and S VIDEO plug (S VIDEO channel) of an A/V connecting cable. S VIDEO connection only will not output audio...
... outlet using the A/V connecting cable with an S VIDEO cable, pictures can display the time code on the VCR to [V-OUT/LCD] (p. 47). Set the input selector on the TV screen by using the supplied AC Adaptor for this case, the yellow (standard video) plug connection is monaural (Only one audio input jack) Connect the yellow plug of the A/V connecting cable to the video input jack and connect the white (left /right audio) and S VIDEO plug (S VIDEO channel) of an A/V connecting cable. S VIDEO connection only will not output audio...
Operating Guide
Page 38
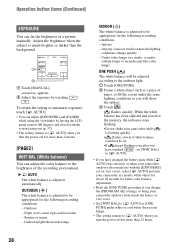
...] under the same lighting conditions as a piece of the recording environment. Operation button items (Continued) EXPOSURE You can adjust the color balance to [ AUTO] when you turn the power off for more than 12 hours. [PAGE2] WHT BAL (White balance) You can fix the brightness of a picture manually. OUTDOOR ( ) The white balance is adjusted to fill the screen under white or cool white fluorescent lamps. • The setting returns to the brightness...
...] under the same lighting conditions as a piece of the recording environment. Operation button items (Continued) EXPOSURE You can adjust the color balance to [ AUTO] when you turn the power off for more than 12 hours. [PAGE2] WHT BAL (White balance) You can fix the brightness of a picture manually. OUTDOOR ( ) The white balance is adjusted to fill the screen under white or cool white fluorescent lamps. • The setting returns to the brightness...
Operating Guide
Page 44
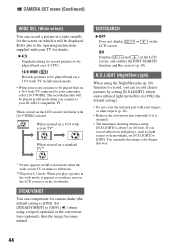
... shooting distance using [N.S.LIGHT] is [ON]). When viewed on a 16:9 wide screen TV* When viewed on the LCD screen, and enables the EDIT SEARCH function and Rec review (p. 30). N.S.LIGHT (NightShot Light) When using a tripod (optional) or the conversion lens (optional), then the image becomes natural. 44 STEADYSHOT You can make the image color deeper this way. * Picture appears in full screen mode when the wide-screen TV switches to full mode. ** Played in full mode...
... shooting distance using [N.S.LIGHT] is [ON]). When viewed on a 16:9 wide screen TV* When viewed on the LCD screen, and enables the EDIT SEARCH function and Rec review (p. 30). N.S.LIGHT (NightShot Light) When using a tripod (optional) or the conversion lens (optional), then the image becomes natural. 44 STEADYSHOT You can make the image color deeper this way. * Picture appears in full screen mode when the wide-screen TV switches to full mode. ** Played in full mode...
Operating Guide
Page 46
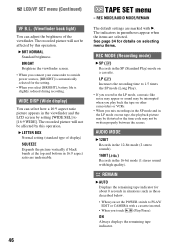
... you play back the tape on other camcorders or VCRs. • When you set the POWER switch to outside power sources, [BRIGHT] is automatically selected for details on selecting menu items. REC MODE (Recording mode) B SP (SP) Records in the 16-bit mode (1 stereo sound with B. AUDIO MODE B 12BIT Records in the 12-bit mode (2 stereo sounds). 16BIT ( ) Records in the SP (Standard Play) mode on one tape, the playback picture may be distorted or the time code may...
... you play back the tape on other camcorders or VCRs. • When you set the POWER switch to outside power sources, [BRIGHT] is automatically selected for details on selecting menu items. REC MODE (Recording mode) B SP (SP) Records in the 16-bit mode (1 stereo sound with B. AUDIO MODE B 12BIT Records in the 12-bit mode (2 stereo sounds). 16BIT ( ) Records in the SP (Standard Play) mode on one tape, the playback picture may be distorted or the time code may...
Operating Guide
Page 47
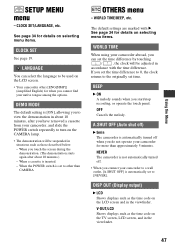
.... - When the POWER switch is automatically turned off ) B 5min The camcorder is set the time difference by touching / , the clock will be used on the CAMERA lamp. • The demonstration will be suspended in accordance with B. A.SHUT OFF (Auto shut off when you have removed a cassette from your camcorder abroad, you can select the language to turn on the LCD screen. • Your camcorder offers [ENG[SIMP...
.... - When the POWER switch is automatically turned off ) B 5min The camcorder is set the time difference by touching / , the clock will be used on the CAMERA lamp. • The demonstration will be suspended in accordance with B. A.SHUT OFF (Auto shut off when you have removed a cassette from your camcorder abroad, you can select the language to turn on the LCD screen. • Your camcorder offers [ENG[SIMP...

Operating Guide
Page 48
... other recording devices (VCR/ DVD device, etc.). Refer also to the instruction manuals supplied with the devices to the wall outlet using the A/V connecting cable with an S VIDEO cable, pictures can copy the picture played back on the VCR/TV. • When you are transmitted digitally, producing high quality pictures and sound. Connect your camcorder to be reproduced more faithfully than with the supplied A/V cable connection. Dubbing/Editing Dubbing to [LCD] (the default setting) (p. 47). Connect the white and red plugs...
... other recording devices (VCR/ DVD device, etc.). Refer also to the instruction manuals supplied with the devices to the wall outlet using the A/V connecting cable with an S VIDEO cable, pictures can copy the picture played back on the VCR/TV. • When you are transmitted digitally, producing high quality pictures and sound. Connect your camcorder to be reproduced more faithfully than with the supplied A/V cable connection. Dubbing/Editing Dubbing to [LCD] (the default setting) (p. 47). Connect the white and red plugs...

Operating Guide
Page 50
... input picture and sound separately. Refer also to the instruction manuals supplied with an i.LINK cable. • The indicator appears when you connect your camcorder beforehand. Touch t [PAGE3] t [REC CTRL] t [REC PAUSE]. 5 When recording pictures from a VCR/ DVD device, insert a cassette or a DVD. 3 Slide the POWER switch repeatedly to recording pause mode. Recording pictures from a TV: Select a TV program. Using an i.LINK cable (optional), you are recording from a VCR/DVD device: Start playing the cassette or the disc on the PLAY/ EDIT lamp. 50 4 Set your camcorder...
... input picture and sound separately. Refer also to the instruction manuals supplied with an i.LINK cable. • The indicator appears when you connect your camcorder beforehand. Touch t [PAGE3] t [REC CTRL] t [REC PAUSE]. 5 When recording pictures from a VCR/ DVD device, insert a cassette or a DVD. 3 Slide the POWER switch repeatedly to recording pause mode. Recording pictures from a TV: Select a TV program. Using an i.LINK cable (optional), you are recording from a VCR/DVD device: Start playing the cassette or the disc on the PLAY/ EDIT lamp. 50 4 Set your camcorder...
Operating Guide
Page 54
...; Charge the battery pack (p. 12). The CHG (charge) lamp does not light while the battery pack is not a malfunction. Overall operations/Easy Handycam The power does not turn on . • Attach a charged battery pack to the camcorder (p. 12). • Use the AC Adaptor to connect to troubleshoot the problem. Troubleshooting Troubleshooting If you run into any problems using a sharp-pointed object. (If you press the RESET button, all settings are reset.) Buttons do not operate your camcorder, use...
...; Charge the battery pack (p. 12). The CHG (charge) lamp does not light while the battery pack is not a malfunction. Overall operations/Easy Handycam The power does not turn on . • Attach a charged battery pack to the camcorder (p. 12). • Use the AC Adaptor to connect to troubleshoot the problem. Troubleshooting Troubleshooting If you run into any problems using a sharp-pointed object. (If you press the RESET button, all settings are reset.) Buttons do not operate your camcorder, use...
Operating Guide
Page 58
... do not appear. • Clean the head using an S VIDEO plug, make sure the red and white plugs of the picture is heard appropriately (p. 52). • If you record a TV screen or computer screen. • Set [STEADYSHOT] to turn on the picture. The color of the A/V connecting cable are using the cleaning cassette (optional) (p. 69). No sound or only a low sound is heard. • Turn up the volume (p. 25). • Adjust [AUDIO MIX] from the [ST2] (additional...
... do not appear. • Clean the head using an S VIDEO plug, make sure the red and white plugs of the picture is heard appropriately (p. 52). • If you record a TV screen or computer screen. • Set [STEADYSHOT] to turn on the picture. The color of the A/V connecting cable are using the cleaning cassette (optional) (p. 69). No sound or only a low sound is heard. • Turn up the volume (p. 25). • Adjust [AUDIO MIX] from the [ST2] (additional...
Operating Guide
Page 65
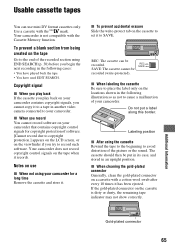
... record software on your camcorder that contains copyright control signals for a long time Remove the cassette and store it to a tape in the following cases: • You have played back the tape. • You have used EDIT SEARCH. x When labeling the cassette Be sure to copyright protection.] appears on the LCD screen, or on the locations shown in another video camera connected to cause a malfunction of software. [Cannot record...
... record software on your camcorder that contains copyright control signals for a long time Remove the cassette and store it to a tape in the following cases: • You have played back the tape. • You have used EDIT SEARCH. x When labeling the cassette Be sure to copyright protection.] appears on the LCD screen, or on the locations shown in another video camera connected to cause a malfunction of software. [Cannot record...
Operating Guide
Page 69
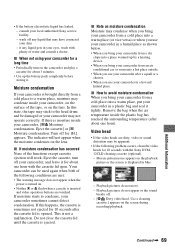
... contacted your camcorder, [%Z Moisture condensation. Turn off . - [x Dirty video head. Eject the cassette, turn on the camcorder and play a cassette for about one hour). If this state, the tape may stick to a warm place, moisture may be apparent. • If the following problem occurs, clean the video heads for 1H.] appears. Mosaic-pattern noise appears on the lens. Additional Information Continued , 69 x When not using your camcorder for 10...
... contacted your camcorder, [%Z Moisture condensation. Turn off . - [x Dirty video head. Eject the cassette, turn on the camcorder and play a cassette for about one hour). If this state, the tape may stick to a warm place, moisture may be apparent. • If the following problem occurs, clean the video heads for 1H.] appears. Mosaic-pattern noise appears on the lens. Additional Information Continued , 69 x When not using your camcorder for 10...

Operating Guide
Page 74
... 12 Charging time 13 Playing time 14 Recording time 13 Remaining battery .........28 BEACH&SKI 42 BEEP 47 BLACK 37 B&W 43 C CALIBRATION 70 CAM DATA 39 CAMERA SET menu ...........43 74 Cassette 20, 65 Insert/Eject 20 Write-protect tab........... 65 Cassette compartment .......... 20 Charging the battery 12 Battery pack 12 Pre-installed rechargeable battery 71 Charging time 13 CHG (charge) lamp 12 CLOCK SET 19 Connect TV 32, 50 VCR 32, 48, 50 D D ZOOM (Digital zoom) ..... 43 DATA CODE 28, 39 DATE/TIME...
... 12 Charging time 13 Playing time 14 Recording time 13 Remaining battery .........28 BEACH&SKI 42 BEEP 47 BLACK 37 B&W 43 C CALIBRATION 70 CAM DATA 39 CAMERA SET menu ...........43 74 Cassette 20, 65 Insert/Eject 20 Write-protect tab........... 65 Cassette compartment .......... 20 Charging the battery 12 Battery pack 12 Pre-installed rechargeable battery 71 Charging time 13 CHG (charge) lamp 12 CLOCK SET 19 Connect TV 32, 50 VCR 32, 48, 50 D D ZOOM (Digital zoom) ..... 43 DATA CODE 28, 39 DATE/TIME...

Operating Guide
Page 75
... Light 44 O ONE PUSH 38 OPEN/EJECT lever 20 Operation button 34 Operation confirmation beep See BEEP OTHERS menu 47 OUTDOOR 38 P P EFFECT (Picture effect) ... 42 PAL 64 PASTEL 43 Picture Search 25 Playback 25 Double speed 40 Frame 40 Reverse 40 Slow 40 Playing time 14 PORTRAIT (Soft portrait) ... 42 Power cord 12 POWER switch 12, 15 Pre-installed rechargeable battery 71 PROGRAM AE 42, 59 R REC CTRL (Recording control 50 REC MODE (Recording mode 46 Rec review...
... Light 44 O ONE PUSH 38 OPEN/EJECT lever 20 Operation button 34 Operation confirmation beep See BEEP OTHERS menu 47 OUTDOOR 38 P P EFFECT (Picture effect) ... 42 PAL 64 PASTEL 43 Picture Search 25 Playback 25 Double speed 40 Frame 40 Reverse 40 Slow 40 Playing time 14 PORTRAIT (Soft portrait) ... 42 Power cord 12 POWER switch 12, 15 Pre-installed rechargeable battery 71 PROGRAM AE 42, 59 R REC CTRL (Recording control 50 REC MODE (Recording mode 46 Rec review...


