
Operation Guide
Page 3
... repairs to the set, ask the service technician to the set. This will often require extensive work by placing the set on a bed, sofa, rug, or other hazards. If the set on or pinched by being dropped, or the cabinet has been damaged. - If the set . - When the set exhibits a distinct change in the operating instructions. Do not use power-line operated sets near water - Use a cloth lightly...
... repairs to the set, ask the service technician to the set. This will often require extensive work by placing the set on a bed, sofa, rug, or other hazards. If the set on or pinched by being dropped, or the cabinet has been damaged. - If the set . - When the set exhibits a distinct change in the operating instructions. Do not use power-line operated sets near water - Use a cloth lightly...

Operation Guide
Page 5
... connected (stored on the supplied CD-ROM) (p. 92) Types of 512 MB or larger marked with a *(for VIDEO CAMERA) mark for your camcorder. - "PMB Guide" for using your camcorder You can use in order to comply with "Memory Stick PRO" compatible equipment. For the State of operations guides. - See page 11 for help. PRO Duo")* ("Memory Stick - ("Memory Stick PRO-HG Duo") * You can use the following discs only. - 8cm DVD-RW - 8cm DVD+RW - 8cm DVD-R - 8cm DVD...
... connected (stored on the supplied CD-ROM) (p. 92) Types of 512 MB or larger marked with a *(for VIDEO CAMERA) mark for your camcorder. - "PMB Guide" for using your camcorder You can use in order to comply with "Memory Stick PRO" compatible equipment. For the State of operations guides. - See page 11 for help. PRO Duo")* ("Memory Stick - ("Memory Stick PRO-HG Duo") * You can use the following discs only. - 8cm DVD-RW - 8cm DVD+RW - 8cm DVD-R - 8cm DVD...
Operation Guide
Page 7
... a TV, you can use for a long time, fragmentation of media first (p. 51, 57), and then format the "Memory Stick PRO Duo" (p. 67). Disc "Memory Stick PRO Duo" 7 Change the screen language before using your camcorder is equipped with a digital still camera, and may look different from a subject coming into the lens. MTF = Modulation Transfer Function. recordings on the media used. Unauthorized recording of media you need an NTSC system-based TV. • Television programs, films, video tapes, and other accessories...
... a TV, you can use for a long time, fragmentation of media first (p. 51, 57), and then format the "Memory Stick PRO Duo" (p. 67). Disc "Memory Stick PRO Duo" 7 Change the screen language before using your camcorder is equipped with a digital still camera, and may look different from a subject coming into the lens. MTF = Modulation Transfer Function. recordings on the media used. Unauthorized recording of media you need an NTSC system-based TV. • Television programs, films, video tapes, and other accessories...

Operation Guide
Page 9
... disc (DISC SELECT GUIDE 70 Repairing the image database file 70 Customizing Your Camcorder What you can do with the (SETTINGS) category of the HOME MENU 72 Using the HOME MENU 72 List of the (SETTINGS) category items 72 MOVIE SETTINGS 74 (Items for recording movies) PHOTO SETTINGS 78 (Items for recording still images) VIEW IMAGES SET 79 (Items to customize the display) SOUND/DISP SET 81 (Items to adjust sound and the screen) OUTPUT SETTINGS 82 (Items for when connecting other devices...
... disc (DISC SELECT GUIDE 70 Repairing the image database file 70 Customizing Your Camcorder What you can do with the (SETTINGS) category of the HOME MENU 72 Using the HOME MENU 72 List of the (SETTINGS) category items 72 MOVIE SETTINGS 74 (Items for recording movies) PHOTO SETTINGS 78 (Items for recording still images) VIEW IMAGES SET 79 (Items to customize the display) SOUND/DISP SET 81 (Items to adjust sound and the screen) OUTPUT SETTINGS 82 (Items for when connecting other devices...

Operation Guide
Page 22
...-out (for selecting the media. Step 2: Charging the battery pack (Continued) Recording time Approximate time (min.) available when you repeat recording start/stop, turning the power on/off the (Movie) lamp/ (Still) lamp (p. 23)/ ACCESS lamp (p. 27)/access lamp (p. 29). • The /CHG (charge) lamp flashes during charging, or Battery Info (p. 21) will not be correctly displayed under the following conditions: - When recording on a disc Battery pack NP-FH50 NP-FH60...
...-out (for selecting the media. Step 2: Charging the battery pack (Continued) Recording time Approximate time (min.) available when you repeat recording start/stop, turning the power on/off the (Movie) lamp/ (Still) lamp (p. 23)/ ACCESS lamp (p. 27)/access lamp (p. 29). • The /CHG (charge) lamp flashes during charging, or Battery Info (p. 21) will not be correctly displayed under the following conditions: - When recording on a disc Battery pack NP-FH50 NP-FH60...

Operation Guide
Page 30
... "Memory Stick PRO Duo," Memory Stick Duo slot, or image data. • If [Failed to remove the "Memory Stick PRO Duo" from the camcorder • Do not open the Memory Stick Duo cover during recording. • Inserting a "Memory Stick PRO Duo" forcibly in the table are minimum recording time. It may be deleted when you format. • Do not pinch and remove the "Memory Stick PRO Duo" forcibly. Figures in ( ) are approximate recording time in minutes of "Memory Stick," or the [REC MODE] setting...
... "Memory Stick PRO Duo," Memory Stick Duo slot, or image data. • If [Failed to remove the "Memory Stick PRO Duo" from the camcorder • Do not open the Memory Stick Duo cover during recording. • Inserting a "Memory Stick PRO Duo" forcibly in the table are minimum recording time. It may be deleted when you format. • Do not pinch and remove the "Memory Stick PRO Duo" forcibly. Figures in ( ) are approximate recording time in minutes of "Memory Stick," or the [REC MODE] setting...

Operation Guide
Page 33
... movie media with VIDEO mode (p. 11). • You cannot use some menu items are fixed. Side show (p. 44) Recording date/time* Previous/Next Recording/Playback To cancel Easy Handycam operation Press EASY A again. If you need to display the menu items available for setup changes (p.16, 72). Invalid buttons during Easy Handycam operation] appears. • You can adjust the volume by touching (HOME) t SETTINGS] t [VOLUME], then with / . (SETTINGS) t [SOUND • You can change settings. To view movies on a disc on other devices (Finalize) To view movies...
... movie media with VIDEO mode (p. 11). • You cannot use some menu items are fixed. Side show (p. 44) Recording date/time* Previous/Next Recording/Playback To cancel Easy Handycam operation Press EASY A again. If you need to display the menu items available for setup changes (p.16, 72). Invalid buttons during Easy Handycam operation] appears. • You can adjust the volume by touching (HOME) t SETTINGS] t [VOLUME], then with / . (SETTINGS) t [SOUND • You can change settings. To view movies on a disc on other devices (Finalize) To view movies...
Operation Guide
Page 37
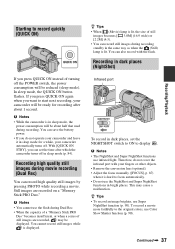
... sleep mode, the QUICK ON button flashes. b Notes • The NightShot and Super NightShot functions use Super NightShot function (p. 90). This may be reduced (sleep mode). b Notes • You cannot use Color Slow Shutter function (p. 90). You can set the NIGHTSHOT switch to ON to display . z Tips • To record an image brighter, use infrared light. Continued , 37 Recording/Playback If you press QUICK ON again when you want to start next recording, your camcorder...
... sleep mode, the QUICK ON button flashes. b Notes • The NightShot and Super NightShot functions use Super NightShot function (p. 90). This may be reduced (sleep mode). b Notes • You cannot use Color Slow Shutter function (p. 90). You can set the NIGHTSHOT switch to ON to display . z Tips • To record an image brighter, use infrared light. Continued , 37 Recording/Playback If you press QUICK ON again when you want to start next recording, your camcorder...
Operation Guide
Page 58
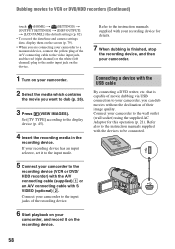
Dubbing movies to VCR or DVD/HDD recorders (Continued) touch (HOME) t (SETTINGS) t [OUTPUT SETTINGS] t [DISP OUTPUT] t [LCD PANEL] (the default setting) (p. 82). • To record the date/time and camera settings data, display them on the screen (p. 79). • When you are connecting your camcorder to a monaural device, connect the yellow plug of their image quality. that is finished, stop the recording device, and then your camcorder. Connect your camcorder, and record it to the input mode. 5 Connect your camcorder. 2 Select the media which contains the movie you can...
Dubbing movies to VCR or DVD/HDD recorders (Continued) touch (HOME) t (SETTINGS) t [OUTPUT SETTINGS] t [DISP OUTPUT] t [LCD PANEL] (the default setting) (p. 82). • To record the date/time and camera settings data, display them on the screen (p. 79). • When you are connecting your camcorder to a monaural device, connect the yellow plug of their image quality. that is finished, stop the recording device, and then your camcorder. Connect your camcorder, and record it to the input mode. 5 Connect your camcorder. 2 Select the media which contains the movie you can...

Operation Guide
Page 60
... copies. [DATE/TIME]: Select [DATE], [DAY&TIME], or [OFF] (no date/time printed). [SIZE]: Select the paper size. If you print a still image recorded in a 16:9 (wide) ratio, the left edges of the printer to be used. • Do not attempt the following operations when is on the screen. To remove the "Memory Stick PRO Duo" from your printer's instruction manual for details. • You may not support the date printing function. still images...
... copies. [DATE/TIME]: Select [DATE], [DAY&TIME], or [OFF] (no date/time printed). [SIZE]: Select the paper size. If you print a still image recorded in a 16:9 (wide) ratio, the left edges of the printer to be used. • Do not attempt the following operations when is on the screen. To remove the "Memory Stick PRO Duo" from your printer's instruction manual for details. • You may not support the date printing function. still images...
Operation Guide
Page 66
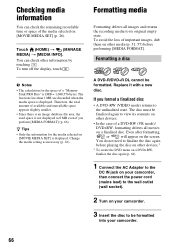
... devices.* * To create the DVD menu on a DVD+RW, finalize the disc again (p. 64). 1 Connect the AC Adaptor to the DC IN jack on your camcorder. 66 Touch (HOME) t (MANAGE MEDIA) t [MEDIA INFO]. To turn off the display, touch . z Tips • Only the information for the space of important images, dub them on a finalized disc. Change the media setting as 0 MB even if you format a finalized disc • A DVD-RW (VIDEO mode...
... devices.* * To create the DVD menu on a DVD+RW, finalize the disc again (p. 64). 1 Connect the AC Adaptor to the DC IN jack on your camcorder. 66 Touch (HOME) t (MANAGE MEDIA) t [MEDIA INFO]. To turn off the display, touch . z Tips • Only the information for the space of important images, dub them on a finalized disc. Change the media setting as 0 MB even if you format a finalized disc • A DVD-RW (VIDEO mode...
Operation Guide
Page 72
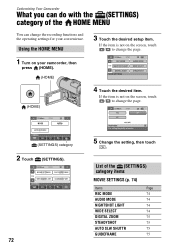
... of the (SETTINGS) category items MOVIE SETTINGS (p. 74) Items Page REC MODE 74 AUDIO MODE 74 NIGHTSHOT LIGHT 74 WIDE SELECT 74 DIGITAL ZOOM 75 STEADYSHOT 75 AUTO SLW SHUTTR 75 GUIDEFRAME 75 Using the HOME MENU 3 Touch the desired setup item. If the item is not on the screen, touch / to change the page. 1 Turn on the screen, touch / to change the recording functions and the operating settings for your camcorder, then press...
... of the (SETTINGS) category items MOVIE SETTINGS (p. 74) Items Page REC MODE 74 AUDIO MODE 74 NIGHTSHOT LIGHT 74 WIDE SELECT 74 DIGITAL ZOOM 75 STEADYSHOT 75 AUTO SLW SHUTTR 75 GUIDEFRAME 75 Using the HOME MENU 3 Touch the desired setup item. If the item is not on the screen, touch / to change the page. 1 Turn on the screen, touch / to change the recording functions and the operating settings for your camcorder, then press...
Operation Guide
Page 76
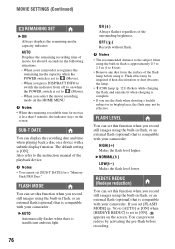
SUB-T DATE You can display the recording date and time when playing back a disc on a device with your camcorder. FLASH MODE You can set this function when you record still images using the built-in flash, or an external flash (optional) that is compatible with a subtitle display function. ON ( ) Always flashes regardless of the playback device. You can set to (Movie). - Also refer to on the screen. B AUTO Automatically flashes when there is [ON]. b Notes • The recommended distance to the...
SUB-T DATE You can display the recording date and time when playing back a disc on a device with your camcorder. FLASH MODE You can set this function when you record still images using the built-in flash, or an external flash (optional) that is compatible with a subtitle display function. ON ( ) Always flashes regardless of the playback device. You can set to (Movie). - Also refer to on the screen. B AUTO Automatically flashes when there is [ON]. b Notes • The recommended distance to the...
Operation Guide
Page 91
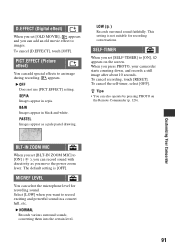
... can record sound with directivity as a pale pastel drawing. B NORMAL Records various surround sounds, converting them into the certain level. 91 B OFF Does not use [PICT.EFFECT] setting. SEPIA Images appear in black and white. MICREF LEVEL You can add special effects to [ON], appears on the Remote Commander (p. 126). Select [LOW] when you move the power zoom lever. To cancel recording, touch [RESET]. PICT.EFFECT (Picture effect...
... can record sound with directivity as a pale pastel drawing. B NORMAL Records various surround sounds, converting them into the certain level. 91 B OFF Does not use [PICT.EFFECT] setting. SEPIA Images appear in black and white. MICREF LEVEL You can add special effects to [ON], appears on the Remote Commander (p. 126). Select [LOW] when you move the power zoom lever. To cancel recording, touch [RESET]. PICT.EFFECT (Picture effect...

Operation Guide
Page 96
... the RESET button (p. 124) using your camcorder to be ready to record after about 1 minute. Movie recording mode: [SP] - [DATA CODE]: [DATE/TIME] - Recording format for DVD-RW: [VIDEO] • The following menu items return to the default settings if the POWER switch is set to on . • Attach a charged battery pack to their defaults automatically. • Following menu settings remain as they were set to OFF (CHG) for your camcorder, use the following buttons/functions are fixed during Easy Handycam operation (p. 31). Turn...
... the RESET button (p. 124) using your camcorder to be ready to record after about 1 minute. Movie recording mode: [SP] - [DATA CODE]: [DATE/TIME] - Recording format for DVD-RW: [VIDEO] • The following menu items return to the default settings if the POWER switch is set to on . • Attach a charged battery pack to their defaults automatically. • Following menu settings remain as they were set to OFF (CHG) for your camcorder, use the following buttons/functions are fixed during Easy Handycam operation (p. 31). Turn...

Operation Guide
Page 98
... time may be removed. • Make sure the power source (battery pack or AC Adaptor) is connected correctly (p. 20). • The disc is damaged or is dirty with your camcorder and complete finalizing the disc (p. 62). If the problem persists, replace the battery pack with a new one (p. 20). Turn off your camcorder, or DISPLAY on DVD-RW (VIDEO mode) except the last recorded movie - Movies recorded on your camcorder, but you cannot record...
... time may be removed. • Make sure the power source (battery pack or AC Adaptor) is connected correctly (p. 20). • The disc is damaged or is dirty with your camcorder and complete finalizing the disc (p. 62). If the problem persists, replace the battery pack with a new one (p. 20). Turn off your camcorder, or DISPLAY on DVD-RW (VIDEO mode) except the last recorded movie - Movies recorded on your camcorder, but you cannot record...

Operation Guide
Page 101
... not operate correctly. • [COLOR SLOW SHTR] may appear on still images recorded on your camcorder is flashing. Turn off the power and then turn off your camcorder (p. 27). • The disc that was recorded, formatted, or finalized on other devices, edited on again, or repeat removing and inserting the "Memory Stick PRO Duo" a couple of your camcorder with (p. 47). This operation may damage the image data, which will be marked with [MICREF LEVEL] set...
... not operate correctly. • [COLOR SLOW SHTR] may appear on still images recorded on your camcorder is flashing. Turn off the power and then turn off your camcorder (p. 27). • The disc that was recorded, formatted, or finalized on other devices, edited on again, or repeat removing and inserting the "Memory Stick PRO Duo" a couple of your camcorder with (p. 47). This operation may damage the image data, which will be marked with [MICREF LEVEL] set...

Operation Guide
Page 114
... guarantee the operation of all types of "Memory Stick Duo" on your camcorder is used by a "Memory Stick PRO Duo." • This product cannot record or play data that records and transfers the contents in the following cases (the data will not be compensated for the "Memory Stick Micro." • A "Memory Stick PRO Duo" formatted by heating. Do not heat the disc or use only a "Memory Stick Duo," which is reading or writing image files on the...
... guarantee the operation of all types of "Memory Stick Duo" on your camcorder is used by a "Memory Stick PRO Duo." • This product cannot record or play data that records and transfers the contents in the following cases (the data will not be compensated for the "Memory Stick Micro." • A "Memory Stick PRO Duo" formatted by heating. Do not heat the disc or use only a "Memory Stick Duo," which is reading or writing image files on the...
Operation Guide
Page 130
... BLACK FADER 90 BLT-IN ZOOM MIC............91 Button-type lithium battery 126 B&W 91 C CALIBRATION 118 CAMERA DATA 79 CANDLE 88 CD-ROM 92 Charging time 21 CLOCK SET 23 130 CLOCK/LANG 83 COLOR SLOW SHTR (Color Slow Shutter 90, 104 Computer 92 Connecting Printer 59 TV 45 VCR or DVD/HDD recorders 57 CONVERSION LENS......... 77 D DATA CODE 79 Date Index 43 DATE/TIME.......... 24, 79, 128 DC IN jack 20 DC plug 20 DELETE Movies 47 Still images 49 DEMO MODE...
... BLACK FADER 90 BLT-IN ZOOM MIC............91 Button-type lithium battery 126 B&W 91 C CALIBRATION 118 CAMERA DATA 79 CANDLE 88 CD-ROM 92 Charging time 21 CLOCK SET 23 130 CLOCK/LANG 83 COLOR SLOW SHTR (Color Slow Shutter 90, 104 Computer 92 Connecting Printer 59 TV 45 VCR or DVD/HDD recorders 57 CONVERSION LENS......... 77 D DATA CODE 79 Date Index 43 DATE/TIME.......... 24, 79, 128 DC IN jack 20 DC plug 20 DELETE Movies 47 Still images 49 DEMO MODE...

Operation Guide
Page 131
... LIGHT.......... 74 NTSC 110 Number of still images recordable 78 O OLD MOVIE 91 ONE PUSH 89, 104 OPTION MENU 85 Original DELETE 47 DIVIDE 52 OTHERS category 47 OUTDOOR 89 OUTPUT SETTINGS .......... 82 P PAL 110 PASTEL 91 PHOTO SETTINGS 78 PictBridge 59 PICT.EFFECT (Picture effect 91, 105 Playback 32, 40 Playback zoom 43 Playing time 22 Playlist Creating 53 Divide 55 Erase 55 Move 55 Playback 54 PORTRAIT 89 Power cord...
... LIGHT.......... 74 NTSC 110 Number of still images recordable 78 O OLD MOVIE 91 ONE PUSH 89, 104 OPTION MENU 85 Original DELETE 47 DIVIDE 52 OTHERS category 47 OUTDOOR 89 OUTPUT SETTINGS .......... 82 P PAL 110 PASTEL 91 PHOTO SETTINGS 78 PictBridge 59 PICT.EFFECT (Picture effect 91, 105 Playback 32, 40 Playback zoom 43 Playing time 22 Playlist Creating 53 Divide 55 Erase 55 Move 55 Playback 54 PORTRAIT 89 Power cord...


