
Operating Instructions
Page 3
...Part 15 of this product, you . Reorient or relocate the receiving antenna. - Increase the separation between the equipment and receiver. - Caution: Do not handle damaged or leaking LithiumIon batteries. You can enjoy for a digital device pursuant to constitute a CAUTION Notice risk of Conformity Trade Name: SONY Model No.: DSR-PD170 Responsible Party: Sony...the FCC related matters only. For disposal or recycling information, please contact your Digital camcorder, you can be regulated if sold in the literature accompanying the appliance. Address: 16450...
...Part 15 of this product, you . Reorient or relocate the receiving antenna. - Increase the separation between the equipment and receiver. - Caution: Do not handle damaged or leaking LithiumIon batteries. You can enjoy for a digital device pursuant to constitute a CAUTION Notice risk of Conformity Trade Name: SONY Model No.: DSR-PD170 Responsible Party: Sony...the FCC related matters only. For disposal or recycling information, please contact your Digital camcorder, you can be regulated if sold in the literature accompanying the appliance. Address: 16450...
Operating Instructions
Page 4
...152 Warning indicators and messages 153 Using your own titles 99 Labeling a cassette 101 Erasing the cassette memory data 103 Customizing Your Camcorder Changing the menu settings 105 "Memory Stick" Operations Using a "Memory Stick" - Digital program editing 75 Using with digital ... 82 Audio dubbing 86 Setting time values 90 Superimposing a title 95 Making your camcorder abroad 155 Maintenance information and precautions .. 156 Specifications 161 Quick Reference Identifying the parts and controls 162 Quick Function Guide 173 Index 174 4 Image protection 135 Deleting ...
...152 Warning indicators and messages 153 Using your own titles 99 Labeling a cassette 101 Erasing the cassette memory data 103 Customizing Your Camcorder Changing the menu settings 105 "Memory Stick" Operations Using a "Memory Stick" - Digital program editing 75 Using with digital ... 82 Audio dubbing 86 Setting time values 90 Superimposing a title 95 Making your camcorder abroad 155 Maintenance information and precautions .. 156 Specifications 161 Quick Reference Identifying the parts and controls 162 Quick Function Guide 173 Index 174 4 Image protection 135 Deleting ...

Operating Instructions
Page 13
... )" indicate the time using the AC Adaptor Be sure to use a fully charged battery Numbers in the following cases: - Until your camcorder. * Approximate minutes when recording while you use it fully discharges again. When using a normally charged battery. Charging time Battery pack NP-F550... a malfunction occurs, disconnect the plug from coming into contact with the metal parts of the DC plug of recording time when you repeat recording start/stop, zooming and turning the power on your camcorder calculates the actual remaining battery time "- - - - You cannot use it...
... )" indicate the time using the AC Adaptor Be sure to use a fully charged battery Numbers in the following cases: - Until your camcorder. * Approximate minutes when recording while you use it fully discharges again. When using a normally charged battery. Charging time Battery pack NP-F550... a malfunction occurs, disconnect the plug from coming into contact with the metal parts of the DC plug of recording time when you repeat recording start/stop, zooming and turning the power on your camcorder calculates the actual remaining battery time "- - - - You cannot use it...

Operating Instructions
Page 17
... lid. 2 3,4 Window 5 PUSH Write-protect tab PUSH To eject a cassette Follow the procedure above, and take out the cassette in step 3. When you press any part of the grip strap (p. 166). Getting Started Step 4 Inserting a cassette (1) Install the power source (p. 11). (2) While pressing the small blue button on the EJECT switch...
... lid. 2 3,4 Window 5 PUSH Write-protect tab PUSH To eject a cassette Follow the procedure above, and take out the cassette in step 3. When you press any part of the grip strap (p. 166). Getting Started Step 4 Inserting a cassette (1) Install the power source (p. 11). (2) While pressing the small blue button on the EJECT switch...
Operating Instructions
Page 22
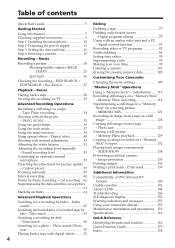
... lever. item in the viewfinder come into sharp focus. Even if you record pictures with the LCD panel closed, check the picture with the large part of the viewfinder screen, use the VF B.L. Adjusting the viewfinder If you adjust the viewfinder screen backlight The recorded picture will not be affected. Adjust...
... lever. item in the viewfinder come into sharp focus. Even if you record pictures with the LCD panel closed, check the picture with the large part of the viewfinder screen, use the VF B.L. Adjusting the viewfinder If you adjust the viewfinder screen backlight The recorded picture will not be affected. Adjust...

Operating Instructions
Page 79
... desired scenes - Digital program editing (6) Press the SEL/PUSH EXEC dial, or MARK on the Remote Commander. When the program is set, and the top part of the program mark changes to light blue. (7) Search for the end of the last program, delete the CUT-OUT mark. To cancel erasing Select... set , the program mark changes to select EXECUTE, then press the dial. The CUT-IN point of the first program is set , then the bottom part of the tape. Erasing the last program To change the end of the first scene you want to 8, then set CUT-IN or CUT-OUT...
... desired scenes - Digital program editing (6) Press the SEL/PUSH EXEC dial, or MARK on the Remote Commander. When the program is set, and the top part of the program mark changes to light blue. (7) Search for the end of the last program, delete the CUT-OUT mark. To cancel erasing Select... set , the program mark changes to select EXECUTE, then press the dial. The CUT-IN point of the first program is set , then the bottom part of the tape. Erasing the last program To change the end of the first scene you want to 8, then set CUT-IN or CUT-OUT...

Operating Instructions
Page 96
... tape has a blank portion in step 2. To not display titles Set TITLE DSPL to use the custom title, select in the middle of the recorded parts The title may be displayed correctly. The titles superimposed with your camcorder The point you want to OFF in the menu settings (p. 105). 96
... tape has a blank portion in step 2. To not display titles Set TITLE DSPL to use the custom title, select in the middle of the recorded parts The title may be displayed correctly. The titles superimposed with your camcorder The point you want to OFF in the menu settings (p. 105). 96

Operating Instructions
Page 100
Enter a new title as desired. To erase a character Turn the SEL/PUSH EXEC dial to change, then press the SEL/PUSH EXEC dial. To enter a space Select [ ], then select the blank part. 100 Making your own titles To change a title you have stored In step 3, select CUSTOM1 SET or CUSTOM2 SET, depending on which title you want to select [C], then press the dial. The last character is erased. Turn the SEL/PUSH EXEC dial to select [C], then press the dial to delete the title. The last character is erased.
Enter a new title as desired. To erase a character Turn the SEL/PUSH EXEC dial to change, then press the SEL/PUSH EXEC dial. To enter a space Select [ ], then select the blank part. 100 Making your own titles To change a title you have stored In step 3, select CUSTOM1 SET or CUSTOM2 SET, depending on which title you want to select [C], then press the dial. The last character is erased. Turn the SEL/PUSH EXEC dial to select [C], then press the dial to delete the title. The last character is erased.

Operating Instructions
Page 102
... to four titles also appear. Slide the write-protect tab to lock You cannot label the tape. To enter a space Select [ ], then select the blank part. 102 If you set the write-protect tab of characters you can select for the label. Labeling a cassette To change the label, and operate in...
... to four titles also appear. Slide the write-protect tab to lock You cannot label the tape. To enter a space Select [ ], then select the blank part. 102 If you set the write-protect tab of characters you can select for the label. Labeling a cassette To change the label, and operate in...
Operating Instructions
Page 113
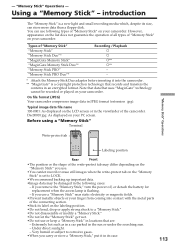
...If you use a "Memory Stick" near static electricity or magnetic fields. •Prevent metallic objects or your finger from coming into contact with the metal parts of the connecting section. •Stick its case. 113 Very humid or subject to LOCK. •We recommend backing up important data. •Image ... record or erase still images when the write-protect tab on the ''Memory Stick'' you carry or store a "Memory Stick," put it into the camcorder. ** "MagicGate" is set to corrosive gases. •When you use or keep a "Memory Stick" in the viewfinder of "Memory Stick" on your...
...If you use a "Memory Stick" near static electricity or magnetic fields. •Prevent metallic objects or your finger from coming into contact with the metal parts of the connecting section. •Stick its case. 113 Very humid or subject to LOCK. •We recommend backing up important data. •Image ... record or erase still images when the write-protect tab on the ''Memory Stick'' you carry or store a "Memory Stick," put it into the camcorder. ** "MagicGate" is set to corrosive gases. •When you use or keep a "Memory Stick" in the viewfinder of "Memory Stick" on your...
Operating Instructions
Page 122
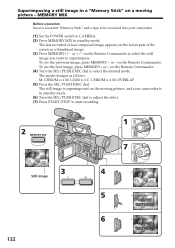
... see the previous image, press MEMORY - LUMI I I I 100-0019 or - CHROM y M. LUMI I 100-0019 M. Superimposing a still image in a "Memory Stick" on a moving picture, and your camcorder. (1) Set the POWER switch to CAMERA. (2) Press MEMORY MIX in standby mode. (6) Turn the SEL/PUSH EXEC dial to adjust the effect. (7) Press START/STOP... to start recording. 2 MEMORY MIX M. To see the next image, press MEMORY+ or + on the lower part of the screen as follows: M. The mode changes as a thumbnail image. (3) Press MEMORY+/-
... see the previous image, press MEMORY - LUMI I I I 100-0019 or - CHROM y M. LUMI I 100-0019 M. Superimposing a still image in a "Memory Stick" on a moving picture, and your camcorder. (1) Set the POWER switch to CAMERA. (2) Press MEMORY MIX in standby mode. (6) Turn the SEL/PUSH EXEC dial to adjust the effect. (7) Press START/STOP... to start recording. 2 MEMORY MIX M. To see the next image, press MEMORY+ or + on the lower part of the screen as follows: M. The mode changes as a thumbnail image. (3) Press MEMORY+/-

Operating Instructions
Page 141
... 7) Depending on model of video equipment, you may not be unlock mode. - Additional Information 141 formatted tapes. The time code format will be partly maladjusted. 3) Depending on signal conditions of the source tape, you may not be able to edit the tape using mini DVCAM video equipment. •..., then use the dubbed tape as described below. Compatibility of DVCAM and DV formats Compatibility on editing using DV connectors When this digital camcorder is connected to other DVCAM or DV video equipment using the mini DVCAM video equipment to carry out DV dubbing of a tape recorded ...
... 7) Depending on model of video equipment, you may not be unlock mode. - Additional Information 141 formatted tapes. The time code format will be partly maladjusted. 3) Depending on signal conditions of the source tape, you may not be able to edit the tape using mini DVCAM video equipment. •..., then use the dubbed tape as described below. Compatibility of DVCAM and DV formats Compatibility on editing using DV connectors When this digital camcorder is connected to other DVCAM or DV video equipment using the mini DVCAM video equipment to carry out DV dubbing of a tape recorded ...

Operating Instructions
Page 159
...•Unplug the unit from coming into contact with the metal parts of solvent which may cause fire or electrical shock. •...battery pack to any type of the connecting section. Very humid - Additional Information Maintenance information and precautions Camcorder care •Remove the tape, and periodically turn on the power, operate the CAMERA and VCR ...sections and play back a tape for about three minutes when your camcorder is in use, particularly during use. Vibrating Rechargeable battery pack •Use only the specified charger ...
...•Unplug the unit from coming into contact with the metal parts of solvent which may cause fire or electrical shock. •...battery pack to any type of the connecting section. Very humid - Additional Information Maintenance information and precautions Camcorder care •Remove the tape, and periodically turn on the power, operate the CAMERA and VCR ...sections and play back a tape for about three minutes when your camcorder is in use, particularly during use. Vibrating Rechargeable battery pack •Use only the specified charger ...

Operating Instructions
Page 161
.../rewind time (using cassette PDVM-40ME) Approx. 2 min and 30 s Viewfinder Electric viewfinder (B&W) Image device 1/3 type CCD (3 Charge Coupled Device) Approx. 380 000 pixels (Effective: Approx. 340 000 pixels) Lens Combined power zoom lens Filter diameter 58 mm (2 3/8 in) 12× (Optical), 48× ...°F to +140 °F) Dimensions (approx.) 133 × 180 × 456 mm (5 1/4 × 7 1/8 × 18 in ) (w/h/d) excluding projecting parts Mass (approx.) 190 g (6.7 oz) excluding power cord * See the label on the AC Adaptor for the front and back of the lens) Carrying pouch (1) Design...
.../rewind time (using cassette PDVM-40ME) Approx. 2 min and 30 s Viewfinder Electric viewfinder (B&W) Image device 1/3 type CCD (3 Charge Coupled Device) Approx. 380 000 pixels (Effective: Approx. 340 000 pixels) Lens Combined power zoom lens Filter diameter 58 mm (2 3/8 in) 12× (Optical), 48× ...°F to +140 °F) Dimensions (approx.) 133 × 180 × 456 mm (5 1/4 × 7 1/8 × 18 in ) (w/h/d) excluding projecting parts Mass (approx.) 190 g (6.7 oz) excluding power cord * See the label on the AC Adaptor for the front and back of the lens) Carrying pouch (1) Design...

Operating Instructions
Page 162
When using additional filters We recommend that you use Sony made filters. 162 - Quick Reference - Identifying the parts and controls Camcorder 1 2 3 4 5 6 7 8 1 INDEX MARK button (p. 64) 2 Zoom ring (p. 23) 3 Focus ring (p. 59) 4 ND FILTER selector (p. 47) 5 FOCUS selector (p. 59) 6 PUSH AUTO button (p. 59) 7 FADER button (p. 39) 8 BACK LIGHT button (p. 25) 9 0 qa qs qd qf qg 9 END SEARCH button (p. 27) 0 EDITSEARCH buttons (p. 27) qa IRIS dial (p. 44) qs IRIS button (p. 44) qd Display window (p. 171) qf OPEN button (p. 18, 28) qg SPOT LIGHT button (p. 26) These are trademarks.
When using additional filters We recommend that you use Sony made filters. 162 - Quick Reference - Identifying the parts and controls Camcorder 1 2 3 4 5 6 7 8 1 INDEX MARK button (p. 64) 2 Zoom ring (p. 23) 3 Focus ring (p. 59) 4 ND FILTER selector (p. 47) 5 FOCUS selector (p. 59) 6 PUSH AUTO button (p. 59) 7 FADER button (p. 39) 8 BACK LIGHT button (p. 25) 9 0 qa qs qd qf qg 9 END SEARCH button (p. 27) 0 EDITSEARCH buttons (p. 27) qa IRIS dial (p. 44) qs IRIS button (p. 44) qd Display window (p. 171) qf OPEN button (p. 18, 28) qg SPOT LIGHT button (p. 26) These are trademarks.

Operating Instructions
Page 163
... (p. 136) ea MEMORY + button (p. 122, 129) es MEMORY MIX button (p. 122) ed MENU button (p. 105) ef DIGITAL EFFECT button (p. 40) Quick Reference 163 Identifying the parts and controls qh qj qk ql w; ea es ed ef qh Speaker qj LCD screen (p. 20) qk LCD BRIGHT buttons (p. 21) ql VOLUME buttons (p. 28) w;
... (p. 136) ea MEMORY + button (p. 122, 129) es MEMORY MIX button (p. 122) ed MENU button (p. 105) ef DIGITAL EFFECT button (p. 40) Quick Reference 163 Identifying the parts and controls qh qj qk ql w; ea es ed ef qh Speaker qj LCD screen (p. 20) qk LCD BRIGHT buttons (p. 21) ql VOLUME buttons (p. 28) w;

Operating Instructions
Page 164
.... [a] [b] [c] 164 eh INPUT2 connector (p. 55) ej INPUT1 connector (p. 10) ek REC START/STOP button (p. 18) el Lens r; When attaching the eyecup, fit it onto the camcorder and slide it all the way along grooves until it stops. • Do not pull the eyecup inward or with your fingers [a], insert a finger into... a lens cap ra Lens hood fixing screw Attaching/removing the eyecup • When removing the eyecup, pull lightly the upper edge of it . Identifying the parts and controls eg eh ej ek el r;
.... [a] [b] [c] 164 eh INPUT2 connector (p. 55) ej INPUT1 connector (p. 10) ek REC START/STOP button (p. 18) el Lens r; When attaching the eyecup, fit it onto the camcorder and slide it all the way along grooves until it stops. • Do not pull the eyecup inward or with your fingers [a], insert a finger into... a lens cap ra Lens hood fixing screw Attaching/removing the eyecup • When removing the eyecup, pull lightly the upper edge of it . Identifying the parts and controls eg eh ej ek el r;

Operating Instructions
Page 165
Identifying the parts and controls rs rd rf rg REC CH INPUT SELECT LEVEL +48V INPUT LEVEL +48V CH1•CH2 CH1 LINE ON MIC OFF MIC ATT ...
Identifying the parts and controls rs rd rf rg REC CH INPUT SELECT LEVEL +48V INPUT LEVEL +48V CH1•CH2 CH1 LINE ON MIC OFF MIC ATT ...

Operating Instructions
Page 166
Identifying the parts and controls rl t; Power zoom lever (p. 23) ta PHOTO button (p. 34, 118) ts BATT (battery) RELEASE lever (p. 11) td GAIN button (p. 45) tf AUTO LOCK ... (p. 18) yk START/STOP button (p. 18) yl SHUTTER SPEED button (p. 46) u; Access lamp (p. 115) Attaching the shoulder strap Attach the shoulder strap supplied with your camcorder to the hooks for shoulder strap t; ta ts td tf tg th tj tk tl rl Hooks for the shoulder strap. 166 Fasten the grip...
Identifying the parts and controls rl t; Power zoom lever (p. 23) ta PHOTO button (p. 34, 118) ts BATT (battery) RELEASE lever (p. 11) td GAIN button (p. 45) tf AUTO LOCK ... (p. 18) yk START/STOP button (p. 18) yl SHUTTER SPEED button (p. 46) u; Access lamp (p. 115) Attaching the shoulder strap Attach the shoulder strap supplied with your camcorder to the hooks for shoulder strap t; ta ts td tf tg th tj tk tl rl Hooks for the shoulder strap. 166 Fasten the grip...

Operating Instructions
Page 167
... (p. 33, 73, 82, 125) if AUDIO CH1/CH2 jack (p. 33, 73, 82, 87) ig DV Interface (p. 74, 84, 126) This "i.LINK" mark is a trademark of Sony Corporation and indicates that the length of video equipment and peripherals connected to it. The LANC control jack is id if ig ih ij i; Otherwise..., you use headphones, the speaker on your camcorder. i; Quick Reference Identifying the parts and controls ua us ud uf ug uh uj uk ul ua Carrying handle us Remote sensor ud Camera recording lamp (p. 18) uf...
... (p. 33, 73, 82, 125) if AUDIO CH1/CH2 jack (p. 33, 73, 82, 87) ig DV Interface (p. 74, 84, 126) This "i.LINK" mark is a trademark of Sony Corporation and indicates that the length of video equipment and peripherals connected to it. The LANC control jack is id if ig ih ij i; Otherwise..., you use headphones, the speaker on your camcorder. i; Quick Reference Identifying the parts and controls ua us ud uf ug uh uj uk ul ua Carrying handle us Remote sensor ud Camera recording lamp (p. 18) uf...


