Operating Instructions
Page 4
...73 Dubbing only desired scenes - Signal convert function 81 Recording video or TV programs 82 Audio dubbing 86 Setting time values 90 Superimposing a title 95 Making your camcorder abroad 155 Maintenance information and precautions .. 156 Specifications 161 Quick Reference Identifying the parts and...152 Warning indicators and messages 153 Using your own titles 99 Labeling a cassette 101 Erasing the cassette memory data 103 Customizing Your Camcorder Changing the menu settings 105 "Memory Stick" Operations Using a "Memory Stick" - SLIDE SHOW 134 Preventing accidental erasure - ...
...73 Dubbing only desired scenes - Signal convert function 81 Recording video or TV programs 82 Audio dubbing 86 Setting time values 90 Superimposing a title 95 Making your camcorder abroad 155 Maintenance information and precautions .. 156 Specifications 161 Quick Reference Identifying the parts and...152 Warning indicators and messages 153 Using your own titles 99 Labeling a cassette 101 Erasing the cassette memory data 103 Customizing Your Camcorder Changing the menu settings 105 "Memory Stick" Operations Using a "Memory Stick" - SLIDE SHOW 134 Preventing accidental erasure - ...

Operating Instructions
Page 18
...- See "Step 2" to "Step 4" (p.11 to 17) for you change or audio noise may occur. Your camcorder starts recording. You can use REC START/STOP located on the handle or front instead of your camcorder light up. Set the ND FILTER selector to CAMERA while pressing the small green button. ...viewfinder The ND filter is necessary. To stop recording, press START/STOP again. Basics - The picture now being shot is not a malfunction. Your camcorder is set to open the LCD panel. However, if you . (1) Open the shutter of the ND FILTER selector before shooting. We recommend that ...
...- See "Step 2" to "Step 4" (p.11 to 17) for you change or audio noise may occur. Your camcorder starts recording. You can use REC START/STOP located on the handle or front instead of your camcorder light up. Set the ND FILTER selector to CAMERA while pressing the small green button. ...viewfinder The ND filter is necessary. To stop recording, press START/STOP again. Basics - The picture now being shot is not a malfunction. Your camcorder is set to open the LCD panel. However, if you . (1) Open the shutter of the ND FILTER selector before shooting. We recommend that ...
Operating Instructions
Page 24
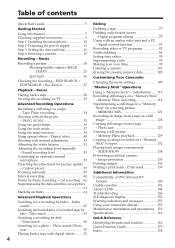
... 45min [d] [e] [f] [g] DVCAM ND1 32K JUL 4 2003 12:05:56PM [h] [k] [j] [i] [a] Remaining battery time This appears after you turn on the LCD screen or in SP mode [h]Audio mode [i] Time [j] ND filter The most suitable mode will disappear. [k] Date 24 When you set to 24× or 48×. SCAN to 24×...
... 45min [d] [e] [f] [g] DVCAM ND1 32K JUL 4 2003 12:05:56PM [h] [k] [j] [i] [a] Remaining battery time This appears after you turn on the LCD screen or in SP mode [h]Audio mode [i] Time [j] ND filter The most suitable mode will disappear. [k] Date 24 When you set to 24× or 48×. SCAN to 24×...
Operating Instructions
Page 33
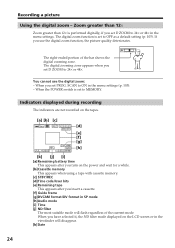
... with your TV or VCR has an S video jack Connect using the audio cable (monaural y stereo) (optional). If your TV or VCR is connected to LINE. Open the jack cover. The color bar is displayed on both your camcorder to the line input on the VCR to a VCR Connect your... screen, we recommend that you monitor the shooting picture, not the playback picture, set the TV/VCR selector on the TV screen. If your camcorder. This connection produces higher quality DVCAM/DV format pictures. Playback - When monitoring the playback picture on the LCD screen. You can operate the video...
... with your TV or VCR has an S video jack Connect using the audio cable (monaural y stereo) (optional). If your TV or VCR is connected to LINE. Open the jack cover. The color bar is displayed on both your camcorder to the line input on the VCR to a VCR Connect your... screen, we recommend that you monitor the shooting picture, not the playback picture, set the TV/VCR selector on the TV screen. If your camcorder. This connection produces higher quality DVCAM/DV format pictures. Playback - When monitoring the playback picture on the LCD screen. You can operate the video...

Operating Instructions
Page 47
... ND 2 indicator disappears from the LCD or viewfinder screen. Set the ND FILTER selector to another positions during recording, the picture may be blurred or audio noise may cause slight off the small aperture may occur. Using the ND filter will reduce influence of the ND FILTER selector before shooting. •...
... ND 2 indicator disappears from the LCD or viewfinder screen. Set the ND FILTER selector to another positions during recording, the picture may be blurred or audio noise may cause slight off the small aperture may occur. Using the ND filter will reduce influence of the ND FILTER selector before shooting. •...
Operating Instructions
Page 53
... MENU to display the menu. (3) Turn the SEL/PUSH EXEC dial to select , then press the dial. (4) Turn the SEL/PUSH EXEC dial to select AUDIO SET, then press the dial. (5) Turn the SEL/PUSH EXEC dial to select the desired item, then press the dial. (6) Turn the SEL/PUSH EXEC...
... MENU to display the menu. (3) Turn the SEL/PUSH EXEC dial to select , then press the dial. (4) Turn the SEL/PUSH EXEC dial to select AUDIO SET, then press the dial. (5) Turn the SEL/PUSH EXEC dial to select the desired item, then press the dial. (6) Turn the SEL/PUSH EXEC...

Operating Instructions
Page 54
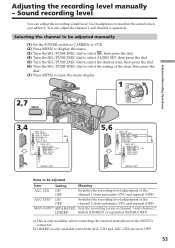
... 30 20 12 0 dB [a] Recording level meter [b] Decreases the recording level [c] Increases the recording level To clear the recording level adjustment display Press AUDIO LEVEL again. When the recording level is set to adjust the recording level of the channel 1, then press the dial. When AGC CH1 or AGC...or recording mode. (2) Turn the SEL/PUSH EXEC dial to display the recording level adjustment display in the viewfinder. The sound input through the AUDIO CH1/CH2 jacks or DV Interface You cannot adjust the recording level. When MAN GAIN is changed as follows. 54 CH1 CH2 30 20 ...
... 30 20 12 0 dB [a] Recording level meter [b] Decreases the recording level [c] Increases the recording level To clear the recording level adjustment display Press AUDIO LEVEL again. When the recording level is set to adjust the recording level of the channel 1, then press the dial. When AGC CH1 or AGC...or recording mode. (2) Turn the SEL/PUSH EXEC dial to display the recording level adjustment display in the viewfinder. The sound input through the AUDIO CH1/CH2 jacks or DV Interface You cannot adjust the recording level. When MAN GAIN is changed as follows. 54 CH1 CH2 30 20 ...

Operating Instructions
Page 55
...The position of the REC CH SELECT switch are as follows: Audio input through its cable. And set to MIC ATT, you can get your desired audio quality, connecting multiple microphones or an optional microphone to your camcorder. (1) Loosen the microphone holder screw and open the cover. ...(2) Detach the supplied microphone and unplug the cable from the camcorder. (3) Connect the microphone (optional) to the ...
...The position of the REC CH SELECT switch are as follows: Audio input through its cable. And set to MIC ATT, you can get your desired audio quality, connecting multiple microphones or an optional microphone to your camcorder. (1) Loosen the microphone holder screw and open the cover. ...(2) Detach the supplied microphone and unplug the cable from the camcorder. (3) Connect the microphone (optional) to the ...

Operating Instructions
Page 56
... on the screen, using an underscan monitor. •If you use the external microphone at a distance from the camcorder. •When the REC CH SELECT switch is set to CH1 and you will not record any audio via the INPUT2 connector. •When you set it while holding the PUSH button down.
... on the screen, using an underscan monitor. •If you use the external microphone at a distance from the camcorder. •When the REC CH SELECT switch is set to CH1 and you will not record any audio via the INPUT2 connector. •When you set it while holding the PUSH button down.

Operating Instructions
Page 66
...the POWER switch to VCR. (2) Set CM SEARCH in to OFF in the menu settings (p. 105). Your camcorder automatically starts playback at the selected index point. or >, your camcorder searches for a recording by index - indicates the actual point you press . The index of the recording start... point when recorded from external audio equipment The index mark is not recorded in cassette memory when recorded from external audio equipment. Searching for the...
...the POWER switch to VCR. (2) Set CM SEARCH in to OFF in the menu settings (p. 105). Your camcorder automatically starts playback at the selected index point. or >, your camcorder searches for a recording by index - indicates the actual point you press . The index of the recording start... point when recorded from external audio equipment The index mark is not recorded in cassette memory when recorded from external audio equipment. Searching for the...

Operating Instructions
Page 73
... type Connect with a VCR using the A/V connecting cable supplied with your camcorder. (2) Set the input selector on the VCR. Editing S VIDEO : Signal flow S video cable (optional) IN VIDEO AUDIO CH1/CH2 S VIDEO VIDEO AUDIO A/V connecting cable (supplied) When you want to record over) into the... VCR, and insert the recorded tape into your camcorder. For details, refer to LINE. Dubbing a tape Using the A/V...
... type Connect with a VCR using the A/V connecting cable supplied with your camcorder. (2) Set the input selector on the VCR. Editing S VIDEO : Signal flow S video cable (optional) IN VIDEO AUDIO CH1/CH2 S VIDEO VIDEO AUDIO A/V connecting cable (supplied) When you want to record over) into the... VCR, and insert the recorded tape into your camcorder. For details, refer to LINE. Dubbing a tape Using the A/V...

Operating Instructions
Page 74
... cable Pictures processed by the digital effect function Pictures processed by connecting a LANC cable (optional) to this camcorder as a player. With a digital-to-digital connection, video and audio signals are not output through the DV Interface. DV Interface i.LINK i.LINK cable (optional) : Signal flow...pictures With this connection, you play back the picture using other video equipment having a fine synchro-editing function, using this camcorder and other 74 video equipment, the picture may jitter. You can edit precisely by the digital effect function are transmitted in...
... cable Pictures processed by the digital effect function Pictures processed by connecting a LANC cable (optional) to this camcorder as a player. With a digital-to-digital connection, video and audio signals are not output through the DV Interface. DV Interface i.LINK i.LINK cable (optional) : Signal flow...pictures With this connection, you play back the picture using other video equipment having a fine synchro-editing function, using this camcorder and other 74 video equipment, the picture may jitter. You can edit precisely by the digital effect function are transmitted in...

Operating Instructions
Page 81
... and output it from which you input the analog signal that includes a copyright protection signal. 81 S VIDEO S video cable (optional) OUT S VIDEO VIDEO AUDIO Editing i.LINK (IEEE1394) A/V connecting cable (supplied) i.LINK cable (optional) : Signal flow (1) Set the POWER switch to VCR. (2) Press MENU to ... on the analog video unit slightly ahead of the analog video signals, the PC may contain noise or incorrect colors. •The camcorder cannot output the digital signal when you use. For details on how to capture images, refer to start capturing images. (8) Start capturing...
... and output it from which you input the analog signal that includes a copyright protection signal. 81 S VIDEO S video cable (optional) OUT S VIDEO VIDEO AUDIO Editing i.LINK (IEEE1394) A/V connecting cable (supplied) i.LINK cable (optional) : Signal flow (1) Set the POWER switch to VCR. (2) Press MENU to ... on the analog video unit slightly ahead of the analog video signals, the PC may contain noise or incorrect colors. •The camcorder cannot output the digital signal when you use. For details on how to capture images, refer to start capturing images. (8) Start capturing...

Operating Instructions
Page 82
... scene from which you want to record a tape from the VCR, insert a recorded tape into your camcorder and the VCR. If you want to start recording. 5 REC PAUSE : Signal flow S VIDEO AUDIO CH1/CH2 S video cable (optional) VIDEO OUT S VIDEO VIDEO AUDIO A/V connecting cable (supplied) When you record from a TV that has video...
... scene from which you want to record a tape from the VCR, insert a recorded tape into your camcorder and the VCR. If you want to start recording. 5 REC PAUSE : Signal flow S VIDEO AUDIO CH1/CH2 S video cable (optional) VIDEO OUT S VIDEO VIDEO AUDIO A/V connecting cable (supplied) When you record from a TV that has video...

Operating Instructions
Page 83
... and the index is automatically marked on a tape when you do various playbacks on cassette memory. 83 On the commander mode Your camcorder works in the commander mode VTR 2, we recommend changing the commander mode or covering the sensor of the VCR with a VCR using.... Commander modes 1, 2 and 3 are used to distinguish your camcorder from other Sony VCRs to connect the yellow (video) plug of both your camcorder and the VCR. Connect using the audio cable (monaural y stereo) (optional). If you use another Sony VCR in the commander mode, VTR 2. Connect an S video cable...
... and the index is automatically marked on a tape when you do various playbacks on cassette memory. 83 On the commander mode Your camcorder works in the commander mode VTR 2, we recommend changing the commander mode or covering the sensor of the VCR with a VCR using.... Commander modes 1, 2 and 3 are used to distinguish your camcorder from other Sony VCRs to connect the yellow (video) plug of both your camcorder and the VCR. Connect using the audio cable (monaural y stereo) (optional). If you use another Sony VCR in the commander mode, VTR 2. Connect an S video cable...
Operating Instructions
Page 84
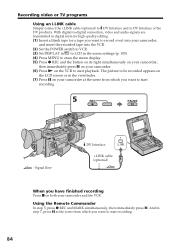
...want to start recording. 5 REC PAUSE : Signal flow DV Interface i.LINK i.LINK cable (optional) When you want to record over) into your camcorder, and insert the recorded tape into the VCR. (2) Set the POWER switch to VCR. (3) Set DISPLAY in to LCD in the menu settings ... simultaneously, then immediately press X. The picture to start recording. 84 With digital-to-digital connection, video and audio signals are transmitted in the viewfinder. (7) Press X on your camcorder and the VCR. Recording video or TV programs Using an i.LINK cable Simply connect the i.LINK cable (optional...
...want to start recording. 5 REC PAUSE : Signal flow DV Interface i.LINK i.LINK cable (optional) When you want to record over) into your camcorder, and insert the recorded tape into the VCR. (2) Set the POWER switch to VCR. (3) Set DISPLAY in to LCD in the menu settings ... simultaneously, then immediately press X. The picture to start recording. 84 With digital-to-digital connection, video and audio signals are transmitted in the viewfinder. (7) Press X on your camcorder and the VCR. Recording video or TV programs Using an i.LINK cable Simply connect the i.LINK cable (optional...

Operating Instructions
Page 86
...sound on TV by specifying the starting and ending points. CH1 CH1•CH2 CH1 CH1•CH2 CH1 CH1•CH2 Channel 3 AUDIO CH1 AUDIO CH1 - INPUT1 INPUT2 - Use the headphones jack. 86 You can also use the Remote Commander for this operation. INPUT1 or INPUT2...INPUT1/INPUT2 connectors, see "Connecting an optional external microphone" on - - - AUDIO CH2 INPUT2 INPUT1 - You cannot monitor the additional sound by connecting audio equipment or a microphone. Audio dubbing You can record an audio sound to add to your recorded tape by connecting with the INPUT1/INPUT2 connectors ...
...sound on TV by specifying the starting and ending points. CH1 CH1•CH2 CH1 CH1•CH2 CH1 CH1•CH2 Channel 3 AUDIO CH1 AUDIO CH1 - INPUT1 INPUT2 - Use the headphones jack. 86 You can also use the Remote Commander for this operation. INPUT1 or INPUT2...INPUT1/INPUT2 connectors, see "Connecting an optional external microphone" on - - - AUDIO CH2 INPUT2 INPUT1 - You cannot monitor the additional sound by connecting audio equipment or a microphone. Audio dubbing You can record an audio sound to add to your recorded tape by connecting with the INPUT1/INPUT2 connectors ...

Operating Instructions
Page 87
... screen of the new sound and original sound using headphones. • When dubbing with the AUDIO CH1/CH2 jacks AUDIO CH1/CH2 Audio equipment (optional) LINE OUT L R AUDIO L AUDIO R : Signal flow Do not connect the video (yellow) plug. Editing 87 Audio dubbing Dubbing with the AUDIO CH1/CH2 jacks, you can check the recorded sound by using...
... screen of the new sound and original sound using headphones. • When dubbing with the AUDIO CH1/CH2 jacks AUDIO CH1/CH2 Audio equipment (optional) LINE OUT L R AUDIO L AUDIO R : Signal flow Do not connect the video (yellow) plug. Editing 87 Audio dubbing Dubbing with the AUDIO CH1/CH2 jacks, you can check the recorded sound by using...

Operating Instructions
Page 88
... sound Adjust the balance between the channels 1/2 (CH1/2) and the channels 3/4 (CH3/4) by pressing N. Audio dubbing Adding an audio sound on a recorded tape (1) Insert the recorded tape into your camcorder. (2) Set the POWER switch to VCR on the LCD screen or in the viewfinder. (5) Press X... and start recording to set the audio balance beforehand, you want to the playback pause mode. (4) Press AUDIO DUB. VCR SET CH SELECT AUD I O M ...
... sound Adjust the balance between the channels 1/2 (CH1/2) and the channels 3/4 (CH3/4) by pressing N. Audio dubbing Adding an audio sound on a recorded tape (1) Insert the recorded tape into your camcorder. (2) Set the POWER switch to VCR on the LCD screen or in the viewfinder. (5) Press X... and start recording to set the audio balance beforehand, you want to the playback pause mode. (4) Press AUDIO DUB. VCR SET CH SELECT AUD I O M ...

Operating Instructions
Page 89
... record on a tape recorded with another camcorder (including an other DSR-PD170), the sound quality may deteriorate. Slide the write-protect tab to a recorded tape. We recommend that you add new sound on a tape recorded with your camcorder You cannot add sound to release the write protection. Editing Audio dubbing Notes •New sound cannot...
... record on a tape recorded with another camcorder (including an other DSR-PD170), the sound quality may deteriorate. Slide the write-protect tab to a recorded tape. We recommend that you add new sound on a tape recorded with your camcorder You cannot add sound to release the write protection. Editing Audio dubbing Notes •New sound cannot...


