Operating Instructions
Page 4
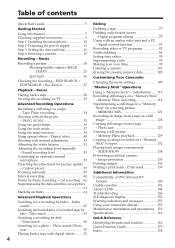
...-diagnosis display 152 Warning indicators and messages 153 Using your own titles 99 Labeling a cassette 101 Erasing the cassette memory data 103 Customizing Your Camcorder Changing the menu settings 105 "Memory Stick" Operations Using a "Memory Stick" - PROG. Image protection 135 Deleting images 136 Writing a print mark - END SEARCH / EDITSEARCH / Rec Review 27 Playback - Print...
...-diagnosis display 152 Warning indicators and messages 153 Using your own titles 99 Labeling a cassette 101 Erasing the cassette memory data 103 Customizing Your Camcorder Changing the menu settings 105 "Memory Stick" Operations Using a "Memory Stick" - PROG. Image protection 135 Deleting images 136 Writing a print mark - END SEARCH / EDITSEARCH / Rec Review 27 Playback - Print...
Operating Instructions
Page 6
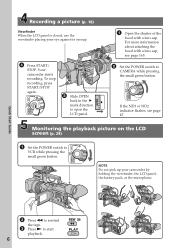
...about attaching the hood with a lens cap. Quick Start Guide 2 Press m to rewind REW the tape. 3 Press N to open the LCD panel. MEMORY OFF CAMERA (CHG) VCR 4 Press START/ STOP. POWER If the ND1 or ND2 indicator flashes, see page 165. 2 Set the POWER switch to..., or the microphone. Your camcorder starts recording. POWER 3 Slide OPEN back in the B mark direction to start playback. Monitoring the playback picture on the LCD screen (p. 28) 1 POWER Set the POWER switch to CAMERA while pressing the small green button. PLAY 6 OPEN MEMORY OFF CAMERA (CHG) VCR ...
...about attaching the hood with a lens cap. Quick Start Guide 2 Press m to rewind REW the tape. 3 Press N to open the LCD panel. MEMORY OFF CAMERA (CHG) VCR 4 Press START/ STOP. POWER If the ND1 or ND2 indicator flashes, see page 165. 2 Set the POWER switch to..., or the microphone. Your camcorder starts recording. POWER 3 Slide OPEN back in the B mark direction to start playback. Monitoring the playback picture on the LCD screen (p. 28) 1 POWER Set the POWER switch to CAMERA while pressing the small green button. PLAY 6 OPEN MEMORY OFF CAMERA (CHG) VCR ...
Operating Instructions
Page 7
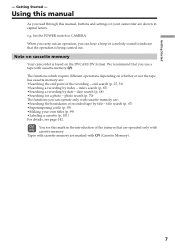
...buttons and settings on cassette memory Your camcorder is being carried out. index search (p. 65) •Searching a recording by index - Tapes with cassette memory are marked with cassette memory . Using this manual As you can operate only with cassette memory. When you carry out an...by date - title search (p. 67) •Superimposing a title (p. 95) •Making your camcorder are shown in the introduction of the features that are operated only with cassette memory are : •Searching the end point of recorded tape by title - We recommend that the ...
...buttons and settings on cassette memory Your camcorder is being carried out. index search (p. 65) •Searching a recording by index - Tapes with cassette memory are marked with cassette memory . Using this manual As you can operate only with cassette memory. When you carry out an...by date - title search (p. 67) •Superimposing a title (p. 95) •Making your camcorder are shown in the introduction of the features that are operated only with cassette memory are : •Searching the end point of recorded tape by title - We recommend that the ...

Operating Instructions
Page 12
...indicator changes to use the battery longer than usual. 4 POWER VCR 1 MEMORY OFF CAMERA (CHG) After charging the battery pack Disconnect the AC Adaptor from the DC IN jack on your camcorder to the DC IN jack with your camcorder. The indicator may not be displayed. 12 Charging begins. To fully charge... on the LCD screen/display window or in minutes on the conditions in which you close the LCD panel and open it again, it . Your camcorder operates only with the "InfoLITHIUM" battery pack (L series). (1) Open the DC IN jack cover and connect the AC Adaptor supplied with the plug's v...
...indicator changes to use the battery longer than usual. 4 POWER VCR 1 MEMORY OFF CAMERA (CHG) After charging the battery pack Disconnect the AC Adaptor from the DC IN jack on your camcorder to the DC IN jack with your camcorder. The indicator may not be displayed. 12 Charging begins. To fully charge... on the LCD screen/display window or in minutes on the conditions in which you close the LCD panel and open it again, it . Your camcorder operates only with the "InfoLITHIUM" battery pack (L series). (1) Open the DC IN jack cover and connect the AC Adaptor supplied with the plug's v...
Operating Instructions
Page 16
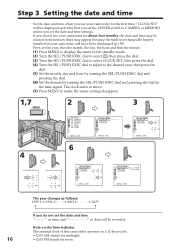
...hour and then the minute. (1) Press MENU to display the menu in your camcorder will be displayed each time that you do not use your camcorder for noon. The clock starts to move. (7) Press MENU to CAMERA or MEMORY unless you set the date and time settings. Note on the time indicator The... internal clock of this camcorder operates on a 12-hour cycle. •12:00 AM ...
...hour and then the minute. (1) Press MENU to display the menu in your camcorder will be displayed each time that you do not use your camcorder for noon. The clock starts to move. (7) Press MENU to CAMERA or MEMORY unless you set the date and time settings. Note on the time indicator The... internal clock of this camcorder operates on a 12-hour cycle. •12:00 AM ...

Operating Instructions
Page 17
... procedure above, and take out the cassette in step 3. Insert the cassette in a straight line deeply into the cassette compartment with cassette memory Read the instruction about cassette memory to insert it. To prevent accidental erasure Slide the write-protect tab on the cassette to close the cover firmly. 17 If the...
... procedure above, and take out the cassette in step 3. Insert the cassette in a straight line deeply into the cassette compartment with cassette memory Read the instruction about cassette memory to insert it. To prevent accidental erasure Slide the write-protect tab on the cassette to close the cover firmly. 17 If the...

Operating Instructions
Page 18
... on the rear. However, if you . (1) Open the shutter of the B mark to CAMERA while pressing the small green button. Recording a picture Your camcorder automatically focuses for more information about attaching the hood with a lens cap. Camera recording lamps Microphone 1 4 OPEN 2 5 VCR POWER Handle REC START/STOP... REC START/STOP 40min REC 00:00:00:01 3 LOCK POWER DVCAM 32K MEMORY VCR OFF CAMERA (CHG) MEMORY OFF CAMERA (CHG) If the ND1 or ND2 indicator flashes on the LCD screen or in the direction of the hood with a ...
... on the rear. However, if you . (1) Open the shutter of the B mark to CAMERA while pressing the small green button. Recording a picture Your camcorder automatically focuses for more information about attaching the hood with a lens cap. Camera recording lamps Microphone 1 4 OPEN 2 5 VCR POWER Handle REC START/STOP... REC START/STOP 40min REC 00:00:00:01 3 LOCK POWER DVCAM 32K MEMORY VCR OFF CAMERA (CHG) MEMORY OFF CAMERA (CHG) If the ND1 or ND2 indicator flashes on the LCD screen or in the direction of the hood with a ...

Operating Instructions
Page 19
... a picture Note on one tape. To re-start recording. Note on the LOCK switch When you set the POWER switch to MEMORY accidentally. If you use a tape with your camcorder. This is not a malfunction. Cassettes that can be smooth. This is to ON in the DV format. 19 Recording -... The picture quality may improve in this mode, but if you shoot a moving subject, the image may not be played back with cassette memory, however, you change...
... a picture Note on one tape. To re-start recording. Note on the LOCK switch When you set the POWER switch to MEMORY accidentally. If you use a tape with your camcorder. This is not a malfunction. Cassettes that can be smooth. This is to ON in the DV format. 19 Recording -... The picture quality may improve in this mode, but if you shoot a moving subject, the image may not be played back with cassette memory, however, you change...
Operating Instructions
Page 24
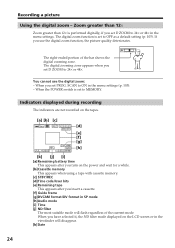
...; is performed digitally, if you have selected it, the ND filter mode displayed on the power and wait for a while. [b]Cassette memory This appears when using a tape with cassette memory. [c] STBY/REC [d]Time code/User bits [e] Remaining tape This appears after you use the digital zoom: - W T The right...the POWER switch is set to OFF as a default setting (p. 105). Recording a picture Using the digital zoom - The digital zoom function is set to MEMORY. When you set D ZOOM to 24× or 48×. When you set D ZOOM to 24× or 48× in the menu settings ...
...; is performed digitally, if you have selected it, the ND filter mode displayed on the power and wait for a while. [b]Cassette memory This appears when using a tape with cassette memory. [c] STBY/REC [d]Time code/User bits [e] Remaining tape This appears after you use the digital zoom: - W T The right...the POWER switch is set to OFF as a default setting (p. 105). Recording a picture Using the digital zoom - The digital zoom function is set to MEMORY. When you set D ZOOM to 24× or 48×. When you set D ZOOM to 24× or 48× in the menu settings ...

Operating Instructions
Page 25
... the time code. On user bits display You can be preset or be displayed accurately depending on the LCD screen or in standby, recording, or memory mode. To cancel, press BACK LIGHT again. Recording - Basics Recording a picture Time code The time code indicates the recording or playback time, "00:00:00...
... the time code. On user bits display You can be preset or be displayed accurately depending on the LCD screen or in standby, recording, or memory mode. To cancel, press BACK LIGHT again. Recording - Basics Recording a picture Time code The time code indicates the recording or playback time, "00:00:00...

Operating Instructions
Page 26
... spot light function will be canceled and the backlight function will be enabled. The indicator appears on the LCD screen or in standby, recording, or memory mode. Shutter speed value of the following settings: - Old movie - Press SPOT LIGHT in the viewfinder. FADER BACK LIGHT SPOT LIGHT SPOT LIGHT If you...
... spot light function will be canceled and the backlight function will be enabled. The indicator appears on the LCD screen or in standby, recording, or memory mode. Shutter speed value of the following settings: - Old movie - Press SPOT LIGHT in the viewfinder. FADER BACK LIGHT SPOT LIGHT SPOT LIGHT If you...

Operating Instructions
Page 27
... or fast-forwards the tape and the last five-second recorded picture is played back and the camcorder returns to standby mode. You can use a tape with cassette memory, the end search function works even once you have recorded on the tape. Checking the last recorded picture - If you use... these buttons to stop playback. After playback the camcorder turns to standby. Hold down the +/- You cannot monitor the ...
... or fast-forwards the tape and the last five-second recorded picture is played back and the camcorder returns to standby mode. You can use a tape with cassette memory, the end search function works even once you have recorded on the tape. Checking the last recorded picture - If you use... these buttons to stop playback. After playback the camcorder turns to standby. Hold down the +/- You cannot monitor the ...

Operating Instructions
Page 28
... playback using the Remote Commander supplied with your camcorder. (1) Install the power source and insert the recorded tape. (2) Set the POWER switch to start playback. (6) To adjust the volume, press either of the VOLUME +/- buttons . 4 REW 5 PLAY VOLUME 6 To stop playback Press x. 2 POWER 31 MEMORY OFF CAMERA (CHG) VCR 28 - Playback - If...
... playback using the Remote Commander supplied with your camcorder. (1) Install the power source and insert the recorded tape. (2) Set the POWER switch to start playback. (6) To adjust the volume, press either of the VOLUME +/- buttons . 4 REW 5 PLAY VOLUME 6 To stop playback Press x. 2 POWER 31 MEMORY OFF CAMERA (CHG) VCR 28 - Playback - If...
Operating Instructions
Page 34
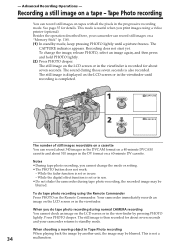
... To change the mode or setting. •The PHOTO button does not work: - Tape Photo recording You can record still images on a "Memory Stick" (p. 118). (1) In standby mode, keep pressing PHOTO lightly until recording is completed. 1 PHOTO CAPTURE 2 PHOTO The number of still ...The CAPTURE indicator appears. Recording does not start yet. See page 35 for about 510 images in use . - Advanced Recording Operations - Your camcorder immediately records an image on a 60-minute DV cassette. - While the fader function is recorded for details. To do tape photo recording ...
... To change the mode or setting. •The PHOTO button does not work: - Tape Photo recording You can record still images on a "Memory Stick" (p. 118). (1) In standby mode, keep pressing PHOTO lightly until recording is completed. 1 PHOTO CAPTURE 2 PHOTO The number of still ...The CAPTURE indicator appears. Recording does not start yet. See page 35 for about 510 images in use . - Advanced Recording Operations - Your camcorder immediately records an image on a 60-minute DV cassette. - While the fader function is recorded for details. To do tape photo recording ...

Operating Instructions
Page 36
... / VF SET LCD B. L. L. LCD COLOR VF B. L. LCD COLOR VF B. The guide frame is not recorded. (1) Press MENU to display the menu in standby, recording, or memory mode. (2) Turn the SEL/PUSH EXEC dial to select , then press the dial. (3) Turn the SEL/PUSH EXEC dial to select GUIDEFRAME, then press the... SET LCD B. Note The guide frame indicates only a rough level. The size and position of the guide frame do not affect the setting of the camcorder.
... / VF SET LCD B. L. L. LCD COLOR VF B. L. LCD COLOR VF B. The guide frame is not recorded. (1) Press MENU to display the menu in standby, recording, or memory mode. (2) Turn the SEL/PUSH EXEC dial to select , then press the dial. (3) Turn the SEL/PUSH EXEC dial to select GUIDEFRAME, then press the... SET LCD B. Note The guide frame indicates only a rough level. The size and position of the guide frame do not affect the setting of the camcorder.

Operating Instructions
Page 39
...recording - Advanced Recording Operations Using the fader function (1) When fading in /out is carried out, your camcorder automatically returns to the normal mode. 1 FADER FADER 2 POWER VCR MEMORY OFF CAMERA (CHG) To cancel the fader function Press FADER until the indicator disappears. The indicator changes as... until the desired fader indicator flashes. Cut recording When the OVERLAP, WIPE, or DOT indicator appears Your camcorder automatically stores the image recorded on a tape. When fading out [b] In recording mode, press FADER until the desired fader indicator flashes.
...recording - Advanced Recording Operations Using the fader function (1) When fading in /out is carried out, your camcorder automatically returns to the normal mode. 1 FADER FADER 2 POWER VCR MEMORY OFF CAMERA (CHG) To cancel the fader function Press FADER until the indicator disappears. The indicator changes as... until the desired fader indicator flashes. Cut recording When the OVERLAP, WIPE, or DOT indicator appears Your camcorder automatically stores the image recorded on a tape. When fading out [b] In recording mode, press FADER until the desired fader indicator flashes.

Operating Instructions
Page 41
y TRAIL y OLD MOVIE (3) Press the SEL/PUSH EXEC dial. The bar appears in memory. (4) Turn the SEL/PUSH EXEC dial to adjust the effect. The digital effect indicator disappears. 41 Items to select the desired digital effect mode. TRAIL ...
y TRAIL y OLD MOVIE (3) Press the SEL/PUSH EXEC dial. The bar appears in memory. (4) Turn the SEL/PUSH EXEC dial to adjust the effect. The digital effect indicator disappears. 41 Items to select the desired digital effect mode. TRAIL ...

Operating Instructions
Page 44
.... 2 •IRIS F2.8 1 AUTO LOCK HOLD 3 To return to automatic iris mode Set the AUTO LOCK selector to the distance in standby, recording, or memory mode. (2) Press IRIS. Lowering the F value (large iris) reduces the depth of field Shallow Iris Near open (Low F value) Zoom Telephoto (T) Deep Near... field in the wide-angle position is the in the viewfinder. (3) Turn the IRIS dial to the center (auto lock release) position while the camcorder is in front. About the depth of field The depth of field. Raising the F value (small iris) provides a larger depth of field is...
.... 2 •IRIS F2.8 1 AUTO LOCK HOLD 3 To return to automatic iris mode Set the AUTO LOCK selector to the distance in standby, recording, or memory mode. (2) Press IRIS. Lowering the F value (large iris) reduces the depth of field Shallow Iris Near open (Low F value) Zoom Telephoto (T) Deep Near... field in the wide-angle position is the in the viewfinder. (3) Turn the IRIS dial to the center (auto lock release) position while the camcorder is in front. About the depth of field The depth of field. Raising the F value (small iris) provides a larger depth of field is...

Operating Instructions
Page 45
... screen or in standby, recording, or memory mode. (2) Press GAIN. The gain indicator disappears from the LCD or viewfinder screen. 45 Advanced Recording Operations Shooting with manual adjustment Adjusting the gain (1) Set the AUTO LOCK selector to the center (auto lock release) position while the camcorder is in the viewfinder. (3) Turn the...
... screen or in standby, recording, or memory mode. (2) Press GAIN. The gain indicator disappears from the LCD or viewfinder screen. 45 Advanced Recording Operations Shooting with manual adjustment Adjusting the gain (1) Set the AUTO LOCK selector to the center (auto lock release) position while the camcorder is in the viewfinder. (3) Turn the...

Operating Instructions
Page 46
... (p. 40) functions. 46 Shooting with manual adjustment Adjusting the shutter speed (1) Set the AUTO LOCK selector to the center (auto lock release) position while the camcorder is in the viewfinder). 1 AUTO LOCK HOLD 2 SHUTTER SPEED 60 3 To return to automatic shutter speed mode Set the AUTO LOCK selector to AUTO LOCK... or press SHUTTER SPEED. Adjust the focus manually using a tripod. The shutter speed indicator appears on the LCD screen or in standby, recording, or memory mode. (2) Press SHUTTER SPEED.
... (p. 40) functions. 46 Shooting with manual adjustment Adjusting the shutter speed (1) Set the AUTO LOCK selector to the center (auto lock release) position while the camcorder is in the viewfinder). 1 AUTO LOCK HOLD 2 SHUTTER SPEED 60 3 To return to automatic shutter speed mode Set the AUTO LOCK selector to AUTO LOCK... or press SHUTTER SPEED. Adjust the focus manually using a tripod. The shutter speed indicator appears on the LCD screen or in standby, recording, or memory mode. (2) Press SHUTTER SPEED.


